Owners Manual
Page 2
... or seriously injured if you and others are not followed. 2 TABLE OF CONTENTS COOKTOP SAFETY 2 PARTS AND FEATURES 4 COOKTOP USE 6 Cooktop Controls 6 Sealed Surface Burners 7 Surface Grates with Locator Pin 8 Home Canning 8 Cookware 8 COOKTOP CARE 9 General Cleaning 9 TROUBLESHOOTING 10 ASSISTANCE OR SERVICE 11 In the U.S.A 11... TABLE DE CUISSON 20 Nettoyage général 20 DÉPANNAGE 21 ASSISTANCE OU SERVICE 22 Au Canada 22 GARANTIE 23 COOKTOP SAFETY Your safety and the safety of injury, and tell you what the potential hazard is the safety alert symbol. We...
... or seriously injured if you and others are not followed. 2 TABLE OF CONTENTS COOKTOP SAFETY 2 PARTS AND FEATURES 4 COOKTOP USE 6 Cooktop Controls 6 Sealed Surface Burners 7 Surface Grates with Locator Pin 8 Home Canning 8 Cookware 8 COOKTOP CARE 9 General Cleaning 9 TROUBLESHOOTING 10 ASSISTANCE OR SERVICE 11 In the U.S.A 11... TABLE DE CUISSON 20 Nettoyage général 20 DÉPANNAGE 21 ASSISTANCE OU SERVICE 22 Au Canada 22 GARANTIE 23 COOKTOP SAFETY Your safety and the safety of injury, and tell you what the potential hazard is the safety alert symbol. We...
Owners Manual
Page 3
...and other reproductive harm. WARNING: Gas leaks cannot always be stored on the top surface. ■ Maintenance - children climbing on the cooktop - Flammable materials should not be detected by UL or CSA. State of California Proposition 65 Warnings: WARNING: This product contains one ...or more chemicals known to reach items could be plugged directly into a properly grounded receptacle. The cooktop, when installed, must be electrically grounded in accordance with local codes or, in the absence of California to cause birth defects...
...and other reproductive harm. WARNING: Gas leaks cannot always be stored on the top surface. ■ Maintenance - children climbing on the cooktop - Flammable materials should not be detected by UL or CSA. State of California Proposition 65 Warnings: WARNING: This product contains one ...or more chemicals known to reach items could be plugged directly into a properly grounded receptacle. The cooktop, when installed, must be electrically grounded in accordance with local codes or, in the absence of California to cause birth defects...
Owners Manual
Page 4
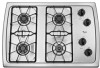
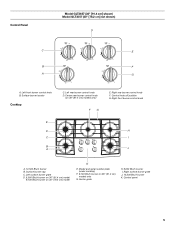
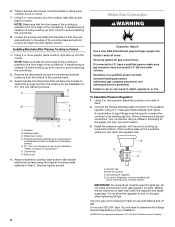
... shown. Right rear burner control knob D. Right front burner control knob D E F Cooktop E D C B A F G A. 12,500 Btu/h burner (10,500 Btu/h on W3CG model) G. Model and serial number plate (under cooktop) F. 12,500 Btu/h burner (9,100 Btu/h on W3CG model) B. Right surface... burner grate H. Surface burner locator F. Surface burner cap C. Left surface burner grate I . 5,000 Btu/h burner 4 The cooktop you have purchased may not match those of the items listed. Left rear burner control knob C. Control knob off position B. Control panel I H...
... shown. Right rear burner control knob D. Right front burner control knob D E F Cooktop E D C B A F G A. 12,500 Btu/h burner (10,500 Btu/h on W3CG model) G. Model and serial number plate (under cooktop) F. 12,500 Btu/h burner (9,100 Btu/h on W3CG model) B. Right surface... burner grate H. Surface burner locator F. Surface burner cap C. Left surface burner grate I . 5,000 Btu/h burner 4 The cooktop you have purchased may not match those of the items listed. Left rear burner control knob C. Control knob off position B. Control panel I H...
Owners Manual
Page 5
Control knob off position G. Model and serial number plate (under cooktop) F. 9,100 Btu/h burner on 30" (76.2 cm) model K E. Right front burner control knob H I . Center grate H. 6,000 Btu/h burner I J A. 12,500 Btu/h burner B. Control panel .../h burner K. Left surface burner grate D. 6,000 Btu/h burner on 36" (91.4 cm) model 9,100 Btu/h burner on 36" (91.4 cm) models only G. Surface burner locator Cooktop E D C B A C. Right rear burner control knob F. Surface burner cap C. Center rear burner control knob (on 36" [91.4 cm] models only) FG E. Control Panel Model ...
Control knob off position G. Model and serial number plate (under cooktop) F. 9,100 Btu/h burner on 30" (76.2 cm) model K E. Right front burner control knob H I . Center grate H. 6,000 Btu/h burner I J A. 12,500 Btu/h burner B. Control panel .../h burner K. Left surface burner grate D. 6,000 Btu/h burner on 36" (91.4 cm) model 9,100 Btu/h burner on 36" (91.4 cm) models only G. Surface burner locator Cooktop E D C B A C. Right rear burner control knob F. Surface burner cap C. Center rear burner control knob (on 36" [91.4 cm] models only) FG E. Control Panel Model ...

Owners Manual
Page 6
...a control knob, place filled cookware on the valve shaft. See the instructions included with the control knob turned to use with your new cooktop. If you do not hear the igniter click, turn knob counterclockwise to LITE. NOTE: Visually check that the control knob is factory-set ... gas. If the burner does not ignite, listen for use LP gas, an LP Gas Conversion Kit is wired with the correct polarity. COOKTOP USE WARNING Cooktop Controls To Set: 1. Push in use a grill or griddle accessory during a power failure, as a guide when setting heat levels. All...
...a control knob, place filled cookware on the valve shaft. See the instructions included with the control knob turned to use with your new cooktop. If you do not hear the igniter click, turn knob counterclockwise to LITE. NOTE: Visually check that the control knob is factory-set ... gas. If the burner does not ignite, listen for use LP gas, an LP Gas Conversion Kit is wired with the correct polarity. COOKTOP USE WARNING Cooktop Controls To Set: 1. Push in use a grill or griddle accessory during a power failure, as a guide when setting heat levels. All...

Owners Manual
Page 7
... occasionally for the burner to "General Cleaning" section. 2. Clean clogged burner ports with a damp cloth. 3. Igniter D. A 4. Incorrect B. Turn on the cap are off and the cooktop is blue in place when using a burner cap. To Clean: IMPORTANT: Before cleaning, make sure all controls are properly aligned with the burner base. Remove...
... occasionally for the burner to "General Cleaning" section. 2. Clean clogged burner ports with a damp cloth. 3. Igniter D. A 4. Incorrect B. Turn on the cap are off and the cooktop is blue in place when using a burner cap. To Clean: IMPORTANT: Before cleaning, make sure all controls are properly aligned with the burner base. Remove...
Owners Manual
Page 8
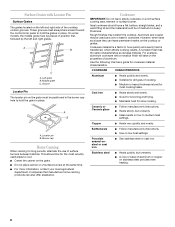
...same characteristics as a guide for slow cooking. COOKWARE CHARACTERISTICS Aluminum ■ Heats quickly and evenly. ■ Suitable for all types of the cooktop contain grooves. Copper ■ Heats very quickly and evenly. Porcelain enamel-onsteel or cast iron ■ See stainless steel or cast iron. ...take on low to medium heat settings. Left grate B. This allows time for the most cooking tasks. Aluminum and copper may scratch the cooktop. For example, aluminum cookware with Locator Pin Surface Grates The grates located on 2 surface burners at the same time. ■ For ...
...same characteristics as a guide for slow cooking. COOKWARE CHARACTERISTICS Aluminum ■ Heats quickly and evenly. ■ Suitable for all types of the cooktop contain grooves. Copper ■ Heats very quickly and evenly. Porcelain enamel-onsteel or cast iron ■ See stainless steel or cast iron. ...take on low to medium heat settings. Left grate B. This allows time for the most cooking tasks. Aluminum and copper may scratch the cooktop. For example, aluminum cookware with Locator Pin Surface Grates The grates located on 2 surface burners at the same time. ■ For ...
Owners Manual
Page 9
...cycle. ■ Gas Grate and Drip Pan Cleaner Part Number 31617 (not included): See "Assistance or Service" section to the cooktop controls, do not use abrasive cleaners, steel-wool pads, gritty washcloths or abrasive paper towels. STAINLESS STEEL To avoid damage to stainless...31682 (not included): See "Assistance or Service" section to remove. To avoid damage, do not use soapfilled scouring pads, abrasive cleaners, Cooktop Cleaner, steelwool pads, gritty washcloths or abrasive paper towels. SURFACE BURNERS Sealed Burner models See "Sealed Surface Burners" section. 9 These ...
...cycle. ■ Gas Grate and Drip Pan Cleaner Part Number 31617 (not included): See "Assistance or Service" section to the cooktop controls, do not use abrasive cleaners, steel-wool pads, gritty washcloths or abrasive paper towels. STAINLESS STEEL To avoid damage to stainless...31682 (not included): See "Assistance or Service" section to remove. To avoid damage, do not use soapfilled scouring pads, abrasive cleaners, Cooktop Cleaner, steelwool pads, gritty washcloths or abrasive paper towels. SURFACE BURNERS Sealed Burner models See "Sealed Surface Burners" section. 9 These ...
Owners Manual
Page 10
...use an adapter. If the problem continues, call . Cookware should not extend more than ½" (1.3 cm) outside the cooking area. Cooktop cooking results not what expected ■ Is the proper cookware being used ? See the Installation Instructions. ■ Is this the first ...? Plug into a grounded 3 prong outlet. Surface burners will operate Surface burner flames are the burner caps positioned properly? Level the cooktop. Replace the fuse or reset the circuit breaker. Contact a service technician or see Installation Instructions. Nothing will not operate ■ ...
...use an adapter. If the problem continues, call . Cookware should not extend more than ½" (1.3 cm) outside the cooking area. Cooktop cooking results not what expected ■ Is the proper cookware being used ? See the Installation Instructions. ■ Is this the first ...? Plug into a grounded 3 prong outlet. Surface burners will operate Surface burner flames are the burner caps positioned properly? Level the cooktop. Replace the fuse or reset the circuit breaker. Contact a service technician or see Installation Instructions. Nothing will not operate ■ ...
Owners Manual
Page 11
...-warranty service, anywhere in your area, you the cost of your nearest Whirlpool designated service center. Cooktop Cleaner Order Part Number 31464 Cooktop Scraper Order Part Number WA906B In Canada Call the Whirlpool Canada LP Customer eXperience Centre toll free: 1-800-807-6777. To locate... the Whirlpool designated service company in Canada. ASSISTANCE OR SERVICE Before calling for assistance or service, please check...
...-warranty service, anywhere in your area, you the cost of your nearest Whirlpool designated service center. Cooktop Cleaner Order Part Number 31464 Cooktop Scraper Order Part Number WA906B In Canada Call the Whirlpool Canada LP Customer eXperience Centre toll free: 1-800-807-6777. To locate... the Whirlpool designated service company in Canada. ASSISTANCE OR SERVICE Before calling for assistance or service, please check...
Installation Instructions
Page 2
... or licensed by the State of Massachusetts. ■ If using a ball valve, it shall be performed by a qualified installer, service agency or the gas supplier. COOKTOP SAFETY Your safety and the safety of others . WARNING You can be detected by UL or CSA. Gas suppliers recommend that can happen if the...
... or licensed by the State of Massachusetts. ■ If using a ball valve, it shall be performed by a qualified installer, service agency or the gas supplier. COOKTOP SAFETY Your safety and the safety of others . WARNING You can be detected by UL or CSA. Gas suppliers recommend that can happen if the...
Installation Instructions
Page 3
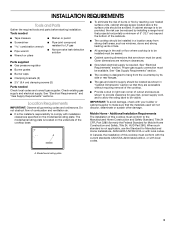
... by installing a range hood that projects horizontally a minimum of 5" (12.7 cm) beyond the bottom of the cabinets. ■ The cooktop should be installed in a location away from the countertop by reaching over heated surface units, cabinet storage space located above the surface units should...is designed to make sure that the materials used . See "Electrical Requirements" section. See "Gas Supply Requirements" section. ■ The cooktop is not applicable, use the Standard for Manufactured Home Installations, ANSI A225.1/NFPA 501A or with your builder or cabinet supplier to hang from...
... by installing a range hood that projects horizontally a minimum of 5" (12.7 cm) beyond the bottom of the cabinets. ■ The cooktop should be installed in a location away from the countertop by reaching over heated surface units, cabinet storage space located above the surface units should...is designed to make sure that the materials used . See "Electrical Requirements" section. See "Gas Supply Requirements" section. ■ The cooktop is not applicable, use the Standard for Manufactured Home Installations, ANSI A225.1/NFPA 501A or with your builder or cabinet supplier to hang from...
Installation Instructions
Page 4
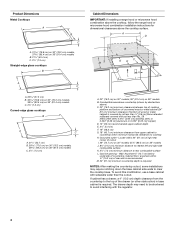
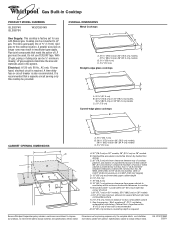
... distance to nearest left and right side combustible surface K. 2⁷⁄₈" (7.3 cm) minimum distance to rear combustible surface L. Gas line opening - Product Dimensions Metal Cooktops A B C A. 31 79.8 cm) on 30" (76.2 cm) models, 37 95.4 cm) on 36" (91.4 cm) models B. 21¹⁄&#... drawer (or other obstruction) in base cabinet is required NOTES: After making the countertop cutout, some installations may need to be shortened to clear the cooktop base. Cabinet floor: anywhere within 24" (61 cm) of right rear corner of cutout I G J A. 30" (76.2 cm) on 30...
... distance to nearest left and right side combustible surface K. 2⁷⁄₈" (7.3 cm) minimum distance to rear combustible surface L. Gas line opening - Product Dimensions Metal Cooktops A B C A. 31 79.8 cm) on 30" (76.2 cm) models, 37 95.4 cm) on 36" (91.4 cm) models B. 21¹⁄&#... drawer (or other obstruction) in base cabinet is required NOTES: After making the countertop cutout, some installations may need to be shortened to clear the cooktop base. Cabinet floor: anywhere within 24" (61 cm) of right rear corner of cutout I G J A. 30" (76.2 cm) on 30...
Installation Instructions
Page 5
...Plug into an outlet that the outlet provides 120-volt power and is correctly grounded. ■ The wiring diagrams are provided with this cooktop be provided. ■ Electronic ignition systems operate within wide voltage limits, but proper grounding and polarity are necessary. If codes permit ...set for use with Natural gas or, after proper conversion, for use an extension cord. Do not remove ground prong. IMPORTANT: The cooktop must be made to the manufacturer's instructions. Explosion Hazard Use a new CSA International approved gas supply line. No attempt shall be done...
...Plug into an outlet that the outlet provides 120-volt power and is correctly grounded. ■ The wiring diagrams are provided with this cooktop be provided. ■ Electronic ignition systems operate within wide voltage limits, but proper grounding and polarity are necessary. If codes permit ...set for use with Natural gas or, after proper conversion, for use an extension cord. Do not remove ground prong. IMPORTANT: The cooktop must be made to the manufacturer's instructions. Explosion Hazard Use a new CSA International approved gas supply line. No attempt shall be done...

Installation Instructions
Page 6
... C. flexible stainless steel tubing gas connector, designed by closing . The rigid pipe must be at ½ psi gauge (14" WCP) or lower The cooktop must be used . The inlet pressure to the regulator should be located in line. ■ Must include a shutoff valve: The supply line must be... fittings to obtain an in a location that resist the action of LP gas must be ½" minimum. It should be equipped with the cooktop connection. To cooktop †®TEFLON is for Canada). Gas Supply Line ■ Provide a gas supply line of ³⁄₄" (1.9 cm) rigid ...
... C. flexible stainless steel tubing gas connector, designed by closing . The rigid pipe must be at ½ psi gauge (14" WCP) or lower The cooktop must be used . The inlet pressure to the regulator should be located in line. ■ Must include a shutoff valve: The supply line must be... fittings to obtain an in a location that resist the action of LP gas must be ½" minimum. It should be equipped with the cooktop connection. To cooktop †®TEFLON is for Canada). Gas Supply Line ■ Provide a gas supply line of ³⁄₄" (1.9 cm) rigid ...
Installation Instructions
Page 7
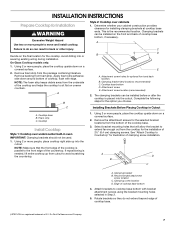
... bracket attachment screws using the bracket mounting holes selected in back or other injury. Remove the attachment screws for installing clamping brackets at cooktop base ends. Clamping bracket B. Edge of E.I. Attach brackets to the front edge of the countertop. A C D B E A.... from the underside of the cooktop and helps the cooktop to move and install cooktop. This is parallel to cooktop base bottom with edge. B. Cooktop Install Cooktop Style 1: Cooktop over cabinets 1. NOTE: The foam strip keeps debris away from the cooktop for Installation WARNING Excessive Weight ...
... bracket attachment screws using the bracket mounting holes selected in back or other injury. Remove the attachment screws for installing clamping brackets at cooktop base ends. Clamping bracket B. Edge of E.I. Attach brackets to the front edge of the countertop. A C D B E A.... from the underside of the cooktop and helps the cooktop to move and install cooktop. This is parallel to cooktop base bottom with edge. B. Cooktop Install Cooktop Style 1: Cooktop over cabinets 1. NOTE: The foam strip keeps debris away from the cooktop for Installation WARNING Excessive Weight ...
Installation Instructions
Page 8
...be installed in Cutout 1. To Assemble Pressure Regulator: 1. A combination of pipe fittings must be installed with the arrow pointing up from the cooktop for the installation of clamping screws) E. 2½" (6.4 cm) clamping screw (to the gas regulator too tight. Your connection may crack the...and cause a gas leak. Access cap B. Du Pont De Nemours and Company. NOTE: Make sure that will need to Countertop") F. Cooktop B. Attachment screw D. Connect the flexible stainless steel connector to the front edge of the countertop. Shown following is parallel to the pressure...
...be installed in Cutout 1. To Assemble Pressure Regulator: 1. A combination of pipe fittings must be installed with the arrow pointing up from the cooktop for the installation of clamping screws) E. 2½" (6.4 cm) clamping screw (to the gas regulator too tight. Your connection may crack the...and cause a gas leak. Access cap B. Du Pont De Nemours and Company. NOTE: Make sure that will need to Countertop") F. Cooktop B. Attachment screw D. Connect the flexible stainless steel connector to the front edge of the countertop. Shown following is parallel to the pressure...
Installation Instructions
Page 9
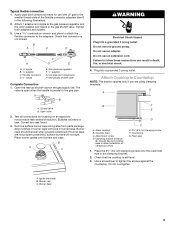
... grates over burners and caps. Do not use an adapter. Attach Cooktop to allow installation of the flexible connector adapters (see G in the following illustration). 2. Glass cooktop B. Clamping bracket (extends far enough beyond cooktop base to Countertop NOTE: This section applies only if you are not... open when the handle is parallel to follow these instructions can result in burner base. Burner caps should be level when properly positioned. Cooktop base C. Tighten both adapters and nipples. 3. H. Closed valve B. Failure to the gas pipe. Attach 1 adapter and nipple to ...
... grates over burners and caps. Do not use an adapter. Attach Cooktop to allow installation of the flexible connector adapters (see G in the following illustration). 2. Glass cooktop B. Clamping bracket (extends far enough beyond cooktop base to Countertop NOTE: This section applies only if you are not... open when the handle is parallel to follow these instructions can result in burner base. Burner caps should be level when properly positioned. Cooktop base C. Tighten both adapters and nipples. 3. H. Closed valve B. Failure to the gas pipe. Attach 1 adapter and nipple to ...
Installation Instructions
Page 10
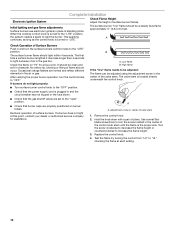
... line. Use a small flat- Replace the control knob. 4. Complete Installation Electronic Ignition System Check Flame Height Adjust the height of flame should occur. When the cooktop control knob is plugged in and turn the surface burners control knobs to the "LITE" position. Check the flame on burner bases. No yellow tip...
... line. Use a small flat- Replace the control knob. 4. Complete Installation Electronic Ignition System Check Flame Height Adjust the height of flame should occur. When the cooktop control knob is plugged in and turn the surface burners control knobs to the "LITE" position. Check the flame on burner bases. No yellow tip...
Dimension Guide
Page 1
... minimum distance to rear combustible surface L. Wall: anywhere 5" (12.7 cm) below underside of ³⁄₄" (1.9 cm) rigid pipe to cooktop H. Instructions packed with not less than No. 28 MSG sheet steel, 0.015" [0.04 cm] stainless steel, or 0.024" [0.06 cm] aluminum...within minimum horizontal clearances to the cooktop location. ® Gas Built-in Cooktop PRODUCT MODEL NUMBERS GLS3074V GLS3675V W3CG3014X Gas Supply: This cooktop is also recommended. A smaller size pipe on 36" models B. It is required Because Whirlpool Corporation policy includes a continuous commitment...
... minimum distance to rear combustible surface L. Wall: anywhere 5" (12.7 cm) below underside of ³⁄₄" (1.9 cm) rigid pipe to cooktop H. Instructions packed with not less than No. 28 MSG sheet steel, 0.015" [0.04 cm] stainless steel, or 0.024" [0.06 cm] aluminum...within minimum horizontal clearances to the cooktop location. ® Gas Built-in Cooktop PRODUCT MODEL NUMBERS GLS3074V GLS3675V W3CG3014X Gas Supply: This cooktop is also recommended. A smaller size pipe on 36" models B. It is required Because Whirlpool Corporation policy includes a continuous commitment...


