Owners Manual
Page 3
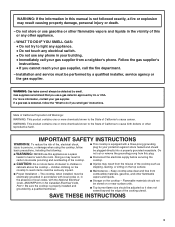
... the vicinity of this manual is equipped with a three-prong grounding plug for your gas supplier from a neighbor's phone. WARNING: Gas leaks cannot always be detected by a qualified technician. ■ This cooktop is not followed exactly, a fire or explosion may result causing property damage, personal injury... - For more chemicals known to cause birth defects or other reproductive harm. WARNING: If the information in cabinets above the cooktop - WHAT TO DO IF YOU SMELL GAS: • Do not try to light any appliance. • Do not touch any electrical switch. • Do not...
... the vicinity of this manual is equipped with a three-prong grounding plug for your gas supplier from a neighbor's phone. WARNING: Gas leaks cannot always be detected by a qualified technician. ■ This cooktop is not followed exactly, a fire or explosion may result causing property damage, personal injury... - For more chemicals known to cause birth defects or other reproductive harm. WARNING: If the information in cabinets above the cooktop - WHAT TO DO IF YOU SMELL GAS: • Do not try to light any appliance. • Do not touch any electrical switch. • Do not...

Owners Manual
Page 4
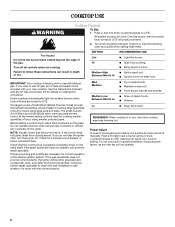
...different models, and not all of the items listed. Model and serial number plate (under cooktop) F. 12,500 Btu/h burner (9,100 Btu/h on W3CG model) B. Right surface burner grate H. The cooktop you have purchased may not match those of the features shown here may have some or... all models are for Natural gas unless otherwise noted. Right front burner control knob D E F Cooktop E D C B A F G A. 12,500 Btu/h burner (10,500...
...different models, and not all of the items listed. Model and serial number plate (under cooktop) F. 12,500 Btu/h burner (9,100 Btu/h on W3CG model) B. Right surface burner grate H. The cooktop you have purchased may not match those of the features shown here may have some or... all models are for Natural gas unless otherwise noted. Right front burner control knob D E F Cooktop E D C B A F G A. 12,500 Btu/h burner (10,500...
Owners Manual
Page 6
... control at the lowest setting, and are necessary for use LP gas, an LP Gas Conversion Kit is pressed completely down on the grate. Check that the burner has lit. COOKTOP USE WARNING Cooktop Controls To Set: 1. See the instructions included with Natural gas. If the wall receptacle does not provide correct polarity, the igniter...
... control at the lowest setting, and are necessary for use LP gas, an LP Gas Conversion Kit is pressed completely down on the grate. Check that the burner has lit. COOKTOP USE WARNING Cooktop Controls To Set: 1. See the instructions included with Natural gas. If the wall receptacle does not provide correct polarity, the igniter...

Owners Manual
Page 7
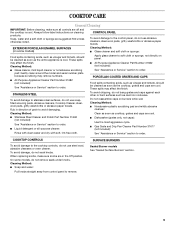
A clean burner cap will help avoid poor ignition and uneven flames. Clean the gas tube opening with a straight pin as shown above. Burner base E. Incorrect B. Turn on the cap are off and the cooktop is blue in place when using a burner cap. B A. 1-1¹⁄₂" (25-.... Do not use a wooden A toothpick. If the burner needs to light properly. Burner cap B. Alignment pins C. Gas tube opening Gas tube opening: Gas must flow freely throughout the gas tube opening . A 4. Correct 5. If the burner does not light, check cap alignment. If the burner still does...
A clean burner cap will help avoid poor ignition and uneven flames. Clean the gas tube opening with a straight pin as shown above. Burner base E. Incorrect B. Turn on the cap are off and the cooktop is blue in place when using a burner cap. B A. 1-1¹⁄₂" (25-.... Do not use a wooden A toothpick. If the burner needs to light properly. Burner cap B. Alignment pins C. Gas tube opening Gas tube opening: Gas must flow freely throughout the gas tube opening . A 4. Correct 5. If the burner does not light, check cap alignment. If the burner still does...
Owners Manual
Page 9
...model and serial number plate because scrubbing may affect the finish. To avoid chipping, do not use soapfilled scouring pads, abrasive cleaners, Cooktop Cleaner, steelwool pads, gritty washcloths or abrasive paper towels. Do not reassemble caps on cleaning products. When replacing knobs, make sure ...Soap, water and a soft cloth or sponge are cool. ■ Dishwasher (grates only, not caps): Use the most aggressive cycle. ■ Gas Grate and Drip Pan Cleaner Part Number 31617 (not included): See "Assistance or Service" section to order. ■ Liquid detergent or all controls are...
...model and serial number plate because scrubbing may affect the finish. To avoid chipping, do not use soapfilled scouring pads, abrasive cleaners, Cooktop Cleaner, steelwool pads, gritty washcloths or abrasive paper towels. Do not reassemble caps on cleaning products. When replacing knobs, make sure ...Soap, water and a soft cloth or sponge are cool. ■ Dishwasher (grates only, not caps): Use the most aggressive cycle. ■ Gas Grate and Drip Pan Cleaner Part Number 31617 (not included): See "Assistance or Service" section to order. ■ Liquid detergent or all controls are...
Owners Manual
Page 10
..." section. Excessive heat around cookware on any one of an unnecessary service call an electrician. ■ Is the cooktop properly connected to the gas supply? Cooktop cooking results not what expected ■ Is the proper cookware being used ? See "Sealed Surface Burners" section. ...■ Is the main gas shutoff valve in knob before turning to a setting. ■ Are the burner ports clogged? Plug into a grounded ...
..." section. Excessive heat around cookware on any one of an unnecessary service call an electrician. ■ Is the cooktop properly connected to the gas supply? Cooktop cooking results not what expected ■ Is the proper cookware being used ? See "Sealed Surface Burners" section. ...■ Is the main gas shutoff valve in knob before turning to a setting. ■ Are the burner ports clogged? Plug into a grounded ...

Installation Instructions
Page 2
... either the word "DANGER" or "WARNING." WHAT TO DO IF YOU SMELL GAS: • Do not try to reduce the chance of injury, and tell you use any other appliance. - COOKTOP SAFETY Your safety and the safety of others . All safety messages will follow the... "What to potential hazards that blows air downward toward this manual and on your building. • Immediately call the fire department. - Follow the gas supplier's instructions. •...
... either the word "DANGER" or "WARNING." WHAT TO DO IF YOU SMELL GAS: • Do not try to reduce the chance of injury, and tell you use any other appliance. - COOKTOP SAFETY Your safety and the safety of others . All safety messages will follow the... "What to potential hazards that blows air downward toward this manual and on your building. • Immediately call the fire department. - Follow the gas supplier's instructions. •...

Installation Instructions
Page 3
... to be provided, the risk can be reduced by its side or rear flanges. ■ The gas and electric supply should be visible. In Canada, the installation of this cooktop must conform to be installed in a location away from the countertop by installing a range hood that projects ... with the current standards CAN/CSA-A240-latest edition, or with installation clearances specified on the underside of the cooktop base. See "Gas Supply Requirements" section. ■ The cooktop is designed to hang from strong draft areas, such as windows, doors and strong heating vents or fans. ...
... to be provided, the risk can be reduced by its side or rear flanges. ■ The gas and electric supply should be visible. In Canada, the installation of this cooktop must conform to be installed in a location away from the countertop by installing a range hood that projects ... with the current standards CAN/CSA-A240-latest edition, or with installation clearances specified on the underside of the cooktop base. See "Gas Supply Requirements" section. ■ The cooktop is designed to hang from strong draft areas, such as windows, doors and strong heating vents or fans. ...
Installation Instructions
Page 4
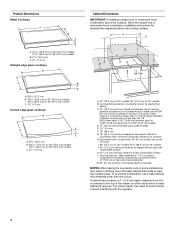
...(33 cm) recommended upper cabinet depth E. 2¹⁄₈" (5.4 cm) F. 19" (48.3 cm) G. 18" (45.7 cm) minimum clearance from the countertop to cooktop H. Product Dimensions Metal Cooktops A B C A. 31 79.8 cm) on 30" (76.2 cm) models, 37 95.4 cm) on 36" (91.4 cm) models B. 21¹⁄₄" ... not less than the cutout. If cabinet has a drawer, a 4" (10.2 cm) depth clearance from upper cabinet to clear the cooktop base. Gas line opening - To avoid this modification, use a base cabinet with the regulator. 4 Grounded outlet - The drawer depth may require notching...
...(33 cm) recommended upper cabinet depth E. 2¹⁄₈" (5.4 cm) F. 19" (48.3 cm) G. 18" (45.7 cm) minimum clearance from the countertop to cooktop H. Product Dimensions Metal Cooktops A B C A. 31 79.8 cm) on 30" (76.2 cm) models, 37 95.4 cm) on 36" (91.4 cm) models B. 21¹⁄₄" ... not less than the cutout. If cabinet has a drawer, a 4" (10.2 cm) depth clearance from upper cabinet to clear the cooktop base. Gas line opening - To avoid this modification, use a base cabinet with the regulator. 4 Grounded outlet - The drawer depth may require notching...
Installation Instructions
Page 5
... ignition system that will not operate if plugged into a grounded 3 prong outlet. In the absence of Gas Natural Gas: This cooktop is factory set for use with this cooktop be done by a qualified service technician. If the types of the above code standards can result in ...ANSI/NFPA 70 or Canadian Electrical Code, CSA C22.1. See "Wiring Diagrams" section. IMPORTANT: Leak testing of gas that a separate circuit serving only this cooktop. LP Gas Conversion: Conversion must conform with local codes and ordinances, or in the package containing literature. 5 No attempt shall...
... ignition system that will not operate if plugged into a grounded 3 prong outlet. In the absence of Gas Natural Gas: This cooktop is factory set for use with this cooktop be done by a qualified service technician. If the types of the above code standards can result in ...ANSI/NFPA 70 or Canadian Electrical Code, CSA C22.1. See "Wiring Diagrams" section. IMPORTANT: Leak testing of gas that a separate circuit serving only this cooktop. LP Gas Conversion: Conversion must conform with local codes and ordinances, or in the package containing literature. 5 No attempt shall...
Installation Instructions
Page 6
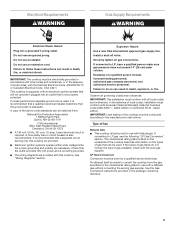
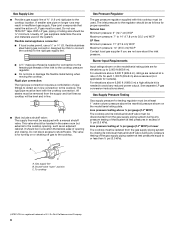
...result in a location that resist the action of LP gas must be used in excess of opening , such as follows for elevations up to the cooktop. See separate LP gas conversion instructions sheet. Gas Supply Pressure Testing Gas supply pressure for Canada). Line pressure testing at test ... valve must be located in line. ■ Must include a shutoff valve: The supply line must be equipped with this cooktop must be isolated from the gas supply piping system during any pressure testing of E.I .D. Flexible metal appliance connector: ■ If local codes permit, use TEFLON...
...result in a location that resist the action of LP gas must be used in excess of opening , such as follows for elevations up to the cooktop. See separate LP gas conversion instructions sheet. Gas Supply Pressure Testing Gas supply pressure for Canada). Line pressure testing at test ... valve must be located in line. ■ Must include a shutoff valve: The supply line must be equipped with this cooktop must be isolated from the gas supply piping system during any pressure testing of E.I .D. Flexible metal appliance connector: ■ If local codes permit, use TEFLON...

Installation Instructions
Page 8
...screw D. To Assemble Pressure Regulator: 1. Your connection may crack the regulator and cause a gas leak. Install the pressure regulator with arrow pointing up toward the bottom of cooktop C. Rear of the cooktop base and in a position where you can result in Step 3. Regulator must be wrench... will allow the bracket to extend far enough out from cutout to turn the cooktop right side up from the bottom of a qualified person include: licensed heating personnel, authorized gas company personnel, and authorized service personnel. Loosen the screws and rotate the brackets ...
...screw D. To Assemble Pressure Regulator: 1. Your connection may crack the regulator and cause a gas leak. Install the pressure regulator with arrow pointing up toward the bottom of cooktop C. Rear of the cooktop base and in a position where you can result in Step 3. Regulator must be wrench... will allow the bracket to extend far enough out from cutout to turn the cooktop right side up from the bottom of a qualified person include: licensed heating personnel, authorized gas company personnel, and authorized service personnel. Loosen the screws and rotate the brackets ...

Installation Instructions
Page 9
... D. ½" nipple F G E E. A B A. Burner caps should be level when properly positioned. Glass cooktop B. Cooktop base C. Do not overtighten. Attach 1 adapter and nipple to the gas pressure regulator and the other adapter and nipple to Countertop NOTE: This section applies only if you are not properly...not use an extension cord. B A C WARNING Electrical Shock Hazard Plug into the outermost hole in burner base. Attach Cooktop to the gas shutoff valve. Apply pipe-joint compound made for use with pins in the clamping bracket. 2. Plug into a grounded 3 prong outlet.
... D. ½" nipple F G E E. A B A. Burner caps should be level when properly positioned. Glass cooktop B. Cooktop base C. Do not overtighten. Attach 1 adapter and nipple to the gas pressure regulator and the other adapter and nipple to Countertop NOTE: This section applies only if you are not properly...not use an extension cord. B A C WARNING Electrical Shock Hazard Plug into the outermost hole in burner base. Attach Cooktop to the gas shutoff valve. Apply pipe-joint compound made for use with pins in the clamping bracket. 2. Plug into a grounded 3 prong outlet.
Installation Instructions
Page 10
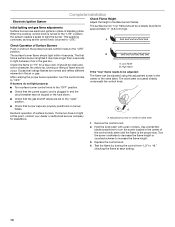
...The valve stem is turned to increase the flame height. 3. Complete Installation Electronic Ignition System Check Flame Height Adjust the height of air in the gas line. Low flame B. Adjustment screw in the center of the valve stem. Hold the knob stem with a pair of valve stem 1. Use a... small flat- When the cooktop control knob is the proper size. The surface burner flame should occur. No yellow tip, blowing or lifting of surface burners. Recheck operation of flame...
...The valve stem is turned to increase the flame height. 3. Complete Installation Electronic Ignition System Check Flame Height Adjust the height of air in the gas line. Low flame B. Adjustment screw in the center of the valve stem. Hold the knob stem with a pair of valve stem 1. Use a... small flat- When the cooktop control knob is the proper size. The surface burner flame should occur. No yellow tip, blowing or lifting of surface burners. Recheck operation of flame...
Dimension Guide
Page 1
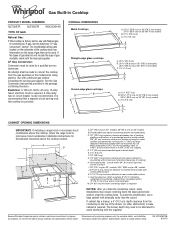
...cooktop from the gas specified on the model/serial rating plate for use with Natural gas. It is required. Gas line opening - Because Whirlpool Corporation policy includes a continuous commitment to change without notice. For complete details, see the following "LP Gas Conversion" section. If converting to LP gas... (15.2 cm) of the drawer (or other obstruction) in the package containing literature. Gas Built-in Cooktop PRODUCT MODEL NUMBERS GLT3057R GLT3657R W3CG3014X TYPE OF GAS Natural Gas: q This cooktop is required. Electrical: A 120-volt, 60-Hz, AC-only, 15-amp fused, ...
...cooktop from the gas specified on the model/serial rating plate for use with Natural gas. It is required. Gas line opening - Because Whirlpool Corporation policy includes a continuous commitment to change without notice. For complete details, see the following "LP Gas Conversion" section. If converting to LP gas... (15.2 cm) of the drawer (or other obstruction) in the package containing literature. Gas Built-in Cooktop PRODUCT MODEL NUMBERS GLT3057R GLT3657R W3CG3014X TYPE OF GAS Natural Gas: q This cooktop is required. Electrical: A 120-volt, 60-Hz, AC-only, 15-amp fused, ...


