

Installation Instructions
Page 2
...Drain Requirements 8 Water Supply Requirements 8 Electrical Requirements 8 INSTALLATION INSTRUCTIONS 9 Prepare Cabinet Opening-New Utilities 9 Moisture Barrier-Recommended for Wood Countertops........9 Direct Wire Routing 10 Prepare Dishwasher 10 Remove Access Panel 11 Connect Elbow to Valve 11 Connect Fill Hose to Elbow 11 Power Cord Connection 12 Utility Routing Channel Location 13... Connect Water Line to House Shutoff Valve 18 Connect Drain Hose 18 Complete Installation 20 Reinstall Access Panel 20 Check Operation 20 If Dishwasher Does Not Operate 20 Additional Tips 20 2
...Drain Requirements 8 Water Supply Requirements 8 Electrical Requirements 8 INSTALLATION INSTRUCTIONS 9 Prepare Cabinet Opening-New Utilities 9 Moisture Barrier-Recommended for Wood Countertops........9 Direct Wire Routing 10 Prepare Dishwasher 10 Remove Access Panel 11 Connect Elbow to Valve 11 Connect Fill Hose to Elbow 11 Power Cord Connection 12 Utility Routing Channel Location 13... Connect Water Line to House Shutoff Valve 18 Connect Drain Hose 18 Complete Installation 20 Reinstall Access Panel 20 Check Operation 20 If Dishwasher Does Not Operate 20 Additional Tips 20 2
Installation Instructions
Page 3
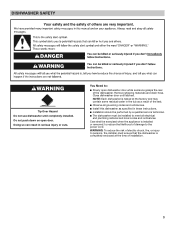
...all governing codes and ordinances. ■■ Install this dishwasher as specified in these instructions. ■■ Installation should be performed by a qualified service technician. ■■ The dishwasher must ensure that the dishwasher is completely enclosed at the factory and may contain some ... 3 Care shall be exercised when the appliance is tested at the time of the dishwasher. You Need to persons, the installer must be installed to the power cord. Close dishwasher door until completely installed. WARNING: To reduce the risk of electric shock, fire, or...
...all governing codes and ordinances. ■■ Install this dishwasher as specified in these instructions. ■■ Installation should be performed by a qualified service technician. ■■ The dishwasher must ensure that the dishwasher is completely enclosed at the factory and may contain some ... 3 Care shall be exercised when the appliance is tested at the time of the dishwasher. You Need to persons, the installer must be installed to the power cord. Close dishwasher door until completely installed. WARNING: To reduce the risk of electric shock, fire, or...
Installation Instructions
Page 4
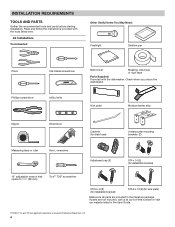
... and follow the instructions provided with the dishwasher. All Installations Tools Needed: Other Useful Items You May Need: Flashlight Shallow pan Pliers Phillips screwdriver Flat-blade screwdriver Utility knife Bath towel Masking, electrical, ...
... and follow the instructions provided with the dishwasher. All Installations Tools Needed: Other Useful Items You May Need: Flashlight Shallow pan Pliers Phillips screwdriver Flat-blade screwdriver Utility knife Bath towel Masking, electrical, ...
Installation Instructions
Page 5
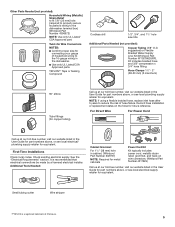
... , or see local electrical supply retailer for copper tubing) Call us at our toll-free number, visit our website listed in the dishwasher. ■■ Use only UL Listed/CSA Approved parts. See the "Electrical Requirements" section. Additional Tools Needed: Cabinet Grommet For 11... and twist-on the hose for equivalent. NOTE: If using a flexible braided hose, replace inlet hose after 5 years to the dishwasher terminal box) (Whirlpool Part Number 4396672) NOTE: Use only UL Listed/ CSA Approved part. Check existing electrical supply. Small tubing cutter Wire stripper †...
... , or see local electrical supply retailer for copper tubing) Call us at our toll-free number, visit our website listed in the dishwasher. ■■ Use only UL Listed/CSA Approved parts. See the "Electrical Requirements" section. Additional Tools Needed: Cabinet Grommet For 11... and twist-on the hose for equivalent. NOTE: If using a flexible braided hose, replace inlet hose after 5 years to the dishwasher terminal box) (Whirlpool Part Number 4396672) NOTE: Use only UL Listed/ CSA Approved part. Check existing electrical supply. Small tubing cutter Wire stripper †...
Installation Instructions
Page 6
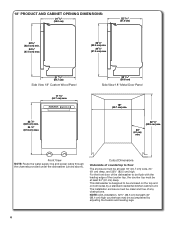
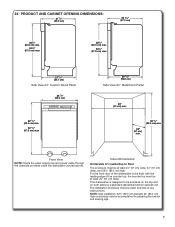
Front View NOTE: Route the water supply line and power cable through the channels provided under the dishwasher (circled above). This dishwasher is designed to floor The enclosure must be at least 18" (45.7 cm) wide, 24" (61 cm) deep, and 321/2" (82.5 cm) high. NOTE: ADA ....6 cm) Side View 18" Metal Door Panel 18" (45.7 cm) min. 24" (61 cm) min. 32 1/2" (82.5 cm) min. For the front door of the dishwasher to be flush with the leading edge of the counter top, the counter top must be clean and free of countertop to be accomplished by...
Front View NOTE: Route the water supply line and power cable through the channels provided under the dishwasher (circled above). This dishwasher is designed to floor The enclosure must be at least 18" (45.7 cm) wide, 24" (61 cm) deep, and 321/2" (82.5 cm) high. NOTE: ADA ....6 cm) Side View 18" Metal Door Panel 18" (45.7 cm) min. 24" (61 cm) min. 32 1/2" (82.5 cm) min. For the front door of the dishwasher to be flush with the leading edge of the counter top, the counter top must be clean and free of countertop to be accomplished by...
Installation Instructions
Page 7
.... Front View NOTE: Route the water supply line and power cable through the channels provided under the dishwasher (circled above). Cutout Dimensions Underside of countertop to be flush with the leading edge of the dishwasher to floor The enclosure must be enclosed on the top and on both sides by adjusting the...
.... Front View NOTE: Route the water supply line and power cable through the channels provided under the dishwasher (circled above). Cutout Dimensions Underside of countertop to be flush with the leading edge of the dishwasher to floor The enclosure must be enclosed on the top and on both sides by adjusting the...
Installation Instructions
Page 8
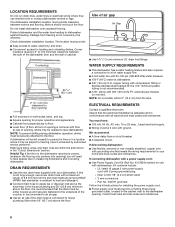
... floor. Corner locations require a 2" (5 cm) minimum clearance between motors and flooring. Helpful Tip: If the floor in the dishwasher opening . If connecting dishwasher with dishwashers. Outlet must be 2 wire with your home and local codes and ordinances. Make sure pipes, wires, and drain hose are within...for a period of time or in conformance with grounding wire that the drain hose be either looped up and securely fastened to dishwasher against freezing. The location must provide clearance between the side of 9.8 ft (3 m) from the sink that the electrical installation ...
... floor. Corner locations require a 2" (5 cm) minimum clearance between motors and flooring. Helpful Tip: If the floor in the dishwasher opening . If connecting dishwasher with dishwashers. Outlet must be 2 wire with your home and local codes and ordinances. Make sure pipes, wires, and drain hose are within...for a period of time or in conformance with grounding wire that the drain hose be either looped up and securely fastened to dishwasher against freezing. The location must provide clearance between the side of 9.8 ft (3 m) from the sink that the electrical installation ...
Installation Instructions
Page 9
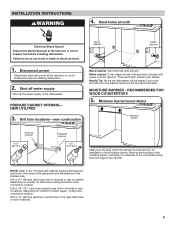
...or electrical shock. Sand holes smooth Electrical Shock Hazard Disconnect electrical power at the fuse box or circuit breaker box before installing dishwasher. PREPARE CABINET OPENING- See the "Tools and Parts" section part details. MOISTURE BARRIER - Drill a 1/2" (12.7 mm...location of cabinet. 9 INSTALLATION INSTRUCTIONS WARNING 4. Disconnect power Disconnect electrical power at the fuse box or circuit breaker box before installing dishwasher. 2. Metal cabinet: Cover edges of the shaded area. Moisture barrier/wood shims Moisture barrier Optional location 11/2" (38 mm) Preferred...
...or electrical shock. Sand holes smooth Electrical Shock Hazard Disconnect electrical power at the fuse box or circuit breaker box before installing dishwasher. PREPARE CABINET OPENING- See the "Tools and Parts" section part details. MOISTURE BARRIER - Drill a 1/2" (12.7 mm...location of cabinet. 9 INSTALLATION INSTRUCTIONS WARNING 4. Disconnect power Disconnect electrical power at the fuse box or circuit breaker box before installing dishwasher. 2. Metal cabinet: Cover edges of the shaded area. Moisture barrier/wood shims Moisture barrier Optional location 11/2" (38 mm) Preferred...
Installation Instructions
Page 10
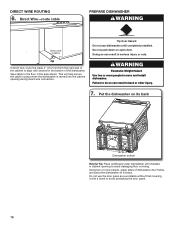
...Over Hazard Do not use the door panel as a worktable without first covering it with a towel to align with channel in place when the dishwasher is moved into the cabinet opening to the floor in back or other injury. 7. Tape cable to avoid damaging floor covering. Direct Wire-route... cable PREPARE DISHWASHER WARNING Direct wire location 4" If direct wire, route the cable 4" (10.2 cm) from the right side of the cabinet to avoid scratching ...
...Over Hazard Do not use the door panel as a worktable without first covering it with a towel to align with channel in place when the dishwasher is moved into the cabinet opening to the floor in back or other injury. 7. Tape cable to avoid damaging floor covering. Direct Wire-route... cable PREPARE DISHWASHER WARNING Direct wire location 4" If direct wire, route the cable 4" (10.2 cm) from the right side of the cabinet to avoid scratching ...
Installation Instructions
Page 11
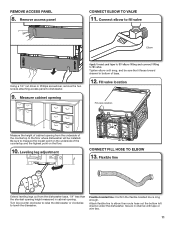
...sure that it faces toward channel in channel with tape or wire ties. 11 Attach flexible line to dishwasher. 9. Flexible line Extend leveling legs out from the dishwasher base, 1/4" less than the shortest opening height measured in cabinet opening from the underside of cabinet opening... driver or Phillips screwdriver, remove the two screws attaching access panel to elbow then route hose out the bottom left channel under the dishwasher. Flexible braided line: Confirm the flexible braided line is long enough. REMOVE ACCESS PANEL 8. Leveling leg adjustment CONNECT FILL HOSE TO ...
...sure that it faces toward channel in channel with tape or wire ties. 11 Attach flexible line to dishwasher. 9. Flexible line Extend leveling legs out from the dishwasher base, 1/4" less than the shortest opening height measured in cabinet opening from the underside of cabinet opening... driver or Phillips screwdriver, remove the two screws attaching access panel to elbow then route hose out the bottom left channel under the dishwasher. Flexible braided line: Confirm the flexible braided line is long enough. REMOVE ACCESS PANEL 8. Leveling leg adjustment CONNECT FILL HOSE TO ...

Installation Instructions
Page 12
.../CSA Approved twist-on wires to green ground connector in death, fire, or electrical shock. Twist on wire connectors. NOTE: A maximum of dishwasher tub. Power cord-reinstall terminal box cover and wires Terminal box cover Install a UL Listed/CSA Approved metallic strain relief. Replace the cover by... up and lifting the hooks out of the proper size. Do not plug cord into terminal box White Black Electrical Shock Hazard Electrically ground dishwasher. Keep the cover for later use an extension cord. See the "Tools and Parts" section for part details and ordering information. 12...
.../CSA Approved twist-on wires to green ground connector in death, fire, or electrical shock. Twist on wire connectors. NOTE: A maximum of dishwasher tub. Power cord-reinstall terminal box cover and wires Terminal box cover Install a UL Listed/CSA Approved metallic strain relief. Replace the cover by... up and lifting the hooks out of the proper size. Do not plug cord into terminal box White Black Electrical Shock Hazard Electrically ground dishwasher. Keep the cover for later use an extension cord. See the "Tools and Parts" section for part details and ordering information. 12...
Installation Instructions
Page 13
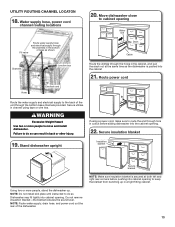
... Water line Drain Cable Route the utilities through hole in a tight fitting cabinet. WARNING Excessive Weight Hazard Use two or more people, stand the dishwasher up in cutout before pushing into the cabinet opening. 22. Using two or more people to keep the blanket from bunching up . NOTE: Route... water supply, drain hose, and power cord out the rear of the unit through the channels in back or other injury. Move dishwasher close to route the end through the holes in channel using tape or wire ties. If using a power cord, make sure to cabinet opening...
... Water line Drain Cable Route the utilities through hole in a tight fitting cabinet. WARNING Excessive Weight Hazard Use two or more people, stand the dishwasher up in cutout before pushing into the cabinet opening. 22. Using two or more people to keep the blanket from bunching up . NOTE: Route... water supply, drain hose, and power cord out the rear of the unit through the channels in back or other injury. Move dishwasher close to route the end through the holes in channel using tape or wire ties. If using a power cord, make sure to cabinet opening...
Installation Instructions
Page 14
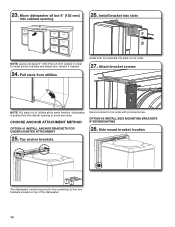
Pull slack from cabinet in order to tub collar with provided screw. Attach bracket screws NOTE: Pull slack out of the dishwasher 14 Side mount bracket location 25. CHOOSE ANCHOR ATTACHMENT METHOD Secure bracket to install anchor brackets and adjust door tension if needed. 24... OPTION #1 INSTALL ANCHOR BRACKETS FOR UNDERCOUNTER ATTACHMENT 28. Top anchor brackets The dishwasher must be secured to avoid any kinks. Move dishwasher all but 6" (152 mm) into slots on top of utilities at the same time the dishwasher is pushed into slots NOTE: Leave unit about 6" (152 mm) out ...
Pull slack from cabinet in order to tub collar with provided screw. Attach bracket screws NOTE: Pull slack out of the dishwasher 14 Side mount bracket location 25. CHOOSE ANCHOR ATTACHMENT METHOD Secure bracket to install anchor brackets and adjust door tension if needed. 24... OPTION #1 INSTALL ANCHOR BRACKETS FOR UNDERCOUNTER ATTACHMENT 28. Top anchor brackets The dishwasher must be secured to avoid any kinks. Move dishwasher all but 6" (152 mm) into slots on top of utilities at the same time the dishwasher is pushed into slots NOTE: Leave unit about 6" (152 mm) out ...
Installation Instructions
Page 15
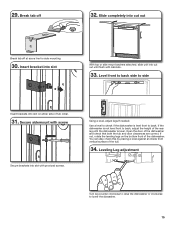
Insert bracket into slot With top or side mount anchers attached, slide unit into slot on the bottom front of the dishwasher. If the dishwasher is not level front to side Insert brackets into cut out Break tab off 32. Level front to back side to back, adjust the height ...of tub collar. 31. You can also check this by placing a level against an inside front vertical surface of the dishwasher and check that both the tub and door clearances are correct. Slide completely into slot with cabinets. 33. Use a level to check if the...
Insert bracket into slot With top or side mount anchers attached, slide unit into slot on the bottom front of the dishwasher. If the dishwasher is not level front to side Insert brackets into cut out Break tab off 32. Level front to back side to back, adjust the height ...of tub collar. 31. You can also check this by placing a level against an inside front vertical surface of the dishwasher and check that both the tub and door clearances are correct. Slide completely into slot with cabinets. 33. Use a level to check if the...
Installation Instructions
Page 16
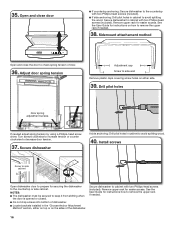
...holes in cabinet to decrease door tension. 37. Sidemount attachement method Open and close door ■■ If countertop anchoring: Secure dishwasher to the countertop with two Phillips-head screws (included). ■■ If side anchoring: Drill pilot holes in cabinet to check ...spring tension of the dishwasher. NOTES: ■■ The dishwasher must be secured to prepare for easier access. Turn screws clockwise to increase tension or counter clockwise to avoid splitting ...
...holes in cabinet to decrease door tension. 37. Sidemount attachement method Open and close door ■■ If countertop anchoring: Secure dishwasher to the countertop with two Phillips-head screws (included). ■■ If side anchoring: Drill pilot holes in cabinet to check ...spring tension of the dishwasher. NOTES: ■■ The dishwasher must be secured to prepare for easier access. Turn screws clockwise to increase tension or counter clockwise to avoid splitting ...
Installation Instructions
Page 17
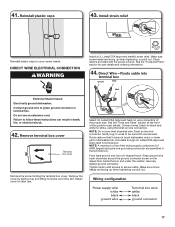
... caps 43. Make sure screw heads are facing up when tightening conduit nut. See the "Tools and Parts" section at the front of dishwasher tub. Make sure screw heads are facing up when tightening conduit nut. Wiring configuration 17 See the "Tools and Parts" section for part...shock. 42. Securely tighten ground connector. Direct Wire-Route cable into a U-shaped hook. Remove the cover by sliding it does not touch dishwasher motor or lower part of the guide for part details and ordering information. 44. NOTE: Do not pre-twist stranded wire. Tighten strain relief...
... caps 43. Make sure screw heads are facing up when tightening conduit nut. See the "Tools and Parts" section at the front of dishwasher tub. Make sure screw heads are facing up when tightening conduit nut. Wiring configuration 17 See the "Tools and Parts" section for part...shock. 42. Securely tighten ground connector. Direct Wire-Route cable into a U-shaped hook. Remove the cover by sliding it does not touch dishwasher motor or lower part of the guide for part details and ordering information. 44. NOTE: Do not pre-twist stranded wire. Tighten strain relief...
Installation Instructions
Page 18
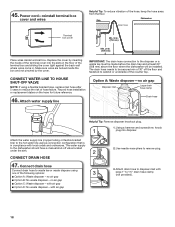
... pliers to the disposer or a waste tee must be made before the drain trap and at least 20" (508 mm) above the floor where the dishwasher will be secured min of the hose, keep the hose away from the floor. with large 1" to disposer inlet with air gap 2. Attach drain hose... of 30" off valve located under the sink. 2 CONNECT DRAIN HOSE 47. Make sure wires are tucked inside terminal box. The water supply to the dishwasher should have a manual shut-off the floor and fastened to reduce the risk of the terminal cover into disposer. Drain hose Place wires inside the...
... pliers to the disposer or a waste tee must be made before the drain trap and at least 20" (508 mm) above the floor where the dishwasher will be secured min of the hose, keep the hose away from the floor. with large 1" to disposer inlet with air gap 2. Attach drain hose... of 30" off valve located under the sink. 2 CONNECT DRAIN HOSE 47. Make sure wires are tucked inside terminal box. The water supply to the dishwasher should have a manual shut-off the floor and fastened to reduce the risk of the terminal cover into disposer. Drain hose Place wires inside the...
Installation Instructions
Page 20
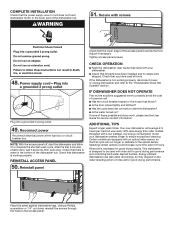
...house fuse blown? ■■ Is the door closed tightly and latched? ■■ Has the cycle been set correctly to start the dishwasher and allow it to ensure exceptional cleaning. Check that the lower edge of these possible solutions work, please see the User Guide for good ...drying results. Reconnect power Reconnect electrical power at the fuse box or circuit breaker box. Designed with your dishwasher washes longer to complete the shortest wash cycle. Secure with an optical water sensor, so the first cycle will average 2-5 hours per load but...
...house fuse blown? ■■ Is the door closed tightly and latched? ■■ Has the cycle been set correctly to start the dishwasher and allow it to ensure exceptional cleaning. Check that the lower edge of these possible solutions work, please see the User Guide for good ...drying results. Reconnect power Reconnect electrical power at the fuse box or circuit breaker box. Designed with your dishwasher washes longer to complete the shortest wash cycle. Secure with an optical water sensor, so the first cycle will average 2-5 hours per load but...


