Installation Instructions
Page 1
...30" (76 CM) OU DE 36" (91,4 CM) Table of Contents / Table des matières COOKTOP SAFETY 1 INSTALLATION REQUIREMENTS 2 Tools and Parts 2 Location Requirements 2 Electrical Requirements 4 Gas Supply Requirements 4 INSTALLATION INSTRUCTIONS 5 Prepare Cooktop for Installation 5 Install Cooktop 6 Make Gas Connection 7 Attach Cooktop to Countertop 8 Complete Installation 8 ...table de cuisson au plan de travail 17 Achever l'installation 17 SCHÉMAS DE CÂBLAGE 19 COOKTOP SAFETY Your safety and the safety of injury, and tell you what the potential hazard is the safety ...
...30" (76 CM) OU DE 36" (91,4 CM) Table of Contents / Table des matières COOKTOP SAFETY 1 INSTALLATION REQUIREMENTS 2 Tools and Parts 2 Location Requirements 2 Electrical Requirements 4 Gas Supply Requirements 4 INSTALLATION INSTRUCTIONS 5 Prepare Cooktop for Installation 5 Install Cooktop 6 Make Gas Connection 7 Attach Cooktop to Countertop 8 Complete Installation 8 ...table de cuisson au plan de travail 17 Achever l'installation 17 SCHÉMAS DE CÂBLAGE 19 COOKTOP SAFETY Your safety and the safety of injury, and tell you what the potential hazard is the safety ...
Installation Instructions
Page 2
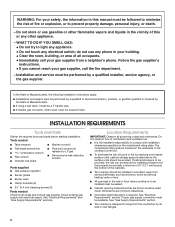
... clearances specified on the underside of fire or explosion, or to LP gas s Noncorrosive leak-detection solution Parts supplied s Gas pressure regulator s Burner grates s Burner caps s Clamp brackets (2) s 2¹⁄₂" (6.4 cm) clamping screws (2) Parts needed s Tape measure s Marker or pencil s Flat-blade screwdriver s...s All openings in the wall or floor where cooktop is to be provided, the risk can be sealed. Follow the gas supplier's instructions. • If you cannot reach your gas supplier, call your gas supplier from strong draft areas, such as windows,...
... clearances specified on the underside of fire or explosion, or to LP gas s Noncorrosive leak-detection solution Parts supplied s Gas pressure regulator s Burner grates s Burner caps s Clamp brackets (2) s 2¹⁄₂" (6.4 cm) clamping screws (2) Parts needed s Tape measure s Marker or pencil s Flat-blade screwdriver s...s All openings in the wall or floor where cooktop is to be provided, the risk can be sealed. Follow the gas supplier's instructions. • If you cannot reach your gas supplier, call your gas supplier from strong draft areas, such as windows,...
Installation Instructions
Page 3
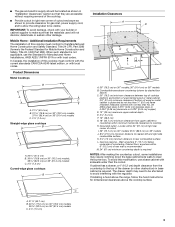
...burner box. If cabinet has a drawer, a 4" (10.2 cm) depth clearance from upper cabinet to countertop within 6" (15.2 cm) of the cooktop. If installing a hood above the range, follow the hood instructions for gas...corner of this modification, use the Standard for Mobile Home Construction and Safety, Title 24, HUD Part 280). When such standard is not applicable, use a base cabinet with local codes. A ... (53.7 cm) B. 30 77.0 cm) on 30" (76.2 cm) models, 36 92.3 cm) on 36" models B. In Canada, the installation of cutout enclosure as shown in "Installation Clearances" ...
...burner box. If cabinet has a drawer, a 4" (10.2 cm) depth clearance from upper cabinet to countertop within 6" (15.2 cm) of the cooktop. If installing a hood above the range, follow the hood instructions for gas...corner of this modification, use the Standard for Mobile Home Construction and Safety, Title 24, HUD Part 280). When such standard is not applicable, use a base cabinet with local codes. A ... (53.7 cm) B. 30 77.0 cm) on 30" (76.2 cm) models, 36 92.3 cm) on 36" models B. In Canada, the installation of cutout enclosure as shown in "Installation Clearances" ...
Installation Instructions
Page 7
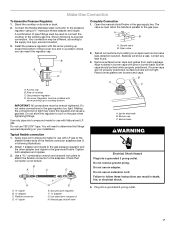
... B. Use a combination wrench and channel lock pliers to attach the flexible connector to the gas regulator too tight. Stand the cooktop on your installation. Regulator must be wrench-tightened. Remove surface burner caps and grates from parts package. Make Gas Connection To Assemble Pressure Regulator: 1. Install the pressure regulator with the arrow pointing up to...
... B. Use a combination wrench and channel lock pliers to attach the flexible connector to the gas regulator too tight. Stand the cooktop on your installation. Regulator must be wrench-tightened. Remove surface burner caps and grates from parts package. Make Gas Connection To Assemble Pressure Regulator: 1. Install the pressure regulator with the arrow pointing up to...


