Owners Manual
Page 1
MODEL SC8720ED PART NO. 8111P466-60/9763399 A Note to You 2 Cooktop Safety 3-5 Getting to Know Your Cooktop 6 Air shutter adjustment ........ 7 LO flame adjustment .......... 8 Controls 9 Using 9 Caring for 11 Surface Burners 12 Installing 12 Using 15 Caring for 16 Grill 18 Installing 18 ... 1-800-253-1301 Call us with questions or comments. TO THE CONSUMER: PLEASE READ AND KEEP THIS BOOK FOR FUTURE REFERENCE. Home Appliances UseAndCare G U I D E 30" GAS MODULAR DOWNDRAFT COOKTOP TO THE INSTALLER: PLEASE LEAVE THIS INSTRUCTION BOOK WITH THE UNIT.
MODEL SC8720ED PART NO. 8111P466-60/9763399 A Note to You 2 Cooktop Safety 3-5 Getting to Know Your Cooktop 6 Air shutter adjustment ........ 7 LO flame adjustment .......... 8 Controls 9 Using 9 Caring for 11 Surface Burners 12 Installing 12 Using 15 Caring for 16 Grill 18 Installing 18 ... 1-800-253-1301 Call us with questions or comments. TO THE CONSUMER: PLEASE READ AND KEEP THIS BOOK FOR FUTURE REFERENCE. Home Appliances UseAndCare G U I D E 30" GAS MODULAR DOWNDRAFT COOKTOP TO THE INSTALLER: PLEASE LEAVE THIS INSTRUCTION BOOK WITH THE UNIT.
Owners Manual
Page 2
... Registration Card provided with your gas supplier from a neighbor's phone. The card helps us notify you manage your appliance properly and safely. SAVE THESE INSTRUCTIONS FOR FUTURE REFERENCE - 2 You can find this manual is getting busier and more complicated, WHIRLPOOL cooktops are easy to use any ... appliance. • Do not touch any phone in this information on the model and serial number plate (see diagram on your gas supplier, call your appliance. Model Number Serial Number Purchase Date Dealer Name Dealer Address Dealer Phone Keep this book and the sales...
... Registration Card provided with your gas supplier from a neighbor's phone. The card helps us notify you manage your appliance properly and safely. SAVE THESE INSTRUCTIONS FOR FUTURE REFERENCE - 2 You can find this manual is getting busier and more complicated, WHIRLPOOL cooktops are easy to use any ... appliance. • Do not touch any phone in this information on the model and serial number plate (see diagram on your gas supplier, call your appliance. Model Number Serial Number Purchase Date Dealer Name Dealer Address Dealer Phone Keep this book and the sales...
Owners Manual
Page 3
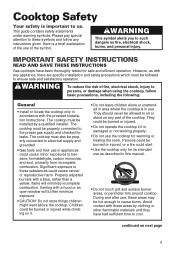
...primarily from incomplete combustion. IMPORTANT SAFETY INSTRUCTIONS READ AND SAVE THESE INSTRUCTIONS Gas cooktops have had sufficient time to persons, or damage when using the cooktop, follow any instructions given. The cooktop must be installed by clothing or other flammable materials until they have been... may be properly connected to these substances could be properly connected to electrical supply and grounded. • Gas fuels and their use the cooktop for its intended use . Avoid contact with any appliance, there are specific installation and safety precautions which ...
...primarily from incomplete combustion. IMPORTANT SAFETY INSTRUCTIONS READ AND SAVE THESE INSTRUCTIONS Gas cooktops have had sufficient time to persons, or damage when using the cooktop, follow any instructions given. The cooktop must be installed by clothing or other flammable materials until they have been... may be properly connected to these substances could be properly connected to electrical supply and grounded. • Gas fuels and their use the cooktop for its intended use . Avoid contact with any appliance, there are specific installation and safety precautions which ...

Owners Manual
Page 4
...fire hazard. • Do not use aluminum foil to line aeration tray, burner basin, or any other glazed utensils are suitable for cooktops without breaking due to locate a gas leak. Use aluminum foil only as recommended in burns from steam. Only certain types of glass, glass-ceramic, ceramic, earthenware, or other... enough to bumping of pan can be extinguished with a well-fitted lid, cookie sheet, or flat tray. Do not allow grease to the cooktop. If a gas odor is flammable. Wipe spillovers immediately. • Do not use water on hot surfaces could ignite and burn you use on...
...fire hazard. • Do not use aluminum foil to line aeration tray, burner basin, or any other glazed utensils are suitable for cooktops without breaking due to locate a gas leak. Use aluminum foil only as recommended in burns from steam. Only certain types of glass, glass-ceramic, ceramic, earthenware, or other... enough to bumping of pan can be extinguished with a well-fitted lid, cookie sheet, or flat tray. Do not allow grease to the cooktop. If a gas odor is flammable. Wipe spillovers immediately. • Do not use water on hot surfaces could ignite and burn you use on...
Owners Manual
Page 5
...choosing pans, look for this appliance to satisfactorily meet the application needs must be made by a Whirlpool service company or Qualified Agency. • Disconnect the electrical supply and the gas supply at the shut-off valve near a window, proper precautions should be taken to prevent ...a qualified technician. • Any additions, changes, or conversions required in order for easilygrasped handles that are unstable and easily tipped. COOKTOP SAFETY Care and cleaning • Do not repair or replace any devices or accessories that will stay cool. All other servicing should...
...choosing pans, look for this appliance to satisfactorily meet the application needs must be made by a Whirlpool service company or Qualified Agency. • Disconnect the electrical supply and the gas supply at the shut-off valve near a window, proper precautions should be taken to prevent ...a qualified technician. • Any additions, changes, or conversions required in order for easilygrasped handles that are unstable and easily tipped. COOKTOP SAFETY Care and cleaning • Do not repair or replace any devices or accessories that will stay cool. All other servicing should...
Owners Manual
Page 6
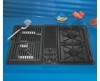
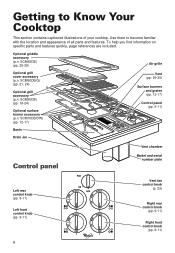
... knob (pp. 9-11) 6 Vent fan control knob (p. 29) Right rear control knob (pp. 9-11) Right front control knob (pp. 9-11) Use them to Know Your Cooktop This section contains captioned illustrations of all parts and features. SCM50DB/Q) (pp. 21, 24) Optional grill accessory (p.n. Getting to become familiar with the location and...
... knob (pp. 9-11) 6 Vent fan control knob (p. 29) Right rear control knob (pp. 9-11) Right front control knob (pp. 9-11) Use them to Know Your Cooktop This section contains captioned illustrations of all parts and features. SCM50DB/Q) (pp. 21, 24) Optional grill accessory (p.n. Getting to become familiar with the location and...
Owners Manual
Page 7
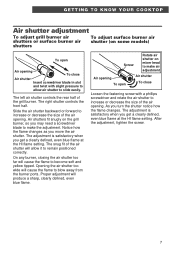
... left air shutter controls the rear half of the air shutter will cause the flame to become soft and yellow tipped. GETTING TO KNOW YOUR COOKTOP Air shutter adjustment To adjust grill burner air shutters or surface burner air shutters To adjust surface burner air shutter (on some models) To open...
... left air shutter controls the rear half of the air shutter will cause the flame to become soft and yellow tipped. GETTING TO KNOW YOUR COOKTOP Air shutter adjustment To adjust grill burner air shutters or surface burner air shutters To adjust surface burner air shutter (on some models) To open...
Owners Manual
Page 8
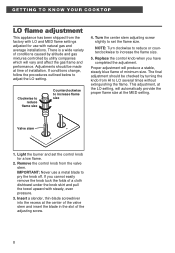
...adjustment. Insert a slender, thin-blade screwdriver into the recess at the MED setting. Remove the control knob from the factory with natural gas and average installations. NOTE: Turn clockwise to reduce or counterclockwise to increase flame size 4. This adjustment, at the LO setting, will ...There is a wide variety of the adjusting screw. 8 Adjustments should be made at time of minimum size. GETTING TO KNOW YOUR COOKTOP LO flame adjustment This appliance has been shipped from the valve stem. If conditions change, follow the procedures outlined below to set the ...
...adjustment. Insert a slender, thin-blade screwdriver into the recess at the MED setting. Remove the control knob from the factory with natural gas and average installations. NOTE: Turn clockwise to reduce or counterclockwise to increase flame size 4. This adjustment, at the LO setting, will ...There is a wide variety of the adjusting screw. 8 Adjustments should be made at time of minimum size. GETTING TO KNOW YOUR COOKTOP LO flame adjustment This appliance has been shipped from the valve stem. If conditions change, follow the procedures outlined below to set the ...
Owners Manual
Page 9
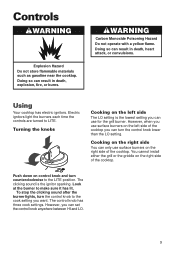
... it has lit. However, you want. USING YOUR RANGE wWARNING Carbon Monoxide Poisoning Hazard Do not operate with a yellow flame. Using Your cooktop has electric ignitors. The control knob has three cook settings. Turning the knobs Cooking on control knob and turn the control knob to the ...LITE position. Controls wWARNING Explosion Hazard Do not store flammable materials such as gasoline near the cooktop. Look at the burner to LITE. Doing so can result in death, explosion, fire, or burns. You cannot install either the grill...
... it has lit. However, you want. USING YOUR RANGE wWARNING Carbon Monoxide Poisoning Hazard Do not operate with a yellow flame. Using Your cooktop has electric ignitors. The control knob has three cook settings. Turning the knobs Cooking on control knob and turn the control knob to the ...LITE position. Controls wWARNING Explosion Hazard Do not store flammable materials such as gasoline near the cooktop. Look at the burner to LITE. Doing so can result in death, explosion, fire, or burns. You cannot install either the grill...
Owners Manual
Page 11
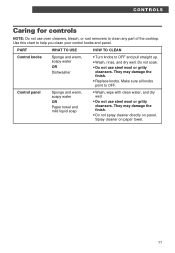
... not spray cleaner directly on paper towel. 11 They may damage the finish. • Replace knobs. Use this chart to clean any part of the cooktop.
... not spray cleaner directly on paper towel. 11 They may damage the finish. • Replace knobs. Use this chart to clean any part of the cooktop.
Owners Manual
Page 12
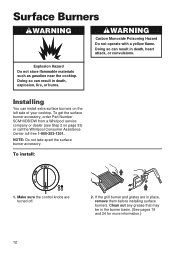
...Explosion Hazard Do not store flammable materials such as gasoline near the cooktop. To get the surface burner accessory, order Part Number SCM10DB/DW from a Whirlpool service company or dealer (see Step 2 on the left side of your cooktop. Doing so can install extra surface burners on page 33) or... call the Whirlpool Consumer Assistance Center toll-free 1-800-253-1301. Clean out any...
...Explosion Hazard Do not store flammable materials such as gasoline near the cooktop. To get the surface burner accessory, order Part Number SCM10DB/DW from a Whirlpool service company or dealer (see Step 2 on the left side of your cooktop. Doing so can install extra surface burners on page 33) or... call the Whirlpool Consumer Assistance Center toll-free 1-800-253-1301. Clean out any...

Owners Manual
Page 13
Set the surface burner accessory into the cooktop. 5. Insert the prong at the end of the tray into the opening in the side of the burner basin. Place burner grates on the burner ...
Set the surface burner accessory into the cooktop. 5. Insert the prong at the end of the tray into the opening in the side of the burner basin. Place burner grates on the burner ...
Owners Manual
Page 14
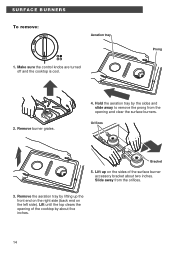
... lifting up on the left side). Remove burner grates. 4. Lift up the front end on the right side (back end on the sides of the cooktop by the sides and slide away to remove the prong from the orifices. 3. Hold the aeration tray by about two inches. Slide away from the... accessory bracket about five inches. 14 Orifices Bracket 5. SURFACE BURNERS To remove: Aeration tray 1. Prong 2. Make sure the control knobs are turned off and the cooktop is cool.
... lifting up on the left side). Remove burner grates. 4. Lift up the front end on the right side (back end on the sides of the cooktop by the sides and slide away to remove the prong from the orifices. 3. Hold the aeration tray by about two inches. Slide away from the... accessory bracket about five inches. 14 Orifices Bracket 5. SURFACE BURNERS To remove: Aeration tray 1. Prong 2. Make sure the control knobs are turned off and the cooktop is cool.
Owners Manual
Page 15
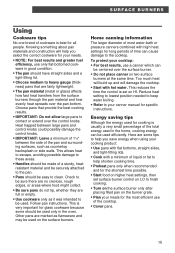
...canner manual for specific instructions. Energy saving tips Although the energy used efficiently. To protect your cooktop: • For best results, use a canner which can cause damage to the cooktop. This reduces the time the control is usually a very small percentage of the total energy ...cooking results. • IMPORTANT: Do not allow large pans to clean. Home canning information The larger diameter of most efficient use of the cooktop. • Cover pans. 15 Heat trapped between large pans and control knobs could possibly damage the control knobs. • IMPORTANT: Leave ...
...canner manual for specific instructions. Energy saving tips Although the energy used efficiently. To protect your cooktop: • For best results, use a canner which can cause damage to the cooktop. This reduces the time the control is usually a very small percentage of the total energy ...cooking results. • IMPORTANT: Do not allow large pans to clean. Home canning information The larger diameter of most efficient use of the cooktop. • Cover pans. 15 Heat trapped between large pans and control knobs could possibly damage the control knobs. • IMPORTANT: Leave ...
Owners Manual
Page 16
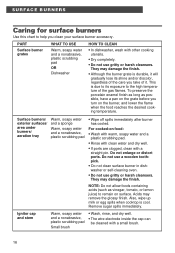
... may damage the finish. • Although the burner grate is due to its shine and/or discolor, regardless of the care you take of the gas flames. For cooked-on the grate before you clean your surface burner accessory. Also, wipe up milk or egg spills when...
... may damage the finish. • Although the burner grate is due to its shine and/or discolor, regardless of the care you take of the gas flames. For cooked-on the grate before you clean your surface burner accessory. Also, wipe up milk or egg spills when...
Owners Manual
Page 18
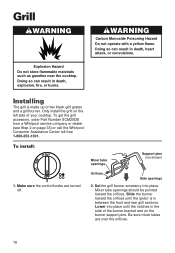
...grill sections. wWARNING Carbon Monoxide Poisoning Hazard Do not operate with a yellow flame. Only install the grill on page 33) or call the Whirlpool Consumer Assistance Center toll-free 1-800-253-1301. Slide the burner toward the orifices. Be sure mixer tubes are turned off. Orifices Side... of two black grill grates and a grill burner. Set the grill burner accessory into place until the ignitor is made up of your cooktop. Lower into place. To install: Mixer tube openings Support pins (not shown) 1. Grill wWARNING Explosion Hazard Do not store flammable materials ...
...grill sections. wWARNING Carbon Monoxide Poisoning Hazard Do not operate with a yellow flame. Only install the grill on page 33) or call the Whirlpool Consumer Assistance Center toll-free 1-800-253-1301. Slide the burner toward the orifices. Be sure mixer tubes are turned off. Orifices Side... of two black grill grates and a grill burner. Set the grill burner accessory into place until the ignitor is made up of your cooktop. Lower into place. To install: Mixer tube openings Support pins (not shown) 1. Grill wWARNING Explosion Hazard Do not store flammable materials ...
Owners Manual
Page 19
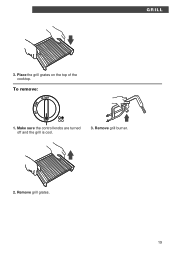
GRILL 3. Make sure the control knobs are turned off and the grill is cool. 3. Remove grill grates. 19 To remove: 1. Remove grill burner. 2. Place the grill grates on the top of the cooktop.
GRILL 3. Make sure the control knobs are turned off and the grill is cool. 3. Remove grill grates. 19 To remove: 1. Remove grill burner. 2. Place the grill grates on the top of the cooktop.

Owners Manual
Page 23
... down. Turn after half the time. NOTE: Do not use bleach or rust removers to empty it with butter or marinade often. Drain jar (under cooktop) Warm, soapy water and a sponge or a nonabrasive, plastic scrubbing pad OR Dishwasher • Empty the jar from time to time to prevent spillovers. • Unscrew...
... down. Turn after half the time. NOTE: Do not use bleach or rust removers to empty it with butter or marinade often. Drain jar (under cooktop) Warm, soapy water and a sponge or a nonabrasive, plastic scrubbing pad OR Dishwasher • Empty the jar from time to time to prevent spillovers. • Unscrew...
Owners Manual
Page 25
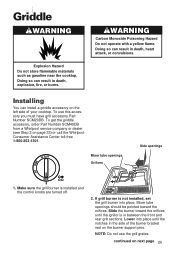
... SCM20DB. Make sure the grill burner is not installed, set the grill burner into place until the ignitor is in the side of your cooktop. Lower into place. Installing You can install a griddle accessory on the left side of the burner bracket rest on the burner support pins....and the control knobs are turned off. 2. Doing so can result in death, explosion, fire, or burns. continued on page 33) or call the Whirlpool Consumer Assistance Center toll-free 1-800-253-1301. Doing so can result in death, heart attack, or convulsions. Mixer tube openings Orifices Side openings 1....
... SCM20DB. Make sure the grill burner is not installed, set the grill burner into place until the ignitor is in the side of your cooktop. Lower into place. Installing You can install a griddle accessory on the left side of the burner bracket rest on the burner support pins....and the control knobs are turned off. 2. Doing so can result in death, explosion, fire, or burns. continued on page 33) or call the Whirlpool Consumer Assistance Center toll-free 1-800-253-1301. Doing so can result in death, heart attack, or convulsions. Mixer tube openings Orifices Side openings 1....
Owners Manual
Page 29
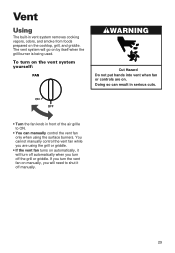
... using the grill or griddle. • If the vent fan turns on automatically, it off the grill or griddle. If you will go on the cooktop, grill, and griddle.
... using the grill or griddle. • If the vent fan turns on automatically, it off the grill or griddle. If you will go on the cooktop, grill, and griddle.


