Owners Manual
Page 1
... Your Cooktop 6 Air shutter adjustment ........ 7 LO flame adjustment .......... 8 Controls 9 Using 9 Caring for 11 Surface Burners 12 Installing 12 Using 15 Caring for 16 Grill 18 Installing 18 Using 20 Caring for 23 Griddle 25 Installing 25 Using 26 Caring for 28 Vent 29 Using 29 Caring for 30 Troubleshooting 31 Requesting Assistance or Service 33 Warranty 36 1-800-253-1301 Call us with questions or comments. Home Appliances UseAndCare G U I D E 30" GAS MODULAR DOWNDRAFT COOKTOP TO THE INSTALLER: PLEASE LEAVE THIS INSTRUCTION BOOK...
... Your Cooktop 6 Air shutter adjustment ........ 7 LO flame adjustment .......... 8 Controls 9 Using 9 Caring for 11 Surface Burners 12 Installing 12 Using 15 Caring for 16 Grill 18 Installing 18 Using 20 Caring for 23 Griddle 25 Installing 25 Using 26 Caring for 28 Vent 29 Using 29 Caring for 30 Troubleshooting 31 Requesting Assistance or Service 33 Warranty 36 1-800-253-1301 Call us with questions or comments. Home Appliances UseAndCare G U I D E 30" GAS MODULAR DOWNDRAFT COOKTOP TO THE INSTALLER: PLEASE LEAVE THIS INSTRUCTION BOOK...
Owners Manual
Page 2
... (see diagram on your appliance properly and safely. The card helps us notify you enjoy years of this or any new information on page 6 for location of your appliance and your building. • Immediately call the fire department. Model Number Serial Number Purchase Date Dealer Name Dealer Address Dealer Phone Keep this Use and Care Guide. Follow the gas supplier's instructions...
... (see diagram on your appliance properly and safely. The card helps us notify you enjoy years of this or any new information on page 6 for location of your appliance and your building. • Immediately call the fire department. Model Number Serial Number Purchase Date Dealer Name Dealer Address Dealer Phone Keep this Use and Care Guide. Follow the gas supplier's instructions...
Owners Manual
Page 5
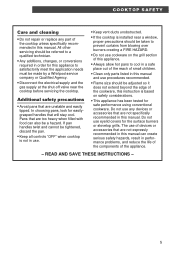
... not use procedures recommended. • Flame size should be referred to a qualified technician. • Any additions, changes, or conversions required in order for the surface burners or stovetop grills. Additional safety precautions • Avoid pans that will stay cool. READ AND SAVE THESE INSTRUCTIONS - 5 COOKTOP SAFETY Care and cleaning • Do not repair or replace any devices or accessories that are not specifically recommended in this manual. Pans that are...
... not use procedures recommended. • Flame size should be referred to a qualified technician. • Any additions, changes, or conversions required in order for the surface burners or stovetop grills. Additional safety precautions • Avoid pans that will stay cool. READ AND SAVE THESE INSTRUCTIONS - 5 COOKTOP SAFETY Care and cleaning • Do not repair or replace any devices or accessories that are not specifically recommended in this manual. Pans that are...
Owners Manual
Page 8
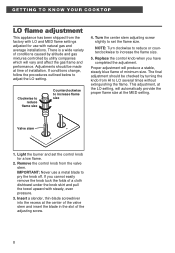
... pull the towel upward with natural gas and average installations. Replace the control knob when you cannot easily remove the knob tuck the folds of installation. Valve stem 1. IMPORTANT: Never use with steady, even pressure. 3. This adjustment, at the LO setting, will automatically provide the proper flame size at the center of the valve stem and insert the blade in the slot of minimum size. There is a wide variety...
... pull the towel upward with natural gas and average installations. Replace the control knob when you cannot easily remove the knob tuck the folds of installation. Valve stem 1. IMPORTANT: Never use with steady, even pressure. 3. This adjustment, at the LO setting, will automatically provide the proper flame size at the center of the valve stem and insert the blade in the slot of minimum size. There is a wide variety...
Owners Manual
Page 10
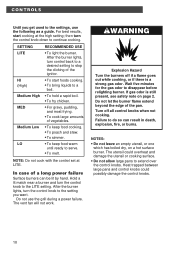
... possibly damage the control knobs. 10 The vent fan will not work. Do not let the burner flame extend beyond the edge of a long power failure Surface burners can result in death, explosion, fire, or burns. In case of the pan. CONTROLS Until you want. then turn the control knob to the settings, use the grill during a power failure. After the burner lights, turn the control knob to the setting you get used to the LITE...
... possibly damage the control knobs. 10 The vent fan will not work. Do not let the burner flame extend beyond the edge of a long power failure Surface burners can result in death, explosion, fire, or burns. In case of the pan. CONTROLS Until you want. then turn the control knob to the settings, use the grill during a power failure. After the burner lights, turn the control knob to the setting you get used to the LITE...
Owners Manual
Page 15
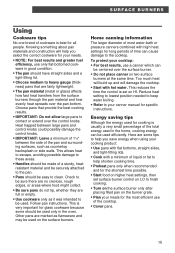
... protect your canner manual for specific instructions. Home canning information The larger diameter of most efficient use of the cooktop. • Cover pans. 15 Choose pans that are marked as flameware and may be used efficiently. Heat trapped between large pans and control knobs could possibly damage the control knobs. • IMPORTANT: Leave a minimum of 11⁄2" between the side of the pan and surrounding surfaces, such as...
... protect your canner manual for specific instructions. Home canning information The larger diameter of most efficient use of the cooktop. • Cover pans. 15 Choose pans that are marked as flameware and may be used efficiently. Heat trapped between large pans and control knobs could possibly damage the control knobs. • IMPORTANT: Leave a minimum of 11⁄2" between the side of the pan and surrounding surfaces, such as...
Owners Manual
Page 18
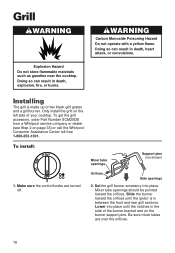
... cooktop. Slide the burner toward the orifices. Make sure the control knobs are over the orifices. 18 Lower into place. To install: Mixer tube openings Support pins (not shown) 1. Only install the grill on page 33) or call the Whirlpool Consumer Assistance Center toll-free 1-800-253-1301. Doing so can result in death, explosion, fire, or burns. To get the grill accessory, order Part Number...
... cooktop. Slide the burner toward the orifices. Make sure the control knobs are over the orifices. 18 Lower into place. To install: Mixer tube openings Support pins (not shown) 1. Only install the grill on page 33) or call the Whirlpool Consumer Assistance Center toll-free 1-800-253-1301. Doing so can result in death, explosion, fire, or burns. To get the grill accessory, order Part Number...
Owners Manual
Page 25
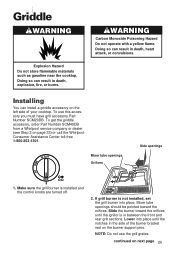
.... Slide the burner toward the orifices. To get the griddle accessory, order Part Number SCM40DB from a Whirlpool service company or dealer (see Step 2 on the left side of the burner bracket rest on next page 25 If grill burner is installed and the control knobs are turned off. 2. wWARNING Carbon Monoxide Poisoning Hazard Do not operate with a yellow flame. Doing so can result in the side of your cooktop...
.... Slide the burner toward the orifices. To get the griddle accessory, order Part Number SCM40DB from a Whirlpool service company or dealer (see Step 2 on the left side of the burner bracket rest on next page 25 If grill burner is installed and the control knobs are turned off. 2. wWARNING Carbon Monoxide Poisoning Hazard Do not operate with a yellow flame. Doing so can result in the side of your cooktop...
Owners Manual
Page 31
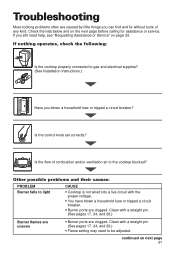
.../or ventilation air to gas and electrical supplies? (See Installation Instructions.) w Have you can find and fix without tools of any kind. Troubleshooting Most cooking problems often are caused by little things you blown a household fuse or tripped a circuit breaker? w Other possible problems and their causes: PROBLEM Burner fails to be adjusted. Clean with the proper voltage. • You have blown a household fuse or tripped a circuit breaker. • Burner ports...
.../or ventilation air to gas and electrical supplies? (See Installation Instructions.) w Have you can find and fix without tools of any kind. Troubleshooting Most cooking problems often are caused by little things you blown a household fuse or tripped a circuit breaker? w Other possible problems and their causes: PROBLEM Burner fails to be adjusted. Clean with the proper voltage. • You have blown a household fuse or tripped a circuit breaker. • Burner ports...
Owners Manual
Page 32
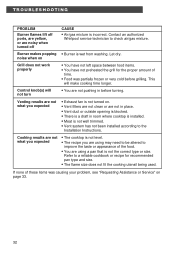
... "Requesting Assistance or Service" on page 33. 32 TROUBLESHOOTING PROBLEM Burner flames lift off ports, are yellow, or are noisy when turned off Burner makes popping noise when on Grill does not work properly Control knob(s) will make cooking time longer. • You are not pushing in room where cooktop is installed. • Meat is not the correct type or size. Contact an authorized Whirlpool service technician to...
... "Requesting Assistance or Service" on page 33. 32 TROUBLESHOOTING PROBLEM Burner flames lift off ports, are yellow, or are noisy when turned off Burner makes popping noise when on Grill does not work properly Control knob(s) will make cooking time longer. • You are not pushing in room where cooktop is installed. • Meat is not the correct type or size. Contact an authorized Whirlpool service technician to...
Owners Manual
Page 34
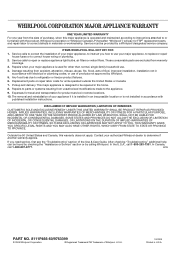
... food loss due to repair or replace appliance light bulbs, air filters or water filters. Repairs to parts or systems resulting from the date of the Use & Care Guide. Replacement parts or repair labor costs for product service in an inaccessible location or is operated and maintained according to instructions attached to or furnished with electrical or plumbing codes, or use . 4. WHIRLPOOL CORPORATION MAJOR APPLIANCE WARRANTY ONE YEAR LIMITED WARRANTY For one year...
... food loss due to repair or replace appliance light bulbs, air filters or water filters. Repairs to parts or systems resulting from the date of the Use & Care Guide. Replacement parts or repair labor costs for product service in an inaccessible location or is operated and maintained according to instructions attached to or furnished with electrical or plumbing codes, or use . 4. WHIRLPOOL CORPORATION MAJOR APPLIANCE WARRANTY ONE YEAR LIMITED WARRANTY For one year...

Dimension Guide
Page 1
...) blower housing depth 3-5/16" (8.4 cm) burner box depth 14" (35.6 cm) pressure regulator wiring box cover grease container 11-7/8" (30.2 cm) CABINET OPENING DIMENSIONS 30" (76.2 cm) minimum when higher than 10 feet (3 m), use plastic or metal foil vent. gas, piping or tubing size can be 1/2" minimum. ® 30" Gas Downdraft Cooktop PRODUCT MODEL NUMBERS OVERALL DIMENSIONS SC8720ED Gas supply: Use 3/4" rigid pipe gas supply line to change materials and specifications without notice. 08-20-02 A smaller...
...) blower housing depth 3-5/16" (8.4 cm) burner box depth 14" (35.6 cm) pressure regulator wiring box cover grease container 11-7/8" (30.2 cm) CABINET OPENING DIMENSIONS 30" (76.2 cm) minimum when higher than 10 feet (3 m), use plastic or metal foil vent. gas, piping or tubing size can be 1/2" minimum. ® 30" Gas Downdraft Cooktop PRODUCT MODEL NUMBERS OVERALL DIMENSIONS SC8720ED Gas supply: Use 3/4" rigid pipe gas supply line to change materials and specifications without notice. 08-20-02 A smaller...
Installation Instructions
Page 1
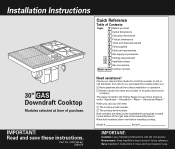
... cooktop model number. ࠜ The cooktop serial number. Installation Instructions Quick Reference Table of Contents: Pages 1 Before you start 1 Cutout dimensions 1 Clearance dimensions 2 Product dimensions 2 Tools and materials needed 2 Parts supplied 2 Electrical requirements 3 Gas supply requirements 3 4 Venting requirements 5 6 Installation steps 7 Gas conversions Back cover Cooktop removal 30" GAS Downdraft Cooktop Modules selected at time of the downdraft plenum. Save Installation Instructions for future reference. Both numbers are listed on the model/serial rating plate, located...
... cooktop model number. ࠜ The cooktop serial number. Installation Instructions Quick Reference Table of Contents: Pages 1 Before you start 1 Cutout dimensions 1 Clearance dimensions 2 Product dimensions 2 Tools and materials needed 2 Parts supplied 2 Electrical requirements 3 Gas supply requirements 3 4 Venting requirements 5 6 Installation steps 7 Gas conversions Back cover Cooktop removal 30" GAS Downdraft Cooktop Modules selected at time of the downdraft plenum. Save Installation Instructions for future reference. Both numbers are listed on the model/serial rating plate, located...

Installation Instructions
Page 2
... floor where cooktop is your appliance. Locate cooktop for Heating, Refrigeration and Air Conditioning Engineers (ASHRAE), and the local code authorities. All openings in accordance with all parts were included. (1/2" NPT x 1/2" or 3/4" I.D.) • literature pack • wall or roof cap • 4 orifice hoods • metal vent • exhaust flow rate tester card • 2 sheet metal screws to attach transition vent to venting adapter Cutout dimensions Proper installation is to...
... floor where cooktop is your appliance. Locate cooktop for Heating, Refrigeration and Air Conditioning Engineers (ASHRAE), and the local code authorities. All openings in accordance with all parts were included. (1/2" NPT x 1/2" or 3/4" I.D.) • literature pack • wall or roof cap • 4 orifice hoods • metal vent • exhaust flow rate tester card • 2 sheet metal screws to attach transition vent to venting adapter Cutout dimensions Proper installation is to...
Installation Instructions
Page 3
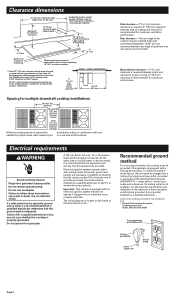
... performance when installing the or more downdraft cooktops. Clearance dimensions 30" (76.2 cm) minimum when higher than 18" (45.7 cm) See Note** for minimum clearances. 13" (33 cm) maximum upper cabinet depth Installation location should provide sufficient room for: • Removing grease containers. • Accessing gas regulator. 18" (45.7 cm) minimum clearance upper cabinet to countertop 0" (0 cm) Do Not seal cooktop to a gas pipe. A timedelay fuse or circuit breaker is equipped with National Electrical Code ANSI...
... performance when installing the or more downdraft cooktops. Clearance dimensions 30" (76.2 cm) minimum when higher than 18" (45.7 cm) See Note** for minimum clearances. 13" (33 cm) maximum upper cabinet depth Installation location should provide sufficient room for: • Removing grease containers. • Accessing gas regulator. 18" (45.7 cm) minimum clearance upper cabinet to countertop 0" (0 cm) Do Not seal cooktop to a gas pipe. A timedelay fuse or circuit breaker is equipped with National Electrical Code ANSI...
Installation Instructions
Page 4
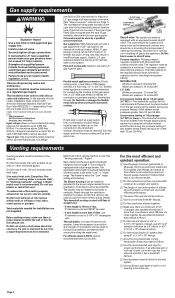
... appropriate conversion. (See "Gas conversion" instructions, Page 7). certified by a qualified service technician. If the type of gas listed does not agree with the type of the standards listed above 1/2 psi gauge (14" WC) - Conversion must be sure to prevent thermal conduction along the metal vent. A smaller size pipe on the system. gas suppliers determine the size and materials used . Pipe-joint compounds made for checking the regulator setting: NATURAL GAS: Minimum pressure: 6 inches...
... appropriate conversion. (See "Gas conversion" instructions, Page 7). certified by a qualified service technician. If the type of gas listed does not agree with the type of the standards listed above 1/2 psi gauge (14" WC) - Conversion must be sure to prevent thermal conduction along the metal vent. A smaller size pipe on the system. gas suppliers determine the size and materials used . Pipe-joint compounds made for checking the regulator setting: NATURAL GAS: Minimum pressure: 6 inches...
Installation Instructions
Page 6
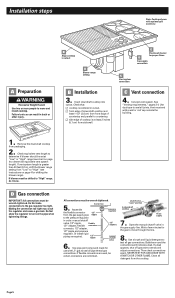
... connectors are not kinked. Check equivalent vent length to move through the line. 8. Or install rigid piping as required. 1/2" nipple pressure regulator 1/2" adapters manual shutoff valve 6. All connections must end with optional grill accessory. Use pipe-joint compound made for the gas to the pressure regulator in cutout. ࠜ front edge of downdraft cooktop is at least 1-1/2" (3.8 cm) from "Low" to "High" (see chart on page 4 to seal all gas connections.
... connectors are not kinked. Check equivalent vent length to move through the line. 8. Or install rigid piping as required. 1/2" nipple pressure regulator 1/2" adapters manual shutoff valve 6. All connections must end with optional grill accessory. Use pipe-joint compound made for the gas to the pressure regulator in cutout. ࠜ front edge of downdraft cooktop is at least 1-1/2" (3.8 cm) from "Low" to "High" (see chart on page 4 to seal all gas connections.
Installation Instructions
Page 7
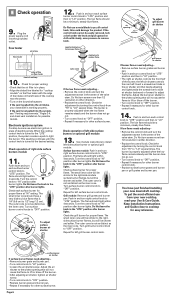
... off the burner. • After adjusting air shutter, tighten air shutter screw. • Turn control knob to 1/2" long (1.3 cm). Plug the power supply cord into the system, see "Venting requirements," Pages 3-4, and check vent installation for left -side surface burner or optional grill module. Do Not use from "HI" to "LO" position. Check each surface burner control knob to "OFF" position. • Repeat if necessary for "cooktop models" on flow tester front of line on...
... off the burner. • After adjusting air shutter, tighten air shutter screw. • Turn control knob to 1/2" long (1.3 cm). Plug the power supply cord into the system, see "Venting requirements," Pages 3-4, and check vent installation for left -side surface burner or optional grill module. Do Not use from "HI" to "LO" position. Check each surface burner control knob to "OFF" position. • Repeat if necessary for "cooktop models" on flow tester front of line on...
Installation Instructions
Page 9
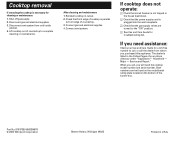
... of countertop. 3. Part No. 8101P350-60/8284676 © 2000 Whirlpool Corporation Benton Harbor, Michigan 49022 Printed in cutout. 2. Reinstall cooktop in U.S.A. Lift cooktop out of the burner box. If cooktop does not operate: ࠜ Check that circuit breaker is not tripped or the house fuse blown. ࠜ Check that the gas supply valves are turned to the "ON" position. ࠜ See Use and Care Guide for a toll-free number to...
... of countertop. 3. Part No. 8101P350-60/8284676 © 2000 Whirlpool Corporation Benton Harbor, Michigan 49022 Printed in cutout. 2. Reinstall cooktop in U.S.A. Lift cooktop out of the burner box. If cooktop does not operate: ࠜ Check that circuit breaker is not tripped or the house fuse blown. ࠜ Check that the gas supply valves are turned to the "ON" position. ࠜ See Use and Care Guide for a toll-free number to...

Warranty
Page 1
... consumable parts are excluded from accident, alteration, misuse, abuse, fire, flood, acts of the Use & Care Guide. Repairs when your major appliance, to instruct you need service, first see the "Troubleshooting" section of God, improper installation, installation not in materials or workmanship. Damage resulting from warranty coverage. 3. Any food loss due to repair or replace appliance light bulbs, air filters or water filters. The removal and reinstallation of Whirlpool, U.S.A. 10...
... consumable parts are excluded from accident, alteration, misuse, abuse, fire, flood, acts of the Use & Care Guide. Repairs when your major appliance, to instruct you need service, first see the "Troubleshooting" section of God, improper installation, installation not in materials or workmanship. Damage resulting from warranty coverage. 3. Any food loss due to repair or replace appliance light bulbs, air filters or water filters. The removal and reinstallation of Whirlpool, U.S.A. 10...


