Owners Manual
Page 1
PART NO. 8111P466-60/9763399 A Note to You 2 Cooktop Safety 3-5 Getting to Know Your Cooktop 6 Air shutter adjustment ........ 7 LO flame adjustment .......... 8 Controls 9 Using 9 Caring for 11 Surface Burners 12 Installing 12 Using 15 Caring for 16 ...Requesting Assistance or Service 33 Warranty 36 1-800-253-1301 Call us with questions or comments. MODEL SC8720ED Home Appliances UseAndCare G U I D E 30" GAS MODULAR DOWNDRAFT COOKTOP TO THE INSTALLER: PLEASE LEAVE THIS INSTRUCTION BOOK WITH THE UNIT. TO THE CONSUMER: PLEASE READ AND KEEP THIS BOOK FOR FUTURE REFERENCE.
PART NO. 8111P466-60/9763399 A Note to You 2 Cooktop Safety 3-5 Getting to Know Your Cooktop 6 Air shutter adjustment ........ 7 LO flame adjustment .......... 8 Controls 9 Using 9 Caring for 11 Surface Burners 12 Installing 12 Using 15 Caring for 16 ...Requesting Assistance or Service 33 Warranty 36 1-800-253-1301 Call us with questions or comments. MODEL SC8720ED Home Appliances UseAndCare G U I D E 30" GAS MODULAR DOWNDRAFT COOKTOP TO THE INSTALLER: PLEASE LEAVE THIS INSTRUCTION BOOK WITH THE UNIT. TO THE CONSUMER: PLEASE READ AND KEEP THIS BOOK FOR FUTURE REFERENCE.
Owners Manual
Page 2
... THESE INSTRUCTIONS FOR FUTURE REFERENCE - 2 Please read it carefully. Installation and service must be performed by a qualified installer, service agency, or the gas supplier. - Whenever you call the fire department. You can find this information on the model and serial number plate (see diagram on your appliance...is full of this book and the sales slip together in this Use and Care Guide. It is getting busier and more complicated, WHIRLPOOL cooktops are easy to You Thank you need to light any appliance. • Do not touch any other flammable vapors and liquids in ...
... THESE INSTRUCTIONS FOR FUTURE REFERENCE - 2 Please read it carefully. Installation and service must be performed by a qualified installer, service agency, or the gas supplier. - Whenever you call the fire department. You can find this information on the model and serial number plate (see diagram on your appliance...is full of this book and the sales slip together in this Use and Care Guide. It is getting busier and more complicated, WHIRLPOOL cooktops are easy to You Thank you need to light any appliance. • Do not touch any other flammable vapors and liquids in ...
Owners Manual
Page 3
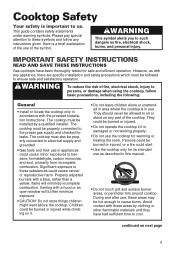
... substances could be allowed to cool. They could cause cancer or reproductive harm. IMPORTANT SAFETY INSTRUCTIONS READ AND SAVE THESE INSTRUCTIONS Gas cooktops have had sufficient time to sit or stand on next page 3 wWARNING To reduce the risk of fire, electrical shock, injury... to the proper gas supply and checked for safe and efficient operation. IMPORTANT SAFETY INSTRUCTIONS Cooktop Safety Your safety is important to cause burns. This guide contains safety statements under warning symbols. ...
... substances could be allowed to cool. They could cause cancer or reproductive harm. IMPORTANT SAFETY INSTRUCTIONS READ AND SAVE THESE INSTRUCTIONS Gas cooktops have had sufficient time to sit or stand on next page 3 wWARNING To reduce the risk of fire, electrical shock, injury... to the proper gas supply and checked for safe and efficient operation. IMPORTANT SAFETY INSTRUCTIONS Cooktop Safety Your safety is important to cause burns. This guide contains safety statements under warning symbols. ...

Owners Manual
Page 4
... this manual. • A faint gas odor may indicate a gas leak. Do not let pot holder touch an open flame and you could result. • Know where your installer or local gas company to the cooktop. When using the cooktop. It could catch on a cooktop could create an explosion and/or fire... hazard. • Do not use water on or near the cooktop. The fumes could ignite and burn you use decorative ...
... this manual. • A faint gas odor may indicate a gas leak. Do not let pot holder touch an open flame and you could result. • Know where your installer or local gas company to the cooktop. When using the cooktop. It could catch on a cooktop could create an explosion and/or fire... hazard. • Do not use water on or near the cooktop. The fumes could ignite and burn you use decorative ...
Owners Manual
Page 5
... choosing pans, look for easilygrasped handles that are unstable and easily tipped. Pans that will stay cool. The use any part of the cooktop unless specifically recommended in this manual. Do not use procedures recommended. • Flame size should be taken to cool in a safe place... result in order for this appliance to satisfactorily meet the application needs must be made by a Whirlpool service company or Qualified Agency. • Disconnect the electrical supply and the gas supply at the shut-off valve near a window, proper precautions should be adjusted so it does...
... choosing pans, look for easilygrasped handles that are unstable and easily tipped. Pans that will stay cool. The use any part of the cooktop unless specifically recommended in this manual. Do not use procedures recommended. • Flame size should be taken to cool in a safe place... result in order for this appliance to satisfactorily meet the application needs must be made by a Whirlpool service company or Qualified Agency. • Disconnect the electrical supply and the gas supply at the shut-off valve near a window, proper precautions should be adjusted so it does...
Owners Manual
Page 6
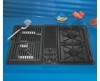
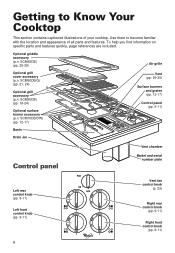
Getting to become familiar with the location and appearance of your cooktop. SCM20DB) (pp. 18-24) Optional surface burner accessory (p.n. SCM10DB/DW) (pp. 12-17) Vent (pp. 29-30) Surface burners and grates (pp. 12-17) ...SCM40DB) (pp. 25-28) Air grille Optional grill cover accessory (p.n. SCM50DB/Q) (pp. 21, 24) Optional grill accessory (p.n. Optional griddle accessory (p.n. Use them to Know Your Cooktop This section contains captioned illustrations of all parts and features. To help you find information on specific parts and features quickly, page references are included.
Getting to become familiar with the location and appearance of your cooktop. SCM20DB) (pp. 18-24) Optional surface burner accessory (p.n. SCM10DB/DW) (pp. 12-17) Vent (pp. 29-30) Surface burners and grates (pp. 12-17) ...SCM40DB) (pp. 25-28) Air grille Optional grill cover accessory (p.n. SCM50DB/Q) (pp. 21, 24) Optional grill accessory (p.n. Optional griddle accessory (p.n. Use them to Know Your Cooktop This section contains captioned illustrations of all parts and features. To help you find information on specific parts and features quickly, page references are included.
Owners Manual
Page 7
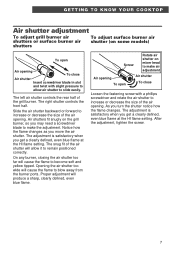
... will allow air shutter to slide easily. Opening the air shutter too wide will produce a sharp, clearly defined, even blue flame. GETTING TO KNOW YOUR COOKTOP Air shutter adjustment To adjust grill burner air shutters or surface burner air shutters To adjust surface burner air shutter (on some models) To open...
... will allow air shutter to slide easily. Opening the air shutter too wide will produce a sharp, clearly defined, even blue flame. GETTING TO KNOW YOUR COOKTOP Air shutter adjustment To adjust grill burner air shutters or surface burner air shutters To adjust surface burner air shutter (on some models) To open...
Owners Manual
Page 8
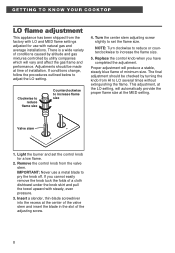
GETTING TO KNOW YOUR COOKTOP LO flame adjustment This appliance has been shipped from the factory with LO and MED flame settings adjusted for a low flame. 2. Adjustments should be made at the LO setting, will vary and affect the gas flame and performance. Valve stem 1. Remove the ...the adjusting screw. 8 This adjustment, at time of a cloth dishtowel under the knob skirt and pull the towel upward with natural gas and average installations. The final adjustment should be checked by utility companies which will automatically provide the proper flame size at the center of...
GETTING TO KNOW YOUR COOKTOP LO flame adjustment This appliance has been shipped from the factory with LO and MED flame settings adjusted for a low flame. 2. Adjustments should be made at the LO setting, will vary and affect the gas flame and performance. Valve stem 1. Remove the ...the adjusting screw. 8 This adjustment, at time of a cloth dishtowel under the knob skirt and pull the towel upward with natural gas and average installations. The final adjustment should be checked by utility companies which will automatically provide the proper flame size at the center of...
Owners Manual
Page 9
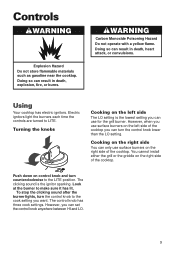
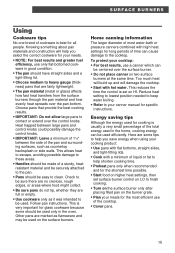
... burns. Cooking on the right side You can only use surface burners on the left side of the cooktop you want. Turning the knobs Cooking on the right side of the cooktop. You cannot install either the grill or the griddle on control knob and turn the control knob to ... control knob has three cook settings. Controls wWARNING Explosion Hazard Do not store flammable materials such as gasoline near the cooktop. Using Your cooktop has electric ignitors. However, when you can result in death, heart attack, or convulsions. The clicking sound is the lowest setting you use for...
... burns. Cooking on the right side You can only use surface burners on the left side of the cooktop you want. Turning the knobs Cooking on the right side of the cooktop. You cannot install either the grill or the griddle on control knob and turn the control knob to ... control knob has three cook settings. Controls wWARNING Explosion Hazard Do not store flammable materials such as gasoline near the cooktop. Using Your cooktop has electric ignitors. However, when you can result in death, heart attack, or convulsions. The clicking sound is the lowest setting you use for...
Owners Manual
Page 11
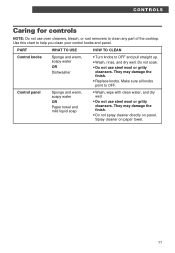
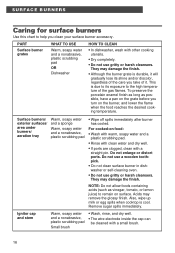
... control knobs and panel. Do not soak. • Do not use steel wool or gritty cleansers. Use this chart to clean any part of the cooktop. Spray cleaner on panel. Make sure all knobs point to OFF and pull straight up. • Wash, rinse, and dry well. PART WHAT TO USE...
... control knobs and panel. Do not soak. • Do not use steel wool or gritty cleansers. Use this chart to clean any part of the cooktop. Spray cleaner on panel. Make sure all knobs point to OFF and pull straight up. • Wash, rinse, and dry well. PART WHAT TO USE...
Owners Manual
Page 12
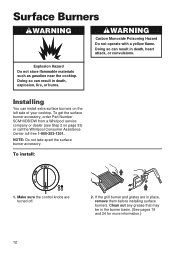
... explosion, fire, or burns. To get the surface burner accessory, order Part Number SCM10DB/DW from a Whirlpool service company or dealer (see Step 2 on the left side of your cooktop. If the grill burner and grates are turned off. 2. Doing so can install extra surface burners on page... 33) or call the Whirlpool Consumer Assistance Center toll-free 1-800-253-1301. Explosion Hazard Do not store flammable materials such as gasoline near the cooktop. Make sure the control knobs are in death, heart attack, or convulsions.
... explosion, fire, or burns. To get the surface burner accessory, order Part Number SCM10DB/DW from a Whirlpool service company or dealer (see Step 2 on the left side of your cooktop. If the grill burner and grates are turned off. 2. Doing so can install extra surface burners on page... 33) or call the Whirlpool Consumer Assistance Center toll-free 1-800-253-1301. Explosion Hazard Do not store flammable materials such as gasoline near the cooktop. Make sure the control knobs are in death, heart attack, or convulsions.

Owners Manual
Page 13
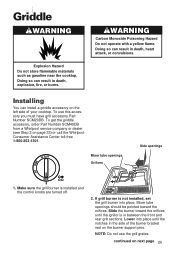
... the burner supports, and the ignitor is over the orifices. Lower into place until the opening Side openings Supports 3. Set the aeration tray into the cooktop. 5. Insert the prong at the end of the burner bracket rest on aeration tray. 13 Lower the other end into place. Aeration tray Burner basin...
... the burner supports, and the ignitor is over the orifices. Lower into place until the opening Side openings Supports 3. Set the aeration tray into the cooktop. 5. Insert the prong at the end of the burner bracket rest on aeration tray. 13 Lower the other end into place. Aeration tray Burner basin...
Owners Manual
Page 14
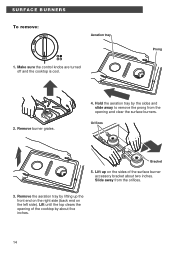
SURFACE BURNERS To remove: Aeration tray 1. Lift up the front end on the right side (back end on the sides of the cooktop by the sides and slide away to remove the prong from the orifices. 3. Hold the aeration tray by about two inches. Remove the aeration tray .... 4. Slide away from the opening of the surface burner accessory bracket about five inches. 14 Make sure the control knobs are turned off and the cooktop is cool. Lift until the top clears the opening and clear the surface burners. Orifices Bracket 5.
SURFACE BURNERS To remove: Aeration tray 1. Lift up the front end on the right side (back end on the sides of the cooktop by the sides and slide away to remove the prong from the orifices. 3. Hold the aeration tray by about two inches. Remove the aeration tray .... 4. Slide away from the opening of the surface burner accessory bracket about five inches. 14 Make sure the control knobs are turned off and the cooktop is cool. Lift until the top clears the opening and clear the surface burners. Orifices Bracket 5.
Owners Manual
Page 15
... could possibly damage the control knobs. • IMPORTANT: Leave a minimum of 11⁄2" between the side of the cooktop. • Cover pans. 15 Follow pan instructions. To protect your cooktop: • For best results, use only flat-bottomed cookware in good condition. • The pan should be made... to help you select the correct cookware for your canner manual for all people. Knowing something about pan materials and construction will damage the cooktop. • Start with a minimum of liquid or fat to be used only in the home, cooking energy can be used for cooking...
... could possibly damage the control knobs. • IMPORTANT: Leave a minimum of 11⁄2" between the side of the cooktop. • Cover pans. 15 Follow pan instructions. To protect your cooktop: • For best results, use only flat-bottomed cookware in good condition. • The pan should be made... to help you select the correct cookware for your canner manual for all people. Knowing something about pan materials and construction will damage the cooktop. • Start with a minimum of liquid or fat to be used only in the home, cooking energy can be used for cooking...
Owners Manual
Page 16
... damage the finish. • Although the burner grate is durable, it . Also, wipe up milk or egg spills when cooktop is due to its shine and/or discolor, regardless of the gas flames. This is cool. To preserve the porcelain enamel finish as long as vinegar, tomato, or lemon juice) to the...
... damage the finish. • Although the burner grate is durable, it . Also, wipe up milk or egg spills when cooktop is due to its shine and/or discolor, regardless of the gas flames. This is cool. To preserve the porcelain enamel finish as long as vinegar, tomato, or lemon juice) to the...
Owners Manual
Page 18
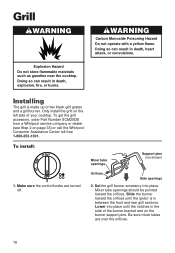
... place. Grill wWARNING Explosion Hazard Do not store flammable materials such as gasoline near the cooktop. Installing The grill is in death, explosion, fire, or burns. To get the grill accessory, order Part Number SCM20DB from a Whirlpool service company or dealer (see Step 2 on the burner support pins. Be sure mixer tubes...: Mixer tube openings Support pins (not shown) 1. Doing so can result in the side of the burner bracket rest on page 33) or call the Whirlpool Consumer Assistance Center toll-free 1-800-253-1301.
... place. Grill wWARNING Explosion Hazard Do not store flammable materials such as gasoline near the cooktop. Installing The grill is in death, explosion, fire, or burns. To get the grill accessory, order Part Number SCM20DB from a Whirlpool service company or dealer (see Step 2 on the burner support pins. Be sure mixer tubes...: Mixer tube openings Support pins (not shown) 1. Doing so can result in the side of the burner bracket rest on page 33) or call the Whirlpool Consumer Assistance Center toll-free 1-800-253-1301.
Owners Manual
Page 19
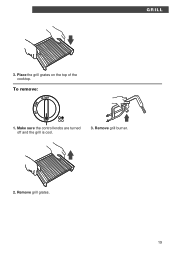
Remove grill burner. 2. Remove grill grates. 19 Place the grill grates on the top of the cooktop. Make sure the control knobs are turned off and the grill is cool. 3. GRILL 3. To remove: 1.
Remove grill burner. 2. Remove grill grates. 19 Place the grill grates on the top of the cooktop. Make sure the control knobs are turned off and the grill is cool. 3. GRILL 3. To remove: 1.

Owners Manual
Page 23
... jar is broken replace it . Brush with butter or marinade often. Turn and brush with butter. NOTE: Do not use oven cleaners. Drain jar (under cooktop) Warm, soapy water and a sponge or a nonabrasive, plastic scrubbing pad OR Dishwasher • Empty the jar from time to time to prevent spillovers. • Unscrew...
... jar is broken replace it . Brush with butter or marinade often. Turn and brush with butter. NOTE: Do not use oven cleaners. Drain jar (under cooktop) Warm, soapy water and a sponge or a nonabrasive, plastic scrubbing pad OR Dishwasher • Empty the jar from time to time to prevent spillovers. • Unscrew...
Owners Manual
Page 25
... grill burner is in death, explosion, fire, or burns. Slide the burner toward the orifices. continued on page 33) or call the Whirlpool Consumer Assistance Center toll-free 1-800-253-1301. Doing so can result in between the front and rear grill sections. Make sure the grill... is installed and the control knobs are turned off. 2. Griddle wWARNING Explosion Hazard Do not store flammable materials such as gasoline near the cooktop. Mixer tube openings Orifices Side openings 1. NOTE: Do not use this accessory you must have grill accessory Part Number SCM20DB. wWARNING Carbon ...
... grill burner is in death, explosion, fire, or burns. Slide the burner toward the orifices. continued on page 33) or call the Whirlpool Consumer Assistance Center toll-free 1-800-253-1301. Doing so can result in between the front and rear grill sections. Make sure the grill... is installed and the control knobs are turned off. 2. Griddle wWARNING Explosion Hazard Do not store flammable materials such as gasoline near the cooktop. Mixer tube openings Orifices Side openings 1. NOTE: Do not use this accessory you must have grill accessory Part Number SCM20DB. wWARNING Carbon ...
Owners Manual
Page 29
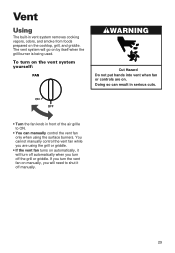
... or controls are using the surface burners. You cannot manually control the vent fan while you turn on . The vent system will go on the cooktop, grill, and griddle. Doing so can manually control the vent fan only when using the grill or griddle. • If the vent fan turns on...
... or controls are using the surface burners. You cannot manually control the vent fan while you turn on . The vent system will go on the cooktop, grill, and griddle. Doing so can manually control the vent fan only when using the grill or griddle. • If the vent fan turns on...


