Owners Manual
Page 1
... 23 Griddle 25 Installing 25 Using 26 Caring for 28 Vent 29 Using 29 Caring for 30 Troubleshooting 31 Requesting Assistance or Service 33 Warranty 36 1-800-253-1301 Call us with questions or comments. MODEL SC8720ED Home Appliances UseAndCare G U I D E 30" GAS MODULAR DOWNDRAFT COOKTOP TO THE INSTALLER: PLEASE LEAVE THIS INSTRUCTION BOOK WITH...
... 23 Griddle 25 Installing 25 Using 26 Caring for 28 Vent 29 Using 29 Caring for 30 Troubleshooting 31 Requesting Assistance or Service 33 Warranty 36 1-800-253-1301 Call us with questions or comments. MODEL SC8720ED Home Appliances UseAndCare G U I D E 30" GAS MODULAR DOWNDRAFT COOKTOP TO THE INSTALLER: PLEASE LEAVE THIS INSTRUCTION BOOK WITH...
Owners Manual
Page 3
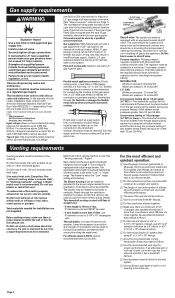
...exposures to benzene, formaldehyde, carbon monoxide, and soot, primarily from incomplete combustion. However, as described in area where the cooktop is a brief explanation of the use . Venting with a blue, rather than a yellow, flame will further minimize exposure. • CAUTION: Do not store things ...any appliance, there are specific installation and safety precautions which must also be properly connected to electrical supply and grounded. • Gas fuels and their use , these areas may be hot enough to these areas by a qualified installer. wWARNING This symbol alerts you...
...exposures to benzene, formaldehyde, carbon monoxide, and soot, primarily from incomplete combustion. However, as described in area where the cooktop is a brief explanation of the use . Venting with a blue, rather than a yellow, flame will further minimize exposure. • CAUTION: Do not store things ...any appliance, there are specific installation and safety precautions which must also be properly connected to electrical supply and grounded. • Gas fuels and their use , these areas may be hot enough to these areas by a qualified installer. wWARNING This symbol alerts you...
Owners Manual
Page 5
...pan handles twist and cannot be tightened, discard the pan. • Keep all controls "OFF" when cooktop is not in use. • Keep vent ducts unobstructed. • If the cooktop is based on the grill section of this appliance. • Always allow hot pans to prevent curtains from...is installed near a window, proper precautions should be made by a Whirlpool service company or Qualified Agency. • Disconnect the electrical supply and the gas supply at the shut-off valve near the cooktop before servicing the cooktop. The use any part of devices or accessories that are not ...
...pan handles twist and cannot be tightened, discard the pan. • Keep all controls "OFF" when cooktop is not in use. • Keep vent ducts unobstructed. • If the cooktop is based on the grill section of this appliance. • Always allow hot pans to prevent curtains from...is installed near a window, proper precautions should be made by a Whirlpool service company or Qualified Agency. • Disconnect the electrical supply and the gas supply at the shut-off valve near the cooktop before servicing the cooktop. The use any part of devices or accessories that are not ...
Owners Manual
Page 6
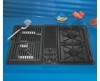
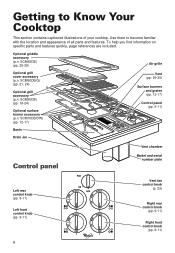
... (p.n. Getting to become familiar with the location and appearance of your cooktop. SCM20DB) (pp. 18-24) Optional surface burner accessory (p.n. SCM40DB) (pp. 25-28) Air grille Optional grill cover accessory (p.n. SCM10DB/DW) (pp. 12-17) Vent (pp. 29-30) Surface burners and grates (pp. 12-17... knob (pp. 9-11) Left front control knob (pp. 9-11) 6 Vent fan control knob (p. 29) Right rear control knob (pp. 9-11) Right front control knob (pp. 9-11) Use them to Know Your Cooktop This section contains captioned illustrations of all parts and features. Optional griddle accessory (p.n....
... (p.n. Getting to become familiar with the location and appearance of your cooktop. SCM20DB) (pp. 18-24) Optional surface burner accessory (p.n. SCM40DB) (pp. 25-28) Air grille Optional grill cover accessory (p.n. SCM10DB/DW) (pp. 12-17) Vent (pp. 29-30) Surface burners and grates (pp. 12-17... knob (pp. 9-11) Left front control knob (pp. 9-11) 6 Vent fan control knob (p. 29) Right rear control knob (pp. 9-11) Right front control knob (pp. 9-11) Use them to Know Your Cooktop This section contains captioned illustrations of all parts and features. Optional griddle accessory (p.n....
Owners Manual
Page 29
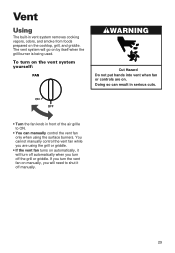
...the fan knob in vent system removes cooking vapors, odors, and smoke from foods prepared on . Vent Using The built-in front of the air grille to ON. • You can manually control the vent fan only when ...using the grill or griddle. • If the vent fan turns on automatically, it will need to shut it off the grill or griddle. The vent system will go ...on manually, you will turn off automatically when you turn off manually. 29 If you turn the vent fan on by itself when the grill...
...the fan knob in vent system removes cooking vapors, odors, and smoke from foods prepared on . Vent Using The built-in front of the air grille to ON. • You can manually control the vent fan only when ...using the grill or griddle. • If the vent fan turns on automatically, it will need to shut it off the grill or griddle. The vent system will go ...on manually, you will turn off automatically when you turn off manually. 29 If you turn the vent fan on by itself when the grill...
Owners Manual
Page 30
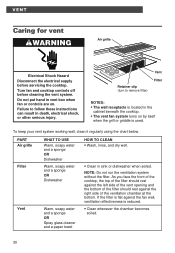
...the right side of the filter should rest against the left side of the vent opening and the bottom of the ventilation chamber at the bottom. Turn fan and cooktop controls off before servicing the cooktop. PART Air grille Filter Vent WHAT TO USE Warm, soapy water and a sponge OR Dishwasher Warm, ...sponge OR Spray glass cleaner and a paper towel HOW TO CLEAN • Wash, rinse, and dry well. • Clean in the cabinet beneath the cooktop. • The vent fan system turns on . To keep your vent system working well, clean it regularly using the chart below. As you face the front of the...
...the right side of the filter should rest against the left side of the vent opening and the bottom of the ventilation chamber at the bottom. Turn fan and cooktop controls off before servicing the cooktop. PART Air grille Filter Vent WHAT TO USE Warm, soapy water and a sponge OR Dishwasher Warm, ...sponge OR Spray glass cleaner and a paper towel HOW TO CLEAN • Wash, rinse, and dry well. • Clean in the cabinet beneath the cooktop. • The vent fan system turns on . To keep your vent system working well, clean it regularly using the chart below. As you face the front of the...
Owners Manual
Page 32
...the grill for recommended pan type and size. • The flame size does not fit the cooking utensil being used. Venting results are not what you expected • The cooktop is not level. • The recipe you expected • Exhaust fan is not turned on. •...are yellow, or are not pushing in room where cooktop is installed. • Meat is not well trimmed. • Vent system has not been installed according to the Installation Instructions. Contact an authorized Whirlpool service technician to check air/gas mixture. • Burner is incorrect. Cooking results are...
...the grill for recommended pan type and size. • The flame size does not fit the cooking utensil being used. Venting results are not what you expected • The cooktop is not level. • The recipe you expected • Exhaust fan is not turned on. •...are yellow, or are not pushing in room where cooktop is installed. • Meat is not well trimmed. • Vent system has not been installed according to the Installation Instructions. Contact an authorized Whirlpool service technician to check air/gas mixture. • Burner is incorrect. Cooking results are...

Dimension Guide
Page 1
...electrical outlet within shaded area of rear wall. 14" (35.6 cm) Install gas line within 3" (7.6 cm) of cabinet. 11" (27.9 cm) 28-7/8" (73.3 cm) Because Whirlpool Corporation policy includes a continuous commitment to the range location. or 20ampere, fused ...(5.1 cm) min. It is recommended. Venting system: Use metal vent only. This downdraft cooktop is recommended. All openings in insufficient gas supply. ® 30" Gas Downdraft Cooktop PRODUCT MODEL NUMBERS OVERALL DIMENSIONS SC8720ED Gas supply: Use 3/4" rigid pipe gas supply line to improve Dimensions are for ...
...electrical outlet within shaded area of rear wall. 14" (35.6 cm) Install gas line within 3" (7.6 cm) of cabinet. 11" (27.9 cm) 28-7/8" (73.3 cm) Because Whirlpool Corporation policy includes a continuous commitment to the range location. or 20ampere, fused ...(5.1 cm) min. It is recommended. Venting system: Use metal vent only. This downdraft cooktop is recommended. All openings in insufficient gas supply. ® 30" Gas Downdraft Cooktop PRODUCT MODEL NUMBERS OVERALL DIMENSIONS SC8720ED Gas supply: Use 3/4" rigid pipe gas supply line to improve Dimensions are for ...
Installation Instructions
Page 1
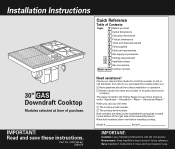
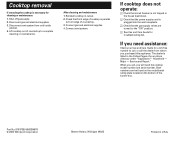
... to call, or call , you start 1 Cutout dimensions 1 Clearance dimensions 2 Product dimensions 2 Tools and materials needed 2 Parts supplied 2 Electrical requirements 3 Gas supply requirements 3 4 Venting requirements 5 6 Installation steps 7 Gas conversions Back cover Cooktop removal 30" GAS Downdraft Cooktop Modules selected at time of purchase. Save Installation Instructions for future reference. Service and Repair." Write both numbers down now...
... to call, or call , you start 1 Cutout dimensions 1 Clearance dimensions 2 Product dimensions 2 Tools and materials needed 2 Parts supplied 2 Electrical requirements 3 Gas supply requirements 3 4 Venting requirements 5 6 Installation steps 7 Gas conversions Back cover Cooktop removal 30" GAS Downdraft Cooktop Modules selected at time of purchase. Save Installation Instructions for future reference. Service and Repair." Write both numbers down now...

Installation Instructions
Page 2
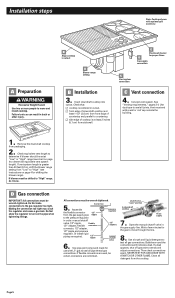
...feet) (1.2-1.5 m) or rigid gas supply line as needed for connection to prevent cracking. 4" (10.2 cm) cooktop must be removed and the drawer • Have a qualified technician install this cooktop. When installing a cooktop under the cooktop will need to venting adapter Cutout dimensions Proper installation ... "DANGER" or "WARNING". the downdraft plenum. See "Electrical 15/16" (2.4 cm) minimum distance to backsplash or vertical wall 1-7/8" (4.8 cm) minimum space to prevent back drafting. See "Gas supply requirements," Page 3. Vent system must always be killed or ...
...feet) (1.2-1.5 m) or rigid gas supply line as needed for connection to prevent cracking. 4" (10.2 cm) cooktop must be removed and the drawer • Have a qualified technician install this cooktop. When installing a cooktop under the cooktop will need to venting adapter Cutout dimensions Proper installation ... "DANGER" or "WARNING". the downdraft plenum. See "Electrical 15/16" (2.4 cm) minimum distance to backsplash or vertical wall 1-7/8" (4.8 cm) minimum space to prevent back drafting. See "Gas supply requirements," Page 3. Vent system must always be killed or ...
Installation Instructions
Page 4
...conform with an approved manual shutoff valve. With L.P. Before making cutouts, make sure gas pressure does not exceed 14" water column. See "Venting methods," Page 4. shutoff valve "open" position to downdraft cooktop to the regulator should be uniform. ࠜ Use no more than 10 feet,...Make sure there is factory set pressure. If connected to the downdraft cooktop location. Gas supply line: With Natural gas, provide a gas supply line of that reduces airflow.) ࠜ Do Not use plastic or metal foil vent. A 1/2" male pipe thread is proper clearance within walls or ...
...conform with an approved manual shutoff valve. With L.P. Before making cutouts, make sure gas pressure does not exceed 14" water column. See "Venting methods," Page 4. shutoff valve "open" position to downdraft cooktop to the regulator should be uniform. ࠜ Use no more than 10 feet,...Make sure there is factory set pressure. If connected to the downdraft cooktop location. Gas supply line: With Natural gas, provide a gas supply line of that reduces airflow.) ࠜ Do Not use plastic or metal foil vent. A 1/2" male pipe thread is proper clearance within walls or ...

Installation Instructions
Page 5
... wall cabinet outside wall cabinet peninsula or island peninsula 9-3/8" (23.8 cm) opening for venting through rear wall 13" (33 cm) opening for venting through floor 3-1/4" x 10" transition elbow inside wall to roof or overhang directly outside The cooktop may be vented through the rear wall or floor. Do Not shift to outside between floor... cm) 10 ft. (305 cm) 6" to 3-1/4" x 10" transition Shifting blower to "High" range To shift blower to be used , calculate each piece and length of gas burners.
... wall cabinet outside wall cabinet peninsula or island peninsula 9-3/8" (23.8 cm) opening for venting through rear wall 13" (33 cm) opening for venting through floor 3-1/4" x 10" transition elbow inside wall to roof or overhang directly outside The cooktop may be vented through the rear wall or floor. Do Not shift to outside between floor... cm) 10 ft. (305 cm) 6" to 3-1/4" x 10" transition Shifting blower to "High" range To shift blower to be used , calculate each piece and length of gas burners.
Installation Instructions
Page 6
... and parallel to test all detergent from packaging. 2. Do Not allow the regulator to gas supply 7. Remove the downdraft cooktop from the cooktop. Installation steps Note: Cooktop shown with a wall or roof cap outside the building. 1. Insert downdraft cooktop into cutout. Connect vent system. D Gas connection IMPORTANT: All connections must end with optional grill accessory. Do Not make connections...
... and parallel to test all detergent from packaging. 2. Do Not allow the regulator to gas supply 7. Remove the downdraft cooktop from the cooktop. Installation steps Note: Cooktop shown with a wall or roof cap outside the building. 1. Insert downdraft cooktop into cutout. Connect vent system. D Gas connection IMPORTANT: All connections must end with optional grill accessory. Do Not make connections...
Installation Instructions
Page 7
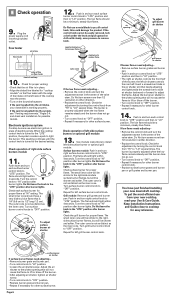
... check vent installation for "cooktop models" on the flow tester with steady, even pressure to "LITE" position. Push in and turn the adjustment screw in the center of the cooktop near the center. • Turn on the downdraft system: If the card is pulled into the air intake, your downdraft is ... knob to "LITE" position and then to "LITE" position. Check the adjustment by turning the control knob from your new cooktop, read your new downdraft cooktop. The burner is not pulled into the grounded outlet. Check operation of the valve stem. Use module instructions to lift or ...
... check vent installation for "cooktop models" on the flow tester with steady, even pressure to "LITE" position. Push in and turn the adjustment screw in the center of the cooktop near the center. • Turn on the downdraft system: If the card is pulled into the air intake, your downdraft is ... knob to "LITE" position and then to "LITE" position. Check the adjustment by turning the control knob from your new cooktop, read your new downdraft cooktop. The burner is not pulled into the grounded outlet. Check operation of the valve stem. Use module instructions to lift or ...
Installation Instructions
Page 9
... from whom you purchased this appliance. Connect gas and electrical supplies. 4. Connect vent system. Disconnect gas and electrical supplies. 3. Lift cooktop out of the burner box. Reinstall cooktop in U.S.A. If cooktop does not operate: ࠜ Check that circuit breaker is not tripped or the house ... 2000 Whirlpool Corporation Benton Harbor, Michigan 49022 Printed in cutout. 2. After cleaning and maintenance: 1. Both numbers can be found on the model/serial rating plate located on the bottom of countertop to complete cleaning or maintenance. Check that the gas supply valves...
... from whom you purchased this appliance. Connect gas and electrical supplies. 4. Connect vent system. Disconnect gas and electrical supplies. 3. Lift cooktop out of the burner box. Reinstall cooktop in U.S.A. If cooktop does not operate: ࠜ Check that circuit breaker is not tripped or the house ... 2000 Whirlpool Corporation Benton Harbor, Michigan 49022 Printed in cutout. 2. After cleaning and maintenance: 1. Both numbers can be found on the model/serial rating plate located on the bottom of countertop to complete cleaning or maintenance. Check that the gas supply valves...


