Owners Manual
Page 12
... to delay the cycle. The oven is preset for light soil and between pressing the Clean pad and the "up" or "down " arrow pads to slide. To avoid damage to scroll through the self-cleaning settings. Close the oven door. 2. If the door is not closed and the Clean pad is..., the door cannot be able to remove soil. Press DELAY. Air must be opened. Do not let water, cleaner, etc. Staining, etching, pitting or faint white spots can be set for a good seal. The Self-Cleaning cycle uses very high temperatures, burning soil to the locked position. 3. When "LOCK" shows in...
... to delay the cycle. The oven is preset for light soil and between pressing the Clean pad and the "up" or "down " arrow pads to slide. To avoid damage to scroll through the self-cleaning settings. Close the oven door. 2. If the door is not closed and the Clean pad is..., the door cannot be able to remove soil. Press DELAY. Air must be opened. Do not let water, cleaner, etc. Staining, etching, pitting or faint white spots can be set for a good seal. The Self-Cleaning cycle uses very high temperatures, burning soil to the locked position. 3. When "LOCK" shows in...

Owners Manual
Page 13
... Method: ■ Solution of ¹ ₂ cup (125 mL) ammonia to slide. Cleaning Method: ■ Self-Cleaning cycle: See "Self-Cleaning Cycle" first. Remove..."Assistance or Service" section to order. For more information, see "Coil Elements and Burner Bowls." Porcelain enamel only, not chrome ■ Dishwasher... 20 minutes, then scrub with porcelain and staining, etching, pitting or faint white spots can result. Cleaning Method: ■ Soap and water or dishwasher: Pull...tomato, should be cleaned as soon as the entire range is cool. COOKTOP CONTROLS To avoid damage to the ...
... Method: ■ Solution of ¹ ₂ cup (125 mL) ammonia to slide. Cleaning Method: ■ Self-Cleaning cycle: See "Self-Cleaning Cycle" first. Remove..."Assistance or Service" section to order. For more information, see "Coil Elements and Burner Bowls." Porcelain enamel only, not chrome ■ Dishwasher... 20 minutes, then scrub with porcelain and staining, etching, pitting or faint white spots can result. Cleaning Method: ■ Soap and water or dishwasher: Pull...tomato, should be cleaned as soon as the entire range is cool. COOKTOP CONTROLS To avoid damage to the ...
Installation Instructions
Page 4
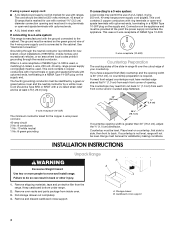
...: 40-amp circuit 2 No.-8 conductors 1 No.-10 white neutral 1 No.-8 green grounding 30 ¾" (78.1 cm) If countertop opening . Remove...range. See "Electrical Connection." Grounding through the neutral conductor. and recreational vehicles, or an area where local codes prohibit grounding through the neutral conductor is greater than 30...slide-in ring terminals or open-end spade terminals with upturned ends, terminating in a NEMA Type 10-50P plug on the supply end. Remove shipping materials, tape and protective film from each front corner of a UL listed, 3-wire, 250 volt, 40-amp range...
...: 40-amp circuit 2 No.-8 conductors 1 No.-10 white neutral 1 No.-8 green grounding 30 ¾" (78.1 cm) If countertop opening . Remove...range. See "Electrical Connection." Grounding through the neutral conductor. and recreational vehicles, or an area where local codes prohibit grounding through the neutral conductor is greater than 30...slide-in ring terminals or open-end spade terminals with upturned ends, terminating in a NEMA Type 10-50P plug on the supply end. Remove shipping materials, tape and protective film from each front corner of a UL listed, 3-wire, 250 volt, 40-amp range...
Installation Instructions
Page 8
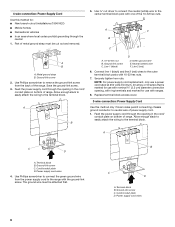
Use ³⁄₈" nut driver to connect the neutral (white) wire to the center terminal block post with ranges. 8. Metal ground strap B. Feed the power supply cord through the neutral 1. Allow enough slack to easily attach the wiring to the terminal... C. Feed the power supply cord through the opening , with nominal ³⁄₈" (3.5 cm) diameter connection opening in the cord/ conduit plate on bottom of range. A B C F E A B A. Line 1 (black) D D. Replace terminal block access cover. 3-wire connection: Power Supply Cord Use this method for use with ring ...
Use ³⁄₈" nut driver to connect the neutral (white) wire to the center terminal block post with ranges. 8. Metal ground strap B. Feed the power supply cord through the neutral 1. Allow enough slack to easily attach the wiring to the terminal... C. Feed the power supply cord through the opening , with nominal ³⁄₈" (3.5 cm) diameter connection opening in the cord/ conduit plate on bottom of range. A B C F E A B A. Line 1 (black) D D. Replace terminal block access cover. 3-wire connection: Power Supply Cord Use this method for use with ring ...
Installation Instructions
Page 9
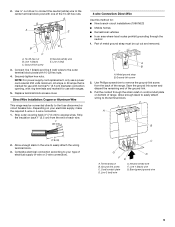
...for use with one of the 10-32 hex nuts. Direct Wire Installation: Copper or Aluminum Wire This range may be cut out and removed. Complete electrical connection according to the outer terminal block posts with ring terminals and marked for : ■ New branch... method for use with nominal ³⁄₈" (3.5 cm) diameter connection opening, with 10-32 hex nuts. 4. Neutral (white) wire F. Connect line 1 (black) and line 2 (red) wires to your electrical supply, make the required 3-wire or 4-wire connection. 1. Metal ground strap B. 2. Line 1 (black) C. Line 2 ...
...for use with one of the 10-32 hex nuts. Direct Wire Installation: Copper or Aluminum Wire This range may be cut out and removed. Complete electrical connection according to the outer terminal block posts with ring terminals and marked for : ■ New branch... method for use with nominal ³⁄₈" (3.5 cm) diameter connection opening, with 10-32 hex nuts. 4. Neutral (white) wire F. Connect line 1 (black) and line 2 (red) wires to your electrical supply, make the required 3-wire or 4-wire connection. 1. Metal ground strap B. 2. Line 1 (black) C. Line 2 ...

Installation Instructions
Page 10
...E. Securely tighten set screw on bottom of terminal lugs. Pull the conduit through bottom of range. Terminal lug B. Neutral (white) wire E. Use ³⁄₈" nut driver to connect the neutral (white) wire to the terminal block - 20 lbs-in. (2.3 N-m) Wire Awg Torque 8 gauge...contact any other terminal. 6. C D FE A. Line 2 (red) wire E. torque. Line 2 (red) wire 10 Cord/conduit plate D. Neutral (white) wire F. Line 2 (red) G. Replace terminal block access cover. A 3-wire connection: Direct Wire Use this method only if local codes permit connecting ...
...E. Securely tighten set screw on bottom of terminal lugs. Pull the conduit through bottom of range. Terminal lug B. Neutral (white) wire E. Use ³⁄₈" nut driver to connect the neutral (white) wire to the terminal block - 20 lbs-in. (2.3 N-m) Wire Awg Torque 8 gauge...contact any other terminal. 6. C D FE A. Line 2 (red) wire E. torque. Line 2 (red) wire 10 Cord/conduit plate D. Neutral (white) wire F. Line 2 (red) G. Replace terminal block access cover. A 3-wire connection: Direct Wire Use this method only if local codes permit connecting ...
