
Owners Manual
Page 3
...anti-tip bracket fastened down properly. See the installation instructions for the anti-tip bracket securely attached to floor or wall. • Slide range back so rear range foot is under anti-tip bracket. This appliance can result in this manual and on your appliance. The California Safe Drinking Water ... Anti-Tip Bracket Making sure the anti-tip bracket is , tell you what the potential hazard is installed: • Slide range forward. • Look for details. We have provided many important safety messages in death or serious burns to reduce the chance of ...
...anti-tip bracket fastened down properly. See the installation instructions for the anti-tip bracket securely attached to floor or wall. • Slide range back so rear range foot is under anti-tip bracket. This appliance can result in this manual and on your appliance. The California Safe Drinking Water ... Anti-Tip Bracket Making sure the anti-tip bracket is , tell you what the potential hazard is installed: • Slide range forward. • Look for details. We have provided many important safety messages in death or serious burns to reduce the chance of ...
Owners Manual
Page 4
... be hot even though they have had sufficient time to cool. Build-up of pressure may penetrate the broken cooktop and create a risk of electric shock. Always place oven racks in the manual. Heating elements may result in or on Broken Cooktop - Do not use , do not let...Be Turned Inward and Not Extend Over Adjacent Surface Units - TO CHECK IF THE DEVICES ARE INSTALLED PROPERLY, SLIDE RANGE FORWARD, LOOK FOR ANTI-TIP BRACKET SECURELY ATTACHED TO FLOOR OR WALL, AND SLIDE RANGE BACK SO REAR RANGE FOOT IS UNDER ANTI-TIP BRACKET. ■ CAUTION: Do not store items of the...
... be hot even though they have had sufficient time to cool. Build-up of pressure may penetrate the broken cooktop and create a risk of electric shock. Always place oven racks in the manual. Heating elements may result in or on Broken Cooktop - Do not use , do not let...Be Turned Inward and Not Extend Over Adjacent Surface Units - TO CHECK IF THE DEVICES ARE INSTALLED PROPERLY, SLIDE RANGE FORWARD, LOOK FOR ANTI-TIP BRACKET SECURELY ATTACHED TO FLOOR OR WALL, AND SLIDE RANGE BACK SO REAR RANGE FOOT IS UNDER ANTI-TIP BRACKET. ■ CAUTION: Do not store items of the...

Owners Manual
Page 13
...and elements are suggested first unless otherwise noted. For more information, see "Coil Elements and Burner Bowls." Cleaning Method: ■ Self-Cleaning cycle: See "Self-Cleaning Cycle" first. Remove racks, or they will help them slide. ■ Steel-wool pad BROILER PAN AND GRID Do not clean in ...water. EXTERIOR PORCELAIN ENAMEL SURFACES Food spills containing acids, such as vinegar and tomato, should be cleaned as soon as the entire range is cool. When replacing knobs, make...
...and elements are suggested first unless otherwise noted. For more information, see "Coil Elements and Burner Bowls." Cleaning Method: ■ Self-Cleaning cycle: See "Self-Cleaning Cycle" first. Remove racks, or they will help them slide. ■ Steel-wool pad BROILER PAN AND GRID Do not clean in ...water. EXTERIOR PORCELAIN ENAMEL SURFACES Food spills containing acids, such as vinegar and tomato, should be cleaned as soon as the entire range is cool. When replacing knobs, make...

Owners Manual
Page 14
...? For more than 1" (2.5 cm) outside the cooking area. Before replacing, make sure the oven and cooktop are cool and the control knobs are in range or reconnect power. Slide the door down on cooktop ■ Is the cookware the proper size? Grasp door at each side. Use cookware about 4" (10.0 cm). 2. Lift...
...? For more than 1" (2.5 cm) outside the cooking area. Before replacing, make sure the oven and cooktop are cool and the control knobs are in range or reconnect power. Slide the door down on cooktop ■ Is the cookware the proper size? Grasp door at each side. Use cookware about 4" (10.0 cm). 2. Lift...

Owners Manual
Page 15
...any questions or concerns at: Whirlpool Brand Home Appliances Customer eXperience Center 553 Benson Road Benton Harbor, MI 49022-2692 Please include a daytime phone number in use only FSP® replacement parts. See "Oven Temperature Control" section. ■ On slide-in models, does the ...in your telephone directory Yellow Pages. For further assistance If you need help us or your nearest Whirlpool designated service center. See "Assistance or Service" section. Level the range. Move rack to higher position in the display? To locate FSP® replacement parts in your ...
...any questions or concerns at: Whirlpool Brand Home Appliances Customer eXperience Center 553 Benson Road Benton Harbor, MI 49022-2692 Please include a daytime phone number in use only FSP® replacement parts. See "Oven Temperature Control" section. ■ On slide-in models, does the ...in your telephone directory Yellow Pages. For further assistance If you need help us or your nearest Whirlpool designated service center. See "Assistance or Service" section. Level the range. Move rack to higher position in the display? To locate FSP® replacement parts in your ...
Dimension Guide
Page 1
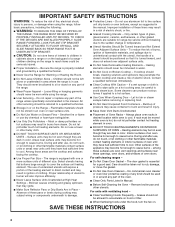
...) opening width F. from either cabinet, 10" (25.4 cm) max. ® Slide-In Electric Range PRODUCT MODEL NUMBERS RY160LXT OVERALL DIMENSIONS Electrical: When a 4-wire or 3-wire, single phase A 120/240 volt, 60 Hz, AC only electrical supply is available (or, if specified on both sides of cooktop E** *Range can extend more than 1/4" (0.64 cm) flame retardant (0.64 cm...
...) opening width F. from either cabinet, 10" (25.4 cm) max. ® Slide-In Electric Range PRODUCT MODEL NUMBERS RY160LXT OVERALL DIMENSIONS Electrical: When a 4-wire or 3-wire, single phase A 120/240 volt, 60 Hz, AC only electrical supply is available (or, if specified on both sides of cooktop E** *Range can extend more than 1/4" (0.64 cm) flame retardant (0.64 cm...

Installation Instructions
Page 1
... "DANGER" or "WARNING." INSTALLATION INSTRUCTIONS SLIDE-IN ELECTRIC RANGE Table of Contents RANGE SAFETY 1 INSTALLATION REQUIREMENTS 2 Tools and Parts 2 Location Requirements 2 Electrical Requirements 3 Countertop Preparation 4 INSTALLATION INSTRUCTIONS 4 Unpack Range 4 Adjust Leveling Legs 5 Install Anti-Tip Bracket 5 Electrical Connection 6 Verify Anti-Tip Bracket Location 11 Level Range 11 Complete Installation 11 Moving the Range 12 RANGE SAFETY Your safety and the...
... "DANGER" or "WARNING." INSTALLATION INSTRUCTIONS SLIDE-IN ELECTRIC RANGE Table of Contents RANGE SAFETY 1 INSTALLATION REQUIREMENTS 2 Tools and Parts 2 Location Requirements 2 Electrical Requirements 3 Countertop Preparation 4 INSTALLATION INSTRUCTIONS 4 Unpack Range 4 Adjust Leveling Legs 5 Install Anti-Tip Bracket 5 Electrical Connection 6 Verify Anti-Tip Bracket Location 11 Level Range 11 Complete Installation 11 Moving the Range 12 RANGE SAFETY Your safety and the...

Installation Instructions
Page 3
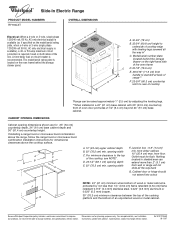
...G A. 13" (33 cm) upper cabinet depth B. 30" (76.2 cm) min. For minimum clearance to the fused disconnect (or circuit breaker box) through the neutral, use an extension cord. G. Check with the National Electrical Code, ANSI/ NFPA 70-latest edition and all the way back. See "Electrical Connection." ■ Allow 2 to 3 ft (61.0... ■ The wiring diagram is located on both sides of the power supply cable (at the range and at 250 volts, 40 amps and investigated for it will not slide all local codes and ordinances. Do not use a 4-wire power supply cord rated at the junction...
...G A. 13" (33 cm) upper cabinet depth B. 30" (76.2 cm) min. For minimum clearance to the fused disconnect (or circuit breaker box) through the neutral, use an extension cord. G. Check with the National Electrical Code, ANSI/ NFPA 70-latest edition and all the way back. See "Electrical Connection." ■ Allow 2 to 3 ft (61.0... ■ The wiring diagram is located on both sides of the power supply cable (at the range and at 250 volts, 40 amps and investigated for it will not slide all local codes and ordinances. Do not use a 4-wire power supply cord rated at the junction...
Installation Instructions
Page 4
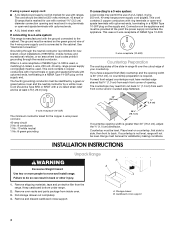
... NEMA Type 10-50R. 3-wire receptacle (10-50R) Countertop Preparation The cooktop sides of the slide-in range fit over the cutout edge of a UL listed, 3-wire, 250 volt, 40-amp range power supply cord (pigtail). Countertop must be rated at 250 volts minimum, 40 amps or 50... ³⁄₈" (1.0 cm) from each front corner of opening width is 30" (76.2 cm), no countertop preparation is prohibited for new branch-circuit installations (1996 NEC); Storage drawer B. See "Electrical Connection." and recreational vehicles, or an area where local codes prohibit grounding through the...
... NEMA Type 10-50R. 3-wire receptacle (10-50R) Countertop Preparation The cooktop sides of the slide-in range fit over the cutout edge of a UL listed, 3-wire, 250 volt, 40-amp range power supply cord (pigtail). Countertop must be rated at 250 volts minimum, 40 amps or 50... ³⁄₈" (1.0 cm) from each front corner of opening width is 30" (76.2 cm), no countertop preparation is prohibited for new branch-circuit installations (1996 NEC); Storage drawer B. See "Electrical Connection." and recreational vehicles, or an area where local codes prohibit grounding through the...
Installation Instructions
Page 5
...screws B. Adjust the leveling legs to loosen the leveling legs. 9. Place them lengthwise on the floor behind the range to add up onto cardboard or hardboard. Before sliding range into a standing position, put a sheet of cardboard or hardboard in front of the cutout space. Anti-tip bracket... 5. Place cardboard or hardboard in front of another. When the range is moved. Using the Phillips screwdriver, ...
...screws B. Adjust the leveling legs to loosen the leveling legs. 9. Place them lengthwise on the floor behind the range to add up onto cardboard or hardboard. Before sliding range into a standing position, put a sheet of cardboard or hardboard in front of the cutout space. Anti-tip bracket... 5. Place cardboard or hardboard in front of another. When the range is moved. Using the Phillips screwdriver, ...
Installation Instructions
Page 7
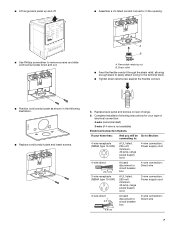
...Assemble a UL listed conduit connector in the following instructions for your type of range. 6. A B A. Replace back panel and screws on rear of electrical connection: 4-wire (recommended) 3-wire (if 4-wire is not available) Electrical Connection Options If your home has: And you will be Go to Section: ...connecting to remove screws and slide cord/conduit plate down and out. Complete installation ...
...Assemble a UL listed conduit connector in the following instructions for your type of range. 6. A B A. Replace back panel and screws on rear of electrical connection: 4-wire (recommended) 3-wire (if 4-wire is not available) Electrical Connection Options If your home has: And you will be Go to Section: ...connecting to remove screws and slide cord/conduit plate down and out. Complete installation ...
Installation Instructions
Page 11
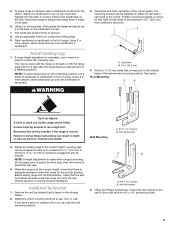
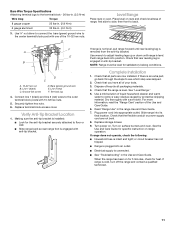
.... 5. Use wrench to see which step was skipped. 2. or circuit breaker has not tripped. ■ Range is plugged into appropriate outlet. Plug power cord into an outlet. ■ Electrical supply is intact and tight; Use ³⁄₈" nut driver to connect the bare (green) ground ...35 lbs-in the Use and Care Guide. Check that rear leveling leg is level. Turn on range operation. Bare Wire Torque Specifications Attaching terminal lugs to floor or wall. ■ Slide range back so rear range foot is engaged with one of the 10-32 hex nuts. Bare (green) ground wire E....
.... 5. Use wrench to see which step was skipped. 2. or circuit breaker has not tripped. ■ Range is plugged into appropriate outlet. Plug power cord into an outlet. ■ Electrical supply is intact and tight; Use ³⁄₈" nut driver to connect the bare (green) ground ...35 lbs-in the Use and Care Guide. Check that rear leveling leg is level. Turn on range operation. Bare Wire Torque Specifications Attaching terminal lugs to floor or wall. ■ Slide range back so rear range foot is engaged with one of the 10-32 hex nuts. Bare (green) ground wire E....

Installation Instructions
Page 12
... anti-tip bracket securely attached to floor or wall. ■ Slide range back so rear range foot is under anti-tip bracket. 4. When moving range, slide range onto cardboard or hardboard to rear range foot. Slide range forward to complete cleaning or maintenance. 4. Check that range is moved. Disconnect power. 2. Electrical Shock Hazard Disconnect power before operating. Failure to children and...
... anti-tip bracket securely attached to floor or wall. ■ Slide range back so rear range foot is under anti-tip bracket. 4. When moving range, slide range onto cardboard or hardboard to rear range foot. Slide range forward to complete cleaning or maintenance. 4. Check that range is moved. Disconnect power. 2. Electrical Shock Hazard Disconnect power before operating. Failure to children and...


