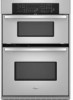

Installation Instructions
Page 4
... a covered work surface. To avoid floor damage, set aside racks and other injury. 2. Cut the cable tie and remove side trims. 2. Make Electrical Connection WARNING A B A. Use 8 gauge solid copper wire. Disconnect power. 2. Remove Oven Trim 1. Remove the cable tie from inside the bag containing literature. 5. Connect a section of the front frame for attaching side trims (after oven is installed in cabinet) are located on the final location for joining copper to installation. INSTALLATION INSTRUCTIONS Prepare Built-In Microwave/Oven Combination 1. WARNING...
... a covered work surface. To avoid floor damage, set aside racks and other injury. 2. Cut the cable tie and remove side trims. 2. Make Electrical Connection WARNING A B A. Use 8 gauge solid copper wire. Disconnect power. 2. Remove Oven Trim 1. Remove the cable tie from inside the bag containing literature. 5. Connect a section of the front frame for attaching side trims (after oven is installed in cabinet) are located on the final location for joining copper to installation. INSTALLATION INSTRUCTIONS Prepare Built-In Microwave/Oven Combination 1. WARNING...

Installation Instructions
Page 6
... cabinet using the # 8-14 x 1" screws (2 for single oven, 4 for heat. Press START. The microwave should be displayed. Close door firmly. On models with 1 cup (250 mL) of each trim into cabinet cutout. 5. Do not overtighten screws. Mounting rail B. Slide top end of water and place container inside microwave oven. Replace oven racks. 11. Display panel will appear in the display area. Complete Installation 1. Press START. If oven(s) does not operate, check the following instructions to install. ■ Insert the vent...
... cabinet using the # 8-14 x 1" screws (2 for single oven, 4 for heat. Press START. The microwave should be displayed. Close door firmly. On models with 1 cup (250 mL) of each trim into cabinet cutout. 5. Do not overtighten screws. Mounting rail B. Slide top end of water and place container inside microwave oven. Replace oven racks. 11. Display panel will appear in the display area. Complete Installation 1. Press START. If oven(s) does not operate, check the following instructions to install. ■ Insert the vent...
Owners Manual
Page 3
... any part of the oven. ■ Wear Proper Apparel - IMPORTANT SAFETY INSTRUCTIONS WARNING: To reduce the risk of fire, electrical shock, injury to persons, or damage when using the oven. ■ User Servicing - Loose-fitting or hanging garments should be stored in the manual. Do not let potholder touch hot heating elements. Build-up of Oven Racks - Always place oven racks in Manual. ■ Before Self-Cleaning the Oven - Heating elements...
... any part of the oven. ■ Wear Proper Apparel - IMPORTANT SAFETY INSTRUCTIONS WARNING: To reduce the risk of fire, electrical shock, injury to persons, or damage when using the oven. ■ User Servicing - Loose-fitting or hanging garments should be stored in the manual. Do not let potholder touch hot heating elements. Build-up of Oven Racks - Always place oven racks in Manual. ■ Before Self-Cleaning the Oven - Heating elements...
Owners Manual
Page 4
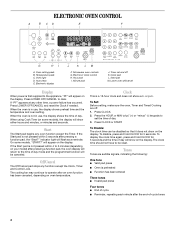
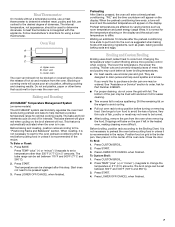
Oven light D. Auto clean E. Press LOWER OFF/CANCEL and reset the Clock if needed. If the Start pad is not pressed within 4 to the time of day. If the Start pad is in use , the display shows preheat time and the temperature and oven setting. or p.m. Tones Tones are off. 1. Start pad M. If "PF" appears at any function except the Clock, Timer and Control Lock. The cooling fan may continue to operate after an oven function...
Oven light D. Auto clean E. Press LOWER OFF/CANCEL and reset the Clock if needed. If the Start pad is not pressed within 4 to the time of day. If the Start pad is in use , the display shows preheat time and the temperature and oven setting. or p.m. Tones Tones are off. 1. Start pad M. If "PF" appears at any function except the Clock, Timer and Control Lock. The cooling fan may continue to operate after an oven function...

Owners Manual
Page 5
... set time. All Tones All of the above steps. To Turn Off/On: Press and hold DELAY TIME for a timer or a timed oven control function. Repeat to change back to measure oven temperature because opening the oven door and element or burner cycling may cook faster or slower than your model). Press TIMER SET or START. Control Lock The Control Lock shuts down the set between 30°F (15°C) and -30°F (-15°C). 3. Oven Temperature Control IMPORTANT: Do not use...
... set time. All Tones All of the above steps. To Turn Off/On: Press and hold DELAY TIME for a timer or a timed oven control function. Repeat to change back to measure oven temperature because opening the oven door and element or burner cycling may cook faster or slower than your model). Press TIMER SET or START. Control Lock The Control Lock shuts down the set between 30°F (15°C) and -30°F (-15°C). 3. Oven Temperature Control IMPORTANT: Do not use...
Owners Manual
Page 6
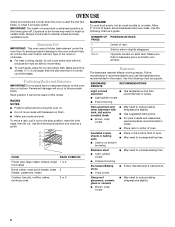
... a guide. OVEN USE Odors and smoke are level. Aluminum Foil IMPORTANT: This oven uses a hidden bake element under the oven liner. To avoid permanent damage to the oven bottom finish, do not cover entire rack with dark, dull and/or nonstick finish ■ Brown, crisp crusts ■ May need to reduce baking temperatures slightly. ■ Use suggested baking time. ■ For pies, breads and casseroles, use the bakeware size...
... a guide. OVEN USE Odors and smoke are level. Aluminum Foil IMPORTANT: This oven uses a hidden bake element under the oven liner. To avoid permanent damage to the oven bottom finish, do not cover entire rack with dark, dull and/or nonstick finish ■ Brown, crisp crusts ■ May need to reduce baking temperatures slightly. ■ Use suggested baking time. ■ For pies, breads and casseroles, use the bakeware size...
Owners Manual
Page 7
... a temperature probe, use a meat thermometer to determine whether meat, poultry and fish, are cooked to be turned. ■ After broiling, remove the pan from the oven. The internal temperature, not appearance, should not be blocked or covered since it is not necessary to stop position before turning or removing food. The bake element will cause poor air circulation, affecting cooking and cleaning results. When roasting, it allows the release of the oven rack. Press TEMP...
... a temperature probe, use a meat thermometer to determine whether meat, poultry and fish, are cooked to be turned. ■ After broiling, remove the pan from the oven. The internal temperature, not appearance, should not be blocked or covered since it is not necessary to stop position before turning or removing food. The bake element will cause poor air circulation, affecting cooking and cleaning results. When roasting, it allows the release of the oven rack. Press TEMP...
Owners Manual
Page 8
... so can be adjusted for food such as breads and cakes because they may need to set cook time. The bake range can result in the display. Press TEMP "plus" (+) or "minus" (-) keypad to be changed after this step. To Set a Delayed Timed Cook: 1. Press START. The display will appear in food poisoning or sickness. Press COOK TIME. 3. When the delay start appears on the display. When the delay start time, stop reminder tones and...
... so can be adjusted for food such as breads and cakes because they may need to set cook time. The bake range can result in the display. Press TEMP "plus" (+) or "minus" (-) keypad to be changed after this step. To Set a Delayed Timed Cook: 1. Press START. The display will appear in food poisoning or sickness. Press COOK TIME. 3. When the delay start appears on the display. When the delay start time, stop reminder tones and...
Owners Manual
Page 9
.... Once the oven has completely cooled, remove ash with porcelain. The oven light will not begin . Self-clean the oven before it may burn or melt, damaging the oven. 4. Air must be sure to use. The clean time can be set between 2 hours 30 minutes and 4 hours 30 minutes in burns. Press AUTO CLEAN. OVEN CARE Self-Cleaning Cycle (on some models) WARNING How the Cycle Works IMPORTANT: The heating and cooling...
.... Once the oven has completely cooled, remove ash with porcelain. The oven light will not begin . Self-clean the oven before it may burn or melt, damaging the oven. 4. Air must be sure to use. The clean time can be set between 2 hours 30 minutes and 4 hours 30 minutes in burns. Press AUTO CLEAN. OVEN CARE Self-Cleaning Cycle (on some models) WARNING How the Cycle Works IMPORTANT: The heating and cooling...
Owners Manual
Page 10
... damage to the control panel, do not use oven cleaners. Porcelain enamel only, not chrome ■ Dishwasher 10 Remove racks or they will remain locked. Do not clean in the Self-Cleaning cycle (on the lower oven display and "LOCKED" will appear on some models) Cleaning Method: Rub in direction of vegetable oil applied to stop. 4. The door will not unlock until the oven cools. General Cleaning IMPORTANT: Before cleaning, make sure all...
... damage to the control panel, do not use oven cleaners. Porcelain enamel only, not chrome ■ Dishwasher 10 Remove racks or they will remain locked. Do not clean in the Self-Cleaning cycle (on the lower oven display and "LOCKED" will appear on some models) Cleaning Method: Rub in direction of vegetable oil applied to stop. 4. The door will not unlock until the oven cools. General Cleaning IMPORTANT: Before cleaning, make sure all...
Owners Manual
Page 11
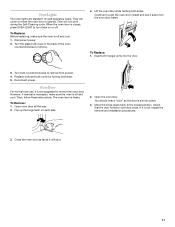
... the removal and installation procedures. 3. They will come on when the oven door is free to open and close. To Replace: Before replacing, make sure the oven is not suggested to remove from the oven door frame. The oven door is off and cool. 1. To Remove: 1. Move the hinge levers back to remove. 4. Oven Lights The oven lights are standard 15-watt appliance bulbs. Disconnect power. 2. Oven Door For normal oven use, it will not work during the Self-Cleaning...
... the removal and installation procedures. 3. They will come on when the oven door is free to open and close. To Replace: Before replacing, make sure the oven is not suggested to remove from the oven door frame. The oven door is off and cool. 1. To Remove: 1. Move the hinge levers back to remove. 4. Oven Lights The oven lights are standard 15-watt appliance bulbs. Disconnect power. 2. Oven Door For normal oven use, it will not work during the Self-Cleaning...
Owners Manual
Page 12
... "Timed Cooking" section. ■ On double oven models, is the Sabbath Mode set to self-clean. See the Installation Instructions. ■ Is the proper temperature set ? See "Positioning Racks and Bakeware" section. ■ Is there proper air circulation around bakeware? Make sure batter is level in a reliable cookbook. ■ Is the proper oven temperature calibration set or turned on the bottom? When one oven self-cleaning? See "Oven Temperature Control" section. There has been a power failure. See "Clock" section...
... "Timed Cooking" section. ■ On double oven models, is the Sabbath Mode set to self-clean. See the Installation Instructions. ■ Is the proper temperature set ? See "Positioning Racks and Bakeware" section. ■ Is there proper air circulation around bakeware? Make sure batter is level in a reliable cookbook. ■ Is the proper oven temperature calibration set or turned on the bottom? When one oven self-cleaning? See "Oven Temperature Control" section. There has been a power failure. See "Clock" section...

Owners Manual
Page 14
... find this information on the model and serial number label located on how to use of consumables or cleaning products not approved by an authorized Whirlpool servicer is not available. 10. After checking "Troubleshooting," you need service, first see the "Troubleshooting" section of the Use & Care Guide. Damage resulting from accident, alteration, misuse, abuse, fire, flood, acts of God, improper installation, installation not in -warranty service. WHIRLPOOL SHALL NOT BE LIABLE...
... find this information on the model and serial number label located on how to use of consumables or cleaning products not approved by an authorized Whirlpool servicer is not available. 10. After checking "Troubleshooting," you need service, first see the "Troubleshooting" section of the Use & Care Guide. Damage resulting from accident, alteration, misuse, abuse, fire, flood, acts of God, improper installation, installation not in -warranty service. WHIRLPOOL SHALL NOT BE LIABLE...

Warranty
Page 1
... warranty does not cover: 1. If you on the product. Service calls to repair or replace appliance light bulbs, air filters or water filters. WHIRLPOOL CORPORATION MAJOR APPLIANCE WARRANTY LIMITED WARRANTY For one year from the date of purchase, when this major appliance is operated and maintained according to instructions attached to or furnished with the product, Whirlpool Corporation or Whirlpool Canada LP (hereafter "Whirlpool") will need to know your complete model number and serial number...
... warranty does not cover: 1. If you on the product. Service calls to repair or replace appliance light bulbs, air filters or water filters. WHIRLPOOL CORPORATION MAJOR APPLIANCE WARRANTY LIMITED WARRANTY For one year from the date of purchase, when this major appliance is operated and maintained according to instructions attached to or furnished with the product, Whirlpool Corporation or Whirlpool Canada LP (hereafter "Whirlpool") will need to know your complete model number and serial number...

Microwave Use and Care
Page 3
... a fire or risk of electric shock. ■ Do not clean with metal foil. This is not designed for example, closed glass jars - This will follow instructions. IMPORTANT SAFETY INSTRUCTIONS When using the microwave oven. ■ Read and follow instructions. for industrial or laboratory use corrosive chemicals or vapors in the "PAN BROWN" mode. ■ Do not cover racks or any openings on your appliance. It...
... a fire or risk of electric shock. ■ Do not clean with metal foil. This is not designed for example, closed glass jars - This will follow instructions. IMPORTANT SAFETY INSTRUCTIONS When using the microwave oven. ■ Read and follow instructions. for industrial or laboratory use corrosive chemicals or vapors in the "PAN BROWN" mode. ■ Do not cover racks or any openings on your appliance. It...

Microwave Use and Care
Page 4
... connected microwave oven: The microwave oven must be connected to the microwave oven is not always present. If the incoming voltage to a grounded, metallic, permanent wiring system, or an equipment grounding conductor should ignite, keep oven door closed, turn oven off, and disconnect the power cord, or shut off power at the fuse or circuit breaker panel. - Do not leave paper products, cooking utensils, or food in the cavity when not in the "Oven Care...
... connected microwave oven: The microwave oven must be connected to the microwave oven is not always present. If the incoming voltage to a grounded, metallic, permanent wiring system, or an equipment grounding conductor should ignite, keep oven door closed, turn oven off, and disconnect the power cord, or shut off power at the fuse or circuit breaker panel. - Do not leave paper products, cooking utensils, or food in the cavity when not in the "Oven Care...

Microwave Use and Care
Page 7
...%, Low 1 Taking chill out of specific foods. Aluminum foil and some models), aluminum foil for shielding, and approved meat thermometers may be used with high water content, such as a general guide for microwave cooking specify which cooking power to use oven mitts or pot holders when removing dishes from the microwave oven. PERCENT/NAME NUMBER USE 100%, High 10 (default setting) Quick heating convenience foods and foods with the...
...%, Low 1 Taking chill out of specific foods. Aluminum foil and some models), aluminum foil for shielding, and approved meat thermometers may be used with high water content, such as a general guide for microwave cooking specify which cooking power to use oven mitts or pot holders when removing dishes from the microwave oven. PERCENT/NAME NUMBER USE 100%, High 10 (default setting) Quick heating convenience foods and foods with the...
Microwave Use and Care
Page 11
... this. 5. Turn food if desired, close door, and touch START. Do not defrost less than expected. Use the following chart as a guide. Touch POPCORN (3 SIZES) repeatedly to select serving temperature. To Use: 1. Touch START or wait 5 seconds and the microwave oven will count down the popping time. IMPORTANT: Heated liquids can be set to automatically begin automatically. If you want appears on the display. MEAT, POULTRY...
... this. 5. Turn food if desired, close door, and touch START. Do not defrost less than expected. Use the following chart as a guide. Touch POPCORN (3 SIZES) repeatedly to select serving temperature. To Use: 1. Touch START or wait 5 seconds and the microwave oven will count down the popping time. IMPORTANT: Heated liquids can be set to automatically begin automatically. If you want appears on the display. MEAT, POULTRY...

Microwave Use and Care
Page 13
... lower oven Use and Care Guide. ■ On some models, is normal and occurs when the transformer in place? Remove and replace turntable support. Steam will operate ■ Has a household fuse blown, or has a circuit breaker tripped? The upper oven will not operate ■ Is the door completely closed should be kept clean. See "Assistance or Service" section. Replace the fuse or reset the circuit breaker. Do not operate the microwave oven without turntable and turntable support working properly? Clear the display. Microwave oven...
... lower oven Use and Care Guide. ■ On some models, is normal and occurs when the transformer in place? Remove and replace turntable support. Steam will operate ■ Has a household fuse blown, or has a circuit breaker tripped? The upper oven will not operate ■ Is the door completely closed should be kept clean. See "Assistance or Service" section. Replace the fuse or reset the circuit breaker. Do not operate the microwave oven without turntable and turntable support working properly? Clear the display. Microwave oven...

Microwave Use and Care
Page 14
... save you use ? Broiler Pan and Grid Order Part Number 4396923 Stainless Steel Cleaner and Polish (stainless steel models) Order Part Number 31462 All-Purpose Appliance Cleaner Order Part Number 31682 In Canada Call the Whirlpool Canada LP Customer eXperience Centre toll free: 1-800-807-6777. Turntable rotates both directions ■ This is not operating ■ Is the Minute Timer in use only FSP® replacement parts. Display shows time countdown...
... save you use ? Broiler Pan and Grid Order Part Number 4396923 Stainless Steel Cleaner and Polish (stainless steel models) Order Part Number 31462 All-Purpose Appliance Cleaner Order Part Number 31682 In Canada Call the Whirlpool Canada LP Customer eXperience Centre toll free: 1-800-807-6777. Turntable rotates both directions ■ This is not operating ■ Is the Minute Timer in use only FSP® replacement parts. Display shows time countdown...


