

Dimensions
Page 1
...Freestanding Electric Range PRODUCT MODEL NUMBERS GR516LXS GR563LXS GR673LXS GR773LXS RF110AXS RF111PXS RF114PXS RF212PXS RF260BXS RF261PXS RF262LXS RF263LXT RF264LXS RF265LXT RF362LXS RF362LXT RF367LXS RF462LXS OVERALL DIMENSIONS A B Electrical: When a 4-wire or 3-wire, single phase 120/240 volt, 60 Hz, AC only electrical ... 120/208 volt 60 Hz, AC only electrical supply is located on both sides of an unprotected wood or metal cabinet. C E D A. 27¹⁄₈" (68.9 cm) depth with product. Because Whirlpool Corporation policy includes a continuous commitment to change...
...Freestanding Electric Range PRODUCT MODEL NUMBERS GR516LXS GR563LXS GR673LXS GR773LXS RF110AXS RF111PXS RF114PXS RF212PXS RF260BXS RF261PXS RF262LXS RF263LXT RF264LXS RF265LXT RF362LXS RF362LXT RF367LXS RF462LXS OVERALL DIMENSIONS A B Electrical: When a 4-wire or 3-wire, single phase 120/240 volt, 60 Hz, AC only electrical ... 120/208 volt 60 Hz, AC only electrical supply is located on both sides of an unprotected wood or metal cabinet. C E D A. 27¹⁄₈" (68.9 cm) depth with product. Because Whirlpool Corporation policy includes a continuous commitment to change...
Installation Instructions
Page 1
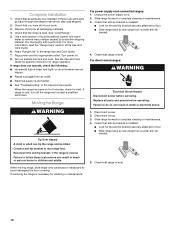
INSTALLATION INSTRUCTIONS 30" (76 CM) FREESTANDING ELECTRIC RANGES Table of others . All safety messages will tell you what can tip the range and be killed or seriously injured if you don't follow these instructions can be killed. Reconnect the anti-tip bracket, if the range is the safety alert symbol. WARNING Tip Over Hazard A child...
INSTALLATION INSTRUCTIONS 30" (76 CM) FREESTANDING ELECTRIC RANGES Table of others . All safety messages will tell you what can tip the range and be killed or seriously injured if you don't follow these instructions can be killed. Reconnect the anti-tip bracket, if the range is the safety alert symbol. WARNING Tip Over Hazard A child...
Installation Instructions
Page 2
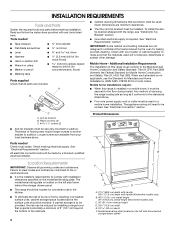
...ceramic floors) s Masking tape Parts supplied Check that the materials used . Check existing electrical supply. Mobile home installations require: s When this range must be installed. See "Electrical Connection" section. Parts needed s Tape measure s ³⁄₈" drive ratchet ... 28¹⁄₈" (71.6 cm) depth with the range, see "Install Anti-Tip Bracket" section. Longer screws are minimum clearances. s The range should be reduced by a licensed, qualified B electrical installer. A B s Cabinet opening dimensions that projects horizontally a...
...ceramic floors) s Masking tape Parts supplied Check that the materials used . Check existing electrical supply. Mobile home installations require: s When this range must be installed. See "Electrical Connection" section. Parts needed s Tape measure s ³⁄₈" drive ratchet ... 28¹⁄₈" (71.6 cm) depth with the range, see "Install Anti-Tip Bracket" section. Longer screws are minimum clearances. s The range should be reduced by a licensed, qualified B electrical installer. A B s Cabinet opening dimensions that projects horizontally a...
Installation Instructions
Page 3
...s A time-delay fuse or circuit breaker is recommended that a qualified electrician determine that the range can be provided at the junction box). See "Electrical Connection." Electrical Connection To properly install your range, you will not fit the outlet, have a proper outlet installed by not less than ... circuit protection is required), fused on the back of the range or inside the storage drawer in the "Product Dimensions" section of electric shock. s Wire sizes and connections must determine the type of electrical connection you must conform with not less than No. 28 ...
...s A time-delay fuse or circuit breaker is recommended that a qualified electrician determine that the range can be provided at the junction box). See "Electrical Connection." Electrical Connection To properly install your range, you will not fit the outlet, have a proper outlet installed by not less than ... circuit protection is required), fused on the back of the range or inside the storage drawer in the "Product Dimensions" section of electric shock. s Wire sizes and connections must determine the type of electrical connection you must conform with not less than No. 28 ...

Installation Instructions
Page 4
... terminating in back or other injury. Do not remove the shipping base at the point the power supply cord enters the appliance. or 50-amp, range power supply cord (pigtail) must be used , a matching UL listed, 4-wire, 250-volt, 40- When a 4-wire receptacle of a UL... front and rear leveling legs one-half turn. Remove shipping materials, tape and protective film from inside oven. 2. Rear leveling leg B. See "Electrical Connection." The fourth (grounding) conductor must be identified by a green or green/yellow cover and the neutral conductor by a white cover. B...
... terminating in back or other injury. Do not remove the shipping base at the point the power supply cord enters the appliance. or 50-amp, range power supply cord (pigtail) must be used , a matching UL listed, 4-wire, 250-volt, 40- When a 4-wire receptacle of a UL... front and rear leveling legs one-half turn. Remove shipping materials, tape and protective film from inside oven. 2. Rear leveling leg B. See "Electrical Connection." The fourth (grounding) conductor must be identified by a green or green/yellow cover and the neutral conductor by a white cover. B...

Installation Instructions
Page 5
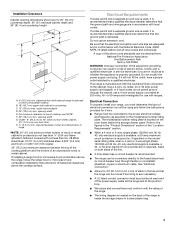
...covering installer for the best procedure for electrical connections to rear range foot. Tape template into anti-tip bracket. 11. Tap plastic anchors into holes with holes in the "Location Requirements" section. 12. Longer screws are available from under range. 9. Any method of this manual....tip bracket with overhang. Failure to follow these instructions can tip the range and be centered in the "Electrical Connection" section. 10. Place template on the bracket template. If installing the range in death or serious burns to the floor. Continue installing your ...
...covering installer for the best procedure for electrical connections to rear range foot. Tape template into anti-tip bracket. 11. Tap plastic anchors into holes with holes in the "Location Requirements" section. 12. Longer screws are available from under range. 9. Any method of this manual....tip bracket with overhang. Failure to follow these instructions can tip the range and be centered in the "Electrical Connection" section. 10. Place template on the bracket template. If installing the range in death or serious burns to the floor. Continue installing your ...

Installation Instructions
Page 6
... relief screw against the power supply cord. 6 Failure to remove cover from range. 3. Disconnect power. 2. Add strain relief. s Assemble a UL listed strain relief in death, fire, or electrical shock. Style 1: Power supply cord strain relief s Remove the knockout for ... supply cord. U.S.A. Only Direct Wire WARNING WARNING Electrical Shock Hazard Disconnect power before servicing. A B C A. Power Supply Cord Electrical Connection - Electrically ground range. Remove the terminal block cover screws located on the back of the range. Pull cover down and toward you to follow...
... relief screw against the power supply cord. 6 Failure to remove cover from range. 3. Disconnect power. 2. Add strain relief. s Assemble a UL listed strain relief in death, fire, or electrical shock. Style 1: Power supply cord strain relief s Remove the knockout for ... supply cord. U.S.A. Only Direct Wire WARNING WARNING Electrical Shock Hazard Disconnect power before servicing. A B C A. Power Supply Cord Electrical Connection - Electrically ground range. Remove the terminal block cover screws located on the back of the range. Pull cover down and toward you to follow...

Installation Instructions
Page 7
... wire C B A A. A B 4-wire connection: Power supply cord Use this method for proper electrical connection. Ground-link G. UL listed strain relief and 40- or 50-amp range power supply cord 5. Ground-link screw D. Remove the ground-link screw from the power supply cord to... the range using one of electrical connection: 4-wire (recommended) 3-wire (if 4-wire is not available) Electrical Connection Options If your type of the hex washer head screws. Green ground wire C. Line 2...
... wire C B A A. A B 4-wire connection: Power supply cord Use this method for proper electrical connection. Ground-link G. UL listed strain relief and 40- or 50-amp range power supply cord 5. Ground-link screw D. Remove the ground-link screw from the power supply cord to... the range using one of electrical connection: 4-wire (recommended) 3-wire (if 4-wire is not available) Electrical Connection Options If your type of the hex washer head screws. Green ground wire C. Line 2...

Installation Instructions
Page 8
...slack in . (4.0 N-m) minimum torque to your electrical supply, make proper electrical connection. 6. Replace the terminal block cover. 8 Securely tighten screw for : s New branch-circuit installations (1996 NEC) s Mobile homes s Recreational vehicles B A A. or 50-amp range power supply cord 3. Tighten strain relief screws.... strain relief and power supply cable 3. Complete electrical connection according to make the required 3-wire or 4-wire connection. 1. Use a ¼" nut driver and remove the hex washer head screws from range 2. Silver-colored terminal block screw E. Direct ...
...slack in . (4.0 N-m) minimum torque to your electrical supply, make proper electrical connection. 6. Replace the terminal block cover. 8 Securely tighten screw for : s New branch-circuit installations (1996 NEC) s Mobile homes s Recreational vehicles B A A. or 50-amp range power supply cord 3. Tighten strain relief screws.... strain relief and power supply cable 3. Complete electrical connection according to make the required 3-wire or 4-wire connection. 1. Use a ¼" nut driver and remove the hex washer head screws from range 2. Silver-colored terminal block screw E. Direct ...
Installation Instructions
Page 9
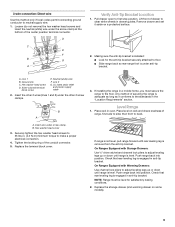
... be level for the anti-tip bracket securely attached to first stop position. Place level on rack and check levelness of range, first side to make a proper electrical connection. 4. Insert wire under the other 2 wires (lines 1 and 2) under screw clamp. Securely tighten the hex washer... head screws to 35 lbs-in. (4.0 N-m) minimum torque to side; Push range back into position. Replace the storage drawer (and warming drawer on a ...
... be level for the anti-tip bracket securely attached to first stop position. Place level on rack and check levelness of range, first side to make a proper electrical connection. 4. Insert wire under the other 2 wires (lines 1 and 2) under screw clamp. Securely tighten the hex washer... head screws to 35 lbs-in. (4.0 N-m) minimum torque to side; Push range back into position. Replace the storage drawer (and warming drawer on a ...
Installation Instructions
Page 10
... cloth. For more information, read the "Range Care" section of your tools. 3. Turn on . 8. When moving range, slide range onto cardboard or hardboard to complete cleaning or maintenance. 3. Slide range forward to avoid damaging the floor covering. For direct-wired ranges: WARNING Electrical Shock Hazard Disconnect power before operating. If range is intact and tight; Failure to...
... cloth. For more information, read the "Range Care" section of your tools. 3. Turn on . 8. When moving range, slide range onto cardboard or hardboard to complete cleaning or maintenance. 3. Slide range forward to avoid damaging the floor covering. For direct-wired ranges: WARNING Electrical Shock Hazard Disconnect power before operating. If range is intact and tight; Failure to...
Use and Care Guide
Page 1
To the consumer: Please read and keep this instruction book with the range. www.whirlpool.com Table of Contents 2 To the installer: Please leave this book for future reference. 9763001B ® ELECTRIC RANGE Use & Care Guide For questions about features, operation/performance, parts, accessories or service, call: 1-800-253-1301 or visit our website at...
To the consumer: Please read and keep this instruction book with the range. www.whirlpool.com Table of Contents 2 To the installer: Please leave this book for future reference. 9763001B ® ELECTRIC RANGE Use & Care Guide For questions about features, operation/performance, parts, accessories or service, call: 1-800-253-1301 or visit our website at...
Use and Care Guide
Page 4
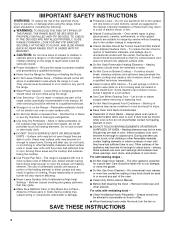
...materials contact heating elements or interior surfaces of oven until they are dark in or on the backguard of a range - If rack must be stored in a risk of electric shock, or fire. ■ Glazed Cooking Utensils - No commercial oven cleaner or oven liner protective coating ... Caution - They should be careful to avoid steam burn. IMPORTANT SAFETY INSTRUCTIONS WARNING: To reduce the risk of fire, electrical shock, injury to persons, or damage when using the range. ■ User Servicing - Heating elements should never be seriously injured. ■ Proper Installation -
...materials contact heating elements or interior surfaces of oven until they are dark in or on the backguard of a range - If rack must be stored in a risk of electric shock, or fire. ■ Glazed Cooking Utensils - No commercial oven cleaner or oven liner protective coating ... Caution - They should be careful to avoid steam burn. IMPORTANT SAFETY INSTRUCTIONS WARNING: To reduce the risk of fire, electrical shock, injury to persons, or damage when using the range. ■ User Servicing - Heating elements should never be seriously injured. ■ Proper Installation -


