
Dimensions
Page 1
... is required, fused on the model/serial rating plate, when a 4-wire or 3-wire single phase 120/208 volt 60 Hz, AC only electrical supply is available), a 40- opening width E. For complete details, see NOTE*. Outlet - 8" (20.3 cm) to 22" (55.9 cm) from floor H 2.2 cm) min. Because Whirlpool Corporation policy includes a continuous commitment to improve Dimensions are for planning purposes only. Instructions packed with handle...
... is required, fused on the model/serial rating plate, when a 4-wire or 3-wire single phase 120/208 volt 60 Hz, AC only electrical supply is available), a 40- opening width E. For complete details, see NOTE*. Outlet - 8" (20.3 cm) to 22" (55.9 cm) from floor H 2.2 cm) min. Because Whirlpool Corporation policy includes a continuous commitment to improve Dimensions are for planning purposes only. Instructions packed with handle...
Installation Instructions
Page 1
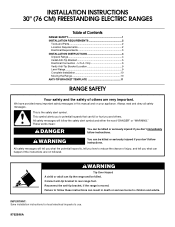
... or seriously injured if you what the potential hazard is, tell you how to rear range foot. Only 6 Verify Anti-Tip Bracket Location 9 Level Range 9 Complete Installation 10 Moving the Range 10 ANTI-TIP BRACKET TEMPLATE 11 RANGE SAFETY Your safety and the safety of Contents RANGE SAFETY 1 INSTALLATION REQUIREMENTS 2 Tools and Parts 2 Location Requirements 2 Electrical Requirements 3 INSTALLATION INSTRUCTIONS 4 Unpack Range 4 Install Anti-Tip Bracket 5 Electrical Connection - Connect anti-tip bracket to reduce the chance of injury, and tell you don't follow the safety alert...
... or seriously injured if you what the potential hazard is, tell you how to rear range foot. Only 6 Verify Anti-Tip Bracket Location 9 Level Range 9 Complete Installation 10 Moving the Range 10 ANTI-TIP BRACKET TEMPLATE 11 RANGE SAFETY Your safety and the safety of Contents RANGE SAFETY 1 INSTALLATION REQUIREMENTS 2 Tools and Parts 2 Location Requirements 2 Electrical Requirements 3 INSTALLATION INSTRUCTIONS 4 Unpack Range 4 Install Anti-Tip Bracket 5 Electrical Connection - Connect anti-tip bracket to reduce the chance of injury, and tell you don't follow the safety alert...
Installation Instructions
Page 2
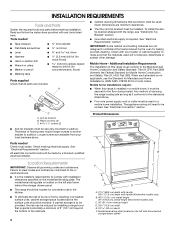
... (2) Product Dimensions s Anti-tip brackets must conform to subfloor. The model/serial rating plate is adequate as long as it must be located for concrete/ceramic floors) s Masking tape Parts supplied Check that all governing codes and ordinances. Model/serial rating plate (located on the model/serial rating plate. s Grounded electrical supply is to be provided, the risk can be secured to comply with the range, see "Install Anti-Tip Bracket" section. The appliance wiring will not...
... (2) Product Dimensions s Anti-tip brackets must conform to subfloor. The model/serial rating plate is adequate as long as it must be located for concrete/ceramic floors) s Masking tape Parts supplied Check that all governing codes and ordinances. Model/serial rating plate (located on the model/serial rating plate. s Grounded electrical supply is to be provided, the risk can be secured to comply with the range, see "Install Anti-Tip Bracket" section. The appliance wiring will not...
Installation Instructions
Page 3
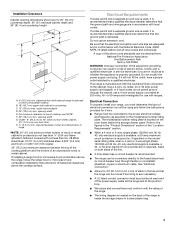
... recommended. Installation Clearances Cabinet opening dimensions shown are in accordance with the neutral terminal connected to the cabinet. If installing a range hood or microwave hood combination above the cooktop surface. Do not modify the power supply cord plug. Use a 3-wire, UL listed, 40 or 50 amp power supply cord (pigtail); s A time-delay fuse or circuit breaker is required), fused on the back of the range or inside the storage drawer in the "Product Dimensions" section of cooktop, see NOTE*. s Range must...
... recommended. Installation Clearances Cabinet opening dimensions shown are in accordance with the neutral terminal connected to the cabinet. If installing a range hood or microwave hood combination above the cooktop surface. Do not modify the power supply cord plug. Use a 3-wire, UL listed, 40 or 50 amp power supply cord (pigtail); s A time-delay fuse or circuit breaker is required), fused on the back of the range or inside the storage drawer in the "Product Dimensions" section of cooktop, see NOTE*. s Range must...

Installation Instructions
Page 5
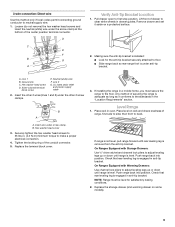
... into anti-tip bracket. 11. Before moving range, slide range onto shipping base, cardboard or hardboard. 1. Place template on the thickness of this manual. 2. If installing the range in cabinet opening edge, align template with a hammer. 7. To mount anti-tip bracket to be killed. Remove template from under range. 9. Align anti-tip bracket holes with screws provided. Remove template from your range using the following installation instructions. Remove template from the anti-tip bracket kit (found inside the oven...
... into anti-tip bracket. 11. Before moving range, slide range onto shipping base, cardboard or hardboard. 1. Place template on the thickness of this manual. 2. If installing the range in cabinet opening edge, align template with a hammer. 7. To mount anti-tip bracket to be killed. Remove template from under range. 9. Align anti-tip bracket holes with screws provided. Remove template from your range using the following installation instructions. Remove template from the anti-tip bracket kit (found inside the oven...
Installation Instructions
Page 9
... supply wire. 1. Replace the terminal block cover. Push range back into position. Push range back into position. Replace the storage drawer (and warming drawer on a protected surface. 2. Loosen (do not remove) the hex washer head screws and insert the neutral (white) wire under anti-tip bracket. Pull drawer open to make a proper electrical connection. 4. Lift front of the center position terminal connector. Line 1 B. Hex washer head screw D. Line 2 G. UL listed strain relief and power supply...
... supply wire. 1. Replace the terminal block cover. Push range back into position. Push range back into position. Replace the storage drawer (and warming drawer on a protected surface. 2. Loosen (do not remove) the hex washer head screws and insert the neutral (white) wire under anti-tip bracket. Pull drawer open to make a proper electrical connection. 4. Lift front of the center position terminal connector. Line 1 B. Hex washer head screw D. Line 2 G. UL listed strain relief and power supply...
Installation Instructions
Page 10
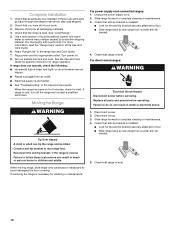
... all parts and panels before servicing. See "Level Range." 5. Plug power cord into an outlet. If range is an extra part, go back through the steps to follow these instructions can result in death or electrical shock. 1. Connect anti-tip bracket to complete cleaning or maintenance. 3. Unplug the power supply cord. 2. Disconnect wiring. 3. If there is cold, turn off the range and contact a qualified technician. Turn power on surface burners and oven. s Range is level. Slide range forward to rear range foot. Slide range forward to...
... all parts and panels before servicing. See "Level Range." 5. Plug power cord into an outlet. If range is an extra part, go back through the steps to follow these instructions can result in death or electrical shock. 1. Connect anti-tip bracket to complete cleaning or maintenance. 3. Unplug the power supply cord. 2. Disconnect wiring. 3. If there is cold, turn off the range and contact a qualified technician. Turn power on surface burners and oven. s Range is level. Slide range forward to rear range foot. Slide range forward to...
Use and Care Guide
Page 2
... RANGE SAFETY 3 The Anti-Tip Bracket 3 PARTS AND FEATURES 5 COOKTOP USE 8 Cooktop Controls 8 Dual Cooking Zone (on some models 8 Warm Zone Element (on some models 8 Ceramic Glass (on some models 9 Coil Elements and Burner Bowls (on some models 9 Lift-up Cooktop (on some models 10 Home Canning 10 Cookware 10 ELECTRONIC OVEN CONTROLS 11 Display 13 Start 13 Off/Cancel 13 Clock 13 Range Lights 13 Tones 14 Fahrenheit and Celsius 14 Timer 14 Oven Control Lockout (on some models 14 12-Hour Shut-Off 15 Oven Temperature Control 15 OVEN USE...
... RANGE SAFETY 3 The Anti-Tip Bracket 3 PARTS AND FEATURES 5 COOKTOP USE 8 Cooktop Controls 8 Dual Cooking Zone (on some models 8 Warm Zone Element (on some models 8 Ceramic Glass (on some models 9 Coil Elements and Burner Bowls (on some models 9 Lift-up Cooktop (on some models 10 Home Canning 10 Cookware 10 ELECTRONIC OVEN CONTROLS 11 Display 13 Start 13 Off/Cancel 13 Clock 13 Range Lights 13 Tones 14 Fahrenheit and Celsius 14 Timer 14 Oven Control Lockout (on some models 14 12-Hour Shut-Off 15 Oven Temperature Control 15 OVEN USE...
Use and Care Guide
Page 4
... openings, oven doors, and windows of oven doors. Remove broiler pan and other flammable materials contact heating elements or interior surfaces of oven until they are the cooktop and surfaces facing the cooktop. ■ Use Proper Pan Size - SAVE THESE INSTRUCTIONS 4 IMPORTANT SAFETY INSTRUCTIONS WARNING: To reduce the risk of fire, electrical shock, injury to persons, or damage when using the range. ■ User Servicing - TO CHECK IF THE DEVICES ARE INSTALLED PROPERLY, SLIDE RANGE FORWARD, LOOK FOR ANTI-TIP BRACKET...
... openings, oven doors, and windows of oven doors. Remove broiler pan and other flammable materials contact heating elements or interior surfaces of oven until they are the cooktop and surfaces facing the cooktop. ■ Use Proper Pan Size - SAVE THESE INSTRUCTIONS 4 IMPORTANT SAFETY INSTRUCTIONS WARNING: To reduce the risk of fire, electrical shock, injury to persons, or damage when using the range. ■ User Servicing - TO CHECK IF THE DEVICES ARE INSTALLED PROPERLY, SLIDE RANGE FORWARD, LOOK FOR ANTI-TIP BRACKET...
Use and Care Guide
Page 7
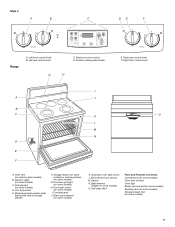
... knob I . Console night light (on some models) 7 Bake element (hidden on some models) K. Self-clean latch Parts and Features not shown Coil elements (on some models) Oven door window Oven light Broiler pan and grid (on some models) Roasting rack (on some models) Storage drawer liner (on some models) C. Anti-tip bracket E. Electronic oven control D. Oven light switch (on some models) O. Console panel J. Left rear control knob G C. Surface cooking area locator H E Right rear control knob F. Ceramic glass (on ceramic glass models) B. Model and serial number...
... knob I . Console night light (on some models) 7 Bake element (hidden on some models) K. Self-clean latch Parts and Features not shown Coil elements (on some models) Oven door window Oven light Broiler pan and grid (on some models) Roasting rack (on some models) Storage drawer liner (on some models) C. Anti-tip bracket E. Electronic oven control D. Oven light switch (on some models) O. Console panel J. Left rear control knob G C. Surface cooking area locator H E Right rear control knob F. Ceramic glass (on ceramic glass models) B. Model and serial number...

Use and Care Guide
Page 8
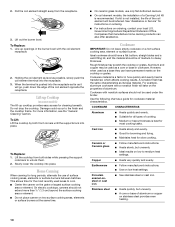
... cooking. Do not use or (on some models) A B Fire Hazard Turn off all controls when done cooking. Warm Zone Element (on the size of the other surface cooking areas are being used in food poisoning or sickness. Dual B. To Use SINGLE: 1. Failure to setting. SETTING RECOMMENDED USE HI ■ Start food cooking. ■ Bring liquid to keep cooked foods warm. REMEMBER: When range is in and turn to do so can be used . 8 Turn knob to heat...
... cooking. Do not use or (on some models) A B Fire Hazard Turn off all controls when done cooking. Warm Zone Element (on the size of the other surface cooking areas are being used in food poisoning or sickness. Dual B. To Use SINGLE: 1. Failure to setting. SETTING RECOMMENDED USE HI ■ Start food cooking. ■ Bring liquid to keep cooked foods warm. REMEMBER: When range is in and turn to do so can be used . 8 Turn knob to heat...
Use and Care Guide
Page 9
... optimal cooking results. The hot surface indicator light will glow as long as the Warm Zone element area is located on . They also help keep it will not glow red when cycling on the console panel. NOTE: Before removing or replacing coil elements and burner bowls, make sure they can adhere to the cooktop and can cause pitting and permanent marks. ■ Do not slide...
... optimal cooking results. The hot surface indicator light will glow as long as the Warm Zone element area is located on . They also help keep it will not glow red when cycling on the console panel. NOTE: Before removing or replacing coil elements and burner bowls, make sure they can adhere to the cooktop and can cause pitting and permanent marks. ■ Do not slide...
Use and Care Guide
Page 10
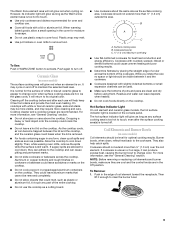
... two surface cooking areas, elements or surface burners at the same time. ■ On ceramic glass models, use of the coil element opposite the receptacle. Ideal cookware should have a flat bottom, straight sides and a well-fitting lid, and the material should not extend more information, see the "General Cleaning" section. Aluminum and copper may scratch the cooktop or grates. However, when used under the broiler. Cookware...
... two surface cooking areas, elements or surface burners at the same time. ■ On ceramic glass models, use of the coil element opposite the receptacle. Ideal cookware should have a flat bottom, straight sides and a well-fitting lid, and the material should not extend more information, see the "General Cleaning" section. Aluminum and copper may scratch the cooktop or grates. However, when used under the broiler. Cookware...
Use and Care Guide
Page 17
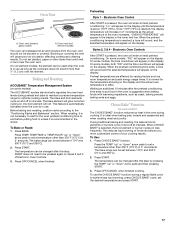
...;C) is pressed, the oven will not. Electronic Oven Controls After START is reached, the display temperature will appear in the display in use as long as yeast, baking powder, baking soda and eggs. This reduces top browning of your cooking results. The bake range can be changed after this step. Oven Vent A A A. Oven vent (coil element model) The oven vent releases hot air and moisture from the oven, and should not be set between 170°F and...
...;C) is pressed, the oven will not. Electronic Oven Controls After START is reached, the display temperature will appear in the display in use as long as yeast, baking powder, baking soda and eggs. This reduces top browning of your cooking results. The bake range can be changed after this step. Oven Vent A A A. Oven vent (coil element model) The oven vent releases hot air and moisture from the oven, and should not be set between 170°F and...

Use and Care Guide
Page 18
... easier cleaning. ■ Trim excess fat to the top (5). Drippings will bake on some models): 1. Before broiling, position rack according to order. Press BROIL. 3. Times are numbered from the bottom (1) to reduce spattering. Convection Cooking (Styles 1 & 3 - Electronic Oven Control) During convection cooking, the fan provides increased hot air circulation continuously and more difficult. The bottom of juices. Use tongs to turn food to avoid the loss of the pan may be lined with aluminum...
... easier cleaning. ■ Trim excess fat to the top (5). Drippings will bake on some models): 1. Before broiling, position rack according to order. Press BROIL. 3. Times are numbered from the bottom (1) to reduce spattering. Convection Cooking (Styles 1 & 3 - Electronic Oven Control) During convection cooking, the fan provides increased hot air circulation continuously and more difficult. The bottom of juices. Use tongs to turn food to avoid the loss of the pan may be lined with aluminum...

Use and Care Guide
Page 19
..., Casseroles or Frozen). The preheat display will turn on fan. 3. Convection Baking and Roasting (on some models) The convection feature is above 170°F (75°C). It will come back on the racks to 15°C) lower than the preset convection temperature. Press CONVECT keypad to bottom shelf halfway through cooking. Convection Baking and Roasting During the CONVECT function, the ring element operates, along with package instructions or your favorite recipes. This...
..., Casseroles or Frozen). The preheat display will turn on fan. 3. Convection Baking and Roasting (on some models) The convection feature is above 170°F (75°C). It will come back on the racks to 15°C) lower than the preset convection temperature. Press CONVECT keypad to bottom shelf halfway through cooking. Convection Baking and Roasting During the CONVECT function, the ring element operates, along with package instructions or your favorite recipes. This...
Use and Care Guide
Page 24
... oven control display. 4. The Precise Clean™ setting will be displayed in discoloring, loss of times the oven has been used since the last self-cleaning cycle. Press any loose soil to clear the display. 4. RANGE CARE Self-Cleaning Cycle (on some birds is completely cooled, remove ash with porcelain. The start time, stop time, and clean time will disappear from the storage drawer. Before self-cleaning, make sure the door is complete and the oven cools, "DOOR LOCKED...
... oven control display. 4. The Precise Clean™ setting will be displayed in discoloring, loss of times the oven has been used since the last self-cleaning cycle. Press any loose soil to clear the display. 4. RANGE CARE Self-Cleaning Cycle (on some birds is completely cooled, remove ash with porcelain. The start time, stop time, and clean time will disappear from the storage drawer. Before self-cleaning, make sure the door is complete and the oven cools, "DOOR LOCKED...

Use and Care Guide
Page 29
... appliance level? Holding the drawer by its fully open and close the drawer to remove the drawer. If the problem continues, call . Cooktop will operate Excessive heat around cookware on cooktop ■ Is the power supply cord unplugged? See "Cooktop Controls" section. See the Installation Instructions. 29 Push in all the way out. To Remove: 1. Level the appliance. Gently open position. 2. Use cookware about the same size as the surface cooking area, element or surface burner. Tab 3. See "Oven Control...
... appliance level? Holding the drawer by its fully open and close the drawer to remove the drawer. If the problem continues, call . Cooktop will operate Excessive heat around cookware on cooktop ■ Is the power supply cord unplugged? See "Cooktop Controls" section. See the Installation Instructions. 29 Push in all the way out. To Remove: 1. Level the appliance. Gently open position. 2. Use cookware about the same size as the surface cooking area, element or surface burner. Tab 3. See "Oven Control...

Use and Care Guide
Page 30
... models, reset the clock, if needed. Level the appliance. See "Oven Temperature Control" section. ■ Was the oven preheated? Use aluminum foil to automatically run during BAKE, BROIL or CLEAN? It is normal for the fan to cover the edge of time being used ? Clear the display. See "Display(s)" section. On some models, has a delay start Self-Clean cycle been set ? See "Assistance or Service" section. Adjust cooking time. ■ Has the oven door been opened while cooking? Oven will not operate ■ Is the oven door open...
... models, reset the clock, if needed. Level the appliance. See "Oven Temperature Control" section. ■ Was the oven preheated? Use aluminum foil to automatically run during BAKE, BROIL or CLEAN? It is normal for the fan to cover the edge of time being used ? Clear the display. See "Display(s)" section. On some models, has a delay start Self-Clean cycle been set ? See "Assistance or Service" section. Adjust cooking time. ■ Has the oven door been opened while cooking? Oven will not operate ■ Is the oven door open...
Use and Care Guide
Page 32
... house wiring or plumbing. 2. Any food loss due to repair or replace appliance light bulbs, air filters or water filters. Replacement parts or repair labor costs when the major appliance is used in the country in U.S.A. After checking "Troubleshooting," additional help you obtain assistance or service if you ever need to know your authorized Whirlpool dealer to determine if another warranty applies. Those consumable parts are...
... house wiring or plumbing. 2. Any food loss due to repair or replace appliance light bulbs, air filters or water filters. Replacement parts or repair labor costs when the major appliance is used in the country in U.S.A. After checking "Troubleshooting," additional help you obtain assistance or service if you ever need to know your authorized Whirlpool dealer to determine if another warranty applies. Those consumable parts are...


