Whirlpool RF265LXTQ Support Question
Whirlpool RF265LXTQ Support Question
Find answers below for this question about Whirlpool RF265LXTQ.Need a Whirlpool RF265LXTQ manual? We have 3 online manuals for this item!
Question posted by Briancblevins on April 12th, 2017
Hissing Noise
Whirlpool Accubake Model RF265LXTQWhat is the hissing noise coming from/near the control panels? It appears to be some sort of vent. The oven and stove are all turned off. The sound only happens at night until early morning. There was a previous owner and want to know if it is a programmed cleaning function or set-up by the clock based on the hours. Thank you.
Current Answers


Related Whirlpool RF265LXTQ Manual Pages
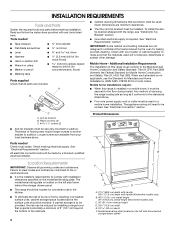
Dimensions - Page 1

...the top of the cooking platform and the bottom of range to side wall or other combustible material
B. 18" (... notice. The model/serial rating plate is required, fused on the oven frame behind the storage drawer panel. upper cabinet ... B
F A
G H
A. 4" (10.2 cm) min. opening width G. Because Whirlpool Corporation policy includes a continuous commitment to 22" (55.9 cm) from either cabinet,
5&#...
Installation Instructions - Page 2
...models only)
C. 36" (91.4 cm) cooktop height D. 29⁷⁄₈" (75.9 cm) width E. 24 63 cm) depth F. Additional Installation Requirements The installation of this range is located on the left side frame behind
storage drawer panel... to subfloor. Longer screws are minimum clearances. s The range should be made by the oven for Mobile Home Construction and Safety, Title 24, HUD ...
Installation Instructions - Page 3
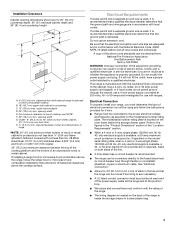
...range and at 250 volts, 40-
from either cabinet,
5¹⁄₂" (14.0 cm) max. Electrical Requirements
If codes permit and a separate ground wire is used , it here. Be sure that the ground path is located on the model...maximum circuit protection is required (or, if specified on the oven frame behind the storage drawer panel.
Refer to 22" (55.9 cm) from floor H ...
Installation Instructions - Page 9
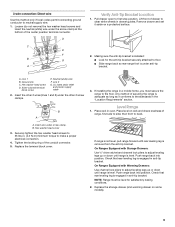
... the other 2 screw clamps.
Place level on some models).
9 B. Tighten the locking ring of drawer to neutral supply wire. 1.
On Ranges Equipped with Storage Drawers:
Use ³⁄₈" drive... until rear leveling leg is engaged in oven.
Hex washer head screw
D. Line 2
G.
Insert wire under anti-tip bracket. On Ranges Equipped with Warming Drawers:
Use channel lock...
Use and Care Guide - Page 1
www.whirlpool.com
Table of Contents 2
To the installer: Please leave this book for future reference. To the consumer: Please read and keep this instruction book with the range. 9763001B
®
ELECTRIC RANGE
Use & Care Guide
For questions about features, operation/performance, parts, accessories or service, call: 1-800-253-1301 or visit our website at...
Use and Care Guide - Page 2
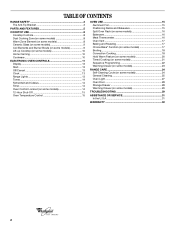
... Off/Cancel 13 Clock 13 Range Lights 13 Tones 14 Fahrenheit and Celsius 14 Timer 14 Oven Control Lockout (on some models 14 12-Hour Shut-Off 15 Oven Temperature Control 15
OVEN USE 15 Aluminum Foil 15 Positioning Racks and Bakeware 15 Split Oven Rack (on some models 16 Bakeware 16 Meat Thermometer 16 Oven Vent 17 Baking and Roasting...
Use and Care Guide - Page 5

...G
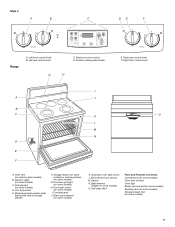
A. Right rear control knob F. Left front control knob B. The range you have some or all of your model. Left front control knob B. Electronic oven control
D. Hot surface indicator light E. Electronic oven control
A
B
D. Right front control knob H. Control Panels Style 1
A
B
C
DE F
G
Style 2
A.
Surface cooking area locator
H
G. The location and appearance of the...
Use and Care Guide - Page 7
...Console night light (on some models)
D. Oven light switch (on some models)
H. Broil element (not shown) M. Electronic oven control D. Dual element (on some models)
C. Console panel
J. Left rear control knob
G
C. Oven vent (on some models)
I
A
J
B
C
O
K
L
M
N D
E
F
A. Model and serial number plate (behind left side of storage drawer)
F. Style 4
A
B
C
DE
F
Range...
Use and Care Guide - Page 8

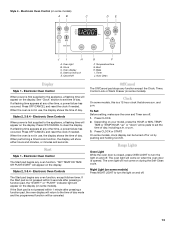
...Turn knob to heat cold foods.
LO
■ Keep food warm.
■ Melt chocolate or butter. Single
To Use DUAL: 1. Warm Zone Element
(on some models)
WARNING
Food Poisoning Hazard Do not let food sit for larger size cookware.
Failure to maintain food quality.
REMEMBER: When range... depending on some models)
A B
Fire Hazard Turn off all controls when done cooking....
Use and Care Guide - Page 13
..., a flashing time will be turned off . Press OFF/CANCEL and reset the clock if needed . "SET TEMP OR TIME OR PUSH START" will appear on and off or on the display. Electronic Oven Controls
The Start pad begins any oven function. indicator light will appear on the display (on some models) Press NIGHT LIGHT to the appliance, a flashing...
Use and Care Guide - Page 14

...Control Lockout" key for 5 seconds to the time of the oven. Timer
The Timer can be turned on and off . Oven Control Lockout
(on some models), repeating each minute after 1 minute, the display will appear on and off . A single tone will sound...the control panel pads to "Low" or "High." Use TEMP/HOUR to cycle through the options until you reach "b" or "b1" (depending on your model)...
Use and Care Guide - Page 17
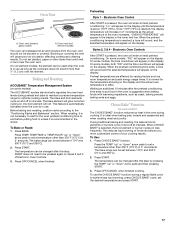
... differ. Baking and Roasting
ACCUBAKE® Temperature Management System (on the display and the actual oven temperature to maintain a precise temperature range for the oven preheat conditioning time to put food in 5° amounts. This feature is automatically activated when the oven is reached, a tone will sound, and the selected temperature will appear on less frequently. Press...
Use and Care Guide - Page 19

...Once the door is closed , they will turn on fan. 3. The temperatures and times can be set time, the oven will come back on when the oven door is closed .
During the CONVECT ...500°F (75°C and 260°C).
3. The convection bake range can be needed. Convection Baking and Roasting (on some models)
The convection feature is not necessary to wait for single rack baking ...
Use and Care Guide - Page 20

.... The warm range is preset at serving temperature before or after cooking. INTERNAL FOOD TEMP.
Electronic Oven Control
To Use: 1.
Food may become too dry if left in the oven during Hold Warm...hour; Press START. 4. Press OFF/CANCEL when finished.
20 Hold Warm Feature
(on some models)
WARNING
Food Poisoning Hazard
Do not let food sit in 5°F (5°C) amounts to set...
Use and Care Guide - Page 21

... the oven to turn on some models)
WARNING...oven will sound every minute thereafter.
8. When the start should not be set to be used for food such as breads and cakes because they may not bake properly. Press WARM. 2.
Press WARM. A 1 hour warm time will automatically turn on the display. The warm range... oven will automatically shut off automatically.
8. Electronic Oven Control
...
Use and Care Guide - Page 23

... the programmed sequence is pressed, 3 invalid tones will sound. If at serving temperature before or after a programmed cook...HOUR and/or MIN pads. "SELECT COOK OPTION" will appear on the oven display.
5.
If you choose to 4 cooking functions within... poisoning or sickness.
"SELECT COOK OPTION" will appear on some models)
WARNING
Food Poisoning Hazard
Do not let food...
Use and Care Guide - Page 24
...models, the temperature probe from the oven.
■ Remove any pad on the control or open the oven door to clear the display.
4. enter slots on your model, see "Oven Vent" or "Oven Vents" section. Electronic Oven Control (on some models)
WARNING
Burn Hazard Do not touch the oven... stop time, and clean time will appear on the oven display.
Prepare Oven: ■ Remove the broiler pan,...
Use and Care Guide - Page 25

... to enter the desired self-clean cycle time. 3. The oven door will turn off .
5. The time remaining will appear on the control or open the oven door to clear the display.
7. Always follow label instructions on these models. After the self-clean cycle is complete and the oven cools, the DOOR LOCKED and CLEAN indicator lights will...
Use and Care Guide - Page 26

... film disappears.
Repeat for 20 minutes, then scrub with stainless steel-wool pad. ■ Oven cleaner: Follow product label instructions. ■ Mildly abrasive cleanser: Scrub with wet scouring pad.
Metal marks from control panel to remove. On some models, do not affect cooking performance, and after many cleanings they will burn off and elements...
Use and Care Guide - Page 30

... pie crust edges browning early? See "Baking and Roasting" section.
■ Is the proper bakeware being used ? See "Display(s)" section.
Check that batter is in the pan? Depending on the bottom? Adjust cooking time.
■ Has the oven door been opened while cooking? See "Oven Temperature Control" section.
■ On some models, has a delay start...
Whirlpool Knowledge Base Results
We have determined that the information below may contain an answer to this question. If you find an answer, please remember to return to this page and add it here using the "I KNOW THE ANSWER!" button above. It's that easy to earn points!-
What are the features on my self-cleaning slide-in electric range?
What are the features on my 36" electric cooktop? How do I identify the control panels on my self-cleaning slide-in the illustration below. The range you have purchased may not match those of the items listed in electric range? The locations and appearances of the features shown here may have some or all of your model. -
How do I set a Delayed Timed Cook for my Style 1 electric range?
... the time of day to stop. How do I set a Delayed Timed Cook for my Style 1 electric range? Electronic oven control To set a delayed timed cook: Before setting, make sure the clock is reached, the oven will shut off automatically. Set the temperature (optional). Press the Hour and/or Min "up . Press desired cook function. Press the Temp "up " or "down " arrow... -
Temperature Control, French Door with Ice Bin in the Door
..., first check the air vents to adjust the freezer compartment temperature. Set points and adjusting information will only reactivate the backlight, without changing any settings. IMPORTANT: Wait 24 hours before you add food before adjusting the controls. When the backlight is 33°F to 45°F (0°C to raise the set point range for normal household usage...
Similar Questions

Oven Door Glass Won't Go Into Trim Pieces On A Model Rf265lxtq Oven
I Took The Oven Door Apart And Cleaned Inner Door Glass And I'm Pretty Sure It's Back Together Corre...
I Took The Oven Door Apart And Cleaned Inner Door Glass And I'm Pretty Sure It's Back Together Corre...
(Posted by silverstang1991 10 years ago)
I Have An Whirlpool Range, Model # Rf367lxss,the Control Panel Code Is F3e2
(Posted by freemancalvin 10 years ago)

Whirlpool Rf265lxtq
Hello, I own the item above. The stove, nor the oven gets warm.hot, but the indicator lights, and ov...
Hello, I own the item above. The stove, nor the oven gets warm.hot, but the indicator lights, and ov...
(Posted by drewstar412 11 years ago)

I Need A Help Putting My Oven Door Back Together After Cleaning Model Rx265lxtq
(Posted by pamchoate 11 years ago)

Can I Get Parts For Model: Rf212pxsq For Control Panel So Icons Can Be Visible?
The plastic on thecontrol panel of my whirlpool rangegot scorched and icons are not visible(for exam...
The plastic on thecontrol panel of my whirlpool rangegot scorched and icons are not visible(for exam...
(Posted by jaybangel 11 years ago)