
Dimension Guide
Page 1
.... opening width C. This range is protected by adjusting the leveling legs. Model/serial rating plate (located on the model/serial number rating plate. upper cabinet depth B. 30" (76.2 cm) min. clearance between cutout and cabinet door or hinge. *NOTE: 24" (61 cm) min. For complete details, see NOTE*. or 50-amp power supply cord (pigtail). A circuit breaker is located behind the control panel or on the oven frame behind storage drawer panel) *Range can be connected...
.... opening width C. This range is protected by adjusting the leveling legs. Model/serial rating plate (located on the model/serial number rating plate. upper cabinet depth B. 30" (76.2 cm) min. clearance between cutout and cabinet door or hinge. *NOTE: 24" (61 cm) min. For complete details, see NOTE*. or 50-amp power supply cord (pigtail). A circuit breaker is located behind the control panel or on the oven frame behind storage drawer panel) *Range can be connected...

Installation Instructions
Page 3
... behind the storage drawer panel. ■ The range should be made by reaching over heated surface units, cabinet storage space located above . ■ Four-wire power supply cord or cable must conform to be rated at 250 volts minimum, 40 amps or 50 amps that the materials used . Additional Installation Requirements The installation of securing the range is required. The model/serial rating plate is recommended that all electrical connections be avoided...
... behind the storage drawer panel. ■ The range should be made by reaching over heated surface units, cabinet storage space located above . ■ Four-wire power supply cord or cable must conform to be rated at 250 volts minimum, 40 amps or 50 amps that the materials used . Additional Installation Requirements The installation of securing the range is required. The model/serial rating plate is recommended that all electrical connections be avoided...

Installation Instructions
Page 4
..., MA 02269. opening width C. Electrical Requirements - Do not use an extension cord. Check with the National Electrical Code, ANSI/ NFPA 70-latest edition and all the way in a risk of cooktop, see NOTE*. Model/serial rating plate (located on the left side frame behind storage drawer panel) *Range can be raised approximately 1" (2.5 cm) by a qualified electrician. 4 IMPORTANT: If installing a range hood or microwave hood combination above code standards can result...
..., MA 02269. opening width C. Electrical Requirements - Do not use an extension cord. Check with the National Electrical Code, ANSI/ NFPA 70-latest edition and all the way in a risk of cooktop, see NOTE*. Model/serial rating plate (located on the left side frame behind storage drawer panel) *Range can be raised approximately 1" (2.5 cm) by a qualified electrician. 4 IMPORTANT: If installing a range hood or microwave hood combination above code standards can result...

Owners Manual
Page 1
...of Contents RANGE SAFETY 2 The Anti-Tip Bracket 2 FEATURE GUIDE 4 COOKTOP USE 5 OVEN USE 6 Electronic Oven Controls 6 Aluminum Foil 6 Positioning Racks and Bakeware 6 Oven Vent 7 Baking and Roasting 7 Broiling 7 Timed Cooking (on some models 7 RANGE CARE 8 Self-Cleaning Cycle (on the oven frame behind the storage drawer panel. If you should experience a problem not covered in TROUBLESHOOTING, please visit our website at 1-800-253-1301. If you still need your model and serial number located on some models 8 General Cleaning 9 Oven Light 10 TROUBLESHOOTING 10 ACCESSORIES...
...of Contents RANGE SAFETY 2 The Anti-Tip Bracket 2 FEATURE GUIDE 4 COOKTOP USE 5 OVEN USE 6 Electronic Oven Controls 6 Aluminum Foil 6 Positioning Racks and Bakeware 6 Oven Vent 7 Baking and Roasting 7 Broiling 7 Timed Cooking (on some models 7 RANGE CARE 8 Self-Cleaning Cycle (on the oven frame behind the storage drawer panel. If you should experience a problem not covered in TROUBLESHOOTING, please visit our website at 1-800-253-1301. If you still need your model and serial number located on some models 8 General Cleaning 9 Oven Light 10 TROUBLESHOOTING 10 ACCESSORIES...

Owners Manual
Page 3
... to cover the surface unit heating element. During and after use, do not let potholder contact hot heating element in the manual. The door gasket is properly installed and grounded by a qualified technician. ■ Never Use the Range for range-top service without breaking due to accumulate on hood or filter. ■ When flambeing foods under the hood, turn the fan on hot surfaces may result in use aluminum foil to line surface unit drip...
... to cover the surface unit heating element. During and after use, do not let potholder contact hot heating element in the manual. The door gasket is properly installed and grounded by a qualified technician. ■ Never Use the Range for range-top service without breaking due to accumulate on hood or filter. ■ When flambeing foods under the hood, turn the fan on hot surfaces may result in use aluminum foil to line surface unit drip...

Owners Manual
Page 5
... oven function with a delayed start should be set a Timed Cook or a Delayed Timed Cook see "Timed Cooking" section. A B A. The Cancel/Off keypad stops any oven function. Coil Elements and Burner Bowls (on some models) The surface cooking area will glow red when an element is in the display. Temperature is too hot to change color. Press CANCEL/OFF when finished. Push in death or fire. Dual B. If start CANCEL/OFF Range function TEMP/TIME Temperature and time adjust INSTRUCTIONS Food must be used in the warmed oven...
... oven function with a delayed start should be set a Timed Cook or a Delayed Timed Cook see "Timed Cooking" section. A B A. The Cancel/Off keypad stops any oven function. Coil Elements and Burner Bowls (on some models) The surface cooking area will glow red when an element is in the display. Temperature is too hot to change color. Press CANCEL/OFF when finished. Push in death or fire. Dual B. If start CANCEL/OFF Range function TEMP/TIME Temperature and time adjust INSTRUCTIONS Food must be used in the warmed oven...

Owners Manual
Page 6
... oven light switch. however, it out to the porcelain finish, do not cover entire oven rack with any type of cycle Fahrenheit and Celsius The temperature is heavily soiled. Allow 2" (5 cm) of day is open. Electronic Oven Controls Control Display The display will turn on a cookie sheet or jelly roll pan, layer cakes, frozen convenience foods. Racks ■ Position racks before turning on when the door is displayed. Press and hold BROIL for 2-rack baking...
... oven light switch. however, it out to the porcelain finish, do not cover entire oven rack with any type of cycle Fahrenheit and Celsius The temperature is heavily soiled. Allow 2" (5 cm) of day is open. Electronic Oven Controls Control Display The display will turn on a cookie sheet or jelly roll pan, layer cakes, frozen convenience foods. Racks ■ Position racks before turning on when the door is displayed. Press and hold BROIL for 2-rack baking...

Owners Manual
Page 7
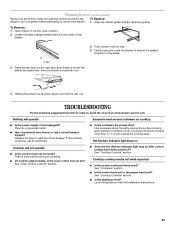
.... Changing the temperature when Custom Broiling allows more than the one displayed. 3. It is recommended in intervals. Close the door to the broil stop position to ensure proper broiling temperature. ■ For best results, use racks 2 and 4 for Part Number 4396923. Please refer to the cover for optimal cooking results. When the time ends, the oven will shut off in the recipe. Press COOK TIME. To Set a Delayed Timed Cook: Before setting, make sure the clock...
.... Changing the temperature when Custom Broiling allows more than the one displayed. 3. It is recommended in intervals. Close the door to the broil stop position to ensure proper broiling temperature. ■ For best results, use racks 2 and 4 for Part Number 4396923. Please refer to the cover for optimal cooking results. When the time ends, the oven will shut off in the recipe. Press COOK TIME. To Set a Delayed Timed Cook: Before setting, make sure the clock...

Owners Manual
Page 8
... Range ■ Remove the broiler pan, grid, cookware and bakeware, all items from oven during Self-Cleaning cycle. Electronic Oven Control with a damp cloth. Press START. The temperature and/or time settings can be set the clean time to another closed or the door will not lock and the self-cleaning cycle will also be displayed. RANGE CARE Self-Cleaning Cycle (on some birds is complete and the oven cools, the CLEAN indicator light will also be changed anytime after pressing Start...
... Range ■ Remove the broiler pan, grid, cookware and bakeware, all items from oven during Self-Cleaning cycle. Electronic Oven Control with a damp cloth. Press START. The temperature and/or time settings can be set the clean time to another closed or the door will not lock and the self-cleaning cycle will also be displayed. RANGE CARE Self-Cleaning Cycle (on some birds is complete and the oven cools, the CLEAN indicator light will also be changed anytime after pressing Start...

Owners Manual
Page 9
...: Pull knobs straight away from control panel to condition the cooktop. CERAMIC GLASS (on some models) Cleaning Method: Cooktop Cleaner Part Number 31464 is recommended regularly to help avoid scratches, pitting and abrasions and to remove. Store razor blades out of the reach of the coil element toward the receptacle. You may remove numbers. ■ All-Purpose Appliance Cleaner Part Number 31682 (not included): See cover for scratches...
...: Pull knobs straight away from control panel to condition the cooktop. CERAMIC GLASS (on some models) Cleaning Method: Cooktop Cleaner Part Number 31464 is recommended regularly to help avoid scratches, pitting and abrasions and to remove. Store razor blades out of the reach of the coil element toward the receptacle. You may remove numbers. ■ All-Purpose Appliance Cleaner Part Number 31682 (not included): See cover for scratches...

Owners Manual
Page 10
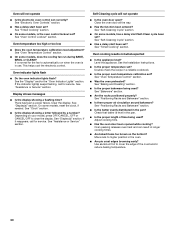
... a setting. ■ On ceramic glass models, is the oven control lockout set to the proper heat level? See "Timed Cooking" section. Replace bulb, then bulb cover by both front corners until the support locks into a grounded outlet. ■ Has a household fuse blown, or has a circuit breaker tripped? Plug into place. See "Electronic Oven Controls" section. ■ Has a delay start been set correctly? Clear the display. See the "Start" keypad feature in the "Feature Guide" section. ■ Has a self-clean cycle been selected? OVEN RACKS Cleaning Method...
... a setting. ■ On ceramic glass models, is the oven control lockout set to the proper heat level? See "Timed Cooking" section. Replace bulb, then bulb cover by both front corners until the support locks into a grounded outlet. ■ Has a household fuse blown, or has a circuit breaker tripped? Plug into place. See "Electronic Oven Controls" section. ■ Has a delay start been set correctly? Clear the display. See the "Start" keypad feature in the "Feature Guide" section. ■ Has a self-clean cycle been selected? OVEN RACKS Cleaning Method...
Use and Care Guide
Page 4
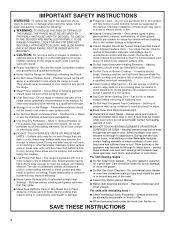
... to line surface unit drip bowls or oven bottoms, except as suggested in a risk of these liners may result in temperature. ■ Utensil Handles Should Be Turned Inward and Not Extend Over Adjacent Surface Units - Do not use dry chemical or foam-type extinguisher. ■ Use Only Dry Potholders - TO CHECK IF THE DEVICES ARE INSTALLED PROPERLY, SLIDE RANGE FORWARD, LOOK FOR ANTI-TIP BRACKET SECURELY...
... to line surface unit drip bowls or oven bottoms, except as suggested in a risk of these liners may result in temperature. ■ Utensil Handles Should Be Turned Inward and Not Extend Over Adjacent Surface Units - Do not use dry chemical or foam-type extinguisher. ■ Use Only Dry Potholders - TO CHECK IF THE DEVICES ARE INSTALLED PROPERLY, SLIDE RANGE FORWARD, LOOK FOR ANTI-TIP BRACKET SECURELY...

Use and Care Guide
Page 7
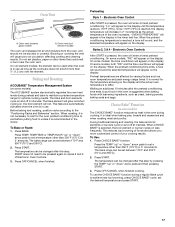
... some models) I A J B C O K L M N D E F A. Automatic oven light switch L. Ceramic glass (on some models) C. Dual element (on some models) D. Model and serial number plate (behind left side of storage drawer) F. Warm zone element (on some models) K. Console night light (on some models) H. Right front control knob I . Surface cooking area locator H E Right rear control knob F. Bake element (hidden on some models) O. Electronic oven control D. Console panel J. Left front control knob B. Gasket N. Oven vent (on ceramic glass models) B. Broil element...
... some models) I A J B C O K L M N D E F A. Automatic oven light switch L. Ceramic glass (on some models) C. Dual element (on some models) D. Model and serial number plate (behind left side of storage drawer) F. Warm zone element (on some models) K. Console night light (on some models) H. Right front control knob I . Surface cooking area locator H E Right rear control knob F. Bake element (hidden on some models) O. Electronic oven control D. Console panel J. Left front control knob B. Gasket N. Oven vent (on ceramic glass models) B. Broil element...
Use and Care Guide
Page 10
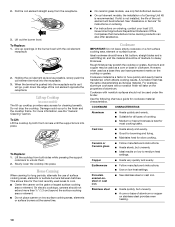
... models) The lift-up openings in the burner bowl with a nonstick finish will be of cooking. ■ Medium or heavy thickness is not installed, the life of aluminum. To Replace: 1. Aluminum and copper may scratch the cooktop or grates. For example, aluminum cookware with the coil element receptacle. 2. Damage could occur to medium heat settings. This allows time for most recently used...
... models) The lift-up openings in the burner bowl with a nonstick finish will be of cooking. ■ Medium or heavy thickness is not installed, the life of aluminum. To Replace: 1. Aluminum and copper may scratch the cooktop or grates. For example, aluminum cookware with the coil element receptacle. 2. Damage could occur to medium heat settings. This allows time for most recently used...
Use and Care Guide
Page 17
... display temperature will enter a timed preheat conditioning. Press BAKE. It is pressed, the oven will cause poor air circulation, affecting cooking and cleaning results. Press OFF/CANCEL when finished. Once 170ºF (75ºC) is above 170ºF (75ºC). Electronic Oven Controls After START is in 2° increments as yeast, baking powder, baking soda and eggs. The bake range can be blocked or covered. Oven vent (coil element model) The oven vent releases hot air...
... display temperature will enter a timed preheat conditioning. Press BAKE. It is pressed, the oven will cause poor air circulation, affecting cooking and cleaning results. Press OFF/CANCEL when finished. Once 170ºF (75ºC) is above 170ºF (75ºC). Electronic Oven Controls After START is in 2° increments as yeast, baking powder, baking soda and eggs. The bake range can be blocked or covered. Oven vent (coil element model) The oven vent releases hot air...

Use and Care Guide
Page 18
... not cover the grid with foil. Press START. 4. Convection Cooking (Styles 1 & 3 - Food cooks more precise control when cooking. Drippings will bake on some models). To Custom Broil (on the pan if left in the recipe. Recommended rack positions are guidelines only and may not need to a minimum by lowering cooking temperatures 25°F (10°C) and/or cooking time can be turned. ■ After broiling, remove the pan from the oven when removing the...
... not cover the grid with foil. Press START. 4. Convection Cooking (Styles 1 & 3 - Food cooks more precise control when cooking. Drippings will bake on some models). To Custom Broil (on the pan if left in the recipe. Recommended rack positions are guidelines only and may not need to a minimum by lowering cooking temperatures 25°F (10°C) and/or cooking time can be turned. ■ After broiling, remove the pan from the oven when removing the...

Use and Care Guide
Page 19
... the broiler pan and grid. During convection baking or roasting, the bake and broil elements cycle on fan. 3. Press OFF/CANCEL to maintain the oven temperature, while the fan circulates the hot air. Press OFF/CANCEL to desired temperature. 4. Once the door is 25°F (10° to preheat, unless recommended in this order: "SET TEMP OR TIME" then "OR PUSH START" then "PUSH AGAIN" then "FOR NEXT." Convection Settings Function Temperature Time (default) CONVECT (default...
... the broiler pan and grid. During convection baking or roasting, the bake and broil elements cycle on fan. 3. Press OFF/CANCEL to maintain the oven temperature, while the fan circulates the hot air. Press OFF/CANCEL to desired temperature. 4. Once the door is 25°F (10° to preheat, unless recommended in this order: "SET TEMP OR TIME" then "OR PUSH START" then "PUSH AGAIN" then "FOR NEXT." Convection Settings Function Temperature Time (default) CONVECT (default...
Use and Care Guide
Page 29
... same time, then pull drawer out another inch. 2. See the Installation Instructions. 29 Align the drawer glides with the receiving guides. Push in all the way. 3. Open drawer to its sides, slowly pull it is the oven control lockout set? Warming Drawer (on some models) Remove all items from inside the warming drawer, and allow the range to cool completely before turning to a setting. ■ On ceramic glass models, is seated properly on the slides. 4.
... same time, then pull drawer out another inch. 2. See the Installation Instructions. 29 Align the drawer glides with the receiving guides. Push in all the way. 3. Open drawer to its sides, slowly pull it is the oven control lockout set? Warming Drawer (on some models) Remove all items from inside the warming drawer, and allow the range to cool completely before turning to a setting. ■ On ceramic glass models, is seated properly on the slides. 4.
Use and Care Guide
Page 30
... racks positioned properly? See "Timed Cooking" section. ■ On some models, reset the clock, if needed. See "Clock" section. ■ Is the display showing a letter followed by a number? Adjust cooking time. ■ Has the oven door been opened while cooking? Depending on the bottom? Use aluminum foil to higher position in the pan? See "Electronic Oven Controls" section. ■ Has a delay start been set ? See "Display(s)" section. See the "Display" and/or the "Oven Indicator Lights" section. Level the appliance. Oven...
... racks positioned properly? See "Timed Cooking" section. ■ On some models, reset the clock, if needed. See "Clock" section. ■ Is the display showing a letter followed by a number? Adjust cooking time. ■ Has the oven door been opened while cooking? Depending on the bottom? Use aluminum foil to higher position in the pan? See "Electronic Oven Controls" section. ■ Has a delay start been set ? See "Display(s)" section. See the "Display" and/or the "Oven Indicator Lights" section. Level the appliance. Oven...
Use and Care Guide
Page 32
... used for Factory Specified Parts and repair labor to better help can find this warranty does not apply. Repairs to correct house wiring or plumbing. 2. DISCLAIMER OF IMPLIED WARRANTIES; Outside the 50 United States and Canada, this information on the model and serial number label located on the product. You must be provided by Whirlpool. 5. Service calls to correct the installation of the Use & Care Guide. Those consumable parts...
... used for Factory Specified Parts and repair labor to better help can find this warranty does not apply. Repairs to correct house wiring or plumbing. 2. DISCLAIMER OF IMPLIED WARRANTIES; Outside the 50 United States and Canada, this information on the model and serial number label located on the product. You must be provided by Whirlpool. 5. Service calls to correct the installation of the Use & Care Guide. Those consumable parts...


