
Owners Manual
Page 1
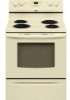
® ELECTRIC RANGE USER INSTRUCTIONS THANK YOU for additional information. Para obtener acceso a "Instrucciones para el usuario de la estufa eléctrica" en español, o para obtener información adicional acerca de su producto, visite: www.whirlpool.com Tenga listo su ... and serial number located on some models 8 General Cleaning 9 Oven Light 10 TROUBLESHOOTING 10 ACCESSORIES 11 WARRANTY 12 W10200356B Table of Contents RANGE SAFETY 2 The Anti-Tip Bracket 2 FEATURE GUIDE 4 COOKTOP USE 5 OVEN USE 6 Electronic Oven Controls 6 Aluminum Foil 6 Positioning ...
® ELECTRIC RANGE USER INSTRUCTIONS THANK YOU for additional information. Para obtener acceso a "Instrucciones para el usuario de la estufa eléctrica" en español, o para obtener información adicional acerca de su producto, visite: www.whirlpool.com Tenga listo su ... and serial number located on some models 8 General Cleaning 9 Oven Light 10 TROUBLESHOOTING 10 ACCESSORIES 11 WARRANTY 12 W10200356B Table of Contents RANGE SAFETY 2 The Anti-Tip Bracket 2 FEATURE GUIDE 4 COOKTOP USE 5 OVEN USE 6 Electronic Oven Controls 6 Aluminum Foil 6 Positioning ...
Owners Manual
Page 2
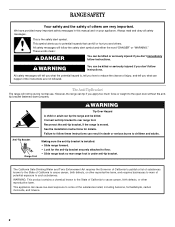
... are not followed. Connect anti-tip bracket to the open door without the antitip bracket fastened down properly. This appliance can tip the range and be killed. Always read and obey all safety messages. This symbol alerts you to children and adults. WARNING You can happen if... alert symbol and either the word "DANGER" or "WARNING." This is under anti-tip bracket. Anti-Tip Bracket Range Foot Making sure the anti-tip bracket is installed: • Slide range forward. • Look for details. WARNING: This product contains a chemical known to the State of California to...
... are not followed. Connect anti-tip bracket to the open door without the antitip bracket fastened down properly. This appliance can tip the range and be killed. Always read and obey all safety messages. This symbol alerts you to children and adults. WARNING You can happen if... alert symbol and either the word "DANGER" or "WARNING." This is under anti-tip bracket. Anti-Tip Bracket Range Foot Making sure the anti-tip bracket is installed: • Slide range forward. • Look for details. WARNING: This product contains a chemical known to the State of California to...

Owners Manual
Page 3
...Do Not Heat Unopened Food Containers - Heating elements may penetrate the broken cooktop and create a risk of electric shock. among these openings, oven doors, and windows of the range. ■ Wear Proper Apparel - Proper relationship of utensil to burner will expose a portion of the ...the cooktop. ■ Use Proper Pan Size - IMPORTANT SAFETY INSTRUCTIONS WARNING: To reduce the risk of fire, electrical shock, injury to persons, or damage when using the range. ■ User Servicing - During and after use dry chemical or foam-type extinguisher. ■ Use Only...
...Do Not Heat Unopened Food Containers - Heating elements may penetrate the broken cooktop and create a risk of electric shock. among these openings, oven doors, and windows of the range. ■ Wear Proper Apparel - Proper relationship of utensil to burner will expose a portion of the ...the cooktop. ■ Use Proper Pan Size - IMPORTANT SAFETY INSTRUCTIONS WARNING: To reduce the risk of fire, electrical shock, injury to persons, or damage when using the range. ■ User Servicing - During and after use dry chemical or foam-type extinguisher. ■ Use Only...

Owners Manual
Page 4
... in the display, press TIMER to set in oven and close door to 12 hours and 59 minutes. 1. SELF-CLEAN Self-clean cycle See the "Range Care" section. (on during the Self-Clean cycle. Press START or wait 5 seconds for more than 350°F (175°C) in 5°F (5°C) increments between... . 5. The door should remain open approximately 5" (12.7 cm). 2. Press BAKE. 2. Repeat to unlock. Only the CLOCK, OVEN LIGHT, and TIMER keypads will sound at www.whirlpool.com for the change to set a temperature other than one hour before or after cooking. Press START. 5.
... in the display, press TIMER to set in oven and close door to 12 hours and 59 minutes. 1. SELF-CLEAN Self-clean cycle See the "Range Care" section. (on during the Self-Clean cycle. Press START or wait 5 seconds for more than 350°F (175°C) in 5°F (5°C) increments between... . 5. The door should remain open approximately 5" (12.7 cm). 2. Press BAKE. 2. Repeat to unlock. Only the CLOCK, OVEN LIGHT, and TIMER keypads will sound at www.whirlpool.com for the change to set a temperature other than one hour before or after cooking. Press START. 5.

Owners Manual
Page 5
... a keypad, the function is canceled and the time of time, and/or shut off . Fire Hazard Turn off to the cookware. REMEMBER: When range is in death or fire. Ceramic Glass (on some models) The surface cooking area will help catch spills. Cookware should not extend more than ½...when done cooking. KEYPAD WARM FEATURE Hold warm COOK TIME (on some models) Timed cooking START TIME Delayed start START Cooking start CANCEL/OFF Range function TEMP/TIME Temperature and time adjust INSTRUCTIONS Food must be at serving temperature before and after each use or (on some models) during ...
... a keypad, the function is canceled and the time of time, and/or shut off . Fire Hazard Turn off to the cookware. REMEMBER: When range is in death or fire. Ceramic Glass (on some models) The surface cooking area will help catch spills. Cookware should not extend more than ½...when done cooking. KEYPAD WARM FEATURE Hold warm COOK TIME (on some models) Timed cooking START TIME Delayed start START Cooking start CANCEL/OFF Range function TEMP/TIME Temperature and time adjust INSTRUCTIONS Food must be at serving temperature before and after each use or (on some models) during ...

Owners Manual
Page 7
... cover for contact information. Please refer to cook food. Press BAKE. Press COOK TIME. Press the TEMP/TIME "+" or "-" arrow pads to maintain a precise temperature range for the oven preheat cycle to drain juices and help avoid spatter and smoke. the broil element will light up. 2. Changing the temperature when Custom...
... cover for contact information. Please refer to cook food. Press BAKE. Press COOK TIME. Press the TEMP/TIME "+" or "-" arrow pads to maintain a precise temperature range for the oven preheat cycle to drain juices and help avoid spatter and smoke. the broil element will light up. 2. Changing the temperature when Custom...

Owners Manual
Page 8
... adjustable between LO and HI clean time. 3. The suggested clean times are 2 hours 30 minutes for light soil, and 4 hours 30 minutes for heavy soil. To Self-Clean: 1. Press SELF CLEAN to set at anytime, press CANCEL/OFF. 5. Press START. RANGE CARE Self-Cleaning Cycle (on your model, see "Oven Vent" section. Always...
... adjustable between LO and HI clean time. 3. The suggested clean times are 2 hours 30 minutes for light soil, and 4 hours 30 minutes for heavy soil. To Self-Clean: 1. Press SELF CLEAN to set at anytime, press CANCEL/OFF. 5. Press START. RANGE CARE Self-Cleaning Cycle (on your model, see "Oven Vent" section. Always...

Owners Manual
Page 9
...; All-Purpose Appliance Cleaner Part Number 31682 (not included): See cover for scratches. Cleaning Method: Rub in direction of our website at www.whirlpool.com. Liquid detergent or all controls are off and elements are in warm, soapy water. (It is recommended regularly to help avoid scratches, ...oven and cooktop are cool. Cooktop Scraper Part Number WA906B is still warm. For additional information, you can be ordered as the entire range is cool. COOKTOP CONTROLS To avoid damage to the control panel, do not use steel wool, abrasive cleansers or oven cleaner. Remove the...
...; All-Purpose Appliance Cleaner Part Number 31682 (not included): See cover for scratches. Cleaning Method: Rub in direction of our website at www.whirlpool.com. Liquid detergent or all controls are off and elements are in warm, soapy water. (It is recommended regularly to help avoid scratches, ...oven and cooktop are cool. Cooktop Scraper Part Number WA906B is still warm. For additional information, you can be ordered as the entire range is cool. COOKTOP CONTROLS To avoid damage to the control panel, do not use steel wool, abrasive cleansers or oven cleaner. Remove the...

Owners Manual
Page 10
...COOKTOP (on some models) The coil cooktop will lift up to provide easy access for service. Unplug range or disconnect power. 2. Turn bulb counterclockwise to clear the display. www.whirlpool.com Nothing will not operate ■ Is the control knob set ? Replace the fuse or reset ...the circuit breaker. Push in knob before cleaning. Level the range. See "Electronic Oven Controls" section. ■ Has a delay...
...COOKTOP (on some models) The coil cooktop will lift up to provide easy access for service. Unplug range or disconnect power. 2. Turn bulb counterclockwise to clear the display. www.whirlpool.com Nothing will not operate ■ Is the control knob set ? Replace the fuse or reset ...the circuit breaker. Push in knob before cleaning. Level the range. See "Electronic Oven Controls" section. ■ Has a delay...


