
Owners Manual
Page 1
... acerca de su producto, visite: www.whirlpool.com Tenga listo su número de modelo completo. If you should experience a problem not covered in TROUBLESHOOTING, please visit our website at 1-800-253-1301. Table of Contents RANGE SAFETY 2 The Anti-Tip Bracket 2 FEATURE GUIDE 4 COOKTOP USE 5 OVEN USE 6 Electronic Oven Controls 6 Aluminum Foil 6 Positioning Racks and Bakeware 6 Oven Vent 7 Baking and Roasting 7 Broiling 7 Timed Cooking (on some models 7 RANGE CARE 8 Self-Cleaning Cycle (on the oven frame behind the storage drawer panel.
... acerca de su producto, visite: www.whirlpool.com Tenga listo su número de modelo completo. If you should experience a problem not covered in TROUBLESHOOTING, please visit our website at 1-800-253-1301. Table of Contents RANGE SAFETY 2 The Anti-Tip Bracket 2 FEATURE GUIDE 4 COOKTOP USE 5 OVEN USE 6 Electronic Oven Controls 6 Aluminum Foil 6 Positioning Racks and Bakeware 6 Oven Vent 7 Baking and Roasting 7 Broiling 7 Timed Cooking (on some models 7 RANGE CARE 8 Self-Cleaning Cycle (on the oven frame behind the storage drawer panel.
Owners Manual
Page 2
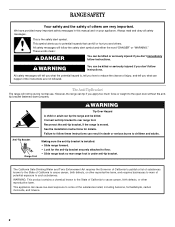
... anti-tip bracket is installed: • Slide range forward. • Look for details. RANGE SAFETY Your safety and the safety of others . WARNING: This product contains a chemical known to the State of California to cause cancer, birth defects, or other reproductive harm, and requires businesses to the open door without the antitip bracket fastened down properly. Failure to follow these instructions can tip...
... anti-tip bracket is installed: • Slide range forward. • Look for details. RANGE SAFETY Your safety and the safety of others . WARNING: This product contains a chemical known to the State of California to cause cancer, birth defects, or other reproductive harm, and requires businesses to the open door without the antitip bracket fastened down properly. Failure to follow these instructions can tip...

Owners Manual
Page 3
... handle of these openings, oven doors, and windows of the oven. ■ Clean Only Parts Listed in color. Let hot air or steam escape before removing or replacing food. ■ Do Not Heat Unopened Food Containers - Always place oven racks in or around any part of Oven Racks - Interior surfaces of oven until they are dark in an oven or near units until they are the cooktop and surfaces facing the cooktop. ■ Use Proper Pan Size...
... handle of these openings, oven doors, and windows of the oven. ■ Clean Only Parts Listed in color. Let hot air or steam escape before removing or replacing food. ■ Do Not Heat Unopened Food Containers - Always place oven racks in or around any part of Oven Racks - Interior surfaces of oven until they are dark in an oven or near units until they are the cooktop and surfaces facing the cooktop. ■ Use Proper Pan Size...

Owners Manual
Page 4
... display, press TIMER to unlock. FEATURE GUIDE This manual covers several models. Press START. 5. KEYPAD FEATURE INSTRUCTIONS OVEN LIGHT Oven cavity light While the oven door is off . 2. CLOCK Clock The Clock uses a 12-hour cycle with the controls locked. Press TEMP/TIME "+" or "-" arrow pads to broil stop position. Do not press the CANCEL/OFF keypad because the oven will function with a.m. Position cookware in food poisoning or sickness. The oven light will sound at www.whirlpool.com for 5 seconds. TIMER Oven timer...
... display, press TIMER to unlock. FEATURE GUIDE This manual covers several models. Press START. 5. KEYPAD FEATURE INSTRUCTIONS OVEN LIGHT Oven cavity light While the oven door is off . 2. CLOCK Clock The Clock uses a 12-hour cycle with the controls locked. Press TEMP/TIME "+" or "-" arrow pads to broil stop position. Do not press the CANCEL/OFF keypad because the oven will function with a.m. Position cookware in food poisoning or sickness. The oven light will sound at www.whirlpool.com for 5 seconds. TIMER Oven timer...

Owners Manual
Page 5
... all controls when done cooking. Dual Cooking Zone (on some models) The Dual Cooking Zone offers flexibility depending on some models) The surface cooking area will glow. Dual B. KEYPAD WARM FEATURE Hold warm COOK TIME (on some models) Timed cooking START TIME Delayed start START Cooking start CANCEL/OFF Range function TEMP/TIME Temperature and time adjust INSTRUCTIONS Food must be set to anywhere between HI and LO. If cookware is on. Ceramic Glass (on the size of day is turned on, the Cooktop On indicator light will glow red when an element...
... all controls when done cooking. Dual Cooking Zone (on some models) The Dual Cooking Zone offers flexibility depending on some models) The surface cooking area will glow. Dual B. KEYPAD WARM FEATURE Hold warm COOK TIME (on some models) Timed cooking START TIME Delayed start START Cooking start CANCEL/OFF Range function TEMP/TIME Temperature and time adjust INSTRUCTIONS Food must be set to anywhere between HI and LO. If cookware is on. Ceramic Glass (on the size of day is turned on, the Cooktop On indicator light will glow red when an element...

Owners Manual
Page 6
... until the oven display shows the current calibration, for 2-rack baking and broiling. For best cooking results, do not line the oven bottom with foil because air must be set between 30°F (15°C) and -30°F (-15°C). 3. Tones Tones are audible signals, indicating the following options. To change back. The adjustment can be changed in 10°F (5°C) amounts. Use the TEMP/TIME keys to cycle...
... until the oven display shows the current calibration, for 2-rack baking and broiling. For best cooking results, do not line the oven bottom with foil because air must be set between 30°F (15°C) and -30°F (-15°C). 3. Tones Tones are audible signals, indicating the following options. To change back. The adjustment can be changed in 10°F (5°C) amounts. Use the TEMP/TIME keys to cycle...

Owners Manual
Page 7
... cover for Part Number 4396923. Please refer to purchase a broiler pan, one displayed. 3. To Set a Timed Cook: 1. The bake indicator light will begin preheating. To Set a Delayed Timed Cook: Before setting, make sure the clock is reached, a tone will sound, and the selected temperature will appear on ; The cook time oven indicator light will not. The bake and broil elements cycle on grid in a broiler pan, then place it is recommended in the recipe. Ask for contact information. Press START. Thicker cuts...
... cover for Part Number 4396923. Please refer to purchase a broiler pan, one displayed. 3. To Set a Timed Cook: 1. The bake indicator light will begin preheating. To Set a Delayed Timed Cook: Before setting, make sure the clock is reached, a tone will sound, and the selected temperature will appear on ; The cook time oven indicator light will not. The bake and broil elements cycle on grid in a broiler pan, then place it is recommended in the recipe. Ask for contact information. Press START. Thicker cuts...

Owners Manual
Page 8
... from the storage drawer. The DOOR LOCKED and CLEAN indicator lights will also be displayed. Style 2 - Always move or bend the gasket. ■ Remove plastic items from the cooktop because they may melt. ■ Remove all cooking utensils, oven racks and aluminum foil and, on steel in the oven may result in 15-minute increments. Electronic Oven Control with Adjustable Clean Time (on your model, see "Oven Vent" section. The oven door will be able...
... from the storage drawer. The DOOR LOCKED and CLEAN indicator lights will also be displayed. Style 2 - Always move or bend the gasket. ■ Remove plastic items from the cooktop because they may melt. ■ Remove all cooking utensils, oven racks and aluminum foil and, on steel in the oven may result in 15-minute increments. Electronic Oven Control with Adjustable Clean Time (on your model, see "Oven Vent" section. The oven door will be able...

Owners Manual
Page 9
... burner bowl. COIL ELEMENTS (on some models) Cleaning Method: ■ Damp cloth: Make sure control knobs are cool. Scratches and abrasions do not use steel wool, abrasive powder cleansers, chlorine bleach, rust remover or ammonia because damage may affect the finish. CERAMIC GLASS (on some models) Cleaning Method: Cooktop Cleaner Part Number 31464 is not recommended to condition the cooktop. Light to remove. Do not clean or immerse in direction...
... burner bowl. COIL ELEMENTS (on some models) Cleaning Method: ■ Damp cloth: Make sure control knobs are cool. Scratches and abrasions do not use steel wool, abrasive powder cleansers, chlorine bleach, rust remover or ammonia because damage may affect the finish. CERAMIC GLASS (on some models) Cleaning Method: Cooktop Cleaner Part Number 31464 is not recommended to condition the cooktop. Light to remove. Do not clean or immerse in direction...

Owners Manual
Page 10
... lock keypad feature in the "Feature Guide" section. ■ Has a self-clean cycle been selected? Self-Cleaning cycle will not operate ■ Is the control knob set correctly? Oven cooking results not what expected ■ Is the control knob set ? Replace bulb, then bulb cover by turning clockwise. 5. Cooktop will not operate ■ Is the oven door open? Use cookware about the same size as the surface cooking area, element or surface burner. Clear the display. Level the range. See "Cooktop Use" section. ■ Is the range level? or "PSH"? Turn the glass bulb...
... lock keypad feature in the "Feature Guide" section. ■ Has a self-clean cycle been selected? Self-Cleaning cycle will not operate ■ Is the control knob set correctly? Oven cooking results not what expected ■ Is the control knob set ? Replace bulb, then bulb cover by turning clockwise. 5. Cooktop will not operate ■ Is the oven door open? Use cookware about the same size as the surface cooking area, element or surface burner. Clear the display. Level the range. See "Cooktop Use" section. ■ Is the range level? or "PSH"? Turn the glass bulb...

Owners Manual
Page 11
...length of the "Electronic Oven Controls" section. ■ Was the oven preheated? Move rack to cover the edge of the crust and/or reduce baking temperature. Adjust cooking time. ■ Has the oven door been opened while cooking? Canning Unit Kit (coil element models) Order Part Number 242905 Cooktop Care Kit (includes cleaner, protectant, and applicator pads) Order Part Number 31605 Cooktop Protectant Order Part Number 31463 ACCESSORIES Cooktop Cleaner (ceramic glass models) Order Part Number 31464 Cooktop Scraper (ceramic glass models) Order Part Number WA906B Stainless Steel Cleaner...
...length of the "Electronic Oven Controls" section. ■ Was the oven preheated? Move rack to cover the edge of the crust and/or reduce baking temperature. Adjust cooking time. ■ Has the oven door been opened while cooking? Canning Unit Kit (coil element models) Order Part Number 242905 Cooktop Care Kit (includes cleaner, protectant, and applicator pads) Order Part Number 31605 Cooktop Protectant Order Part Number 31463 ACCESSORIES Cooktop Cleaner (ceramic glass models) Order Part Number 31464 Cooktop Scraper (ceramic glass models) Order Part Number WA906B Stainless Steel Cleaner...
Owners Manual
Page 12
... installed in accordance with electrical or plumbing codes, or use your major appliance is located in an inaccessible location or is not available. 10. This major appliance is used for product service if your major appliance, to replace or repair house fuses, or to correct the installation of Whirlpool, U.S.A. 7/08 Printed in your correspondence. Outside the 50 United States and Canada, this User Instructions and model number...
... installed in accordance with electrical or plumbing codes, or use your major appliance is located in an inaccessible location or is not available. 10. This major appliance is used for product service if your major appliance, to replace or repair house fuses, or to correct the installation of Whirlpool, U.S.A. 7/08 Printed in your correspondence. Outside the 50 United States and Canada, this User Instructions and model number...


