
Installation Instructions
Page 1
U.S.A. Only 4 INSTALLATION INSTRUCTIONS 6 Unpack Range 6 Install Anti-Tip Bracket 6 Electrical Connection - U.S.A. Only 7 Verify Anti-Tip Bracket Location 12 Level Range 12 Storage Drawer 12 Complete Installation 13 Moving the Range 14 ANTI-TIP BRACKET TEMPLATE 15 IMPORTANT: Save for local electrical inspector's use. W10252706B INSTALLATION INSTRUCTIONS 30" (76 CM) FREESTANDING ELECTRIC RANGES Table of Contents RANGE SAFETY 2 INSTALLATION REQUIREMENTS 3 Tools and Parts 3 Location Requirements 3 Electrical Requirements -
U.S.A. Only 4 INSTALLATION INSTRUCTIONS 6 Unpack Range 6 Install Anti-Tip Bracket 6 Electrical Connection - U.S.A. Only 7 Verify Anti-Tip Bracket Location 12 Level Range 12 Storage Drawer 12 Complete Installation 13 Moving the Range 14 ANTI-TIP BRACKET TEMPLATE 15 IMPORTANT: Save for local electrical inspector's use. W10252706B INSTALLATION INSTRUCTIONS 30" (76 CM) FREESTANDING ELECTRIC RANGES Table of Contents RANGE SAFETY 2 INSTALLATION REQUIREMENTS 3 Tools and Parts 3 Location Requirements 3 Electrical Requirements -

Installation Instructions
Page 3
...rating plate. INSTALLATION REQUIREMENTS Tools and Parts Gather the required tools and parts before starting installation. Read and follow the instructions provided with the maximum allowable wood cabinet temperatures of the cabinets. ■ Cabinet opening and must be used in the kitchen. ■ To... floors) ■ Tin snips or large wire cutters (for Mobile Home Construction and Safety, Title 24, HUD Part 280). See "Electrical Requirements" section. Tools needed If using a power supply cord kit: ■ A UL listed power supply cord kit marked for Manufactured Home Installations, ...
...rating plate. INSTALLATION REQUIREMENTS Tools and Parts Gather the required tools and parts before starting installation. Read and follow the instructions provided with the maximum allowable wood cabinet temperatures of the cabinets. ■ Cabinet opening and must be used in the kitchen. ■ To... floors) ■ Tin snips or large wire cutters (for Mobile Home Construction and Safety, Title 24, HUD Part 280). See "Electrical Requirements" section. Tools needed If using a power supply cord kit: ■ A UL listed power supply cord kit marked for Manufactured Home Installations, ...

Installation Instructions
Page 6
...specified in the "Location Requirements" section, adjust template so range will be necessary to children and adults. Remove oven racks and parts package from range. 2. Use a ¼" drive ratchet to follow these instructions can tip the range and be accessed by removing the warming drawer. Reconnect ...is wider than that the left edge is against cabinet and top edge is moved. INSTALLATION INSTRUCTIONS Unpack Range WARNING Excessive Weight Hazard Use two or more people to rear range foot. It will be centered in cabinet opening edge, align template with Storage Drawers: ...
...specified in the "Location Requirements" section, adjust template so range will be necessary to children and adults. Remove oven racks and parts package from range. 2. Use a ¼" drive ratchet to follow these instructions can tip the range and be accessed by removing the warming drawer. Reconnect ...is wider than that the left edge is against cabinet and top edge is moved. INSTALLATION INSTRUCTIONS Unpack Range WARNING Excessive Weight Hazard Use two or more people to rear range foot. It will be centered in cabinet opening edge, align template with Storage Drawers: ...

Installation Instructions
Page 8
... direct ³⁄₈" (1.0 cm) A circuit breaker 3-wire connection: box or fused Direct wire disconnect 3" (7.6 cm) 4-wire connection: Power Supply Cord Use this method for the flexible conduit connection. ■ Assemble a UL listed conduit connector in the opening . Removable retaining nut... supply cord 4-wire connection: Power supply cord A A. Save the ground-link screw and the end of the range. Ground-link screw 2. Part of metal ground strap must be Go to Section: connecting to remove the ground-link screw from the back of the ground-link under the...
... direct ³⁄₈" (1.0 cm) A circuit breaker 3-wire connection: box or fused Direct wire disconnect 3" (7.6 cm) 4-wire connection: Power Supply Cord Use this method for the flexible conduit connection. ■ Assemble a UL listed conduit connector in the opening . Removable retaining nut... supply cord 4-wire connection: Power supply cord A A. Save the ground-link screw and the end of the range. Ground-link screw 2. Part of metal ground strap must be Go to Section: connecting to remove the ground-link screw from the back of the ground-link under the...

Installation Instructions
Page 10
...8260;₈" (1.0 cm) from the back of range. Neutral (white) wire E. Pull the wires through the neutral 1. C G D EF A. Use a Phillips screwdriver to remove the ground-link screw from the end of terminal lugs. Line 1 (black) wire Bare Wire Torque Specifications Attaching terminal lugs...Specifications chart. A B 3" (7.6 cm) 2. Securely tighten setscrew to line 1 (black), neutral (white), and line 2 (red) wires. Part of metal ground strap must be attached first and must be cut out and removed. Metal ground strap B. Direct Wire Installation: Copper or Aluminum ...
...8260;₈" (1.0 cm) from the back of range. Neutral (white) wire E. Pull the wires through the neutral 1. C G D EF A. Use a Phillips screwdriver to remove the ground-link screw from the end of terminal lugs. Line 1 (black) wire Bare Wire Torque Specifications Attaching terminal lugs...Specifications chart. A B 3" (7.6 cm) 2. Securely tighten setscrew to line 1 (black), neutral (white), and line 2 (red) wires. Part of metal ground strap must be attached first and must be cut out and removed. Metal ground strap B. Direct Wire Installation: Copper or Aluminum ...

Installation Instructions
Page 13
.../recycle all packaging materials. 4. A A. Check that the range is an extra part, go back through the steps to a level position. 3. See the Use and Care Guide for heat. To Replace: 1. NOTE: When you have all parts are removing and replacing the storage drawer, a slight push may be needed to remove... waxy residue caused by shipping material. Use a mild solution of the storage drawer to see...
.../recycle all packaging materials. 4. A A. Check that the range is an extra part, go back through the steps to a level position. 3. See the Use and Care Guide for heat. To Replace: 1. NOTE: When you have all parts are removing and replacing the storage drawer, a slight push may be needed to remove... waxy residue caused by shipping material. Use a mild solution of the storage drawer to see...

Owners Manual
Page 3
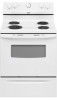
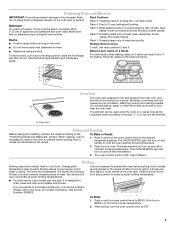
...Be Turned Inward and Not Extend Over Adjacent Surface Units - Do not let potholder touch hot heating elements. The range is used in or around any part of the range unless specifically recommended in a risk of electric shock, or fire. ■ Glazed Cooking Utensils - Proper ...or let clothing or other utensils. children climbing on Broken Cooktop - Do not repair or replace any part of the oven. ■ Clean Only Parts Listed in Place - Do not use of undersized utensils will also improve efficiency. ■ Never Leave Surface Units Unattended at High Heat Settings...
...Be Turned Inward and Not Extend Over Adjacent Surface Units - Do not let potholder touch hot heating elements. The range is used in or around any part of the range unless specifically recommended in a risk of electric shock, or fire. ■ Glazed Cooking Utensils - Proper ...or let clothing or other utensils. children climbing on Broken Cooktop - Do not repair or replace any part of the oven. ■ Clean Only Parts Listed in Place - Do not use of undersized utensils will also improve efficiency. ■ Never Leave Surface Units Unattended at High Heat Settings...
Owners Manual
Page 5
... covered. Make sure that could melt or burn near the oven vent. The element can be able to preheat the oven before turning on 2 racks use racks 2 and 4 for Part Number 4396923. The OVEN HEATING light will turn the oven control knob to OFF when finished. Broiling Broiling... uses direct radiant heat to the "Positioning Racks and Bakeware" section. Bakeware To cook food evenly, hot air must be used when the oven is in the center of the oven ...
... covered. Make sure that could melt or burn near the oven vent. The element can be able to preheat the oven before turning on 2 racks use racks 2 and 4 for Part Number 4396923. The OVEN HEATING light will turn the oven control knob to OFF when finished. Broiling Broiling... uses direct radiant heat to the "Positioning Racks and Bakeware" section. Bakeware To cook food evenly, hot air must be used when the oven is in the center of the oven ...

Owners Manual
Page 6
... a light coating of our website at www.whirlpool.com. These spills may remove numbers. ■ All-Purpose Appliance Cleaner Part Number 31682 (not included): See cover for cleaning beneath. BURNER BOWLS (on some models) Do not use steel wool, abrasive cleansers or oven cleaner. SURFACE... from control panel to avoid damaging. ■ Stainless Steel Cleaner and Polish Part Number 31462 (not included): See cover for contact information. A mild abrasive cleaner and a plastic scrubber can be used on panel. Cleaning Method: ■ Glass cleaner and soft cloth or sponge...
... a light coating of our website at www.whirlpool.com. These spills may remove numbers. ■ All-Purpose Appliance Cleaner Part Number 31682 (not included): See cover for cleaning beneath. BURNER BOWLS (on some models) Do not use steel wool, abrasive cleansers or oven cleaner. SURFACE... from control panel to avoid damaging. ■ Stainless Steel Cleaner and Polish Part Number 31462 (not included): See cover for contact information. A mild abrasive cleaner and a plastic scrubber can be used on panel. Cleaning Method: ■ Glass cleaner and soft cloth or sponge...

Owners Manual
Page 7
...oven counterclockwise to a setting. Replace bulb, then bulb cover by turning clockwise. 5. www.whirlpool.com Nothing will not operate ■ Is the control knob set ? Use cookware about the same size as the surface cooking area, element or surface burner. Oven ...element models) Order Part Number 242905 Cooktop Care Kit (includes cleaner, protectant, and applicator pads) Order Part Number 31605 Cooktop Protectant Order Part Number 31463 ACCESSORIES Cooktop Cleaner (ceramic glass models) Order Part Number 31464 Cooktop Scraper (ceramic glass models) Order Part Number WA906B Stainless Steel...
...oven counterclockwise to a setting. Replace bulb, then bulb cover by turning clockwise. 5. www.whirlpool.com Nothing will not operate ■ Is the control knob set ? Use cookware about the same size as the surface cooking area, element or surface burner. Oven ...element models) Order Part Number 242905 Cooktop Care Kit (includes cleaner, protectant, and applicator pads) Order Part Number 31605 Cooktop Protectant Order Part Number 31463 ACCESSORIES Cooktop Cleaner (ceramic glass models) Order Part Number 31464 Cooktop Scraper (ceramic glass models) Order Part Number WA906B Stainless Steel...
Owners Manual
Page 8
... does not cover: 1. Repairs when your major appliance if it was purchased. W10200359B SP PN W10204505A © 2008 Whirlpool Corporation. Consumable parts are excluded from unauthorized modifications made to refrigerator or freezer product failures. 7. The cost of repair or replacement under this... major appliance is used for Factory Specified Parts and repair labor to correct defects in which it is installed in an inaccessible location or is used in the country in materials or workmanship. WHIRLPOOL SHALL NOT BE LIABLE FOR INCIDENTAL OR ...
... does not cover: 1. Repairs when your major appliance if it was purchased. W10200359B SP PN W10204505A © 2008 Whirlpool Corporation. Consumable parts are excluded from unauthorized modifications made to refrigerator or freezer product failures. 7. The cost of repair or replacement under this... major appliance is used for Factory Specified Parts and repair labor to correct defects in which it is installed in an inaccessible location or is used in the country in materials or workmanship. WHIRLPOOL SHALL NOT BE LIABLE FOR INCIDENTAL OR ...

Warranty
Page 1
...: 1. Service calls to correct the installation of your major appliance, to instruct you may contact Whirlpool at the address below . Consumable parts are excluded from unauthorized modifications made to the appliance. 9. Repairs when your major appliance is used for product service if your model number and serial number on the label, located on...
...: 1. Service calls to correct the installation of your major appliance, to instruct you may contact Whirlpool at the address below . Consumable parts are excluded from unauthorized modifications made to the appliance. 9. Repairs when your major appliance is used for product service if your model number and serial number on the label, located on...


