Use and Care Guide
Page 3
... SAFETY INSTRUCTIONS wWARNING To reduce the risk of fire, electrical shock, injury to persons, or damage when using the cooktop. •Install or locate the cooktop only in color. wWARNING This symbol alerts you to such dangers as described in use. The cooktop must be burned or injured while climbing on it is in this manual. •Do not touch surface...
... SAFETY INSTRUCTIONS wWARNING To reduce the risk of fire, electrical shock, injury to persons, or damage when using the cooktop. •Install or locate the cooktop only in color. wWARNING This symbol alerts you to such dangers as described in use. The cooktop must be burned or injured while climbing on it is in this manual. •Do not touch surface...
Use and Care Guide
Page 4
... store flammable materials on a broken cooktop. Only certain types of clothing or pot holders. Contact a qualified technician immediately. •Select a pan with aluminum foil or other surface units. Cooking without breaking due to the sudden change in place during cooking. If cooktop should break, cleaning solutions and spillovers could ignite. Do not use on fire. •Do not heat unopened containers. A boilover could...
... store flammable materials on a broken cooktop. Only certain types of clothing or pot holders. Contact a qualified technician immediately. •Select a pan with aluminum foil or other surface units. Cooking without breaking due to the sudden change in place during cooking. If cooktop should break, cleaning solutions and spillovers could ignite. Do not use on fire. •Do not heat unopened containers. A boilover could...
Use and Care Guide
Page 5
... or fire could produce noxious fumes if applied to collect around cooktop. COOKTOP SAFETY Grease •Grease is not in use. •Clean only parts listed in water. Smother flaming pan by covering with a well-fitted lid, cookie sheet, or flat tray. Some cleaners could result. •Do not repair or replace any devices or accessories that are not specifically recommended in this manual.
... or fire could produce noxious fumes if applied to collect around cooktop. COOKTOP SAFETY Grease •Grease is not in use. •Clean only parts listed in water. Smother flaming pan by covering with a well-fitted lid, cookie sheet, or flat tray. Some cleaners could result. •Do not repair or replace any devices or accessories that are not specifically recommended in this manual.
Use and Care Guide
Page 6
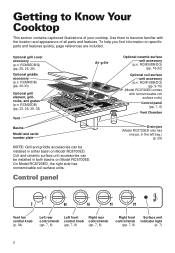
..., 28, 29, 33) Air grille Vent Basins Model and serial number plate NOTE: Grill and griddle accessories can be installed in the left bay.) (p. 29) Vent fan control knob (p. 34) Left rear control knob (pp. 7, 8) Left front control knob (pp. 7, 8) Right rear control knob (pp. 7, 8) Right front control knob (pp. 7, 8) Surface unit indicator light (p. 7) 6 RCM30DB/DQ) (pp. 16-22) Optional coil surface unit accessory (p.n. RCM50DB/Q) (pp. 25, 26, 29) Optional griddle accessory (p.n. Control panel Optional ceramic surface unit accessory (p.n. RCM10DB...
..., 28, 29, 33) Air grille Vent Basins Model and serial number plate NOTE: Grill and griddle accessories can be installed in the left bay.) (p. 29) Vent fan control knob (p. 34) Left rear control knob (pp. 7, 8) Left front control knob (pp. 7, 8) Right rear control knob (pp. 7, 8) Right front control knob (pp. 7, 8) Surface unit indicator light (p. 7) 6 RCM30DB/DQ) (pp. 16-22) Optional coil surface unit accessory (p.n. RCM50DB/Q) (pp. 25, 26, 29) Optional griddle accessory (p.n. Control panel Optional ceramic surface unit accessory (p.n. RCM10DB...
Use and Care Guide
Page 7
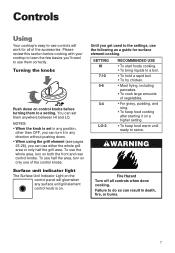
... on control knobs before turning them correctly. To use the whole area, turn on a higher setting. • To keep food warm until ready to serve. You can turn on . NOTES: • When the knob is on only one of the control knobs. To use half the area, turn it on both the front and rear control knobs. Surface unit indicator light The Surface Unit Indicator Light on the control panel will work for surface element cooking...
... on control knobs before turning them correctly. To use the whole area, turn on a higher setting. • To keep food warm until ready to serve. You can turn on . NOTES: • When the knob is on only one of the control knobs. To use half the area, turn it on both the front and rear control knobs. Surface unit indicator light The Surface Unit Indicator Light on the control panel will work for surface element cooking...
Use and Care Guide
Page 9
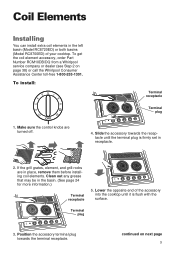
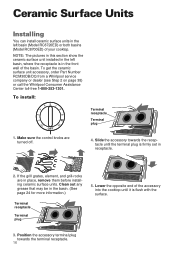
... the control knobs are in the left basin (Model RC8720ED) or both basins (Model RC8700ED) of the accessory into the cooktop until the terminal plug is flush with the surface. continued on page 38) or call the Whirlpool Consumer Assistance Center toll-free 1-800-253-1301. To get the coil element accessory, order Part Number RCM10DB/DQ from a Whirlpool service company or dealer (see Step...
... the control knobs are in the left basin (Model RC8720ED) or both basins (Model RC8700ED) of the accessory into the cooktop until the terminal plug is flush with the surface. continued on page 38) or call the Whirlpool Consumer Assistance Center toll-free 1-800-253-1301. To get the coil element accessory, order Part Number RCM10DB/DQ from a Whirlpool service company or dealer (see Step...

Use and Care Guide
Page 11
... boiling. COIL ELEMENTS Using Cookware tips • Select a pan that is about the same size as some porcelain enamelware), or dented bottoms could cause severe overheating, which has boiled dry, on a hot surface unit. Choose pans that are fairly lightweight. • The pan material (metal or glass) affects how fast heat transfers from the surface unit through the pan material and how...
... boiling. COIL ELEMENTS Using Cookware tips • Select a pan that is about the same size as some porcelain enamelware), or dented bottoms could cause severe overheating, which has boiled dry, on a hot surface unit. Choose pans that are fairly lightweight. • The pan material (metal or glass) affects how fast heat transfers from the surface unit through the pan material and how...
Use and Care Guide
Page 16
... basins (Model RC8700ED) of your cooktop. Slide the accessory towards the terminal receptacle. 16 If the grill grates, element, and grill-rocks are turned off. 4. Position the accessory terminal plug towards the receptacle until the terminal plug is firmly set in the front wall of the accessory into the cooktop until it is in receptacle. 2. To install: Terminal receptacle Terminal plug 1. Make sure the control knobs are...
... basins (Model RC8700ED) of your cooktop. Slide the accessory towards the terminal receptacle. 16 If the grill grates, element, and grill-rocks are turned off. 4. Position the accessory terminal plug towards the receptacle until the terminal plug is firmly set in the front wall of the accessory into the cooktop until it is in receptacle. 2. To install: Terminal receptacle Terminal plug 1. Make sure the control knobs are...
Use and Care Guide
Page 18
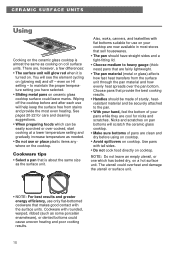
... heating. See pages 20-22 for care and cleaning suggestions. • When preparing foods which has boiled dry, on ceramic glass cooktop surface could overheat and damage the utensil or surface unit. • NOTE: For best results and greater energy efficiency, use only flat-bottomed cookware that makes good contact with tall sides. • Do not cook food directly on HI setting...
... heating. See pages 20-22 for care and cleaning suggestions. • When preparing foods which has boiled dry, on ceramic glass cooktop surface could overheat and damage the utensil or surface unit. • NOTE: For best results and greater energy efficiency, use only flat-bottomed cookware that makes good contact with tall sides. • Do not cook food directly on HI setting...
Use and Care Guide
Page 20
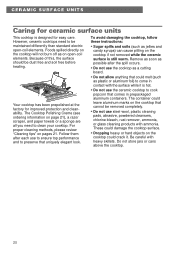
..., ceramic cooktops need to clean your cooktop. These could damage the cooktop surface. • Dropping heavy or hard objects on the cooktop could leave aluminum marks on the cooktop that cannot be removed completely. • Do not use steel wool, plastic cleaning pads, abrasive, powdered cleansers, chlorine bleach, rust remover, ammonia, or glass cleaning products with ammonia. Follow them after the spill occurs. • Do not use the cooktop as a cutting...
..., ceramic cooktops need to clean your cooktop. These could damage the cooktop surface. • Dropping heavy or hard objects on the cooktop could leave aluminum marks on the cooktop that cannot be removed completely. • Do not use steel wool, plastic cleaning pads, abrasive, powdered cleansers, chlorine bleach, rust remover, ammonia, or glass cleaning products with ammonia. Follow them after the spill occurs. • Do not use the cooktop as a cutting...

Use and Care Guide
Page 21
...: IF THERE ARE Sugary spills and soils (such as Surface Unit Indicator Light(s) goes off . If heated before heating the cooktop again. Steps to order. How to keep the razor blade as flat against the cooktop as a result of paper towels to wipe up the spillover, being careful not to order by polishing entire cooktop with clean water and dry your ceramic cooktop.
...: IF THERE ARE Sugary spills and soils (such as Surface Unit Indicator Light(s) goes off . If heated before heating the cooktop again. Steps to order. How to keep the razor blade as flat against the cooktop as a result of paper towels to wipe up the spillover, being careful not to order by polishing entire cooktop with clean water and dry your ceramic cooktop.

Use and Care Guide
Page 35
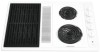
..., or cuts. Filter NOTE: The vent fan system turns on . Filter should rest against the fan wall, the ventilation system will not work well. • Clean whenever the chamber becomes soiled. 35 NOTE: Do not run the ventilation system without the filter. Failure to follow these instructions can result in sink or dishwasher when soiled. If the filter is used. VENT VENT Caring for vent wWARNING Removal tab Air grille Vent Electrical Shock...
..., or cuts. Filter NOTE: The vent fan system turns on . Filter should rest against the fan wall, the ventilation system will not work well. • Clean whenever the chamber becomes soiled. 35 NOTE: Do not run the ventilation system without the filter. Failure to follow these instructions can result in sink or dishwasher when soiled. If the filter is used. VENT VENT Caring for vent wWARNING Removal tab Air grille Vent Electrical Shock...
Use and Care Guide
Page 36
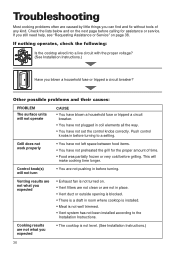
... or Service" on . • Vent filters are not clean or are not pushing in room where cooktop is installed. • Meat is not turned on page 38. If you blown a household fuse or tripped a circuit breaker? Grill does not work properly Control knob(s) will not operate CAUSE • You have blown a household fuse or tripped a circuit breaker. • You have not plugged in before turning. Push control knobs in coil elements all...
... or Service" on . • Vent filters are not clean or are not pushing in room where cooktop is installed. • Meat is not turned on page 38. If you blown a household fuse or tripped a circuit breaker? Grill does not work properly Control knob(s) will not operate CAUSE • You have blown a household fuse or tripped a circuit breaker. • You have not plugged in before turning. Push control knobs in coil elements all...
Use and Care Guide
Page 39
... OF IMPLIED WARRANTIES; Contact your appliance if it is installed in an inaccessible location or is used for units operated outside the United States or Canada. 7. If you how to correct house wiring or plumbing. 2. Service must be provided by calling Whirlpool. The removal and reinstallation of the Use & Care Guide. Repairs when your major appliance, to replace or repair house fuses or to use . 4. ITEMS WHIRLPOOL WILL...
... OF IMPLIED WARRANTIES; Contact your appliance if it is installed in an inaccessible location or is used for units operated outside the United States or Canada. 7. If you how to correct house wiring or plumbing. 2. Service must be provided by calling Whirlpool. The removal and reinstallation of the Use & Care Guide. Repairs when your major appliance, to replace or repair house fuses or to use . 4. ITEMS WHIRLPOOL WILL...
Installation Instructions
Page 1
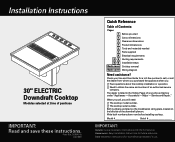
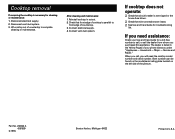
... dealer from whom you purchased the appliance when you start 1 Cutout dimensions 1 Clearance dimensions 1 Product dimensions 1 Tools and materials needed 1 Parts supplied 4 Electrical requirements 2 - 3 Venting requirements 4 - 5 Installation steps Back cover Cooktop removal Back cover Wiring diagram Need assistance? Model Serial IMPORTANT: Installer: Leave Installation Instructions with the homeowner. The dealer is listed in the Yellow Pages of your Use and Care Guide for a toll-free number to obtain the name and number of Contents: Pages 1 Before you : ࠜ Have questions about...
... dealer from whom you purchased the appliance when you start 1 Cutout dimensions 1 Clearance dimensions 1 Product dimensions 1 Tools and materials needed 1 Parts supplied 4 Electrical requirements 2 - 3 Venting requirements 4 - 5 Installation steps Back cover Cooktop removal Back cover Wiring diagram Need assistance? Model Serial IMPORTANT: Installer: Leave Installation Instructions with the homeowner. The dealer is listed in the Yellow Pages of your Use and Care Guide for a toll-free number to obtain the name and number of Contents: Pages 1 Before you : ࠜ Have questions about...
Installation Instructions
Page 2
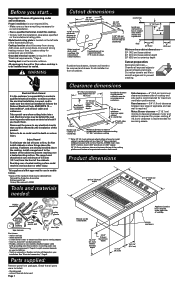
... 2 for removing grease containers. 18" (45.7 cm) minimum clearance upper cabinet to countertop 3/4" (1.9 cm) Do Not seal cooktop to countertop. 6" both sides (15.2 cm) Minimum distance to backsplash or vertical wall Select required duct cutout (see "Electrical requirements" Page 4). latest edition*, and all governing codes and ordinances. Reaching over a heated cooking surface. countertop 20-7/8" (53.2 cm) cutout depth 1-7/8" (4.8 cm) minimum space to prevent chipping laminate. Cut radius corners and file to smooth edges...
... 2 for removing grease containers. 18" (45.7 cm) minimum clearance upper cabinet to countertop 3/4" (1.9 cm) Do Not seal cooktop to countertop. 6" both sides (15.2 cm) Minimum distance to backsplash or vertical wall Select required duct cutout (see "Electrical requirements" Page 4). latest edition*, and all governing codes and ordinances. Reaching over a heated cooking surface. countertop 20-7/8" (53.2 cm) cutout depth 1-7/8" (4.8 cm) minimum space to prevent chipping laminate. Cut radius corners and file to smooth edges...
Installation Instructions
Page 3
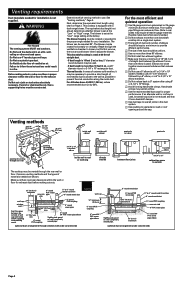
... PVC coupling with a dual range blower. Do Not cut , then a supporting frame must be kept to a minimum to adjust the blower. See "Venting methods," Page 2. The blower is proper clearance within the wall or floor for exhaust duct before making cutouts, make sure there is set at 60 feet of elbows should be uniform. ࠜ Use no more than one elbow...
... PVC coupling with a dual range blower. Do Not cut , then a supporting frame must be kept to a minimum to adjust the blower. See "Venting methods," Page 2. The blower is proper clearance within the wall or floor for exhaust duct before making cutouts, make sure there is set at 60 feet of elbows should be uniform. ࠜ Use no more than one elbow...
Installation Instructions
Page 5
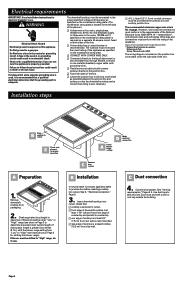
...-delay fuse or circuit breaker is ever necessary. The downdraft cooktop must be moved if servicing is recommended. WARNING Electrical Shock Hazard Electrical ground is adequate. If blower must be obtained from packaging. 2. See "Venting requirements," Pages 2-3. Check A blower range setting Make D electrical connection Connect C duct system B Installation It may be connected to the junction box. ࠜ Fuse both sides of the National Electrical Code, ANSI/NFPA 70 - The recommended minimum copper wire size...
...-delay fuse or circuit breaker is ever necessary. The downdraft cooktop must be moved if servicing is recommended. WARNING Electrical Shock Hazard Electrical ground is adequate. If blower must be obtained from packaging. 2. See "Venting requirements," Pages 2-3. Check A blower range setting Make D electrical connection Connect C duct system B Installation It may be connected to the junction box. ࠜ Fuse both sides of the National Electrical Code, ANSI/NFPA 70 - The recommended minimum copper wire size...
Installation Instructions
Page 6
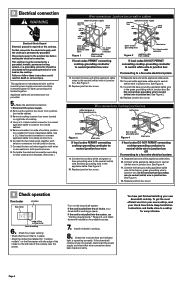
... "Venting requirements," Pages 2-3, and check ductwork installation for possible causes. 7. Keep Installation Instructions and Guide close to neutral (white) wire in death or serious injury. Remove the junction box cover from your new cooktop, read your new downdraft cooktop. Remove cooktop junction box cover located on the left side of appliance cable. Connect the two black wires together with twiston connectors in junction box. See Figure 1. 10. Connect white appliance cable wire to cooktop for "cooktop models" on...
... "Venting requirements," Pages 2-3, and check ductwork installation for possible causes. 7. Keep Installation Instructions and Guide close to neutral (white) wire in death or serious injury. Remove the junction box cover from your new cooktop, read your new downdraft cooktop. Remove cooktop junction box cover located on the left side of appliance cable. Connect the two black wires together with twiston connectors in junction box. See Figure 1. 10. Connect white appliance cable wire to cooktop for "cooktop models" on...
Installation Instructions
Page 7
... fuse blown. ࠜ Check that circuit breaker is parallel to front edge of the plenum. Major - If cooktop does not operate: ࠜ Check that wire connections are intact. ࠜ See Use and Care Guide for a toll-free number to complete cleaning or maintenance. If you purchased this appliance. Connect vent duct system. When you call the dealer from whom you need the cooktop model number and serial number. Reinstall cooktop in U.S.A. Part...
... fuse blown. ࠜ Check that circuit breaker is parallel to front edge of the plenum. Major - If cooktop does not operate: ࠜ Check that wire connections are intact. ࠜ See Use and Care Guide for a toll-free number to complete cleaning or maintenance. If you purchased this appliance. Connect vent duct system. When you call the dealer from whom you need the cooktop model number and serial number. Reinstall cooktop in U.S.A. Part...


