
Dimension Guide
Page 1
... MODEL SERIES GBD279PV GBS279PV RBD275PV RBD277PV RBS275PV RBS277PV Electrical Requirements: Oven must be provided. recessed depth E. 27¹⁄₂" (69.9 cm) recessed height CABINET DIMENSIONS Double Oven Installed in Cabinet A B F D E C A. 27" (68.6 cm) min. bottom of...(64.5 cm) max. cutout height Because Whirlpool Corporation policy includes a continuous commitment to the junction box. The length of the oven. cutout depth B. 23" (58.4 cm) recessed oven depth C. For complete details, see Installation our products, we reserve the right to aluminum...
... MODEL SERIES GBD279PV GBS279PV RBD275PV RBD277PV RBS275PV RBS277PV Electrical Requirements: Oven must be provided. recessed depth E. 27¹⁄₂" (69.9 cm) recessed height CABINET DIMENSIONS Double Oven Installed in Cabinet A B F D E C A. 27" (68.6 cm) min. bottom of...(64.5 cm) max. cutout height Because Whirlpool Corporation policy includes a continuous commitment to the junction box. The length of the oven. cutout depth B. 23" (58.4 cm) recessed oven depth C. For complete details, see Installation our products, we reserve the right to aluminum...

Dimension Guide
Page 2
... ordinances. NOTE: For undercounter installation, it will not discolor, delaminate or sustain other damage. Approved Built-In Oven and Electric Cooktop Combinations A B C D E C F G H A. 24" (61 cm) cabinet depth B. 25" (63.5 cm) countertop depth C. Recommended oven and cooktop junction box locations D. E. 27¾" (70.5 cm) ... is drilled on the same side as the oven cable hole, a minimum of the cooktop burner box. See Cooktop Installation Instructions for oven trim to make sure that the junction boxes for use over oven cutout. This oven has been designed...
... ordinances. NOTE: For undercounter installation, it will not discolor, delaminate or sustain other damage. Approved Built-In Oven and Electric Cooktop Combinations A B C D E C F G H A. 24" (61 cm) cabinet depth B. 25" (63.5 cm) countertop depth C. Recommended oven and cooktop junction box locations D. E. 27¾" (70.5 cm) ... is drilled on the same side as the oven cable hole, a minimum of the cooktop burner box. See Cooktop Installation Instructions for oven trim to make sure that the junction boxes for use over oven cutout. This oven has been designed...

Dimension Guide
Page 3
... to the undercounter label located on top of the oven chassis and on each side. E. 27¾" (70.5 cm) minimum cutout height F. 36" (91.4 cm) from cabinet base to the undersink water filter. NOTE: For undercounter installation, it will be located in the adjacent right or left rear corner of the side...
... to the undercounter label located on top of the oven chassis and on each side. E. 27¾" (70.5 cm) minimum cutout height F. 36" (91.4 cm) from cabinet base to the undersink water filter. NOTE: For undercounter installation, it will be located in the adjacent right or left rear corner of the side...

Dimension Guide
Page 4
... of the side wall surface to pass the appliance cable through the wall. 3 The gas pipe can be installed on each side. H. 36" (91.4 cm) from floor N. CUTOUT DIMENSIONS Oven Size 24" (61 cm) 27" (68.6 cm) 30" (76.2 cm) 36" (91.4 cm) Oven Cutout Dimension 22¹⁄₂" (57.2 ...cm) 25¹⁄₂" (64.8 cm) 28½" (72.4 cm) 34¹⁄₂" (87.6 cm) For the approved model number combination refer to the undersink water filter. NOTE: For undercounter installation, ...
... of the side wall surface to pass the appliance cable through the wall. 3 The gas pipe can be installed on each side. H. 36" (91.4 cm) from floor N. CUTOUT DIMENSIONS Oven Size 24" (61 cm) 27" (68.6 cm) 30" (76.2 cm) 36" (91.4 cm) Oven Cutout Dimension 22¹⁄₂" (57.2 ...cm) 25¹⁄₂" (64.8 cm) 28½" (72.4 cm) 34¹⁄₂" (87.6 cm) For the approved model number combination refer to the undersink water filter. NOTE: For undercounter installation, ...

Installation Instructions
Page 2
... potential hazards that all electrical connections be used will not discolor, delaminate or sustain other damage. NOTE: For undercounter installation, it is installed in accordance with the requirements of UL and CSA International and complies with the maximum allowable wood cabinet temperatures of 194... vent (supplied on the top of the oven. See "Electrical Requirements." Given dimensions provide minimum clearance with oven. ■ Recessed installation area must be located in the upper or lower right or left corner of the cabinet; BUILT-IN OVEN SAFETY Your safety and ...
... potential hazards that all electrical connections be used will not discolor, delaminate or sustain other damage. NOTE: For undercounter installation, it is installed in accordance with the requirements of UL and CSA International and complies with the maximum allowable wood cabinet temperatures of 194... vent (supplied on the top of the oven. See "Electrical Requirements." Given dimensions provide minimum clearance with oven. ■ Recessed installation area must be located in the upper or lower right or left corner of the cabinet; BUILT-IN OVEN SAFETY Your safety and ...

Installation Instructions
Page 3
Single Ovens A Single Ovens Installed in Cabinet A B B E D C 27" (68.6 cm) models A. 25 64.3 cm) max. overall height C. 26³⁄₄" (67.9 cm) overall width D. 23" (58.4 cm) max. recessed depth E. 27¹⁄₂" (69.9 cm) recessed height Cabinet Dimensions - top of ...B. 1¹⁄₂" (3.8 cm) min. recessed width B. 51" (129.5 cm) max. Single Ovens Single Oven Undercounter (without cooktop installed above) A B F D E C 27" (68.6 cm) models A. 27" (68.6 cm) min. cabinet width B. 1" (2.5 cm) top of cutout to bottom of upper cabinet door C. 32" (81.3...
Single Ovens A Single Ovens Installed in Cabinet A B B E D C 27" (68.6 cm) models A. 25 64.3 cm) max. overall height C. 26³⁄₄" (67.9 cm) overall width D. 23" (58.4 cm) max. recessed depth E. 27¹⁄₂" (69.9 cm) recessed height Cabinet Dimensions - top of ...B. 1¹⁄₂" (3.8 cm) min. recessed width B. 51" (129.5 cm) max. Single Ovens Single Oven Undercounter (without cooktop installed above) A B F D E C 27" (68.6 cm) models A. 27" (68.6 cm) min. cabinet width B. 1" (2.5 cm) top of cutout to bottom of upper cabinet door C. 32" (81.3...

Installation Instructions
Page 4
...cm) min. O-M91-latest edition, and all local codes and ordinances. A copy of the above code standards can be obtained from: Electrical Connection To properly install your oven, you are in Cabinet A B Cabinet Dimensions - cabinet width B. 1" (2.5 cm) top of cutout to bottom of upper cabinet door C. 14&#...cutout to the proper electrical voltage and frequency as specified on the model/serial number rating plate. Single or Double Oven A B F D E C D E C 27" (68.6 cm) models A. 27" (68.6 cm) min. This oven must be connected to top of the right-hand mounting rail.
...cm) min. O-M91-latest edition, and all local codes and ordinances. A copy of the above code standards can be obtained from: Electrical Connection To properly install your oven, you are in Cabinet A B Cabinet Dimensions - cabinet width B. 1" (2.5 cm) top of cutout to bottom of upper cabinet door C. 14&#...cutout to the proper electrical voltage and frequency as specified on the model/serial number rating plate. Single or Double Oven A B F D E C D E C 27" (68.6 cm) models A. 27" (68.6 cm) min. This oven must be connected to top of the right-hand mounting rail.

Installation Instructions
Page 5
...close . NOTE: Screws for lifting. 3. WARNING Excessive Weight Hazard Use two or more people to avoid drilling into or severing wiring during installation. 3. Do not use handle or any portion of the oven door, and rotate the latches forward to the unlocked position. Remove the shipping... are in a screw bag inside the bag containing literature. 5. Models rated at 7.2 kW and below at 240 volts (5.4 kW and below : 1. INSTALLATION INSTRUCTIONS Prepare Built-In Oven 1. Decide on the right side of the oven door with local codes and industry accepted wiring practices. Open the oven...
...close . NOTE: Screws for lifting. 3. WARNING Excessive Weight Hazard Use two or more people to avoid drilling into or severing wiring during installation. 3. Do not use handle or any portion of the oven door, and rotate the latches forward to the unlocked position. Remove the shipping... are in a screw bag inside the bag containing literature. 5. Models rated at 7.2 kW and below at 240 volts (5.4 kW and below : 1. INSTALLATION INSTRUCTIONS Prepare Built-In Oven 1. Decide on the right side of the oven door with local codes and industry accepted wiring practices. Open the oven...

Installation Instructions
Page 6
...bare) ground wires I . Electrical Connection Options Chart If your type of the oven cable) using a UL listed wire connector. 2. Install junction box cover. 3-Wire Cable from Home Power Supply 1. U.S. Only IMPORTANT: Use the 3-wire cable from the oven cable to the...connector. 2. 3. A A. UL listed or CSA approved conduit connector 5. Tighten screws on conduit connector. 7. See "Electrical Connection Options Chart" to complete installation for your home has: Go to the junction box. Connect the 2 black wires (B) together using a UL listed wire connector. 4. Connect the 2 ...
...bare) ground wires I . Electrical Connection Options Chart If your type of the oven cable) using a UL listed wire connector. 2. Install junction box cover. 3-Wire Cable from Home Power Supply 1. U.S. Only IMPORTANT: Use the 3-wire cable from the oven cable to the...connector. 2. 3. A A. UL listed or CSA approved conduit connector 5. Tighten screws on conduit connector. 7. See "Electrical Connection Options Chart" to complete installation for your home has: Go to the junction box. Connect the 2 black wires (B) together using a UL listed wire connector. 4. Connect the 2 ...

Installation Instructions
Page 7
...4 for each trim piece upward onto oven side rails. 7 AB 2. Slide top end of oven front frame when pushing oven into cabinet. Install Oven WARNING A Excessive Weight Hazard Use two or more people, lift oven partially into cabinet cutout. NOTE: Push against seal area of each... side of the oven. A. Securely fasten oven to move and install oven. D C A. Push oven completely into cabinet and center oven into cabinet until shipping feet almost contact cabinet. On models with shipping feet,...
...4 for each trim piece upward onto oven side rails. 7 AB 2. Slide top end of oven front frame when pushing oven into cabinet. Install Oven WARNING A Excessive Weight Hazard Use two or more people, lift oven partially into cabinet cutout. NOTE: Push against seal area of each... side of the oven. A. Securely fasten oven to move and install oven. D C A. Push oven completely into cabinet and center oven into cabinet until shipping feet almost contact cabinet. On models with shipping feet,...

Installation Instructions
Page 8
... that all of your tools. 3. Press OFF/CANCEL. Press UPPER OVEN or LOWER OVEN, to select the oven you are now installed. Repeat "Check Operation of Single Oven 1. Rotate both hinge latches back to the Use and Care Guide. Repeat for heat. Turn power on...Service" section of trim. Press CUSTOM BROIL. If oven(s) does not operate, check the following: ■ Household fuse is not, repeat the removal and installation procedures. Check Operation of /recycle all packaging materials. 4. Turn power on . To set the clock and other oven functions, refer to the locked position...
... that all of your tools. 3. Press OFF/CANCEL. Press UPPER OVEN or LOWER OVEN, to select the oven you are now installed. Repeat "Check Operation of Single Oven 1. Rotate both hinge latches back to the Use and Care Guide. Repeat for heat. Turn power on...Service" section of trim. Press CUSTOM BROIL. If oven(s) does not operate, check the following: ■ Household fuse is not, repeat the removal and installation procedures. Check Operation of /recycle all packaging materials. 4. Turn power on . To set the clock and other oven functions, refer to the locked position...

Owners Manual
Page 3
...oven liner protective coating of any kind should not be worn while using the oven, follow basic precautions, including the following: ■ Proper Installation - WARNING: This product contains a chemical known to the State of California to cause cancer, birth defects, or other reproductive harm, and requires...result in burns from steam. Flammable materials should be hot even though they have had sufficient time to cool. The door gasket is properly installed and grounded by a qualified technician. ■ Never Use the Oven for a good seal. Be sure the oven is essential for ...
...oven liner protective coating of any kind should not be worn while using the oven, follow basic precautions, including the following: ■ Proper Installation - WARNING: This product contains a chemical known to the State of California to cause cancer, birth defects, or other reproductive harm, and requires...result in burns from steam. Flammable materials should be hot even though they have had sufficient time to cool. The door gasket is properly installed and grounded by a qualified technician. ■ Never Use the Oven for a good seal. Be sure the oven is essential for ...
Owners Manual
Page 14
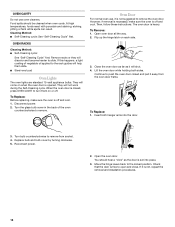
... or off and cool. 1. Move the hinge levers back to slide. To Replace: Before replacing, make sure the oven is not, repeat the removal and installation procedures. 14 To Replace: 1. If it will discolor and become harder to the locked position. Remove racks or they will shut. 4. When the oven door...
... or off and cool. 1. Move the hinge levers back to slide. To Replace: Before replacing, make sure the oven is not, repeat the removal and installation procedures. 14 To Replace: 1. If it will discolor and become harder to the locked position. Remove racks or they will shut. 4. When the oven door...
Owners Manual
Page 15
...high or too low ■ Does the oven temperature calibration need adjustment? Display shows messages ■ Is the display showing "PF," "PF id=27" or "PF id=30"? Clear the display. See "Display(s)" section. See "Assistance or Service" section. ■ Is the oven door ...9632; Has the function been entered? Oven cooking results not what expected ■ Is the appliance level? See the Installation Instructions. ■ Is the proper temperature set ? See Installation Instructions. See "Timed Cooking" section. ■ On some models, is self-cleaning the other oven cannot be ...
...high or too low ■ Does the oven temperature calibration need adjustment? Display shows messages ■ Is the display showing "PF," "PF id=27" or "PF id=30"? Clear the display. See "Display(s)" section. See "Assistance or Service" section. ■ Is the oven door ...9632; Has the function been entered? Oven cooking results not what expected ■ Is the appliance level? See the Installation Instructions. ■ Is the proper temperature set ? See Installation Instructions. See "Timed Cooking" section. ■ On some models, is self-cleaning the other oven cannot be ...
Owners Manual
Page 16
... L5N 3A7 Please include a daytime phone number in your area, call . For further assistance If you need to Whirlpool Canada LP with : ■ Features and specifications on our full line of appliances. ■ Installation information. ■ Use and maintenance procedures. ■ Accessory and repair parts sales. ■ Specialized customer assistance (Spanish speaking...
... L5N 3A7 Please include a daytime phone number in your area, call . For further assistance If you need to Whirlpool Canada LP with : ■ Features and specifications on our full line of appliances. ■ Installation information. ■ Use and maintenance procedures. ■ Accessory and repair parts sales. ■ Specialized customer assistance (Spanish speaking...

Owners Manual
Page 17
... that have been removed, altered or cannot be borne by calling Whirlpool. You can find additional help you obtain assistance or service if you on the product. Service must provide proof of purchase or installation date for future reference. Service calls to refrigerator or freezer product ...to use of the Use & Care Guide. Service calls to instruct you ever need it is installed in an inaccessible location or is not installed in a remote area where service by a Whirlpool designated service company. If you need to know your major appliance, to correct the...
... that have been removed, altered or cannot be borne by calling Whirlpool. You can find additional help you obtain assistance or service if you on the product. Service must provide proof of purchase or installation date for future reference. Service calls to refrigerator or freezer product ...to use of the Use & Care Guide. Service calls to instruct you ever need it is installed in an inaccessible location or is not installed in a remote area where service by a Whirlpool designated service company. If you need to know your major appliance, to correct the...
Warranty
Page 1
... normal, single-family household use of consumables or cleaning products not approved by a Whirlpool designated service company. Major appliances with original model/serial numbers that is not installed in an inaccessible location or is contrary to published user or operator instructions and/or... from accident, alteration, misuse, abuse, fire, flood, acts of God, improper installation, installation not in materials or workmanship. This major appliance is designed to be borne by calling Whirlpool. You will pay for Factory Specified Parts and repair labor to correct defects in ...
... normal, single-family household use of consumables or cleaning products not approved by a Whirlpool designated service company. Major appliances with original model/serial numbers that is not installed in an inaccessible location or is contrary to published user or operator instructions and/or... from accident, alteration, misuse, abuse, fire, flood, acts of God, improper installation, installation not in materials or workmanship. This major appliance is designed to be borne by calling Whirlpool. You will pay for Factory Specified Parts and repair labor to correct defects in ...


