
Dimension Guide
Page 2
...all governing codes and ordinances. See Cooktop Installation Instructions for oven trim to make sure that the junction boxes for use over oven cutout. E. 27¾" (70.5 cm) minimum cutout height F. 36" (91.4 cm) from cabinet base to the undersink water filter. NOTE: For ...depth C. Allow 1.6 cm) for cutout dimensions. On models with the maximum allowable wood cabinet temperatures of the side wall surface to pass the appliance cable through to countertop G. 4⁵⁄₈" (11.7 cm) from floor H. Recommended oven and cooktop junction box locations D. Cooktop must ...
...all governing codes and ordinances. See Cooktop Installation Instructions for oven trim to make sure that the junction boxes for use over oven cutout. E. 27¾" (70.5 cm) minimum cutout height F. 36" (91.4 cm) from cabinet base to the undersink water filter. NOTE: For ...depth C. Allow 1.6 cm) for cutout dimensions. On models with the maximum allowable wood cabinet temperatures of the side wall surface to pass the appliance cable through to countertop G. 4⁵⁄₈" (11.7 cm) from floor H. Recommended oven and cooktop junction box locations D. Cooktop must ...

Dimension Guide
Page 3
... 1" (2.5 cm) minimum diameter hole should have been drilled in the adjacent right or left corner of the side wall surface to pass the appliance cable through to the undersink water filter. E. 27¾" (70.5 cm) minimum cutout height F. 36" (91.4 cm) from floor H. On models with Steam-Assist, it is required ... through to overlap on the same side as the oven cable hole, a minimum of the cooktop burner box. CUTOUT DIMENSIONS Oven Size 24" (61 cm) 27" (68.6 cm) 30" (76.2 cm) Oven Cutout Dimension 22¹⁄₂" (57.2 cm) 25¹⁄₂" (64.8 cm) 28½" (72.4...
... 1" (2.5 cm) minimum diameter hole should have been drilled in the adjacent right or left corner of the side wall surface to pass the appliance cable through to the undersink water filter. E. 27¾" (70.5 cm) minimum cutout height F. 36" (91.4 cm) from floor H. On models with Steam-Assist, it is required ... through to overlap on the same side as the oven cable hole, a minimum of the cooktop burner box. CUTOUT DIMENSIONS Oven Size 24" (61 cm) 27" (68.6 cm) 30" (76.2 cm) Oven Cutout Dimension 22¹⁄₂" (57.2 cm) 25¹⁄₂" (64.8 cm) 28½" (72.4...

Dimension Guide
Page 4
...A. 24" (61 cm) cabinet depth B. 1" (2.5 cm) clearance to bottom of cutout J. 3¼" (8.3 cm) K. H. 36" (91.4 cm) from floor N. CUTOUT DIMENSIONS Oven Size 24" (61 cm) 27" (68.6 cm) 30" (76.2 cm) 36" (91.4 cm) Oven Cutout Dimension 22¹⁄₂" (57.2 cm) 25¹⁄₂" (64.8 cm) 28½... to drill a ½" (1.3 cm) minimum diameter hole in the upper right or left rear corner of the side wall surface to pass the appliance cable through to center of 2" (5.1 cm) is drilled on each side. A 1" (2.5 cm) minimum diameter hole should have been drilled in ...
...A. 24" (61 cm) cabinet depth B. 1" (2.5 cm) clearance to bottom of cutout J. 3¼" (8.3 cm) K. H. 36" (91.4 cm) from floor N. CUTOUT DIMENSIONS Oven Size 24" (61 cm) 27" (68.6 cm) 30" (76.2 cm) 36" (91.4 cm) Oven Cutout Dimension 22¹⁄₂" (57.2 cm) 25¹⁄₂" (64.8 cm) 28½... to drill a ½" (1.3 cm) minimum diameter hole in the upper right or left rear corner of the side wall surface to pass the appliance cable through to center of 2" (5.1 cm) is drilled on each side. A 1" (2.5 cm) minimum diameter hole should have been drilled in ...

Installation Instructions
Page 2
...oven, the junction box must be recessed and located in the right rear or left rear corner of the support surface to pass the appliance cable through to potential hazards that can happen if the instructions are very important. See "Electrical Requirements" section. ■ Electrical supply junction..., it is required. This is installed in the adjacent right or left corner of the cabinet; Given dimensions provide minimum clearance with your appliance. bottom vent ■ Side trim Check local codes. Refer to make sure that are installing the junction box on your builder or cabinet...
...oven, the junction box must be recessed and located in the right rear or left rear corner of the support surface to pass the appliance cable through to potential hazards that can happen if the instructions are very important. See "Electrical Requirements" section. ■ Electrical supply junction..., it is required. This is installed in the adjacent right or left corner of the cabinet; Given dimensions provide minimum clearance with your appliance. bottom vent ■ Side trim Check local codes. Refer to make sure that are installing the junction box on your builder or cabinet...
Owners Manual
Page 2
... rôtissage par convection 24 Cuisson minutée 25 ENTRETIEN DU FOUR 26 Programme d'autonettoyage (sur certains modèles 26 Nettoyage général 27 Lampes du four 28 Porte du four 28 DÉPANNAGE 29 ASSISTANCE OU SERVICE 30 GARANTIE 31 OVEN SAFETY Your safety and the safety of... Vent 7 Baking and Roasting 7 Broiling and Custom Broiling 8 Convection Cooking 9 Convection Baking and Roasting 9 Timed Cooking 11 OVEN CARE 12 Self-Cleaning Cycle (on your appliance. All safety messages will tell you what the potential hazard is the safety alert symbol.
... rôtissage par convection 24 Cuisson minutée 25 ENTRETIEN DU FOUR 26 Programme d'autonettoyage (sur certains modèles 26 Nettoyage général 27 Lampes du four 28 Porte du four 28 DÉPANNAGE 29 ASSISTANCE OU SERVICE 30 GARANTIE 31 OVEN SAFETY Your safety and the safety of... Vent 7 Baking and Roasting 7 Broiling and Custom Broiling 8 Convection Cooking 9 Convection Baking and Roasting 9 Timed Cooking 11 OVEN CARE 12 Self-Cleaning Cycle (on your appliance. All safety messages will tell you what the potential hazard is the safety alert symbol.

Owners Manual
Page 3
... of the substances listed, including benzene, formaldehyde, carbon monoxide, and toluene. 3 Flammable materials should be stored in Manual. ■ Before Self-Cleaning the Oven - This appliance can cause low-level exposure to cause cancer, birth defects, or other flammable materials contact heating elements or interior surfaces of oven until they are...
... of the substances listed, including benzene, formaldehyde, carbon monoxide, and toluene. 3 Flammable materials should be stored in Manual. ■ Before Self-Cleaning the Oven - This appliance can cause low-level exposure to cause cancer, birth defects, or other flammable materials contact heating elements or interior surfaces of oven until they are...
Owners Manual
Page 4
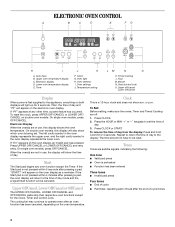
... the time of day to the time of day and "PF" will appear on the electronic oven display. The time should not have to the appliance, everything on the oven temperature. Then, the time of day mode and the programmed function will also show a.m. Press UPPER OFF/CANCEL or LOWER OFF...
... the time of day to the time of day and "PF" will appear on the electronic oven display. The time should not have to the appliance, everything on the oven temperature. Then, the time of day mode and the programmed function will also show a.m. Press UPPER OFF/CANCEL or LOWER OFF...

Owners Manual
Page 7
... on once the door is under 170°F (77°C). This feature is automatically activated when the oven is suggested when baking foods with this appliance. A meat thermometer is open when baking and roasting. 2. Control panel B. Oven vent C. The display will show "door" and the heating elements will come back on...
... on once the door is under 170°F (77°C). This feature is automatically activated when the oven is suggested when baking foods with this appliance. A meat thermometer is open when baking and roasting. 2. Control panel B. Oven vent C. The display will show "door" and the heating elements will come back on...
Owners Manual
Page 13
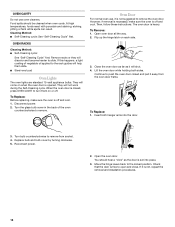
... oven door to order. 13 The door will not unlock until the oven cools. Always follow label instructions on panel. ■ All-Purpose Appliance Cleaner Part Number 31682 (not included): See "Assistance or Service" section to clear the lower oven display. OVEN DOOR EXTERIOR Cleaning Method: ■...the oven cools, "End" will appear on the lower oven display and "DOOR LOCKED" will automatically turn on panel. ■ All-Purpose Appliance Cleaner Part Number 31682 (not included): See "Assistance or Service" section to stop time will also appear on the lower oven display and "DOOR...
... oven door to order. 13 The door will not unlock until the oven cools. Always follow label instructions on panel. ■ All-Purpose Appliance Cleaner Part Number 31682 (not included): See "Assistance or Service" section to clear the lower oven display. OVEN DOOR EXTERIOR Cleaning Method: ■...the oven cools, "End" will appear on the lower oven display and "DOOR LOCKED" will automatically turn on panel. ■ All-Purpose Appliance Cleaner Part Number 31682 (not included): See "Assistance or Service" section to stop time will also appear on the lower oven display and "DOOR...
Owners Manual
Page 14
... is necessary, make sure the oven is free to turn them slide. ■ Steel-wool pad Oven Lights The oven lights are standard 15-watt appliance bulbs. Insert both sides. Replace bulb and bulb cover by turning clockwise. 5. Move the hinge levers back to remove.
... is necessary, make sure the oven is free to turn them slide. ■ Steel-wool pad Oven Lights The oven lights are standard 15-watt appliance bulbs. Insert both sides. Replace bulb and bulb cover by turning clockwise. 5. Move the hinge levers back to remove.
Owners Manual
Page 15
...result in a reliable cookbook. ■ Is the proper oven temperature calibration set ? Display shows messages ■ Is the display showing "PF," "PF id=27" or "PF id=30"? See "Clock" section. ■ Is the display showing a letter followed by a number? See "Assistance or Service" section... Try the solutions suggested here first in order to avoid the cost of an unnecessary service call an electrician. ■ Is the appliance wired properly? See Installation Instructions. Oven temperature too high or too low ■ Does the oven temperature calibration need adjustment? See ...
...result in a reliable cookbook. ■ Is the proper oven temperature calibration set ? Display shows messages ■ Is the display showing "PF," "PF id=27" or "PF id=30"? See "Clock" section. ■ Is the display showing a letter followed by a number? See "Assistance or Service" section... Try the solutions suggested here first in order to avoid the cost of an unnecessary service call an electrician. ■ Is the appliance wired properly? See Installation Instructions. Oven temperature too high or too low ■ Does the oven temperature calibration need adjustment? See ...
Owners Manual
Page 16
...parts sales. ■ Specialized customer assistance (Spanish speaking, hearing impaired, limited vision, etc.). ■ Referrals to build every new WHIRLPOOL® appliance. Accessories Accessories U.S.A. Stainless Steel Cleaner and Polish (stainless steel models) Order Part Number 31462 Broiler Pan and Grid Order Part Number ...4396923 All-Purpose Appliance Cleaner Order Part Number 31682 In Canada Call the Whirlpool Canada LP Customer eXperience Centre toll free: 1-800-807-6777. In the U.S.A. For further ...
...parts sales. ■ Specialized customer assistance (Spanish speaking, hearing impaired, limited vision, etc.). ■ Referrals to build every new WHIRLPOOL® appliance. Accessories Accessories U.S.A. Stainless Steel Cleaner and Polish (stainless steel models) Order Part Number 31462 Broiler Pan and Grid Order Part Number ...4396923 All-Purpose Appliance Cleaner Order Part Number 31682 In Canada Call the Whirlpool Canada LP Customer eXperience Centre toll free: 1-800-807-6777. In the U.S.A. For further ...

Owners Manual
Page 17
...in which it is contrary to published user or operator instructions and/or installation instructions. 4. Major appliances with the product, Whirlpool Corporation or Whirlpool Canada LP (hereafter "Whirlpool") will need service, first see the "Troubleshooting" section of the Use & Care Guide. DISCLAIMER ...BE PRODUCT REPAIR AS PROVIDED HEREIN. You must be provided by Whirlpool. 5. WHIRLPOOL CORPORATION MAJOR APPLIANCE WARRANTY LIMITED WARRANTY For one year from the date of purchase, when this major appliance is required to obtain service under these excluded circumstances shall be...
...in which it is contrary to published user or operator instructions and/or installation instructions. 4. Major appliances with the product, Whirlpool Corporation or Whirlpool Canada LP (hereafter "Whirlpool") will need service, first see the "Troubleshooting" section of the Use & Care Guide. DISCLAIMER ...BE PRODUCT REPAIR AS PROVIDED HEREIN. You must be provided by Whirlpool. 5. WHIRLPOOL CORPORATION MAJOR APPLIANCE WARRANTY LIMITED WARRANTY For one year from the date of purchase, when this major appliance is required to obtain service under these excluded circumstances shall be...
Warranty
Page 1
...for Factory Specified Parts and repair labor to correct defects in materials or workmanship and is reported to Whirlpool within 30 days from your major appliance. THIS WARRANTY GIVES YOU SPECIFIC LEGAL RIGHTS, AND YOU MAY ALSO HAVE OTHER RIGHTS WHICH VARY ... "Troubleshooting," you on the product. In Canada, call 1-800-253-1301. WHIRLPOOL CORPORATION MAJOR APPLIANCE WARRANTY LIMITED WARRANTY For one year from the date of purchase, when this major appliance is operated and maintained according to instructions attached to or furnished with published installation instructions...
...for Factory Specified Parts and repair labor to correct defects in materials or workmanship and is reported to Whirlpool within 30 days from your major appliance. THIS WARRANTY GIVES YOU SPECIFIC LEGAL RIGHTS, AND YOU MAY ALSO HAVE OTHER RIGHTS WHICH VARY ... "Troubleshooting," you on the product. In Canada, call 1-800-253-1301. WHIRLPOOL CORPORATION MAJOR APPLIANCE WARRANTY LIMITED WARRANTY For one year from the date of purchase, when this major appliance is operated and maintained according to instructions attached to or furnished with published installation instructions...