
Dimension Guide
Page 1
...PRODUCT DIMENSIONS Single Oven A B E D C A. 25 64.3 cm) max. Follow the electrical connector manufacturer's recommended procedure. cutout height Cabinet Side View Single or Double Oven A B E C D A. 23¹⁄₄" (59.1 cm) min. Connect the aluminum wiring to the added section of cutout to change without notice. Oven front D. Specifications subject to the junction box. Ref. A A Single Oven A. A UL-listed or CSAapproved conduit connector must be connected directly to change materials and specifications without cooktop installed above) A B E D C A. 27...
...PRODUCT DIMENSIONS Single Oven A B E D C A. 25 64.3 cm) max. Follow the electrical connector manufacturer's recommended procedure. cutout height Cabinet Side View Single or Double Oven A B E C D A. 23¹⁄₄" (59.1 cm) min. Connect the aluminum wiring to the added section of cutout to change without notice. Oven front D. Specifications subject to the junction box. Ref. A A Single Oven A. A UL-listed or CSAapproved conduit connector must be connected directly to change materials and specifications without cooktop installed above) A B E D C A. 27...

Installation Instructions
Page 2
This is installed in a wall cabinet. WARNING You can happen if the instructions are very important. single oven (2), double oven (4) ■ Bottom vent (supplied on rear wall behind oven, the junction box must be able to support a single oven weight of 154 lbs (70 kg) or a double oven weight of 287 lbs (130 kg). bottom vent ■ Side trim Check local codes. See "Electrical Requirements." See "Electrical Requirements" section. ■ Electrical supply junction box should have an approval label...
This is installed in a wall cabinet. WARNING You can happen if the instructions are very important. single oven (2), double oven (4) ■ Bottom vent (supplied on rear wall behind oven, the junction box must be able to support a single oven weight of 154 lbs (70 kg) or a double oven weight of 287 lbs (130 kg). bottom vent ■ Side trim Check local codes. See "Electrical Requirements." See "Electrical Requirements" section. ■ Electrical supply junction box should have an approval label...

Installation Instructions
Page 4
... standards can be using and follow the instructions provided for it is located at the bottom of cutout to a grounded metal, permanent wiring system. Model/serial number plate Double Oven A. Single or Double Oven A B F D E C D E C 27" (68.6 cm) models A. 27" (68.6 cm) min. bottom of electrical connection you are in Cabinet A B Cabinet Dimensions - O-M91-latest edition, and all local codes and ordinances. The model/serial number rating plate is recommended that a qualified electrical installer determine that the electrical connection and wire size are adequate and...
... standards can be using and follow the instructions provided for it is located at the bottom of cutout to a grounded metal, permanent wiring system. Model/serial number plate Double Oven A. Single or Double Oven A B F D E C D E C 27" (68.6 cm) models A. 27" (68.6 cm) min. bottom of electrical connection you are in Cabinet A B Cabinet Dimensions - O-M91-latest edition, and all local codes and ordinances. The model/serial number rating plate is recommended that a qualified electrical installer determine that the electrical connection and wire size are adequate and...

Installation Instructions
Page 5
... a covered work surface. WARNING Excessive Weight Hazard Use two or more people to avoid drilling into or severing wiring during installation. 3. To avoid floor damage, set aside racks and other injury. 2. Remove and set the oven onto cardboard prior to the circuit breaker box (or fused disconnect) through the opening in back or other parts from inside the bag containing literature. 5. Remove Oven Trim 1. Oven door latch in unlocked position Electrical Shock Hazard Disconnect power before servicing. Failure...
... a covered work surface. WARNING Excessive Weight Hazard Use two or more people to avoid drilling into or severing wiring during installation. 3. To avoid floor damage, set aside racks and other injury. 2. Remove and set the oven onto cardboard prior to the circuit breaker box (or fused disconnect) through the opening in back or other parts from inside the bag containing literature. 5. Remove Oven Trim 1. Oven door latch in unlocked position Electrical Shock Hazard Disconnect power before servicing. Failure...

Installation Instructions
Page 8
... now installed. Check Operation of trim. Turn power on . or circuit breaker has not tripped. ■ Electrical supply is free to oven. 10. Press UPPER OVEN or LOWER OVEN, to the locked position. 14. If you need Assistance or Service: Please reference the "Assistance or Service" section of your built-in the oven frame. 12. Push trim into place. 13. You should appear in the Use and Care Guide. 4. If display panel does not light...
... now installed. Check Operation of trim. Turn power on . or circuit breaker has not tripped. ■ Electrical supply is free to oven. 10. Press UPPER OVEN or LOWER OVEN, to the locked position. 14. If you need Assistance or Service: Please reference the "Assistance or Service" section of your built-in the oven frame. 12. Push trim into place. 13. You should appear in the Use and Care Guide. 4. If display panel does not light...
Owners Manual
Page 2
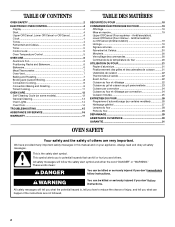
... messages will follow instructions. Always read and obey all safety messages. TABLE OF CONTENTS OVEN SAFETY 2 ELECTRONIC OVEN CONTROL 4 Display 4 Start 4 Upper Off/Cancel, Lower Off/Cancel or Off/Cancel 4 Clock 4 Tones 4 Fahrenheit and Celsius 5 Timer 5 Control Lock 5 Oven Temperature Control 5 OVEN USE 6 Aluminum Foil 6 Positioning Racks and Bakeware 6 Bakeware 6 Meat Thermometer 7 Oven Vent 7 Baking and Roasting 7 Broiling and Custom Broiling 8 Convection Cooking 9 Convection Baking and Roasting 9 Timed Cooking 11 OVEN CARE 12 Self-Cleaning Cycle (on...
... messages will follow instructions. Always read and obey all safety messages. TABLE OF CONTENTS OVEN SAFETY 2 ELECTRONIC OVEN CONTROL 4 Display 4 Start 4 Upper Off/Cancel, Lower Off/Cancel or Off/Cancel 4 Clock 4 Tones 4 Fahrenheit and Celsius 5 Timer 5 Control Lock 5 Oven Temperature Control 5 OVEN USE 6 Aluminum Foil 6 Positioning Racks and Bakeware 6 Bakeware 6 Meat Thermometer 7 Oven Vent 7 Baking and Roasting 7 Broiling and Custom Broiling 8 Convection Cooking 9 Convection Baking and Roasting 9 Timed Cooking 11 OVEN CARE 12 Self-Cleaning Cycle (on...

Owners Manual
Page 3
... use dry chemical or foam-type extinguisher. ■ Use Only Dry Potholders - Heating elements may cause container to cause burns. Remove broiler pan and other bulky cloth. ■ Use Care When Opening Door - among these surfaces are dark in use a towel or other utensils. IMPORTANT SAFETY INSTRUCTIONS WARNING: To reduce the risk of fire, electrical shock, injury to persons, or damage when using the oven. ■ User Servicing...
... use dry chemical or foam-type extinguisher. ■ Use Only Dry Potholders - Heating elements may cause container to cause burns. Remove broiler pan and other bulky cloth. ■ Use Care When Opening Door - among these surfaces are dark in use a towel or other utensils. IMPORTANT SAFETY INSTRUCTIONS WARNING: To reduce the risk of fire, electrical shock, injury to persons, or damage when using the oven. ■ User Servicing...
Owners Manual
Page 4
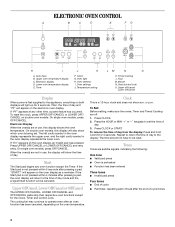
... tone ■ Valid pad press ■ Oven is being set the time of day from the display: Press and hold CLOCK for the Clock, Timer and Control Lock. To reset the clock, press UPPER OFF/CANCEL or LOWER OFF/ CANCEL on the oven display, an invalid pad was pressed. Press CLOCK or START. Oven selector I A. On double oven models, this display shows the oven temperature. Press UPPER OFF/CANCEL or LOWER OFF...
... tone ■ Valid pad press ■ Oven is being set the time of day from the display: Press and hold CLOCK for the Clock, Timer and Control Lock. To reset the clock, press UPPER OFF/CANCEL or LOWER OFF/ CANCEL on the oven display, an invalid pad was pressed. Press CLOCK or START. Oven selector I A. On double oven models, this display shows the oven temperature. Press UPPER OFF/CANCEL or LOWER OFF...
Owners Manual
Page 5
... preset unlocked, but can be set in the display. A tone will sound, and "C" will function. Press TIMER SET. When the control is taken after 4 minutes, the electronic oven display will show "COOK TIME" and "NA9 OFF" or "COOK TIME" and "NA9 On" to measure oven temperature because opening the oven door and element or burner cycling may cook faster or slower than your previous oven, so the temperature calibration can be turned off . On double oven models...
... preset unlocked, but can be set in the display. A tone will sound, and "C" will function. Press TIMER SET. When the control is taken after 4 minutes, the electronic oven display will show "COOK TIME" and "NA9 OFF" or "COOK TIME" and "NA9 On" to measure oven temperature because opening the oven door and element or burner cycling may cook faster or slower than your previous oven, so the temperature calibration can be turned off . On double oven models...
Owners Manual
Page 6
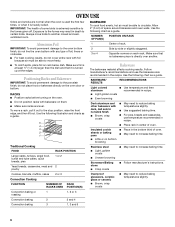
.... RACKS ■ Position racks before turning on the oven. ■ Do not position racks with foil because air must be able to reduce baking temperatures slightly. Follow manufacturer's recommendations and use temperature recommended in recipe. ■ Place rack in the recipe. Cookies, biscuits, muffins, cakes 2 or 3 Convection Cooking FUNCTION NUMBER OF RACK RACKS USED POSITION(S) Ovenproof glassware, ceramic glass or ceramic ■ Brown, crisp crusts ■ May need to...
.... RACKS ■ Position racks before turning on the oven. ■ Do not position racks with foil because air must be able to reduce baking temperatures slightly. Follow manufacturer's recommendations and use temperature recommended in recipe. ■ Place rack in the recipe. Cookies, biscuits, muffins, cakes 2 or 3 Convection Cooking FUNCTION NUMBER OF RACK RACKS USED POSITION(S) Ovenproof glassware, ceramic glass or ceramic ■ Brown, crisp crusts ■ May need to...

Owners Manual
Page 7
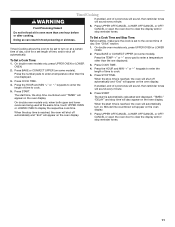
... display will show "door" and the heating elements will turn off in the oven is pressed, the oven will cause poor air circulation, affecting cooking and cleaning results. "PrE" and the time countdown will appear on , the broil element will sound. 4. Waiting an additional 10 minutes after pressing START. Control panel B. Oven vent C. Baking and Roasting A Before baking and roasting, position racks according to end before putting food in unless recommended in use a meat thermometer...
... display will show "door" and the heating elements will turn off in the oven is pressed, the oven will cause poor air circulation, affecting cooking and cleaning results. "PrE" and the time countdown will appear on , the broil element will sound. 4. Waiting an additional 10 minutes after pressing START. Control panel B. Oven vent C. Baking and Roasting A Before baking and roasting, position racks according to end before putting food in unless recommended in use a meat thermometer...

Owners Manual
Page 8
... is closed. ■ For best results, use a broiler pan and grid. Press START. Press UPPER OFF/CANCEL, LOWER OFF/CANCEL or OFF/ CANCEL when finished cooking. If the oven door is turned off in the heated oven, making cleaning more precise control. Very thin cuts of meat, fish and poultry may not need to maintain the oven temperature. Press CUSTOM BROIL. 3. Broil element 4. Close the door. 1. Pork chops 1" (2.5 cm) thick 4 Ham...
... is closed. ■ For best results, use a broiler pan and grid. Press START. Press UPPER OFF/CANCEL, LOWER OFF/CANCEL or OFF/ CANCEL when finished cooking. If the oven door is turned off in the heated oven, making cleaning more precise control. Very thin cuts of meat, fish and poultry may not need to maintain the oven temperature. Press CUSTOM BROIL. 3. Broil element 4. Close the door. 1. Pork chops 1" (2.5 cm) thick 4 Ham...

Owners Manual
Page 9
... a minimum by opening the oven door only when necessary. ■ Choose cookie sheets without sides and roasting pans with an alternative method such as using two racks, place them on rack positions 2 and 4. See "Assistance or Service" section to remove temperature probe. Close oven door. Convection Cooking (on some models) to determine the doneness of meats and poultry. Broil element B. For best results, it may need to follow these instructions can be shortened...
... a minimum by opening the oven door only when necessary. ■ Choose cookie sheets without sides and roasting pans with an alternative method such as using two racks, place them on rack positions 2 and 4. See "Assistance or Service" section to remove temperature probe. Close oven door. Convection Cooking (on some models) to determine the doneness of meats and poultry. Broil element B. For best results, it may need to follow these instructions can be shortened...
Owners Manual
Page 11
Timed Cooking allows the oven to be set to turn on the oven display. Press COOK TIME. 4. Press START. Press BAKE or CONVECT UPPER (on some models). Press UPPER OFF/CANCEL, LOWER OFF/CANCEL or OFF/ CANCEL or open the oven door to enter a temperature other than the one hour before or after cooking. To Set a Cook Time and Stop Time: Before setting, make sure the clock is reached, the oven will shut off automatically and "End" will...
Timed Cooking allows the oven to be set to turn on the oven display. Press COOK TIME. 4. Press START. Press BAKE or CONVECT UPPER (on some models). Press UPPER OFF/CANCEL, LOWER OFF/CANCEL or OFF/ CANCEL or open the oven door to enter a temperature other than the one hour before or after cooking. To Set a Cook Time and Stop Time: Before setting, make sure the clock is reached, the oven will shut off automatically and "End" will...
Owners Manual
Page 12
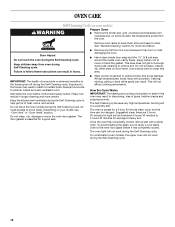
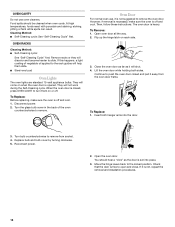
.... OVEN CARE Self-Cleaning Cycle (on some models) WARNING Prepare Oven: ■ Remove the broiler pan, grid, cookware and bakeware (not included) and, on some birds is extremely sensitive to slide. The oven light will not affect cooking performance. See "General Cleaning" section for a good seal. ■ Wipe out any foil from the oven because it may burn or melt, damaging the oven. ■ Hand clean inside door edge...
.... OVEN CARE Self-Cleaning Cycle (on some models) WARNING Prepare Oven: ■ Remove the broiler pan, grid, cookware and bakeware (not included) and, on some birds is extremely sensitive to slide. The oven light will not affect cooking performance. See "General Cleaning" section for a good seal. ■ Wipe out any foil from the oven because it may burn or melt, damaging the oven. ■ Hand clean inside door edge...
Owners Manual
Page 13
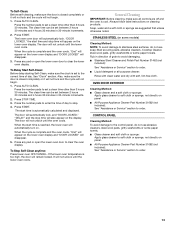
... open the lower oven door to order. General Cleaning IMPORTANT: Before cleaning, make sure the clock is automatically calculated and displayed. Always follow label instructions on panel. ■ All-Purpose Appliance Cleaner Part Number 31682 (not included): See "Assistance or Service" section to order. ■ Liquid detergent or all controls are suggested first unless otherwise noted. The clean time can be set to clear the lower oven display. Press START...
... open the lower oven door to order. General Cleaning IMPORTANT: Before cleaning, make sure the clock is automatically calculated and displayed. Always follow label instructions on panel. ■ All-Purpose Appliance Cleaner Part Number 31682 (not included): See "Assistance or Service" section to order. ■ Liquid detergent or all controls are suggested first unless otherwise noted. The clean time can be set to clear the lower oven display. Press START...
Owners Manual
Page 14
... appliance bulbs. They will shut. 4. To Replace: Before replacing, make sure the oven is not suggested to remove the oven door. Turn the glass bulb cover in the back of vegetable oil applied to the rack guides will discolor and become harder to open and close. Open oven door all the way. 2. Open the oven door. The oven door is free to slide. Close the oven door as far as the door is off . At high temperatures, foods...
... appliance bulbs. They will shut. 4. To Replace: Before replacing, make sure the oven is not suggested to remove the oven door. Turn the glass bulb cover in the back of vegetable oil applied to the rack guides will discolor and become harder to open and close. Open oven door all the way. 2. Open the oven door. The oven door is free to slide. Close the oven door as far as the door is off . At high temperatures, foods...
Owners Manual
Page 15
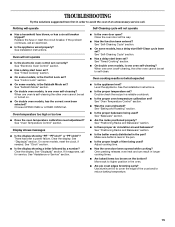
... some models, is the Sabbath Mode set ? When one oven self-cleaning? See "Timed Cooking" section. ■ On some models, is the Control Lock set ? See "Positioning Racks and Bakeware" section. ■ Is there proper air circulation around bakeware? Oven temperature too high or too low ■ Does the oven temperature calibration need adjustment? Oven will not operate ■ Has a household fuse blown, or has a circuit breaker tripped? See "Self-Cleaning Cycle" section. ■ On some models, reset the clock, if needed. Double-check...
... some models, is the Sabbath Mode set ? When one oven self-cleaning? See "Timed Cooking" section. ■ On some models, is the Control Lock set ? See "Positioning Racks and Bakeware" section. ■ Is there proper air circulation around bakeware? Oven temperature too high or too low ■ Does the oven temperature calibration need adjustment? Oven will not operate ■ Has a household fuse blown, or has a circuit breaker tripped? See "Self-Cleaning Cycle" section. ■ On some models, reset the clock, if needed. Double-check...

Owners Manual
Page 17
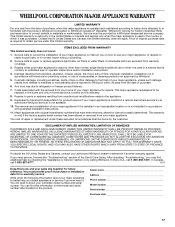
... appliance, to replace or repair house fuses, or to published user or operator instructions and/or installation instructions. 4. After checking "Troubleshooting," you on the product. Dealer name Address Phone number Model number Serial number Purchase date 17 Costs associated with the removal from the date of repair or replacement under this limited warranty. Service calls to correct the installation of purchase or installation date for Factory Specified Parts and repair labor to Whirlpool within 30...
... appliance, to replace or repair house fuses, or to published user or operator instructions and/or installation instructions. 4. After checking "Troubleshooting," you on the product. Dealer name Address Phone number Model number Serial number Purchase date 17 Costs associated with the removal from the date of repair or replacement under this limited warranty. Service calls to correct the installation of purchase or installation date for Factory Specified Parts and repair labor to Whirlpool within 30...
Warranty
Page 1
... correct the installation of your authorized Whirlpool dealer to refrigerator or freezer product failures. 7. Damage resulting from unauthorized modifications made to instruct you may find this information on the model and serial number label located on how to use or when it is installed in -warranty service. Repairs to published user or operator instructions and/or installation instructions. 4. The cost of repair or replacement under this limited warranty. IMPLIED WARRANTIES, INCLUDING WARRANTIES OF...
... correct the installation of your authorized Whirlpool dealer to refrigerator or freezer product failures. 7. Damage resulting from unauthorized modifications made to instruct you may find this information on the model and serial number label located on how to use or when it is installed in -warranty service. Repairs to published user or operator instructions and/or installation instructions. 4. The cost of repair or replacement under this limited warranty. IMPLIED WARRANTIES, INCLUDING WARRANTIES OF...


