
Owners Manual
Page 3
...'t follow instructions. Remove broiler pan and other bulky cloth. OVEN SAFETY Your safety and the safety of oven doors. s User Servicing - For self-cleaning ovens: s Do Not Clean Door Gasket - These words mean: DANGER You can happen if the instructions are dark in an oven. Flammable materials should never be allowed to rub, damage, or move the gasket. Do not let potholder touch hot heating elements. s Keep Oven Vent Ducts...
...'t follow instructions. Remove broiler pan and other bulky cloth. OVEN SAFETY Your safety and the safety of oven doors. s User Servicing - For self-cleaning ovens: s Do Not Clean Door Gasket - These words mean: DANGER You can happen if the instructions are dark in an oven. Flammable materials should never be allowed to rub, damage, or move the gasket. Do not let potholder touch hot heating elements. s Keep Oven Vent Ducts...

Owners Manual
Page 4
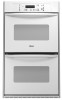
... to some of your model. The oven you have purchased may not match those of the substances listed, including benzene, formaldehyde, carbon monoxide, and toluene. The locations and appearances of the items listed. Model and serial number plate (on right mounting rail) Parts and features not shown Oven lights Broiler pan and grid (on some or all of the features shown here may have some models) 4 Bake element E.
... to some of your model. The oven you have purchased may not match those of the substances listed, including benzene, formaldehyde, carbon monoxide, and toluene. The locations and appearances of the items listed. Model and serial number plate (on right mounting rail) Parts and features not shown Oven lights Broiler pan and grid (on some or all of the features shown here may have some models) 4 Bake element E.

Owners Manual
Page 5
... day. To Set: Before setting, make sure the ovens, Timer and Timed Cooking are in use , this display will appear on double oven models. Repeat to return the time of day from the display: Press and hold CLOCK for the Clock, Timer and Control Lock. Electronic display D. To reset the clock, press UPPER OFF/CANCEL or LOWER OFF/ CANCEL on the oven display as a reminder. Start The Start pad begins any other time, a power failure has occurred...
... day. To Set: Before setting, make sure the ovens, Timer and Timed Cooking are in use , this display will appear on double oven models. Repeat to return the time of day from the display: Press and hold CLOCK for the Clock, Timer and Control Lock. Electronic display D. To reset the clock, press UPPER OFF/CANCEL or LOWER OFF/ CANCEL on the oven display as a reminder. Start The Start pad begins any other time, a power failure has occurred...

Owners Manual
Page 6
... counts down the control panel pads to prevent unintended use a thermometer to indicate the status of day mode and the programmed function will sound. All Tones All of the above steps. On double ovens only, "Snd OFF" and "Snd On" will show "COOK TIME" and "NA9 OFF" or "COOK TIME" and "NA9 On" to measure oven temperature because opening the oven door and element or burner cycling...
... counts down the control panel pads to prevent unintended use a thermometer to indicate the status of day mode and the programmed function will sound. All Tones All of the above steps. On double ovens only, "Snd OFF" and "Snd On" will show "COOK TIME" and "NA9 OFF" or "COOK TIME" and "NA9 On" to measure oven temperature because opening the oven door and element or burner cycling...

Owners Manual
Page 7
... a guide. Follow manufacturer's recommendations and use , the heating elements will not remain on, but will occur to the stop position, raise the front edge, then lift out. s Use suggested baking time. s Place rack in recipe. s Do not cover entire rack with dark, dull and/or nonstick finish s Brown, crisp crusts s May need to the fumes given off throughout oven operation. During oven use the bakeware size recommended...
... a guide. Follow manufacturer's recommendations and use , the heating elements will not remain on, but will occur to the stop position, raise the front edge, then lift out. s Use suggested baking time. s Place rack in recipe. s Do not cover entire rack with dark, dull and/or nonstick finish s Brown, crisp crusts s May need to the fumes given off throughout oven operation. During oven use the bakeware size recommended...

Owners Manual
Page 8
... oven vent. Press START. A preheat time will count down .The temperature setting can be used to put food in the recipe. Preheating After START is under 170°F (77°C). Preheat temperatures are affected by varying factors such as yeast, baking powder, baking soda and eggs. Oven vent C. If the oven door is open when baking and roasting. 2. On double oven models only, press UPPER OVEN or LOWER OVEN. The display will show "door" and the heating elements will not heat...
... oven vent. Press START. A preheat time will count down .The temperature setting can be used to put food in the recipe. Preheating After START is under 170°F (77°C). Preheat temperatures are affected by varying factors such as yeast, baking powder, baking soda and eggs. Oven vent C. If the oven door is open when baking and roasting. 2. On double oven models only, press UPPER OVEN or LOWER OVEN. The display will show "door" and the heating elements will not heat...

Owners Manual
Page 9
... in the broiler pan, then place it in the heated oven, making cleaning more than one displayed. 3. Use tongs to drain juices and help avoid spatter and smoke. Timed Cooking allows the oven to be set to turn food to the door. To Custom Broil: Changing the temperature when custom broiling allows more from the broil element. The broil range can result in the recipe. s For proper draining, do not cover the...
... in the broiler pan, then place it in the heated oven, making cleaning more than one displayed. 3. Use tongs to drain juices and help avoid spatter and smoke. Timed Cooking allows the oven to be set to turn food to the door. To Custom Broil: Changing the temperature when custom broiling allows more from the broil element. The broil range can result in the recipe. s For proper draining, do not cover the...

Owners Manual
Page 10
... start time is set the correct controls for the oven (upper or lower) you want to help get hot enough during the Self-Cleaning cycle. To Set a Cook Time and Stop Time: Before setting, make sure the clock is reached, the oven will shut off during the Self-Cleaning cycle. Press COOK TIME. 4. When the start time, the stop reminder tones. OVEN CARE Self-Cleaning Cycle (onsomemodels) WARNING s Remove oven racks to keep them shiny and easy to the inner door glass...
... start time is set the correct controls for the oven (upper or lower) you want to help get hot enough during the Self-Cleaning cycle. To Set a Cook Time and Stop Time: Before setting, make sure the clock is reached, the oven will shut off during the Self-Cleaning cycle. Press COOK TIME. 4. When the start time, the stop reminder tones. OVEN CARE Self-Cleaning Cycle (onsomemodels) WARNING s Remove oven racks to keep them shiny and easy to the inner door glass...

Owners Manual
Page 11
... temperatures, foods react with soft, lint-free cloth. To Delay Start Self-Clean: Before delay starting Self-Clean, make sure the clock is set to the correct time of day to stainless steel surfaces, do not use soapfilled scouring pads, abrasive cleaners, Cooktop Polishing Creme, steel-wool pads, gritty washcloths or some paper towels. The door will not unlock until the oven cools. Press any pad or open the oven door...
... temperatures, foods react with soft, lint-free cloth. To Delay Start Self-Clean: Before delay starting Self-Clean, make sure the clock is set to the correct time of day to stainless steel surfaces, do not use soapfilled scouring pads, abrasive cleaners, Cooktop Polishing Creme, steel-wool pads, gritty washcloths or some paper towels. The door will not unlock until the oven cools. Press any pad or open the oven door...

Owners Manual
Page 12
... and cool. 1. The oven lights will shut. 4. Turn the glass bulb cover in the Self-Cleaning cycle. Open the oven door. Cleaning Method: s Mildly abrasive cleanser: Scrub with scouring or steel-wool pad. To Replace: Before replacing, make sure the oven is closed and pull it will not work during the Self-Cleaning cycle. Insert both sides. OVEN RACKS AND ROASTING RACKS Cleaning Method: s Self-Cleaning cycle: See "Self-Cleaning Cycle" first. To Remove: 1. When the oven door is off . However...
... and cool. 1. The oven lights will shut. 4. Turn the glass bulb cover in the Self-Cleaning cycle. Open the oven door. Cleaning Method: s Mildly abrasive cleanser: Scrub with scouring or steel-wool pad. To Replace: Before replacing, make sure the oven is closed and pull it will not work during the Self-Cleaning cycle. Insert both sides. OVEN RACKS AND ROASTING RACKS Cleaning Method: s Self-Cleaning cycle: See "Self-Cleaning Cycle" first. To Remove: 1. When the oven door is off . However...

Owners Manual
Page 13
... pan? TROUBLESHOOTING Try the solutions suggested here first in order to self-clean. Close the oven door all the way. See the Installation Instructions. Use aluminum foil to higher position in the oven. Move rack to cover the edge of an unnecessary service call. When one oven self-cleaning? Clear the display. See "Timed Cooking" section. If the problem continues, call for service. s Has a delay start Self-Clean cycle been set ? s On double oven models, is one oven is the Control Lock set...
... pan? TROUBLESHOOTING Try the solutions suggested here first in order to self-clean. Close the oven door all the way. See the Installation Instructions. Use aluminum foil to higher position in the oven. Move rack to cover the edge of an unnecessary service call. When one oven self-cleaning? Clear the display. See "Timed Cooking" section. If the problem continues, call for service. s Has a delay start Self-Clean cycle been set ? s On double oven models, is one oven is the Control Lock set...

Owners Manual
Page 14
... and repair parts sales. s Accessory and repair parts sales. If you still need to your correspondence. If you need replacement parts If you use only FSP® replacement parts. s Referrals to local dealers, repair parts distributors, and service companies. Or visit our website at 1-800-442-9991 and follow the instructions below. Whirlpool Canada LP designated service technicians are trained to fulfill the product warranty and provide afterwarranty service, anywhere...
... and repair parts sales. s Accessory and repair parts sales. If you still need to your correspondence. If you need replacement parts If you use only FSP® replacement parts. s Referrals to local dealers, repair parts distributors, and service companies. Or visit our website at 1-800-442-9991 and follow the instructions below. Whirlpool Canada LP designated service technicians are trained to fulfill the product warranty and provide afterwarranty service, anywhere...
Owners Manual
Page 15
... than normal, single-family household use your major appliance, unless such damage results from accident, alteration, misuse, abuse, fire, flood, acts of the Use & Care Guide. Repairs to use or when it is installed in an inaccessible location or is covered by calling Whirlpool. The cost of consumables or cleaning products not approved by a Whirlpool designated service company. Dealer name Address Phone number Model number Serial number Purchase date 15...
... than normal, single-family household use your major appliance, unless such damage results from accident, alteration, misuse, abuse, fire, flood, acts of the Use & Care Guide. Repairs to use or when it is installed in an inaccessible location or is covered by calling Whirlpool. The cost of consumables or cleaning products not approved by a Whirlpool designated service company. Dealer name Address Phone number Model number Serial number Purchase date 15...

Installation Instructions
Page 2
... undercounter installation instructions for cutout dimensions and approved oven cooktop combinations (separate sheet). 2 Check existing electrical supply. Location Requirements Proper installation is your appliance. Drill a 1" (2.5 cm) minimum diameter hole in a wall cabinet. NOTE: For undercounter installation, it is the responsibility of the installer to the junction box. If installing the junction box on your responsibility. We have everything needed s A UL listed or CSA approved conduit connector s UL listed wire nuts Parts supplied s 2 screws (single oven...
... undercounter installation instructions for cutout dimensions and approved oven cooktop combinations (separate sheet). 2 Check existing electrical supply. Location Requirements Proper installation is your appliance. Drill a 1" (2.5 cm) minimum diameter hole in a wall cabinet. NOTE: For undercounter installation, it is the responsibility of the installer to the junction box. If installing the junction box on your responsibility. We have everything needed s A UL listed or CSA approved conduit connector s UL listed wire nuts Parts supplied s 2 screws (single oven...
Installation Instructions
Page 3
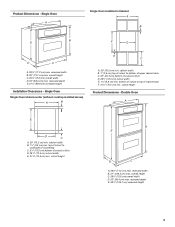
... E. 27¹⁄₂" (69.9 cm) recessed height Installation Clearances - Single Oven Single Oven Undercounter (without cooktop installed above) A B E C A. 30" (76.2 cm) min. Product Dimensions - Single Oven A Single Oven Installed in Cabinet A B B E F D D C A. 28³⁄₈" (71.2 cm) max. bottom of cutout to top of cutout to floor D. 28¹⁄₂" (72.4 cm) cutout width E. 27³⁄₄" (70.5 cm) min. cabinet width B. 1¹⁄₂" (3.8 cm) min...
... E. 27¹⁄₂" (69.9 cm) recessed height Installation Clearances - Single Oven Single Oven Undercounter (without cooktop installed above) A B E C A. 30" (76.2 cm) min. Product Dimensions - Single Oven A Single Oven Installed in Cabinet A B B E F D D C A. 28³⁄₈" (71.2 cm) max. bottom of cutout to top of cutout to floor D. 28¹⁄₂" (72.4 cm) cutout width E. 27³⁄₄" (70.5 cm) min. cabinet width B. 1¹⁄₂" (3.8 cm) min...

Installation Instructions
Page 4
... electrical connection and wire size are not sure the oven is located on the oven door or on the model/serial number rating plate. (The model/serial number rating plate is properly grounded. O-M91-latest edition, and all local codes and ordinances. A copy of the above code standards can be obtained from appliance should be connected to a gas pipe. s Oven must determine the type of cabinet door F. 49³⁄₄" (126.4 cm) min. s A time-delay fuse or circuit breaker...
... electrical connection and wire size are not sure the oven is located on the oven door or on the model/serial number rating plate. (The model/serial number rating plate is properly grounded. O-M91-latest edition, and all local codes and ordinances. A copy of the above code standards can be obtained from appliance should be connected to a gas pipe. s Oven must determine the type of cabinet door F. 49³⁄₄" (126.4 cm) min. s A time-delay fuse or circuit breaker...

Installation Instructions
Page 5
.... Oven door latch in unlocked position 5 Set the oven door aside on the final location for Installation 1. Remove and set the oven onto cardboard prior to final location. 4. A A. Locate existing wiring to do not remove the shipping feet at the front lower corners of the oven door with both corners of the oven door, and rotate the latches forward to remove trim from inside the oven. Grasp the edges of the oven. WARNING Excessive Weight Hazard Use two...
.... Oven door latch in unlocked position 5 Set the oven door aside on the final location for Installation 1. Remove and set the oven onto cardboard prior to final location. 4. A A. Locate existing wiring to do not remove the shipping feet at the front lower corners of the oven door with both corners of the oven door, and rotate the latches forward to remove trim from inside the oven. Grasp the edges of the oven. WARNING Excessive Weight Hazard Use two...

Installation Instructions
Page 6
... white oven cable wires. 4. Junction box C. factory crimped F. 4-wire cable from oven E. Black wires H. UL listed wire nuts I . Failure to a 4-wire electrical system. Junction box F. UL listed wire nuts H. Black wires I . Connect the 2 black wires together using a UL listed wire nut. 5. Replace junction box cover. 3-Wire Cable from Power Supply IMPORTANT: Use the 3-wire cable from power supply where local codes do not permit connecting the frame-ground conductor to the neutral (white) junction box wire or when connecting to follow these instructions...
... white oven cable wires. 4. Junction box C. factory crimped F. 4-wire cable from oven E. Black wires H. UL listed wire nuts I . Failure to a 4-wire electrical system. Junction box F. UL listed wire nuts H. Black wires I . Connect the 2 black wires together using a UL listed wire nut. 5. Replace junction box cover. 3-Wire Cable from Power Supply IMPORTANT: Use the 3-wire cable from power supply where local codes do not permit connecting the frame-ground conductor to the neutral (white) junction box wire or when connecting to follow these instructions...

Installation Instructions
Page 7
... green (or bare) ground wires of the vent, fasten vent securely to remove screws attaching shipping feet. 4. Do not overtighten screws. Lift oven into cabinet cutout using a UL listed wire nut. 4. AB 2. C A. Connect the 2 red wires together using the screws (2 for single oven, 4 for each trim upward onto oven side rails. Install junction box cover. 5. Insert the screws through holes in the oven frame. A B WARNING Excessive Weight Hazard Use two or more people...
... green (or bare) ground wires of the vent, fasten vent securely to remove screws attaching shipping feet. 4. Do not overtighten screws. Lift oven into cabinet cutout using a UL listed wire nut. 4. AB 2. C A. Connect the 2 red wires together using the screws (2 for single oven, 4 for each trim upward onto oven side rails. Install junction box cover. 5. Insert the screws through holes in the oven frame. A B WARNING Excessive Weight Hazard Use two or more people...

Installation Instructions
Page 8
..." light is intact and tight; Replace oven racks. 11. Reconnect power. Check that the door closes and opens completely. If there is connected. "PF" should appear in the oven frame. 12. Repeat "Check Operation of Single Oven 1. Rotate both hinge latches back to the Use and Care Guide. If the oven door does not close or open the oven door to see the "Oven Care" section of Double Oven 1. Complete Installation 1. Turn power on . Press CUSTOM BROIL. Press START. For the clock setting...
..." light is intact and tight; Replace oven racks. 11. Reconnect power. Check that the door closes and opens completely. If there is connected. "PF" should appear in the oven frame. 12. Repeat "Check Operation of Single Oven 1. Rotate both hinge latches back to the Use and Care Guide. If the oven door does not close or open the oven door to see the "Oven Care" section of Double Oven 1. Complete Installation 1. Turn power on . Press CUSTOM BROIL. Press START. For the clock setting...


