
User Manual
Page 2
... OF CONTENTS OVEN SAFETY 3 PARTS AND FEATURES 5 ELECTRONIC OVEN CONTROL 6 Display 6 Start/Enter 6 Upper Off, Lower Off or Off/Cancel 6 Clock 6 Tones 6 Fahrenheit and Celsius 7 Timer 7 Control Lock 7 Oven Temperature Control 7 OVEN USE 8 Aluminum Foil 8 Positioning Racks and Bakeware 8 Bakeware 8 Meat Thermometer 9 Oven Vent 9 Baking and Roasting 9 Broiling and Custom Broiling 9 Timed Cooking 10 OVEN CARE 11 Self-Cleaning Cycle 11 General Cleaning 12 Oven Lights 13 Oven Door 13 TROUBLESHOOTING 14 ASSISTANCE OR SERVICE 15 In the U.S.A 15 In Canada 15 WARRANTY 16 2
... OF CONTENTS OVEN SAFETY 3 PARTS AND FEATURES 5 ELECTRONIC OVEN CONTROL 6 Display 6 Start/Enter 6 Upper Off, Lower Off or Off/Cancel 6 Clock 6 Tones 6 Fahrenheit and Celsius 7 Timer 7 Control Lock 7 Oven Temperature Control 7 OVEN USE 8 Aluminum Foil 8 Positioning Racks and Bakeware 8 Bakeware 8 Meat Thermometer 9 Oven Vent 9 Baking and Roasting 9 Broiling and Custom Broiling 9 Timed Cooking 10 OVEN CARE 11 Self-Cleaning Cycle 11 General Cleaning 12 Oven Lights 13 Oven Door 13 TROUBLESHOOTING 14 ASSISTANCE OR SERVICE 15 In the U.S.A 15 In Canada 15 WARRANTY 16 2
User Manual
Page 3
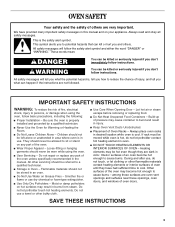
... damage when using the oven. ■ User Servicing - All other flammable materials contact heating elements or interior surfaces of the oven unless specifically recommended in the manual. If rack must be stored in an oven. ■ Do Not Use Water on hot surfaces may cause container to burst and result in color. During and after use a towel or other bulky cloth. ■ Use Care When Opening Door - Always...
... damage when using the oven. ■ User Servicing - All other flammable materials contact heating elements or interior surfaces of the oven unless specifically recommended in the manual. If rack must be stored in an oven. ■ Do Not Use Water on hot surfaces may cause container to burst and result in color. During and after use a towel or other bulky cloth. ■ Use Care When Opening Door - Always...

User Manual
Page 4
... California Safe Drinking Water and Toxic Enforcement Act requires the Governor of California to publish a list of substances known to the State of California to cause cancer, birth defects, or other utensils. IMPORTANT SAFETY INSTRUCTIONS For self-cleaning ovens: ■ Do Not Clean Door Gasket - Remove broiler pan and other reproductive harm, and requires businesses to warn of California to such substances...
... California Safe Drinking Water and Toxic Enforcement Act requires the Governor of California to publish a list of substances known to the State of California to cause cancer, birth defects, or other utensils. IMPORTANT SAFETY INSTRUCTIONS For self-cleaning ovens: ■ Do Not Clean Door Gasket - Remove broiler pan and other reproductive harm, and requires businesses to warn of California to such substances...
User Manual
Page 5
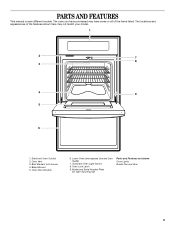
Lower Oven (see separate Use and Care Guide) 7. The locations and appearances of the items listed. Bake Element 5. PARTS AND FEATURES This manual covers different models. Electronic Oven Control 2. Broil Element (not shown) 4. Oven Door Window 6. Model and Serial Number Plate (on right mounting rail) Parts and Features not shown Oven Lights Broiler Pan and Grid 5 Oven Vent 3. Oven Lock Latch 9. The oven you have purchased may have some or all of the features shown here may not match your model. 1 2 7 8 3 4 9 5 6 1. Automatic Oven Light Switch 8.
Lower Oven (see separate Use and Care Guide) 7. The locations and appearances of the items listed. Bake Element 5. PARTS AND FEATURES This manual covers different models. Electronic Oven Control 2. Broil Element (not shown) 4. Oven Door Window 6. Model and Serial Number Plate (on right mounting rail) Parts and Features not shown Oven Lights Broiler Pan and Grid 5 Oven Vent 3. Oven Lock Latch 9. The oven you have purchased may have some or all of the features shown here may not match your model. 1 2 7 8 3 4 9 5 6 1. Automatic Oven Light Switch 8.
User Manual
Page 6
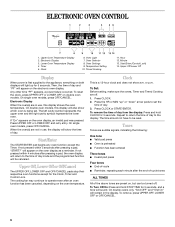
... pressed. Oven Light 7. Temperature Setting 10. Start/Enter [Control Lock] 14. Then, the time of day from the display: Press and hold STOP TIME for 5 seconds. If "Err" appears on the electronic oven display. The cooling fan may continue to set . Press the HR or MIN "up" or "down" arrow pads to operate even after pressing a pad, the oven display will light up for the Clock, Timer and Control Lock. To remove the time of...
... pressed. Oven Light 7. Temperature Setting 10. Start/Enter [Control Lock] 14. Then, the time of day from the display: Press and hold STOP TIME for 5 seconds. If "Err" appears on the electronic oven display. The cooling fan may continue to set . Press the HR or MIN "up" or "down" arrow pads to operate even after pressing a pad, the oven display will light up for the Clock, Timer and Control Lock. To remove the time of...
User Manual
Page 7
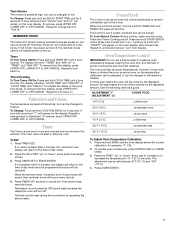
... be set time. Press TIMER OFF anytime to unlock and remove "Loc" from display. Control Lock The Control Lock shuts down the control panel pads to prevent unintended use a thermometer to decrease the temperature in hours and minutes and counts down " arrow pad to increase or to measure oven temperature because opening the oven door and element or burner cycling may cook faster or slower than your previous oven, so the temperature calibration can be reset during...
... be set time. Press TIMER OFF anytime to unlock and remove "Loc" from display. Control Lock The Control Lock shuts down the control panel pads to prevent unintended use a thermometer to decrease the temperature in hours and minutes and counts down " arrow pad to increase or to measure oven temperature because opening the oven door and element or burner cycling may cook faster or slower than your previous oven, so the temperature calibration can be reset during...
User Manual
Page 8
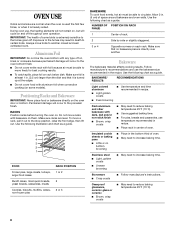
... need to increase baking time. NUMBER OF POSITION ON RACK PAN(S) 1 Center of oven. ■ May need to the stop position, raise the front edge, then lift out. Bakeware The bakeware material affects cooking results. Ovenproof glassware, ceramic glass or ceramic ■ Brown, crisp crusts ■ May need to reduce baking temperatures 25°F (15°C). 8 Use the following chart as a guide. 5 4 3 2 1 FOOD Frozen pies, large roasts...
... need to increase baking time. NUMBER OF POSITION ON RACK PAN(S) 1 Center of oven. ■ May need to the stop position, raise the front edge, then lift out. Bakeware The bakeware material affects cooking results. Ovenproof glassware, ceramic glass or ceramic ■ Brown, crisp crusts ■ May need to reduce baking temperatures 25°F (15°C). 8 Use the following chart as a guide. 5 4 3 2 1 FOOD Frozen pies, large roasts...
User Manual
Page 9
... display. On double oven models only, press UPPER OVEN or LOWER OVEN. When the set temperature is in use. Waiting an additional 10 minutes after pressing START/ENTER. If the temperature drops, cook the meat or poultry longer. ■ Check all meat in two or three places. Oven Vent 1 2 3 1. "PrE" and the time countdown will appear on the oven display if the actual oven temperature is opened during baking and roasting, the bake and broil elements will turn...
... display. On double oven models only, press UPPER OVEN or LOWER OVEN. When the set temperature is in use. Waiting an additional 10 minutes after pressing START/ENTER. If the temperature drops, cook the meat or poultry longer. ■ Check all meat in two or three places. Oven Vent 1 2 3 1. "PrE" and the time countdown will appear on the oven display if the actual oven temperature is opened during baking and roasting, the bake and broil elements will turn...
User Manual
Page 10
... be set oven temperature will appear on the oven display until the oven is turned off . 5. ■ Use only the broiler pan and grid provided with foil. It is not necessary to be turned. ■ After broiling, remove the pan from the oven when removing the food. Press START/ENTER. On double oven models only, press UPPER OVEN or LOWER OVEN. 2. Press UPPER OFF, LOWER OFF or OFF/CANCEL when finished cooking. Thicker cuts...
... be set oven temperature will appear on the oven display until the oven is turned off . 5. ■ Use only the broiler pan and grid provided with foil. It is not necessary to be turned. ■ After broiling, remove the pan from the oven when removing the food. Press START/ENTER. On double oven models only, press UPPER OVEN or LOWER OVEN. 2. Press UPPER OFF, LOWER OFF or OFF/CANCEL when finished cooking. Thicker cuts...
User Manual
Page 11
... COOK TIME. 4. On double oven models only, press UPPER OVEN or LOWER OVEN. 2. Press BAKE or CONVECT UPPER (on . Press COOK TIME. 4. Press START/ENTER. When the start . 7. Always move freely. Keep the kitchen well-ventilated during self-cleaning to remove soil. Press the number pads to slide. Press START/ENTER. If enabled, end-of day. The start time and stop time will automatically turn on some models). "DELAY" and the stop time countdown will appear on the oven display. OVEN CARE Self-Cleaning...
... COOK TIME. 4. On double oven models only, press UPPER OVEN or LOWER OVEN. 2. Press BAKE or CONVECT UPPER (on . Press COOK TIME. 4. Press START/ENTER. When the start . 7. Always move freely. Keep the kitchen well-ventilated during self-cleaning to remove soil. Press the number pads to slide. Press START/ENTER. If enabled, end-of day. The start time and stop time will automatically turn on some models). "DELAY" and the stop time countdown will appear on the oven display. OVEN CARE Self-Cleaning...
User Manual
Page 12
... and displayed. CONTROL PANEL Do not use abrasive cleaners, steel-wool pads, gritty washcloths or some paper towels. Suggested clean times are suggested first unless otherwise noted. Press AUTO CLEAN. Press START/ENTER. Damage may occur. ■ Glass cleaner and soft cloth or sponge: Apply glass cleaner to a powdery ash. The oven light will not work during the Self-Cleaning cycle. Press AUTO CLEAN. 3. Also, make sure the clock...
... and displayed. CONTROL PANEL Do not use abrasive cleaners, steel-wool pads, gritty washcloths or some paper towels. Suggested clean times are suggested first unless otherwise noted. Press AUTO CLEAN. Press START/ENTER. Damage may occur. ■ Glass cleaner and soft cloth or sponge: Apply glass cleaner to a powdery ash. The oven light will not work during the Self-Cleaning cycle. Press AUTO CLEAN. 3. Also, make sure the clock...

User Manual
Page 13
... mL) ammonia to the rack guides will discolor and become harder to remove. Flip up the hinge latch on when the lower oven door is set into the door. 3. Oven Door For normal range use, it is opened . Turn bulb counterclockwise to remove the oven door. The oven door is opened . Continue to push the oven door closed , touch LIGHT to turn them slide. ■ Steel wool pad BROILER PAN AND GRID Do not clean in the back of...
... mL) ammonia to the rack guides will discolor and become harder to remove. Flip up the hinge latch on when the lower oven door is set into the door. 3. Oven Door For normal range use, it is opened . Turn bulb counterclockwise to remove the oven door. The oven door is opened . Continue to push the oven door closed , touch LIGHT to turn them slide. ■ Steel wool pad BROILER PAN AND GRID Do not clean in the back of...

User Manual
Page 14
... used ? Use aluminum foil to self-clean. See Installation Instructions. See "Control Lock" section. ■ On some models, is one oven is the Sabbath Mode set ? When one oven self-cleaning? Oven temperature too high or too low ■ Does the oven temperature calibration need adjustment? There has been a power failure. See "Clock" section. ■ Is the display showing a letter followed by a number? See "Self-Cleaning Cycle" section. ■ Has a delay start been set ? See "Timed Cooking" section. ■ On double oven models, is level in the pan...
... used ? Use aluminum foil to self-clean. See Installation Instructions. See "Control Lock" section. ■ On some models, is one oven is the Sabbath Mode set ? When one oven self-cleaning? Oven temperature too high or too low ■ Does the oven temperature calibration need adjustment? There has been a power failure. See "Clock" section. ■ Is the display showing a letter followed by a number? See "Self-Cleaning Cycle" section. ■ Has a delay start been set ? See "Timed Cooking" section. ■ On double oven models, is level in the pan...
User Manual
Page 15
... & Polish (stainless steel models) Order Part #4396095 Dehydration Kit (includes 3 racks and an oven door stop) Order Part #4395974A96 In Canada For product related questions, please call our Customer Interaction Center telephone number or your correspondence. If you still need to order replacement parts, we recommend that you need help us to better respond to Whirlpool Corporation with : ■ Features and specifications on our full line...
... & Polish (stainless steel models) Order Part #4396095 Dehydration Kit (includes 3 racks and an oven door stop) Order Part #4395974A96 In Canada For product related questions, please call our Customer Interaction Center telephone number or your correspondence. If you still need to order replacement parts, we recommend that you need help us to better respond to Whirlpool Corporation with : ■ Features and specifications on our full line...
User Manual
Page 16
... Use & Care Guide. 6. You must be provided by Whirlpool Corporation or Whirlpool Canada Inc. 5. Whirlpool Canada Inc. WHIRLPOOL® COOKTOP, BUILT-IN OVEN AND RANGE WARRANTY ONE-YEAR FULL WARRANTY For one year from the date of purchase, when this appliance is operated and maintained according to instructions attached to or furnished with the product, Whirlpool Corporation will pay for FSP® replacement parts for the CLEANTOP® ceramic glass cooktop...
... Use & Care Guide. 6. You must be provided by Whirlpool Corporation or Whirlpool Canada Inc. 5. Whirlpool Canada Inc. WHIRLPOOL® COOKTOP, BUILT-IN OVEN AND RANGE WARRANTY ONE-YEAR FULL WARRANTY For one year from the date of purchase, when this appliance is operated and maintained according to instructions attached to or furnished with the product, Whirlpool Corporation will pay for FSP® replacement parts for the CLEANTOP® ceramic glass cooktop...

Parts Diagram
Page 1
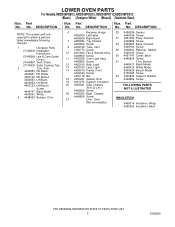
LOWER OVEN PARTS 24" BUILT−IN ELECTRIC DOUBLE OVEN For Models:RBD245PDB12, RBD245PDQ12, RBD245PDT12,RBD245PDS12 STD−CLEAN LOWER SELF−CLEAN UPPER (Black) (Designer White) (Biscuit) (Stainless Steel) 2−04 Litho in U.S.A. (cre) 1 Part No. 8185829 Rev.A
LOWER OVEN PARTS 24" BUILT−IN ELECTRIC DOUBLE OVEN For Models:RBD245PDB12, RBD245PDQ12, RBD245PDT12,RBD245PDS12 STD−CLEAN LOWER SELF−CLEAN UPPER (Black) (Designer White) (Biscuit) (Stainless Steel) 2−04 Litho in U.S.A. (cre) 1 Part No. 8185829 Rev.A
Parts Diagram
Page 2
... screws and nuts required to attach a part are listed immediately following that part. 1 Literature Parts LIT4450409 Installation Instructions LIT4450568 Use & Care Guide (Oven) LIT4451887 Tech Sheet LIT3191638 Safer Cooking Tips 2 Trim, Side 4450850 RH Black 4450851 RH White 4452122 RH Biscuit 4450853 LH Black 4450854 LH White 4452123 LH Biscuit Screw 4449747 Black Model 4449041 White 4 4448520 Bumper, Door 6 Receiver, Hinge 29 4455636 Sensor 4455605 Left Hand 4449154...
... screws and nuts required to attach a part are listed immediately following that part. 1 Literature Parts LIT4450409 Installation Instructions LIT4450568 Use & Care Guide (Oven) LIT4451887 Tech Sheet LIT3191638 Safer Cooking Tips 2 Trim, Side 4450850 RH Black 4450851 RH White 4452122 RH Biscuit 4450853 LH Black 4450854 LH White 4452123 LH Biscuit Screw 4449747 Black Model 4449041 White 4 4448520 Bumper, Door 6 Receiver, Hinge 29 4455636 Sensor 4455605 Left Hand 4449154...

Parts Diagram
Page 5
... Model Illus. Part No. Part No. No. No. DESCRIPTION 13 Door Handle 4448402 Black Model 4448403 White Model 8300512 Biscuit Model 14 4450813 Bracket, Handle 4451040 Screw 20 4450863 Retainer, Glass 23 Retainer, Clip 4450863 Black Model 4450864 White Model 8185829 5 DESCRIPTION NOTE: The screws and nuts required to attach a part are listed immediately following that part. 1 4455616 Liner, Door 3 4449247 Glass, Inner 5 8300776 Retainer, Glass 4449809 Screw Illus. LOWER OVEN DOOR PARTS...
... Model Illus. Part No. Part No. No. No. DESCRIPTION 13 Door Handle 4448402 Black Model 4448403 White Model 8300512 Biscuit Model 14 4450813 Bracket, Handle 4451040 Screw 20 4450863 Retainer, Glass 23 Retainer, Clip 4450863 Black Model 4450864 White Model 8185829 5 DESCRIPTION NOTE: The screws and nuts required to attach a part are listed immediately following that part. 1 4455616 Liner, Door 3 4449247 Glass, Inner 5 8300776 Retainer, Glass 4449809 Screw Illus. LOWER OVEN DOOR PARTS...

Parts Diagram
Page 6
... required to attach a part are listed immediately following that part. 1 4455616 Liner, Door 2 Hinge, Door 8300567 Right Side 8300568 Left Side 4449743 Screw 3 4449247 Glass, Inner Illus. DESCRIPTION 4 4451720 Insulation, Door 5 8300776 Retainer, Glass 4449809 Screw 7 4449251 Glass, Inner 12 Door Glass, Assy 8300917 Black Model 8300916 White Model 8300913 Biscuit Model 8300997 S.Steel Model 13 Door Handle 4448402 Black Model 4448403 White Model 8300512 Biscuit Model Illus. Part No. DESCRIPTION 14 4450813 Bracket, Handle...
... required to attach a part are listed immediately following that part. 1 4455616 Liner, Door 2 Hinge, Door 8300567 Right Side 8300568 Left Side 4449743 Screw 3 4449247 Glass, Inner Illus. DESCRIPTION 4 4451720 Insulation, Door 5 8300776 Retainer, Glass 4449809 Screw 7 4449251 Glass, Inner 12 Door Glass, Assy 8300917 Black Model 8300916 White Model 8300913 Biscuit Model 8300997 S.Steel Model 13 Door Handle 4448402 Black Model 4448403 White Model 8300512 Biscuit Model Illus. Part No. DESCRIPTION 14 4450813 Bracket, Handle...

Dimensions
Page 1
... of cabinet door 14-3/4" bottom of cutout to floor Double oven Cabinet cabinet side view recessed oven oven front Cabinet side view Because Whirlpool Corporation policy includes a continuous commitment to underside of the line. ® 24" Electric Built-In Single and Double Ovens PRODUCT MODEL NUMBERS RBD245PD RBS245PD OVERALL DIMENSIONS 22-3/8" max. Models rated at 7.2 kW and below at 240 volts (5.4 kW and below at 240 volts (5.5 to change without cooktop installed above) 1-1/2" min. A time-delay fuse or circuit breaker is required. CABINET OPENING DIMENSIONS...
... of cabinet door 14-3/4" bottom of cutout to floor Double oven Cabinet cabinet side view recessed oven oven front Cabinet side view Because Whirlpool Corporation policy includes a continuous commitment to underside of the line. ® 24" Electric Built-In Single and Double Ovens PRODUCT MODEL NUMBERS RBD245PD RBS245PD OVERALL DIMENSIONS 22-3/8" max. Models rated at 7.2 kW and below at 240 volts (5.4 kW and below at 240 volts (5.5 to change without cooktop installed above) 1-1/2" min. A time-delay fuse or circuit breaker is required. CABINET OPENING DIMENSIONS...


