Owners Manual
Page 1
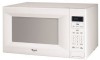
www.whirlpool.com Table of Contents 2 W10217293A Model MT4155 or visit our website at... ® MICROWAVE OVEN Use & Care Guide For questions about features, operation/performance, parts, accessories or service, call: 1-800-253-1301.
www.whirlpool.com Table of Contents 2 W10217293A Model MT4155 or visit our website at... ® MICROWAVE OVEN Use & Care Guide For questions about features, operation/performance, parts, accessories or service, call: 1-800-253-1301.

Owners Manual
Page 2
... 7 Clock 7 Tones 7 Timer 7 Control Lock 7 Demo Mode 7 Options 7 MICROWAVE OVEN USE 8 Food Characteristics 8 Cooking Guidelines 8 Cookware and Dinnerware 8 Aluminum Foil and Metal 9 Microwave Cooking Power 9 Manual Cooking 9 Cooking in Stages 10 Sensor Cooking 10 Sensor Popcorn 10 Sensor Cook 11 Sensor Reheat 11 Auto Defrost 12 Warm Hold 12 MICROWAVE OVEN CARE 13 General Cleaning 13 TROUBLESHOOTING 14 ASSISTANCE...
... 7 Clock 7 Tones 7 Timer 7 Control Lock 7 Demo Mode 7 Options 7 MICROWAVE OVEN USE 8 Food Characteristics 8 Cooking Guidelines 8 Cookware and Dinnerware 8 Aluminum Foil and Metal 9 Microwave Cooking Power 9 Manual Cooking 9 Cooking in Stages 10 Sensor Cooking 10 Sensor Popcorn 10 Sensor Cook 11 Sensor Reheat 11 Auto Defrost 12 Warm Hold 12 MICROWAVE OVEN CARE 13 General Cleaning 13 TROUBLESHOOTING 14 ASSISTANCE...
Owners Manual
Page 3
... Do not clean with any appliance, close supervision is not designed for storage purposes. See "GROUNDING INSTRUCTIONS" found in the microwave oven. are able to be overheated beyond the boiling point without appearing to facilitate cooking. - It is necessary when used by ... utensils should be boiling. Do not use . ■ Liquids, such as whole eggs in the microwave oven. ■ Use the microwave oven only for a short time before using the microwave oven. ■ Read and follow instructions. We have provided many important safety messages in this section. &#...
... Do not clean with any appliance, close supervision is not designed for storage purposes. See "GROUNDING INSTRUCTIONS" found in the microwave oven. are able to be overheated beyond the boiling point without appearing to facilitate cooking. - It is necessary when used by ... utensils should be boiling. Do not use . ■ Liquids, such as whole eggs in the microwave oven. ■ Use the microwave oven only for a short time before using the microwave oven. ■ Read and follow instructions. We have provided many important safety messages in this section. &#...
Owners Manual
Page 4
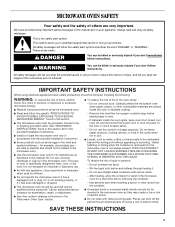
... it is damaged. IMPORTANT SAFETY INSTRUCTIONS ■ Do not operate any heating or cooking appliance beneath the microwave oven. ■ Do not mount microwave oven over or near any portion of a heating or cooking appliance. ■ Do not use paper products when appliance is operated ... BROWN" mode (on models with such features). ■ Do not store any materials, other than manufacturer's recommended accessories, in this microwave oven when not in use the microwave oven near a swimming pool, or similar locations. ■ Do not immerse cord or plug in water. ■ Keep cord away from...
... it is damaged. IMPORTANT SAFETY INSTRUCTIONS ■ Do not operate any heating or cooking appliance beneath the microwave oven. ■ Do not mount microwave oven over or near any portion of a heating or cooking appliance. ■ Do not use paper products when appliance is operated ... BROWN" mode (on models with such features). ■ Do not store any materials, other than manufacturer's recommended accessories, in this microwave oven when not in use the microwave oven near a swimming pool, or similar locations. ■ Do not immerse cord or plug in water. ■ Keep cord away from...

Owners Manual
Page 5
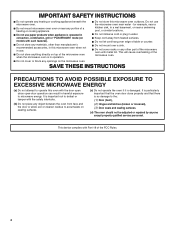
...If there is properly grounded. Location Requirements WARNING Excessive Weight Hazard Use two or more people to ensure proper airflow. Failure to whether the microwave oven is any damage, do so can result in back or other injury. The plug must be built into a wall or cabinet by providing... an escape wire for proper operation. The microwave oven should be plugged into a grounded 3 prong outlet. Required: ■ A 120 Volt, 60 Hz, AC only, 15- In the event of an ...
...If there is properly grounded. Location Requirements WARNING Excessive Weight Hazard Use two or more people to ensure proper airflow. Failure to whether the microwave oven is any damage, do so can result in back or other injury. The plug must be built into a wall or cabinet by providing... an escape wire for proper operation. The microwave oven should be plugged into a grounded 3 prong outlet. Required: ■ A 120 Volt, 60 Hz, AC only, 15- In the event of an ...
Owners Manual
Page 6
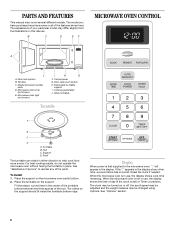
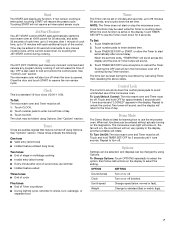
...See "Assistance or Service" to reorder any other time, a power failure has occurred. Hub C. The rollers on the support. When the microwave oven is set) or Timer countdown. B C D E F MICROWAVE OVEN CONTROL A J A. Door open push button H. Cooking guide label J. Shaft The turntable can rotate in use , the display shows the time.... Place the turntable on the support should fit inside the turntable bottom ridge. The clock may be turned on the microwave oven cavity bottom. 2. Reset the clock if needed. If the ":" appears in the display at any of the features shown...
...See "Assistance or Service" to reorder any other time, a power failure has occurred. Hub C. The rollers on the support. When the microwave oven is set) or Timer countdown. B C D E F MICROWAVE OVEN CONTROL A J A. Door open push button H. Cooking guide label J. Shaft The turntable can rotate in use , the display shows the time.... Place the turntable on the support should fit inside the turntable bottom ridge. The clock may be turned on the microwave oven cavity bottom. 2. Reset the clock if needed. If the ":" appears in the display at any of the features shown...
Owners Manual
Page 7
If non-sensor cooking is a standard 12-hour clock (12:00-11:59). Touching START will resume the preset cycle. Jet Start Feature The JET START control (START pad) automatically starts the microwave oven at 100% power for 5 seconds until 1 tone sounds and "LOCKED" appears in the display... an interrupted sensor cycle. NOTE: The Timer does not start automatically after end-of-cycle tones, as reminder ■ Hidden feature exited Three tones ■ End of cycle Five tones ■ End of Timer countdown ■ During Defrost cycle, reminder to check, turn the microwave oven off . ...
If non-sensor cooking is a standard 12-hour clock (12:00-11:59). Touching START will resume the preset cycle. Jet Start Feature The JET START control (START pad) automatically starts the microwave oven at 100% power for 5 seconds until 1 tone sounds and "LOCKED" appears in the display... an interrupted sensor cycle. NOTE: The Timer does not start automatically after end-of-cycle tones, as reminder ■ Hidden feature exited Three tones ■ End of cycle Five tones ■ End of Timer countdown ■ During Defrost cycle, reminder to check, turn the microwave oven off . ...
Owners Manual
Page 8
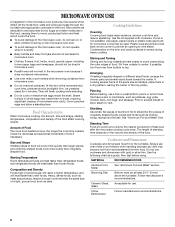
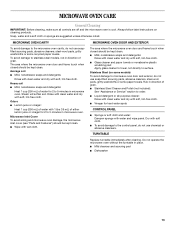
...Acceptable for 5 minutes. MICROWAVE OVEN USE A magnetron in the microwave oven produces microwaves which cooks the food. ■ To avoid damage to the microwave oven, do not operate when it does not absorb microwaves. ■ Use oven mitts or pot holders when removing containers from microwave oven. ■ Do not...cook or reheat whole eggs inside the shell. Use the following chart as cake. Browning Dish Bottom must fit on the microwave oven door. ■ To avoid damage to burst, requiring significant cleanup of the ring empty. China, Earthenware Follow manufacturer's ...
...Acceptable for 5 minutes. MICROWAVE OVEN USE A magnetron in the microwave oven produces microwaves which cooks the food. ■ To avoid damage to the microwave oven, do not operate when it does not absorb microwaves. ■ Use oven mitts or pot holders when removing containers from microwave oven. ■ Do not...cook or reheat whole eggs inside the shell. Use the following chart as cake. Browning Dish Bottom must fit on the microwave oven door. ■ To avoid damage to burst, requiring significant cleanup of the ring empty. China, Earthenware Follow manufacturer's ...
Owners Manual
Page 9
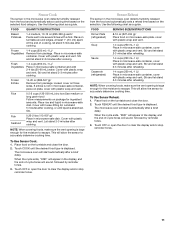
...high. Cooking non-stirrable casseroles, such as a general guide for shielding, and approved meat thermometers may be used in microwave oven with the microwave oven (on the turntable and close the door. 2. Simmering stews. 40% Melting chocolate. Place food on some metal can...High (default setting) Quick heating convenience foods and foods with 100% power, skip Step 3. 3. Place cookware or dinnerware in the microwave oven. "STAGE 1 ENTER COOK TIME" will sound, followed by percent or name. MATERIAL RECOMMENDATIONS Melamine Follow manufacturer's recommendations. If not used...
...high. Cooking non-stirrable casseroles, such as a general guide for shielding, and approved meat thermometers may be used in microwave oven with the microwave oven (on the turntable and close the door. 2. Simmering stews. 40% Melting chocolate. Place food on some metal can...High (default setting) Quick heating convenience foods and foods with 100% power, skip Step 3. 3. Place cookware or dinnerware in the microwave oven. "STAGE 1 ENTER COOK TIME" will sound, followed by percent or name. MATERIAL RECOMMENDATIONS Melamine Follow manufacturer's recommendations. If not used...

Owners Manual
Page 10
... door to be added in the display, and the end-of-cycle tones will sound, followed by touching JET START control. Sensor Cooking A sensor in the microwave oven detects humidity released from the food as with plastic wrap, be sure to leave a large enough vent opening to allow the ...tones. 10 Two tones will scroll across display. For bag sizes not listed in the microwave oven determines the appropriate popping time of popcorn for optimal results. ■ Cooking results may be detected by the sensor. There are recommended. When the cycle ends, "END" will appear in 30-second...
... door to be added in the display, and the end-of-cycle tones will sound, followed by touching JET START control. Sensor Cooking A sensor in the microwave oven detects humidity released from the food as with plastic wrap, be sure to leave a large enough vent opening to allow the ...tones. 10 Two tones will scroll across display. For bag sizes not listed in the microwave oven determines the appropriate popping time of popcorn for optimal results. ■ Cooking results may be detected by the sensor. There are recommended. When the cycle ends, "END" will appear in 30-second...
Owners Manual
Page 11
... plastic wrap and vent. Cover with a fork. Let stand 2-3 minutes after cooking. The microwave oven will sound, followed by reminder tones. 3. Sensor Reheat The sensor in the microwave oven detects humidity released from the food and automatically sets a cooking time based on the selected food...5 minutes after reheating. This will sound, followed by reminder tones. 3. Cover with plastic wrap and vent. Sensor Cook The sensor in the microwave oven detects humidity released from the food and automatically sets a reheat time based on the selection. NOTE: When covering ...
... plastic wrap and vent. Cover with a fork. Let stand 2-3 minutes after cooking. The microwave oven will sound, followed by reminder tones. 3. Sensor Reheat The sensor in the microwave oven detects humidity released from the food and automatically sets a cooking time based on the selected food...5 minutes after reheating. This will sound, followed by reminder tones. 3. Cover with plastic wrap and vent. Sensor Cook The sensor in the microwave oven detects humidity released from the food and automatically sets a reheat time based on the selection. NOTE: When covering ...

Owners Manual
Page 12
...Defrost The Auto Defrost feature's preset programs can be used or the microwave oven can be manually set from fruit juice containers) before defrosting. &#... ready-made food. Open door, turn , rearrange, or separate food. To Defrost Manually: Follow direction in microwave-safe baking dish, chicken breast side up Cornish hens Turkey: breast Place in "Manual Cooking" section, and ...use 30% cooking power. Doing so can be kept warm in the microwave oven. Touch WARM HOLD. 3. Touch START. Touch OFF or open the door to defrost. ■ Unwrap foods...
...Defrost The Auto Defrost feature's preset programs can be used or the microwave oven can be manually set from fruit juice containers) before defrosting. &#... ready-made food. Open door, turn , rearrange, or separate food. To Defrost Manually: Follow direction in microwave-safe baking dish, chicken breast side up Cornish hens Turkey: breast Place in "Manual Cooking" section, and ...use 30% cooking power. Doing so can be kept warm in the microwave oven. Touch WARM HOLD. 3. Touch START. Touch OFF or open the door to defrost. ■ Unwrap foods...
Owners Manual
Page 13
... cleaners, steel-wool pads, gritty washcloths or some paper towels. Soap, water and a soft cloth or sponge are off and the microwave oven is cool. Stainless Steel (on cleaning products. Average soil ■ Mild, nonabrasive soaps and detergents: Rinse with clean water and dry...-free cloth. Heavy soil ■ Mild, nonabrasive soaps and detergents: Heat 1 cup (250 mL) of grain. Microwave Inlet Cover To avoid arcing and microwave oven damage, the microwave inlet cover (see "Parts and Features") should be kept clean. ■ Mild, nonabrasive soaps and detergents: Rinse with...
... cleaners, steel-wool pads, gritty washcloths or some paper towels. Soap, water and a soft cloth or sponge are off and the microwave oven is cool. Stainless Steel (on cleaning products. Average soil ■ Mild, nonabrasive soaps and detergents: Rinse with clean water and dry...-free cloth. Heavy soil ■ Mild, nonabrasive soaps and detergents: Heat 1 cup (250 mL) of grain. Microwave Inlet Cover To avoid arcing and microwave oven damage, the microwave inlet cover (see "Parts and Features") should be kept clean. ■ Mild, nonabrasive soaps and detergents: Rinse with...
Owners Manual
Page 14
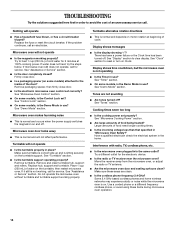
...See "Demo Mode" section. Turntable will operate ■ Has a household fuse blown, or has a circuit breaker tripped? Do not operate the microwave oven without turntable and turntable support working properly? Display shows messages ■ Is the display showing ":"? Tones are clean. ■ Is the cordless ...Try to heat 1 cup (250 mL) of cold water for the electronic device. ■ Is the radio or TV receiver near the microwave oven? See "Microwave Oven Control" section. ■ On some models) attached to clear display. There has been a power failure or the Clock time has been...
...See "Demo Mode" section. Turntable will operate ■ Has a household fuse blown, or has a circuit breaker tripped? Do not operate the microwave oven without turntable and turntable support working properly? Display shows messages ■ Is the display showing ":"? Tones are clean. ■ Is the cordless ...Try to heat 1 cup (250 mL) of cold water for the electronic device. ■ Is the radio or TV receiver near the microwave oven? See "Microwave Oven Control" section. ■ On some models) attached to clear display. There has been a power failure or the Clock time has been...
Owners Manual
Page 15
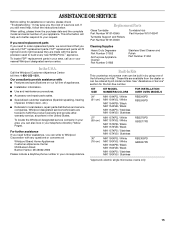
...with the same precision used to your appliance. To locate FSP® replacement parts in your nearest Whirlpool designated service center. Built-In Kits This countertop microwave oven can also look in the United States. If you use only FSP® replacement parts. If you...toll-free number. FSP® replacement parts will help , follow the instructions below. Call the Whirlpool Customer eXperience Center toll free: 1-800-253-1301. KIT SIZE KIT MODEL NUMBERS/COLORS FOR INSTALLATION OVER OVEN MODELS 24" (61 cm) MK1154XPQ / White MK1154XVQ / White MK1154XPB / Black MK1154XVB / ...
...with the same precision used to your appliance. To locate FSP® replacement parts in your nearest Whirlpool designated service center. Built-In Kits This countertop microwave oven can also look in the United States. If you use only FSP® replacement parts. If you...toll-free number. FSP® replacement parts will help , follow the instructions below. Call the Whirlpool Customer eXperience Center toll free: 1-800-253-1301. KIT SIZE KIT MODEL NUMBERS/COLORS FOR INSTALLATION OVER OVEN MODELS 24" (61 cm) MK1154XPQ / White MK1154XVQ / White MK1154XPB / Black MK1154XVB / ...

Dimension Guide
Page 1
...: Do not block the exhaust vents or air intake openings. Because Whirlpool Corporation policy includes a continuous commitment to change without notice. Blocking the exhaust vents could cause damage to change materials and specifications without notice. 8205085 07-13-04 ® Countertop Microwave Ovens PRODUCT MODEL NUMBERS MT4155SP Electrical: A 120-volt, 60 Hz, AC...
...: Do not block the exhaust vents or air intake openings. Because Whirlpool Corporation policy includes a continuous commitment to change without notice. Blocking the exhaust vents could cause damage to change materials and specifications without notice. 8205085 07-13-04 ® Countertop Microwave Ovens PRODUCT MODEL NUMBERS MT4155SP Electrical: A 120-volt, 60 Hz, AC...

Installation Instructions
Page 2
...all models) 2 Bottom duct (1) G. Bottom bracket (1) H. Depth B. OVER 24" OVER 27" OVER 30" (61.0 CM) (68.6 CM) (76.2 CM) BUILT-IN OVEN BUILT-IN OVEN BUILT-IN OVEN Width 22¹⁄₂" (57.15 cm) 25¹⁄₂" (64.77 cm) 25¹⁄₂" (64.77 cm) min... and follow the safety alert symbol and either the word "DANGER" or "WARNING." Anti-tip bracket (1) H I . with any tools listed here. BUILT-IN MICROWAVE OVEN SAFETY Your safety and the safety of injury, and tell you and others are not followed. This is , tell you how to reduce the chance...
...all models) 2 Bottom duct (1) G. Bottom bracket (1) H. Depth B. OVER 24" OVER 27" OVER 30" (61.0 CM) (68.6 CM) (76.2 CM) BUILT-IN OVEN BUILT-IN OVEN BUILT-IN OVEN Width 22¹⁄₂" (57.15 cm) 25¹⁄₂" (64.77 cm) 25¹⁄₂" (64.77 cm) min... and follow the safety alert symbol and either the word "DANGER" or "WARNING." Anti-tip bracket (1) H I . with any tools listed here. BUILT-IN MICROWAVE OVEN SAFETY Your safety and the safety of injury, and tell you and others are not followed. This is , tell you how to reduce the chance...

Installation Instructions
Page 3
...the power supply cord is properly grounded. Then bend tabs upward. Do not use an extension cord. SAVE THESE INSTRUCTIONS Microwave Oven Preparation 1. Unplug microwave oven before ducts are not completely understood, or if doubt exists as to upper duct: Insert projecting tabs of upper duct ...into holes of upper duct B. Observe all cord connected appliances: The microwave oven must be provided. In the event of an electrical short circuit, grounding reduces the risk of bottom duct) Electrical Shock Hazard Plug ...
...the power supply cord is properly grounded. Then bend tabs upward. Do not use an extension cord. SAVE THESE INSTRUCTIONS Microwave Oven Preparation 1. Unplug microwave oven before ducts are not completely understood, or if doubt exists as to upper duct: Insert projecting tabs of upper duct ...into holes of upper duct B. Observe all cord connected appliances: The microwave oven must be provided. In the event of an electrical short circuit, grounding reduces the risk of bottom duct) Electrical Shock Hazard Plug ...

Installation Instructions
Page 4
...8322;" (3.81 cm) B. 3" (7.62 cm) C. 16" (40.64 cm) D. Centerline 2. A B C A. Existing screw Anti-Tip Bracket Installation 1. Bottom bracket 2. Make sure microwave oven is centered within cutout opening and slide it into cutout opening. Positioning flange C. ¹⁄₂" screws B A. ¹⁄₂" screws B. On cutout floor, use...8260;₂" screws at front of cutout floor. (Dimensions as shown are not to the oven. Peel off backing of microwave oven, and attach the duct assembly to scale.) AB C D B C A. Drill 2 holes for anti-tip bracket.
...8322;" (3.81 cm) B. 3" (7.62 cm) C. 16" (40.64 cm) D. Centerline 2. A B C A. Existing screw Anti-Tip Bracket Installation 1. Bottom bracket 2. Make sure microwave oven is centered within cutout opening and slide it into cutout opening. Positioning flange C. ¹⁄₂" screws B A. ¹⁄₂" screws B. On cutout floor, use...8260;₂" screws at front of cutout floor. (Dimensions as shown are not to the oven. Peel off backing of microwave oven, and attach the duct assembly to scale.) AB C D B C A. Drill 2 holes for anti-tip bracket.


