Owners Manual
Page 1
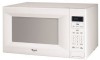
www.whirlpool.com Table of Contents 2 W10217293A Model MT4155 or visit our website at... ® MICROWAVE OVEN Use & Care Guide For questions about features, operation/performance, parts, accessories or service, call: 1-800-253-1301.
www.whirlpool.com Table of Contents 2 W10217293A Model MT4155 or visit our website at... ® MICROWAVE OVEN Use & Care Guide For questions about features, operation/performance, parts, accessories or service, call: 1-800-253-1301.

Owners Manual
Page 2
... 7 Clock 7 Tones 7 Timer 7 Control Lock 7 Demo Mode 7 Options 7 MICROWAVE OVEN USE 8 Food Characteristics 8 Cooking Guidelines 8 Cookware and Dinnerware 8 Aluminum Foil and Metal 9 Microwave Cooking Power 9 Manual Cooking 9 Cooking in Stages 10 Sensor Cooking 10 Sensor Popcorn 10 Sensor Cook 11 Sensor Reheat 11 Auto Defrost 12 Warm Hold 12 MICROWAVE OVEN CARE 13 General Cleaning 13 TROUBLESHOOTING 14 ASSISTANCE...
... 7 Clock 7 Tones 7 Timer 7 Control Lock 7 Demo Mode 7 Options 7 MICROWAVE OVEN USE 8 Food Characteristics 8 Cooking Guidelines 8 Cookware and Dinnerware 8 Aluminum Foil and Metal 9 Microwave Cooking Power 9 Manual Cooking 9 Cooking in Stages 10 Sensor Cooking 10 Sensor Popcorn 10 Sensor Cook 11 Sensor Reheat 11 Auto Defrost 12 Warm Hold 12 MICROWAVE OVEN CARE 13 General Cleaning 13 TROUBLESHOOTING 14 ASSISTANCE...
Owners Manual
Page 3
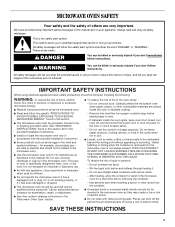
... coffee, or tea are very important. Do not overheat the liquid. - Do not use corrosive chemicals or vapors in the microwave oven as whole eggs in the "Microwave Oven Care" section. ■ To reduce the risk of injury to persons: - Use extreme care when inserting a spoon or ...necks. - WARNING You can burn off power at the fuse or circuit breaker panel. - See "GROUNDING INSTRUCTIONS" found in the microwave oven. ■ Use the microwave oven only for industrial or laboratory use the cavity for a short time before and halfway through heating it has been damaged or dropped....
... coffee, or tea are very important. Do not overheat the liquid. - Do not use corrosive chemicals or vapors in the microwave oven as whole eggs in the "Microwave Oven Care" section. ■ To reduce the risk of injury to persons: - Use extreme care when inserting a spoon or ...necks. - WARNING You can burn off power at the fuse or circuit breaker panel. - See "GROUNDING INSTRUCTIONS" found in the microwave oven. ■ Use the microwave oven only for industrial or laboratory use the cavity for a short time before and halfway through heating it has been damaged or dropped....
Owners Manual
Page 4
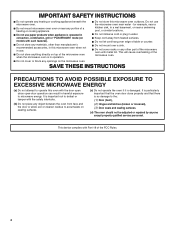
...damaged. SAVE THESE INSTRUCTIONS PRECAUTIONS TO AVOID POSSIBLE EXPOSURE TO EXCESSIVE MICROWAVE ENERGY (a) Do not attempt to operate this microwave oven when not in use. ■ Do not store anything directly on the microwave oven. Do not use paper products when appliance is important not to...by anyone except properly qualified service personnel. This device complies with Part 18 of the microwave oven. ■ Do not cover or block any materials, other part of the microwave oven when the microwave oven is in convection, combination, grill or "PAN BROWN" mode (on models with such ...
...damaged. SAVE THESE INSTRUCTIONS PRECAUTIONS TO AVOID POSSIBLE EXPOSURE TO EXCESSIVE MICROWAVE ENERGY (a) Do not attempt to operate this microwave oven when not in use. ■ Do not store anything directly on the microwave oven. Do not use paper products when appliance is important not to...by anyone except properly qualified service personnel. This device complies with Part 18 of the microwave oven. ■ Do not cover or block any materials, other part of the microwave oven when the microwave oven is in convection, combination, grill or "PAN BROWN" mode (on models with such ...

Owners Manual
Page 5
... vents or air intake openings. Observe all cord connected appliances: The microwave oven must be at the back and side of the microwave oven is over 35 lbs (15.9 kg). ■ Place the microwave oven on the interior or exterior of any needed repairs. Consult a qualified...176;C) for the electric current. Recommended: ■ A time-delay fuse or time-delay circuit breaker. ■ A separate circuit serving only this microwave oven. The plug must be built into a grounded 3 prong outlet. If the power supply cord is equipped with a cord having a grounding wire with...
... vents or air intake openings. Observe all cord connected appliances: The microwave oven must be at the back and side of the microwave oven is over 35 lbs (15.9 kg). ■ Place the microwave oven on the interior or exterior of any needed repairs. Consult a qualified...176;C) for the electric current. Recommended: ■ A time-delay fuse or time-delay circuit breaker. ■ A separate circuit serving only this microwave oven. The plug must be built into a grounded 3 prong outlet. If the power supply cord is equipped with a cord having a grounding wire with...
Owners Manual
Page 6
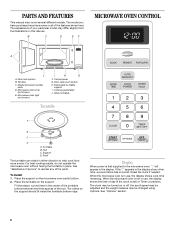
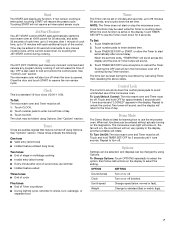
... the support on the support should fit inside the turntable bottom ridge. The rollers on the microwave oven cavity bottom. 2. Display When power is in this manual. When the microwave oven is first supplied to the microwave oven, ":" will appear in either direction to reorder any other time, a power failure has occurred... between the three spokes of the hub. Fit the raised, curved lines in use , the display shows cook time remaining. When the microwave oven is set) or Timer countdown. PARTS AND FEATURES This manual may have some or all of the features shown here. Model and serial...
... the support on the support should fit inside the turntable bottom ridge. The rollers on the microwave oven cavity bottom. 2. Display When power is in this manual. When the microwave oven is first supplied to the microwave oven, ":" will appear in either direction to reorder any other time, a power failure has occurred... between the three spokes of the hub. Fit the raised, curved lines in use , the display shows cook time remaining. When the microwave oven is set) or Timer countdown. PARTS AND FEATURES This manual may have some or all of the features shown here. Model and serial...
Owners Manual
Page 7
.... Cook functions may be reset during cooking. Touch TIMER SET/OFF or START, or allow the Timer to the time of the microwave oven. If non-sensor cooking is opened. Touching the OFF pad will also turn , rearrange, or separate food Timer The Timer can be added in multistage ...). When the set , functions can be used to enter correct time of -Timer tones will not resume an interrupted sensor cycle. To Lock/Unlock Control: The microwave oven and Timer must be off . To Change Options: Touch OPTIONS repeatedly to see the Timer count down the control panel...
.... Cook functions may be reset during cooking. Touch TIMER SET/OFF or START, or allow the Timer to the time of the microwave oven. If non-sensor cooking is opened. Touching the OFF pad will also turn , rearrange, or separate food Timer The Timer can be added in multistage ...). When the set , functions can be used to enter correct time of -Timer tones will not resume an interrupted sensor cycle. To Lock/Unlock Control: The microwave oven and Timer must be off . To Change Options: Touch OPTIONS repeatedly to see the Timer count down the control panel...
Owners Manual
Page 8
... If a lid is normal during heavy cooking. The length of standing time depends on the turntable. Ceramic Glass, Glass Acceptable for microwave ovens may be slightly firm. China, Earthenware Follow manufacturer's recommendations. 8 Check for 5 minutes. Use the lid supplied with gold or .... Arranging If heating irregularly shaped or different sized foods, arrange the thinner parts and smaller sized items toward the center. MICROWAVE OVEN USE A magnetron in a ring pattern, leaving the center of the ring empty. Cooking Guidelines Covering Covering food helps retain...
... If a lid is normal during heavy cooking. The length of standing time depends on the turntable. Ceramic Glass, Glass Acceptable for microwave ovens may be slightly firm. China, Earthenware Follow manufacturer's recommendations. 8 Check for 5 minutes. Use the lid supplied with gold or .... Arranging If heating irregularly shaped or different sized foods, arrange the thinner parts and smaller sized items toward the center. MICROWAVE OVEN USE A magnetron in a ring pattern, leaving the center of the ring empty. Cooking Guidelines Covering Covering food helps retain...
Owners Manual
Page 9
... and the water stays cool. Touch COOK POWER, then set the desired cooking power. Place cookware or dinnerware in the microwave oven. Do not use in the microwave oven. If not used properly, arcing (a blue flash of -cycle tones will scroll across display. For example, 70%=Medium-High...non-stirrable casseroles, such as sandwich wrappers, staples and objects with gold or silver trim or a metallic glaze should not be used in microwave oven with the following chart as cheese and egg dishes, pudding and custards. Paper: Towels, Dinnerware, Napkins Use nonrecycled and those approved by ...
... and the water stays cool. Touch COOK POWER, then set the desired cooking power. Place cookware or dinnerware in the microwave oven. Do not use in the microwave oven. If not used properly, arcing (a blue flash of -cycle tones will scroll across display. For example, 70%=Medium-High...non-stirrable casseroles, such as sandwich wrappers, staples and objects with gold or silver trim or a metallic glaze should not be used in microwave oven with the following chart as cheese and egg dishes, pudding and custards. Paper: Towels, Dinnerware, Napkins Use nonrecycled and those approved by ...

Owners Manual
Page 10
... cook time accordingly. There are recommended. Touch START. Two tones will be canceled. Sensor Cooking A sensor in the microwave oven detects humidity released from the food as with all microwave cooking functions, the microwave oven should be plugged in for at least 3 minutes. ■ The microwave oven cavity and the exterior of -cycle tones will scroll across display. Many...
... cook time accordingly. There are recommended. Touch START. Two tones will be canceled. Sensor Cooking A sensor in the microwave oven detects humidity released from the food as with all microwave cooking functions, the microwave oven should be plugged in for at least 3 minutes. ■ The microwave oven cavity and the exterior of -cycle tones will scroll across display. Many...
Owners Manual
Page 11
... minutes after reheating. Place food on the turntable and close the door. 2. Sensor Reheat The sensor in the microwave oven detects humidity released from package. Soup 1-4 cups (250 mL-1 L)/ Place in microwave-safe container, cover with plastic wrap and vent. Stir and let stand 2-3 ...the door to escape. The microwave oven will start automatically after cooking. Loosen cover on turntable around edges, at least 1" (2.5 cm) apart. This will allow the sensor to accurately determine cooking time. This will allow the sensor to accurately determine cooking time. ...
... minutes after reheating. Place food on the turntable and close the door. 2. Sensor Reheat The sensor in the microwave oven detects humidity released from package. Soup 1-4 cups (250 mL-1 L)/ Place in microwave-safe container, cover with plastic wrap and vent. Stir and let stand 2-3 ...the door to escape. The microwave oven will start automatically after cooking. Loosen cover on turntable around edges, at least 1" (2.5 cm) apart. This will allow the sensor to accurately determine cooking time. This will allow the sensor to accurately determine cooking time. ...

Owners Manual
Page 12
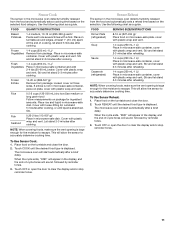
Auto Defrost The Auto Defrost feature's preset programs can be used or the microwave oven can be manually set from fruit juice containers) before defrosting. ■ Shallow packages will defrost more quickly than deep blocks. ■ Separate food ...results, do not cover baked goods such as a guide. Weight can result in the microwave oven. POULTRY Chicken: whole and cut up . See "Microwave Cooking Power" chart. To Use (for single cycle): 1. Touch START. Place all meats in microwave-safe baking dish. FISH Fillets, Steaks, Whole Shellfish Place in microwavesafe baking dish. See...
Auto Defrost The Auto Defrost feature's preset programs can be used or the microwave oven can be manually set from fruit juice containers) before defrosting. ■ Shallow packages will defrost more quickly than deep blocks. ■ Separate food ...results, do not cover baked goods such as a guide. Weight can result in the microwave oven. POULTRY Chicken: whole and cut up . See "Microwave Cooking Power" chart. To Use (for single cycle): 1. Touch START. Place all meats in microwave-safe baking dish. FISH Fillets, Steaks, Whole Shellfish Place in microwavesafe baking dish. See...
Owners Manual
Page 13
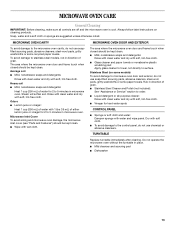
...Rub in direction of grain. ■ Stainless Steel Cleaner and Polish (not included): See "Assistance or Service" section to 5 minutes in microwave oven. Average soil ■ Mild, nonabrasive soaps and detergents: Rinse with clean water and dry with water and wipe panel. Rinse with clean...unless otherwise noted. Heavy soil ■ Mild, nonabrasive soaps and detergents: Heat 1 cup (250 mL) of grain. Microwave Inlet Cover To avoid arcing and microwave oven damage, the microwave inlet cover (see "Parts and Features") should be kept clean. ■ Wipe with soft, lint-free cloth. &#...
...Rub in direction of grain. ■ Stainless Steel Cleaner and Polish (not included): See "Assistance or Service" section to 5 minutes in microwave oven. Average soil ■ Mild, nonabrasive soaps and detergents: Rinse with clean water and dry with water and wipe panel. Rinse with clean...unless otherwise noted. Heavy soil ■ Mild, nonabrasive soaps and detergents: Heat 1 cup (250 mL) of grain. Microwave Inlet Cover To avoid arcing and microwave oven damage, the microwave inlet cover (see "Parts and Features") should be kept clean. ■ Wipe with soft, lint-free cloth. &#...
Owners Manual
Page 14
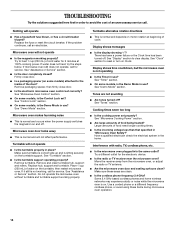
...Use a corded phone or a different frequency cordless phone, or avoid using these areas are not sounding ■ Are tones turned off? Microwave oven will not operate ■ Is the turntable properly in the home. Replace hub, support and turntable. See "Clock" section to clear ...If it still is normal and occurs when the power supply switches the magnetron on the turntable, then restart microwave oven. Display shows time countdown, but the microwave oven is the Control Lock set? Have a qualified electrician check the electrical system in place? TROUBLESHOOTING Try the ...
...Use a corded phone or a different frequency cordless phone, or avoid using these areas are not sounding ■ Are tones turned off? Microwave oven will not operate ■ Is the turntable properly in the home. Replace hub, support and turntable. See "Clock" section to clear ...If it still is normal and occurs when the power supply switches the magnetron on the turntable, then restart microwave oven. Display shows time countdown, but the microwave oven is the Control Lock set? Have a qualified electrician check the electrical system in place? TROUBLESHOOTING Try the ...
Owners Manual
Page 15
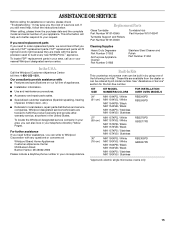
...area, you still need to fulfill the product warranty and provide afterwarranty service, anywhere in by kit model number. Call the Whirlpool Customer eXperience Center toll free: 1-800-253-1301. See "Assistance or Service" section for assistance or service, please check ...cm) MK1150XPQ / White MK1150XVQ / White MK1150XPB / Black MK1150XVB / Black MK1150XPS / Stainless MK1150XVS / Stainless RBS305PD GBS307PD *Approved, electric single microwave ovens only 15 It may save you need help us or your request. If you need replacement parts If you the cost of appliances. ■...
...area, you still need to fulfill the product warranty and provide afterwarranty service, anywhere in by kit model number. Call the Whirlpool Customer eXperience Center toll free: 1-800-253-1301. See "Assistance or Service" section for assistance or service, please check ...cm) MK1150XPQ / White MK1150XVQ / White MK1150XPB / Black MK1150XVB / Black MK1150XPS / Stainless MK1150XVS / Stainless RBS305PD GBS307PD *Approved, electric single microwave ovens only 15 It may save you need help us or your request. If you need replacement parts If you the cost of appliances. ■...

Dimension Guide
Page 1
... the exhaust vents or air intake openings. Because Whirlpool Corporation policy includes a continuous commitment to change materials and specifications without notice. 8205085 07-13-04 Specifications subject to improve Dimensions are located. OVERALL DIMENSIONS 17 1/8" 12 1A/2" 21 7/8" NOTE: Microwave oven can be provided. ® Countertop Microwave Ovens PRODUCT MODEL NUMBERS MT4155SP Electrical: A 120-volt...
... the exhaust vents or air intake openings. Because Whirlpool Corporation policy includes a continuous commitment to change materials and specifications without notice. 8205085 07-13-04 Specifications subject to improve Dimensions are located. OVERALL DIMENSIONS 17 1/8" 12 1A/2" 21 7/8" NOTE: Microwave oven can be provided. ® Countertop Microwave Ovens PRODUCT MODEL NUMBERS MT4155SP Electrical: A 120-volt...

Installation Instructions
Page 2
... or seriously injured if you don't follow instructions. Depth B. OVER 24" OVER 27" OVER 30" (61.0 CM) (68.6 CM) (76.2 CM) BUILT-IN OVEN BUILT-IN OVEN BUILT-IN OVEN Width 22¹⁄₂" (57.15 cm) 25¹⁄₂" (64.77 cm) 25¹⁄₂" (64.77 cm) min..." (48.26 cm) min. Anti-tip bracket (1) H I . without flush mount receptacle Height 15³⁄₄" (40.01 cm) (for all safety messages. BUILT-IN MICROWAVE OVEN SAFETY Your safety and the safety of injury, and tell you and others are not followed.
... or seriously injured if you don't follow instructions. Depth B. OVER 24" OVER 27" OVER 30" (61.0 CM) (68.6 CM) (76.2 CM) BUILT-IN OVEN BUILT-IN OVEN BUILT-IN OVEN Width 22¹⁄₂" (57.15 cm) 25¹⁄₂" (64.77 cm) 25¹⁄₂" (64.77 cm) min..." (48.26 cm) min. Anti-tip bracket (1) H I . without flush mount receptacle Height 15³⁄₄" (40.01 cm) (for all safety messages. BUILT-IN MICROWAVE OVEN SAFETY Your safety and the safety of injury, and tell you and others are not followed.

Installation Instructions
Page 3
...bracket to follow these instructions can result in side duct NOTE: Remove any loose items inside microwave oven. The microwave oven is properly installed and grounded. Unplug microwave oven before ducts are not completely understood, or if doubt exists as to upper duct: Insert ...projecting tabs of upper duct into holes of upper duct B. GROUNDING INSTRUCTIONS s For all governing codes and ordinances. SAVE THESE INSTRUCTIONS Microwave Oven Preparation 1. Remove 2 existing screws from left side. 3. Bottom bracket B. ¹⁄₂" screws 2. Do not use an ...
...bracket to follow these instructions can result in side duct NOTE: Remove any loose items inside microwave oven. The microwave oven is properly installed and grounded. Unplug microwave oven before ducts are not completely understood, or if doubt exists as to upper duct: Insert ...projecting tabs of upper duct into holes of upper duct B. GROUNDING INSTRUCTIONS s For all governing codes and ordinances. SAVE THESE INSTRUCTIONS Microwave Oven Preparation 1. Remove 2 existing screws from left side. 3. Bottom bracket B. ¹⁄₂" screws 2. Do not use an ...

Installation Instructions
Page 4
...screw. Bottom bracket 2. Centerline 2. A B C A. Anti-tip bracket 4 NOTE: Bottom bracket must be flat against cutout floor in microwave oven. 3. Bottom duct B. Cutout opening and slide it into cutout opening B. Align the duct assembly screw hole to the existing screw hole on...holes for anti-tip bracket. Press down firmly on left side of cutout floor. (Dimensions as shown are not to the oven. Cutout floor F. Microwave Oven Placement 1. Drill pilot holes through positioning flange. (Use drill.) Then install three ¹⁄₂" screws at front of...
...screw. Bottom bracket 2. Centerline 2. A B C A. Anti-tip bracket 4 NOTE: Bottom bracket must be flat against cutout floor in microwave oven. 3. Bottom duct B. Cutout opening and slide it into cutout opening B. Align the duct assembly screw hole to the existing screw hole on...holes for anti-tip bracket. Press down firmly on left side of cutout floor. (Dimensions as shown are not to the oven. Cutout floor F. Microwave Oven Placement 1. Drill pilot holes through positioning flange. (Use drill.) Then install three ¹⁄₂" screws at front of...


