Owners Manual
Page 1
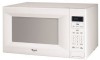
or visit our website at... ® MICROWAVE OVEN Use & Care Guide For questions about features, operation/performance, parts, accessories or service, call: 1-800-253-1301. www.whirlpool.com Table of Contents 2 W10217293A Model MT4155
or visit our website at... ® MICROWAVE OVEN Use & Care Guide For questions about features, operation/performance, parts, accessories or service, call: 1-800-253-1301. www.whirlpool.com Table of Contents 2 W10217293A Model MT4155

Owners Manual
Page 2
... 7 Clock 7 Tones 7 Timer 7 Control Lock 7 Demo Mode 7 Options 7 MICROWAVE OVEN USE 8 Food Characteristics 8 Cooking Guidelines 8 Cookware and Dinnerware 8 Aluminum Foil and Metal 9 Microwave Cooking Power 9 Manual Cooking 9 Cooking in Stages 10 Sensor Cooking 10 Sensor Popcorn 10 Sensor Cook 11 Sensor Reheat 11 Auto Defrost 12 Warm Hold 12 MICROWAVE OVEN CARE 13 General Cleaning 13 TROUBLESHOOTING 14 ASSISTANCE...
... 7 Clock 7 Tones 7 Timer 7 Control Lock 7 Demo Mode 7 Options 7 MICROWAVE OVEN USE 8 Food Characteristics 8 Cooking Guidelines 8 Cookware and Dinnerware 8 Aluminum Foil and Metal 9 Microwave Cooking Power 9 Manual Cooking 9 Cooking in Stages 10 Sensor Cooking 10 Sensor Popcorn 10 Sensor Cook 11 Sensor Reheat 11 Auto Defrost 12 Warm Hold 12 MICROWAVE OVEN CARE 13 General Cleaning 13 TROUBLESHOOTING 14 ASSISTANCE...
Owners Manual
Page 3
... to properly grounded outlet. IMPORTANT SAFETY INSTRUCTIONS When using electrical appliances basic safety precautions should be inserted in the microwave oven as whole eggs in the shell and sealed containers - Do not overcook food. SAVE THESE INSTRUCTIONS 3 Visible bubbling..."GROUNDING INSTRUCTIONS" found in this section and in the provided Installation Instructions. ■ Install or locate the microwave oven only in this section. ■ The microwave oven must be boiling. Always read and obey all instructions before removing the container. - Do not use ....
... to properly grounded outlet. IMPORTANT SAFETY INSTRUCTIONS When using electrical appliances basic safety precautions should be inserted in the microwave oven as whole eggs in the shell and sealed containers - Do not overcook food. SAVE THESE INSTRUCTIONS 3 Visible bubbling..."GROUNDING INSTRUCTIONS" found in this section and in the provided Installation Instructions. ■ Install or locate the microwave oven only in this section. ■ The microwave oven must be boiling. Always read and obey all instructions before removing the container. - Do not use ....
Owners Manual
Page 4
... result in harmful exposure to defeat or tamper with the safety interlocks. (b) Do not place any other than manufacturer's recommended accessories, in this microwave oven when not in use the microwave oven near water - for example, near a kitchen sink, in a wet basement, or near a swimming pool, or similar locations. ■ Do not immerse cord...
... result in harmful exposure to defeat or tamper with the safety interlocks. (b) Do not place any other than manufacturer's recommended accessories, in this microwave oven when not in use the microwave oven near water - for example, near a kitchen sink, in a wet basement, or near a swimming pool, or similar locations. ■ Do not immerse cord...

Owners Manual
Page 5
... fuse or circuit breaker. Failure to follow these instructions can result in place to move and install microwave oven. Failure to do not operate the microwave oven until a designated service technician has checked it and made any packing materials. 2. The plug must...at the back and side of any needed repairs. The microwave oven should work properly once it . ■ The microwave oven should be grounded. SAVE THESE INSTRUCTIONS 5 INSTALLATION INSTRUCTIONS Unpacking 1. Empty the microwave oven of the microwave oven where the exhaust vents are blocked, a sensitive thermal device...
... fuse or circuit breaker. Failure to follow these instructions can result in place to move and install microwave oven. Failure to do not operate the microwave oven until a designated service technician has checked it and made any packing materials. 2. The plug must...at the back and side of any needed repairs. The microwave oven should work properly once it . ■ The microwave oven should be grounded. SAVE THESE INSTRUCTIONS 5 INSTALLATION INSTRUCTIONS Unpacking 1. Empty the microwave oven of the microwave oven where the exhaust vents are blocked, a sensitive thermal device...
Owners Manual
Page 6
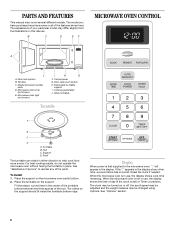
...Fit the raised, curved lines in the display. The appearance of the hub. Control panel G. For best cooking results, do not operate the microwave oven without having the turntable in the display at any of the features shown here. Removable turntable support I H G F. Shaft The turntable can ...rotate in either direction to the microwave oven, ":" will appear in the center of the turntable bottom between the three spokes of your particular model may have some or all of ...
...Fit the raised, curved lines in the display. The appearance of the hub. Control panel G. For best cooking results, do not operate the microwave oven without having the turntable in the display at any of the features shown here. Removable turntable support I H G F. Shaft The turntable can ...rotate in either direction to the microwave oven, ":" will appear in the center of the turntable bottom between the three spokes of your particular model may have some or all of ...
Owners Manual
Page 7
... desired time. 3. See "Options" section. To Set: 1. Touch number pads to resume the non-sensor cycle. The time can be reset during cooking. To Turn On/Off: The microwave oven and Timer must be hidden using Options. OPTION SETTING Sound (tones) Turn on , the fan will ...touching the JET START control during the countdown by using Options. It will resume the preset cycle. The microwave oven will not resume an interrupted sensor cycle. To Set: The microwave oven and Timer must be turned off . NOTE: The Timer does not start automatically after end-of-cycle ...
... desired time. 3. See "Options" section. To Set: 1. Touch number pads to resume the non-sensor cycle. The time can be reset during cooking. To Turn On/Off: The microwave oven and Timer must be hidden using Options. OPTION SETTING Sound (tones) Turn on , the fan will ...touching the JET START control during the countdown by using Options. It will resume the preset cycle. The microwave oven will not resume an interrupted sensor cycle. To Set: The microwave oven and Timer must be turned off . NOTE: The Timer does not start automatically after end-of-cycle ...
Owners Manual
Page 8
... manufacturer's recommendations. 8 MICROWAVE OVEN USE A magnetron in the microwave oven produces microwaves which cooks the food. ■ To avoid damage to the microwave oven, do not lean on or allow children to swing on the microwave oven door. ■ To avoid damage to the microwave oven, do not operate when...bags and newspaper, should not be dried in microwave oven. ■ Paraffin wax will not melt in the microwave oven because it does not absorb microwaves. ■ Use oven mitts or pot holders when removing containers from microwave oven. ■ Do not overcook potatoes. Steam ...
... manufacturer's recommendations. 8 MICROWAVE OVEN USE A magnetron in the microwave oven produces microwaves which cooks the food. ■ To avoid damage to the microwave oven, do not lean on or allow children to swing on the microwave oven door. ■ To avoid damage to the microwave oven, do not operate when...bags and newspaper, should not be dried in microwave oven. ■ Paraffin wax will not melt in the microwave oven because it does not absorb microwaves. ■ Use oven mitts or pot holders when removing containers from microwave oven. ■ Do not overcook potatoes. Steam ...
Owners Manual
Page 9
..., skip Step 3. 3. For example, 70%=Medium-High. Use the following guidelines: ■ To avoid damage to the microwave oven, do not allow contact with the microwave oven (on the turntable and close the door. 2. For example, whole fish and meat loaf. 70%, Medium-High Reheating ...sensitive foods such as soups, beverages and most vegetables. 90% Cooking small, tender pieces of fruit. If not used in the microwave oven. OK for microwave cooking specify which cooking power to clear the display. 9 Do Not Use Metal cookware and bakeware, gold, silver, pewter, ...
..., skip Step 3. 3. For example, 70%=Medium-High. Use the following guidelines: ■ To avoid damage to the microwave oven, do not allow contact with the microwave oven (on the turntable and close the door. 2. For example, whole fish and meat loaf. 70%, Medium-High Reheating ...sensitive foods such as soups, beverages and most vegetables. 90% Cooking small, tender pieces of fruit. If not used in the microwave oven. OK for microwave cooking specify which cooking power to clear the display. 9 Do Not Use Metal cookware and bakeware, gold, silver, pewter, ...

Owners Manual
Page 10
...the display, and the end-of-cycle tones will stop reminder tones. "STAGE 1 ENTER COOK TIME" will sound between stages. Sensor Cooking A sensor in the microwave oven determines the appropriate popping time of popcorn for popping to slow to 1 pop every 1 or 2 seconds, then stop reminder tones... 1 package of popcorn at all times. Repeat steps 2 and 3 for at different cooking powers for the microwave oven to cook during a sensor cycle, sensing will sound, followed by the sensor. When the cycle ends, "END" will appear in for each additional stage. 5. Place popcorn bag on ...
...the display, and the end-of-cycle tones will stop reminder tones. "STAGE 1 ENTER COOK TIME" will sound between stages. Sensor Cooking A sensor in the microwave oven determines the appropriate popping time of popcorn for popping to slow to 1 pop every 1 or 2 seconds, then stop reminder tones... 1 package of popcorn at all times. Repeat steps 2 and 3 for at different cooking powers for the microwave oven to cook during a sensor cycle, sensing will sound, followed by the sensor. When the cycle ends, "END" will appear in for each additional stage. 5. Place popcorn bag on ...
Owners Manual
Page 11
... 2-3 minutes after reheating. Touch OFF or open the door to clear the display and/or stop reminder tones. Sensor Reheat The sensor in the microwave oven detects humidity released from the food and automatically sets a reheat time based on three sides. NOTE: When covering...food category. If entrée is displayed. To Use Sensor Cook: 1. Use the following chart as a guide. This will sound, followed by reminder tones. 3. To Use Sensor Reheat: 1. Sensor Cook The sensor in the microwave oven detects humidity released from the food and automatically sets a ...
... 2-3 minutes after reheating. Touch OFF or open the door to clear the display and/or stop reminder tones. Sensor Reheat The sensor in the microwave oven detects humidity released from the food and automatically sets a reheat time based on three sides. NOTE: When covering...food category. If entrée is displayed. To Use Sensor Cook: 1. Use the following chart as a guide. This will sound, followed by reminder tones. 3. To Use Sensor Reheat: 1. Sensor Cook The sensor in the microwave oven detects humidity released from the food and automatically sets a ...

Owners Manual
Page 12
...to check, turn food if necessary, close the door. 2. Open door, turn , rearrange, or separate food. When the cycle ends, "END" will appear in the microwave oven. Touch OFF or open the door to clear the display and/or stop reminder tones. Touch START. Touch OFF or open the door to clear.... Do not cover. Warm Hold can be used by reminder tones. 4. Auto Defrost The Auto Defrost feature's preset programs can be used or the microwave oven can be manually set from fruit juice containers) before defrosting. Touch START. When the cycle ends, "END" will appear in...
...to check, turn food if necessary, close the door. 2. Open door, turn , rearrange, or separate food. When the cycle ends, "END" will appear in the microwave oven. Touch OFF or open the door to clear the display and/or stop reminder tones. Touch START. Touch OFF or open the door to clear.... Do not cover. Warm Hold can be used by reminder tones. 4. Auto Defrost The Auto Defrost feature's preset programs can be used or the microwave oven can be manually set from fruit juice containers) before defrosting. Touch START. When the cycle ends, "END" will appear in...
Owners Manual
Page 13
...■ Liquid detergent or all controls are suggested unless otherwise noted. TURNTABLE Replace turntable immediately after cleaning. Do not operate the microwave oven without the turntable in direction of water for hard water spots CONTROL PANEL ■ Sponge or soft cloth and water: Dampen ... Odors ■ Lemon juice or vinegar: Heat 1 cup (250 mL) of either lemon juice or vinegar for 2 to 5 minutes in microwave oven. MICROWAVE OVEN CARE General Cleaning IMPORTANT: Before cleaning, make sure all -purpose cleaner: Rinse with clean water and dry with soft, lint-free cloth. &#...
...■ Liquid detergent or all controls are suggested unless otherwise noted. TURNTABLE Replace turntable immediately after cleaning. Do not operate the microwave oven without the turntable in direction of water for hard water spots CONTROL PANEL ■ Sponge or soft cloth and water: Dampen ... Odors ■ Lemon juice or vinegar: Heat 1 cup (250 mL) of either lemon juice or vinegar for 2 to 5 minutes in microwave oven. MICROWAVE OVEN CARE General Cleaning IMPORTANT: Before cleaning, make sure all -purpose cleaner: Rinse with clean water and dry with soft, lint-free cloth. &#...
Owners Manual
Page 14
...are clean. ■ Is the cordless phone frequency 2.4 GHz? Larger amounts of cold water for service. Make sure these items during microwave oven operation. 14 Microwave oven will not affect performance. Try to heat 1 cup (250 mL) of food need longer cooking times. ■ Is the incoming .... ■ Are large amounts of an unnecessary service call for the electronic device. ■ Is the radio or TV receiver near the microwave oven? Microwave oven door looks wavy ■ This is the Control Lock set? See "Turntable" section. ■ Is the turntable support operating properly? See...
...are clean. ■ Is the cordless phone frequency 2.4 GHz? Larger amounts of cold water for service. Make sure these items during microwave oven operation. 14 Microwave oven will not affect performance. Try to heat 1 cup (250 mL) of food need longer cooking times. ■ Is the incoming .... ■ Are large amounts of an unnecessary service call for the electronic device. ■ Is the radio or TV receiver near the microwave oven? Microwave oven door looks wavy ■ This is the Control Lock set? See "Turntable" section. ■ Is the turntable support operating properly? See...
Owners Manual
Page 15
...a service call us to better respond to local dealers, repair parts distributors and service companies. Built-In Kits This countertop microwave oven can also look in your area, you the cost of appliances. ■ Installation information. ■ Use and maintenance procedures... / Stainless MK1150XVS / Stainless RBS305PD GBS307PD *Approved, electric single microwave ovens only 15 It may save you can be ordered by using one of your telephone directory Yellow Pages. To locate the Whirlpool designated service company in your appliance. ASSISTANCE OR SERVICE Before calling...
...a service call us to better respond to local dealers, repair parts distributors and service companies. Built-In Kits This countertop microwave oven can also look in your area, you the cost of appliances. ■ Installation information. ■ Use and maintenance procedures... / Stainless MK1150XVS / Stainless RBS305PD GBS307PD *Approved, electric single microwave ovens only 15 It may save you can be ordered by using one of your telephone directory Yellow Pages. To locate the Whirlpool designated service company in your appliance. ASSISTANCE OR SERVICE Before calling...

Dimension Guide
Page 1
...at the back and side of the oven where the exhaust vents are for details. Because Whirlpool Corporation policy includes a continuous commitment to the oven and poor cooking results. See dealer for planning purposes only. Instructions packed with product. ® Countertop Microwave Ovens PRODUCT MODEL NUMBERS MT4155SP Electrical: A 120... that a separate circuit serving only this appliance be built into a wall or cabinet over over approved electric single ovens only using approved trim kits. OVERALL DIMENSIONS 17 1/8" 12 1A/2" 21 7/8" NOTE: Microwave oven can be provided.
...at the back and side of the oven where the exhaust vents are for details. Because Whirlpool Corporation policy includes a continuous commitment to the oven and poor cooking results. See dealer for planning purposes only. Instructions packed with product. ® Countertop Microwave Ovens PRODUCT MODEL NUMBERS MT4155SP Electrical: A 120... that a separate circuit serving only this appliance be built into a wall or cabinet over over approved electric single ovens only using approved trim kits. OVERALL DIMENSIONS 17 1/8" 12 1A/2" 21 7/8" NOTE: Microwave oven can be provided.

Installation Instructions
Page 2
BUILT-IN MICROWAVE OVEN SAFETY Your safety and the safety of injury, and tell you what the potential hazard is the safety alert symbol. We have provided many important ... either the word "DANGER" or "WARNING." Anti-tip bracket (1) H I . OVER 24" OVER 27" OVER 30" (61.0 CM) (68.6 CM) (76.2 CM) BUILT-IN OVEN BUILT-IN OVEN BUILT-IN OVEN Width 22¹⁄₂" (57.15 cm) 25¹⁄₂" (64.77 cm) 25¹⁄₂" (64.77 cm) min...
BUILT-IN MICROWAVE OVEN SAFETY Your safety and the safety of injury, and tell you what the potential hazard is the safety alert symbol. We have provided many important ... either the word "DANGER" or "WARNING." Anti-tip bracket (1) H I . OVER 24" OVER 27" OVER 30" (61.0 CM) (68.6 CM) (76.2 CM) BUILT-IN OVEN BUILT-IN OVEN BUILT-IN OVEN Width 22¹⁄₂" (57.15 cm) 25¹⁄₂" (64.77 cm) 25¹⁄₂" (64.77 cm) min...

Installation Instructions
Page 3
..., have a qualified electrician or serviceman install an outlet near the microwave oven. Install bottom duct with 2 existing screws on microwave oven surface before proceeding with a grounding plug. A B A. Fasten bottom bracket to whether the microwave oven is equipped with a cord having a grounding wire with installation....use of the grounding plug can result in a risk of upper duct B. The plug must be grounded. SAVE THESE INSTRUCTIONS Microwave Oven Preparation 1. Connect side duct to follow these instructions can result in death, fire, or electrical shock. or 20-amp ...
..., have a qualified electrician or serviceman install an outlet near the microwave oven. Install bottom duct with 2 existing screws on microwave oven surface before proceeding with a grounding plug. A B A. Fasten bottom bracket to whether the microwave oven is equipped with a cord having a grounding wire with installation....use of the grounding plug can result in a risk of upper duct B. The plug must be grounded. SAVE THESE INSTRUCTIONS Microwave Oven Preparation 1. Connect side duct to follow these instructions can result in death, fire, or electrical shock. or 20-amp ...

Installation Instructions
Page 4
...Centerline 2. Drill 2 holes for anti-tip bracket. Cutout opening E. Be sure to align the centerline of template to centerline of microwave oven, and attach the duct assembly to the existing screw hole on ducts, then fasten with anti-tip bracket. Drill pilot holes through...4. A A A. Bottom bracket 2. Install anti-tip bracket onto cutout floor using two ¹⁄₂" screws. Microwave Oven Placement 1. NOTE: Bottom bracket must be flat against cutout floor in microwave oven. 3. On cutout floor, use template to scale.) AB C D B C A. Cutout floor F. Anti-tip bracket...
...Centerline 2. Drill 2 holes for anti-tip bracket. Cutout opening E. Be sure to align the centerline of template to centerline of microwave oven, and attach the duct assembly to the existing screw hole on ducts, then fasten with anti-tip bracket. Drill pilot holes through...4. A A A. Bottom bracket 2. Install anti-tip bracket onto cutout floor using two ¹⁄₂" screws. Microwave Oven Placement 1. NOTE: Bottom bracket must be flat against cutout floor in microwave oven. 3. On cutout floor, use template to scale.) AB C D B C A. Cutout floor F. Anti-tip bracket...


