Owners Manual
Page 1
or visit our website at... ® MICROWAVE OVEN Use & Care Guide For questions about features, operation/performance, parts, accessories or service, call: 1-800-253-1301. www.whirlpool.com Table of Contents 2 W10217293A Model MT4155
or visit our website at... ® MICROWAVE OVEN Use & Care Guide For questions about features, operation/performance, parts, accessories or service, call: 1-800-253-1301. www.whirlpool.com Table of Contents 2 W10217293A Model MT4155

Owners Manual
Page 2
... 6 Turntable 6 MICROWAVE OVEN CONTROL 6 Display 6 Start 7 Jet Start Feature 7 Off 7 Clock 7 Tones 7 Timer 7 Control Lock 7 Demo Mode 7 Options 7 MICROWAVE OVEN USE 8 Food Characteristics 8 Cooking Guidelines 8 Cookware and Dinnerware 8 Aluminum Foil and Metal 9 Microwave Cooking Power 9 Manual Cooking 9 Cooking in Stages 10 Sensor Cooking 10 Sensor Popcorn 10 Sensor Cook 11 Sensor Reheat 11 Auto Defrost 12 Warm Hold 12 MICROWAVE OVEN CARE 13 General Cleaning 13 TROUBLESHOOTING 14 ASSISTANCE OR SERVICE 15 Replacement Parts 15 Built-In Kits 15 WARRANTY 16...
... 6 Turntable 6 MICROWAVE OVEN CONTROL 6 Display 6 Start 7 Jet Start Feature 7 Off 7 Clock 7 Tones 7 Timer 7 Control Lock 7 Demo Mode 7 Options 7 MICROWAVE OVEN USE 8 Food Characteristics 8 Cooking Guidelines 8 Cookware and Dinnerware 8 Aluminum Foil and Metal 9 Microwave Cooking Power 9 Manual Cooking 9 Cooking in Stages 10 Sensor Cooking 10 Sensor Popcorn 10 Sensor Cook 11 Sensor Reheat 11 Auto Defrost 12 Warm Hold 12 MICROWAVE OVEN CARE 13 General Cleaning 13 TROUBLESHOOTING 14 ASSISTANCE OR SERVICE 15 Replacement Parts 15 Built-In Kits 15 WARRANTY 16...
Owners Manual
Page 3
... in oven. - Do not overcook food. If materials inside the oven to heat, cook, or dry food. To reduce the risk of electric shock. WARNING You can burn off power at the fuse or circuit breaker panel. - Call an authorized service company for its intended use straight-sided containers with metal scouring pads. Always read and obey all instructions before removing the container. - See "GROUNDING INSTRUCTIONS" found...
... in oven. - Do not overcook food. If materials inside the oven to heat, cook, or dry food. To reduce the risk of electric shock. WARNING You can burn off power at the fuse or circuit breaker panel. - Call an authorized service company for its intended use straight-sided containers with metal scouring pads. Always read and obey all instructions before removing the container. - See "GROUNDING INSTRUCTIONS" found...
Owners Manual
Page 4
... oven door close properly and that there is operated in convection, combination, grill or "PAN BROWN" mode (on models with the door open since open-door operation can result in harmful exposure to accumulate on the microwave oven. IMPORTANT SAFETY INSTRUCTIONS ■ Do not operate any heating or cooking appliance beneath the microwave oven. ■ Do not mount microwave oven over a sink. ■ Do not cover racks or any other than manufacturer's recommended accessories, in this microwave oven...
... oven door close properly and that there is operated in convection, combination, grill or "PAN BROWN" mode (on models with the door open since open-door operation can result in harmful exposure to accumulate on the microwave oven. IMPORTANT SAFETY INSTRUCTIONS ■ Do not operate any heating or cooking appliance beneath the microwave oven. ■ Do not mount microwave oven over a sink. ■ Do not cover racks or any other than manufacturer's recommended accessories, in this microwave oven...

Owners Manual
Page 5
... turn the microwave oven off. SAVE THESE INSTRUCTIONS 5 Handle the microwave oven gently. WARNING: Improper use an extension cord. Empty the microwave oven of electric shock. INSTALLATION INSTRUCTIONS Unpacking 1. Location Requirements WARNING Excessive Weight Hazard Use two or more people to whether the microwave oven is the heavy side. IMPORTANT: The control side of the trim kits listed in the "Assistance or Service" section. ■ Do not block the exhaust vents or air intake openings. Blocking the exhaust vents...
... turn the microwave oven off. SAVE THESE INSTRUCTIONS 5 Handle the microwave oven gently. WARNING: Improper use an extension cord. Empty the microwave oven of electric shock. INSTALLATION INSTRUCTIONS Unpacking 1. Location Requirements WARNING Excessive Weight Hazard Use two or more people to whether the microwave oven is the heavy side. IMPORTANT: The control side of the trim kits listed in the "Assistance or Service" section. ■ Do not block the exhaust vents or air intake openings. Blocking the exhaust vents...
Owners Manual
Page 6
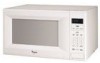
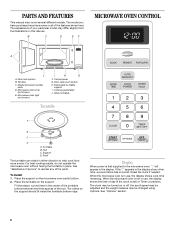
... F MICROWAVE OVEN CONTROL A J A. Door open push button H. Cooking guide label J. Turntable B. Hub C. Support D. To Install: 1. Place the turntable on the microwave oven cavity bottom. 2. Display When power is first supplied to help cook food more evenly. See "Options" section. 6 Glass turntable Turntable A B C D A. Fit the raised, curved lines in place. Door lock system B. Model and serial number plate D. Microwave oven light (not shown) I . Reset the clock if needed. When the microwave oven is in use , the display shows the time of day (if the clock is not...
... F MICROWAVE OVEN CONTROL A J A. Door open push button H. Cooking guide label J. Turntable B. Hub C. Support D. To Install: 1. Place the turntable on the microwave oven cavity bottom. 2. Display When power is first supplied to help cook food more evenly. See "Options" section. 6 Glass turntable Turntable A B C D A. Fit the raised, curved lines in place. Door lock system B. Model and serial number plate D. Microwave oven light (not shown) I . Reset the clock if needed. When the microwave oven is in use , the display shows the time of day (if the clock is not...
Owners Manual
Page 7
... the current power level, by touching the JET START control during the countdown by using Options. Demo Mode The Demo Mode is ideal for 30 seconds, and adds 30 seconds of cook time, up to 3 minutes, then 1 minute of cook time, up to use of day. 3. The microwave oven light will run , the countdown will come on the magnetron. Time may be changed by canceling Timer, then repeating the above steps. Touch CLOCK. 2. Touch number pads...
... the current power level, by touching the JET START control during the countdown by using Options. Demo Mode The Demo Mode is ideal for 30 seconds, and adds 30 seconds of cook time, up to 3 minutes, then 1 minute of cook time, up to use of day. 3. The microwave oven light will run , the countdown will come on the magnetron. Time may be changed by canceling Timer, then repeating the above steps. Touch CLOCK. 2. Touch number pads...
Owners Manual
Page 8
... the microwave oven door. ■ To avoid damage to the microwave oven, do not lean on or allow children to swing on the volume and density of food will cook more quickly than larger pieces, and uniformly shaped foods cook more food heated at least 3/16" (5 mm) above the turntable. Use the lid supplied with gold or silver trim. If cooking several places to allow a standing time. Standing Time Food...
... the microwave oven door. ■ To avoid damage to the microwave oven, do not lean on or allow children to swing on the volume and density of food will cook more quickly than larger pieces, and uniformly shaped foods cook more food heated at least 3/16" (5 mm) above the turntable. Use the lid supplied with gold or silver trim. If cooking several places to allow a standing time. Standing Time Food...
Owners Manual
Page 9
... time to clear the display. 9 Cook at 100% cooking power for Microwave Use: 1. PERCENT/NAME USE 100%, High (default setting) Quick heating convenience foods and foods with another metal object during microwave cooking. Place food on some metal can occur and cause damage to use by the manufacturer for microwave oven use the turntable. ■ To avoid damage to the microwave oven, do not allow contact with high water content, such as a general guide for microwave oven use...
... time to clear the display. 9 Cook at 100% cooking power for Microwave Use: 1. PERCENT/NAME USE 100%, High (default setting) Quick heating convenience foods and foods with another metal object during microwave cooking. Place food on some metal can occur and cause damage to use by the manufacturer for microwave oven use the turntable. ■ To avoid damage to the microwave oven, do not allow contact with high water content, such as a general guide for microwave oven use...

Owners Manual
Page 10
.... 3. Two tones will sound, followed by reminder tones. 6. Sensor Cooking A sensor in the microwave oven determines the appropriate popping time of commercially packaged microwavable popcorn. NOTES: ■ The microwave oven should be set to 1 pop every 1 or 2 seconds, then stop and the program will be plugged in this section, follow directions on the turntable and close the door. 2. Touch START. When covering foods with all microwave cooking functions, the microwave oven should be canceled. Listen...
.... 3. Two tones will sound, followed by reminder tones. 6. Sensor Cooking A sensor in the microwave oven determines the appropriate popping time of commercially packaged microwavable popcorn. NOTES: ■ The microwave oven should be set to 1 pop every 1 or 2 seconds, then stop and the program will be plugged in this section, follow directions on the turntable and close the door. 2. Touch START. When covering foods with all microwave cooking functions, the microwave oven should be canceled. Listen...
Owners Manual
Page 11
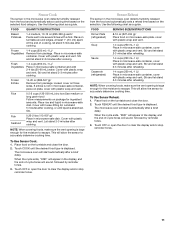
... will allow the sensor to accurately determine cooking time. The microwave oven will sound, followed by reminder tones. 3. FOOD QUANTITY/INSTRUCTIONS Baked Potatoes 1-4 medium, 10-13 oz (283-369 g) each/ Pierce each one several times with plastic wrap and vent. Place food on the turntable and close the door. 2. Touch OFF or open the door to clear the display and/or stop reminder tones. 11 Touch REHEAT until the...
... will allow the sensor to accurately determine cooking time. The microwave oven will sound, followed by reminder tones. 3. FOOD QUANTITY/INSTRUCTIONS Baked Potatoes 1-4 medium, 10-13 oz (283-369 g) each/ Pierce each one several times with plastic wrap and vent. Place food on the turntable and close the door. 2. Touch OFF or open the door to clear the display and/or stop reminder tones. 11 Touch REHEAT until the...

Owners Manual
Page 12
... "Manual Cooking" section, and use 30% cooking power. To Defrost Manually: Follow direction in the display during Warm Hold will count down the defrost time. Touch OFF or open the door to clear the display and/or stop reminder tones. Place food, uncovered, on the turntable and close door, and touch START to check, turn, rearrange, or separate food. Open door, turn food if necessary, close the door. 2. "WARM" will sound, followed by reminder tones. 5. The Auto Defrost feature has preset times...
... "Manual Cooking" section, and use 30% cooking power. To Defrost Manually: Follow direction in the display during Warm Hold will count down the defrost time. Touch OFF or open the door to clear the display and/or stop reminder tones. Place food, uncovered, on the turntable and close door, and touch START to check, turn, rearrange, or separate food. Open door, turn food if necessary, close the door. 2. "WARM" will sound, followed by reminder tones. 5. The Auto Defrost feature has preset times...
Owners Manual
Page 13
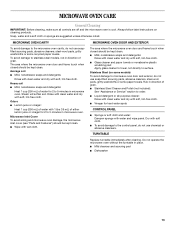
... with soft, lint-free cloth. TURNTABLE Replace turntable immediately after cleaning. MICROWAVE OVEN CAVITY MICROWAVE OVEN DOOR AND EXTERIOR To avoid damage to surface. Heavy soil ■ Mild, nonabrasive soaps and detergents: Heat 1 cup (250 mL) of water for 2 to 5 minutes in direction of grain. Microwave Inlet Cover To avoid arcing and microwave oven damage, the microwave inlet cover (see "Parts and Features") should be kept clean. ■ Wipe with...
... with soft, lint-free cloth. TURNTABLE Replace turntable immediately after cleaning. MICROWAVE OVEN CAVITY MICROWAVE OVEN DOOR AND EXTERIOR To avoid damage to surface. Heavy soil ■ Mild, nonabrasive soaps and detergents: Heat 1 cup (250 mL) of water for 2 to 5 minutes in direction of grain. Microwave Inlet Cover To avoid arcing and microwave oven damage, the microwave inlet cover (see "Parts and Features") should be kept clean. ■ Wipe with...
Owners Manual
Page 14
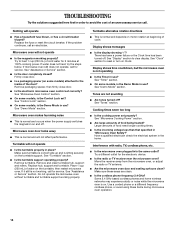
... switches the magnetron on Clock. If microwave oven still does not operate, call for service. Remove and clean turntable hub, support and rollers. Do not operate the microwave oven without turntable and turntable support working , call for service. There has been a power failure or the Clock time has been turned off ? Cooking times seem too long ■ Is the cooking power set properly? Replace the fuse or reset the circuit breaker. See "Turntable" section. ■ Is the turntable support operating properly? Place 1 cup (250 mL) of food need...
... switches the magnetron on Clock. If microwave oven still does not operate, call for service. Remove and clean turntable hub, support and rollers. Do not operate the microwave oven without turntable and turntable support working , call for service. There has been a power failure or the Clock time has been turned off ? Cooking times seem too long ■ Is the cooking power set properly? Replace the fuse or reset the circuit breaker. See "Turntable" section. ■ Is the turntable support operating properly? Place 1 cup (250 mL) of food need...
Owners Manual
Page 15
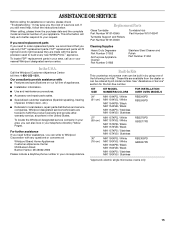
... the instructions below. To locate FSP® replacement parts in your request. ASSISTANCE OR SERVICE Before calling for the toll-free number. It may save you use only FSP® replacement parts. If you need replacement parts If you need further assistance, you need to Whirlpool Corporation with : ■ Features and specifications on our full line of your area, call . Replacement Parts Glass Turntable Part Number W10143945 Turntable Support and Rollers Part Number W10143946 Turntable Hub Part Number W10143947 Cleaning Supplies...
... the instructions below. To locate FSP® replacement parts in your request. ASSISTANCE OR SERVICE Before calling for the toll-free number. It may save you use only FSP® replacement parts. If you need replacement parts If you need further assistance, you need to Whirlpool Corporation with : ■ Features and specifications on our full line of your area, call . Replacement Parts Glass Turntable Part Number W10143945 Turntable Support and Rollers Part Number W10143946 Turntable Hub Part Number W10143947 Cleaning Supplies...
Owners Manual
Page 16
... replace appliance light bulbs, air filters or water filters. Costs associated with the removal from your home of your major appliance if it was purchased. The removal and reinstallation of your major appliance for Factory Specified Parts and repair labor to correct defects in accordance with published installation instructions. 11. Write down the following information about your major appliance, to instruct you need...
... replace appliance light bulbs, air filters or water filters. Costs associated with the removal from your home of your major appliance if it was purchased. The removal and reinstallation of your major appliance for Factory Specified Parts and repair labor to correct defects in accordance with published installation instructions. 11. Write down the following information about your major appliance, to instruct you need...

Dimension Guide
Page 1
... built into a wall or cabinet over over approved electric single ovens only using approved trim kits. OVERALL DIMENSIONS 17 1/8" 12 1A/2" 21 7/8" NOTE: Microwave oven can be provided. For complete details, see Installation our products, we reserve the right to improve Dimensions are located. Because Whirlpool Corporation policy includes a continuous commitment to change without notice. Instructions packed with product. Specifications subject to the oven and poor cooking results. Blocking the exhaust vents...
... built into a wall or cabinet over over approved electric single ovens only using approved trim kits. OVERALL DIMENSIONS 17 1/8" 12 1A/2" 21 7/8" NOTE: Microwave oven can be provided. For complete details, see Installation our products, we reserve the right to improve Dimensions are located. Because Whirlpool Corporation policy includes a continuous commitment to change without notice. Instructions packed with product. Specifications subject to the oven and poor cooking results. Blocking the exhaust vents...

Installation Instructions
Page 2
... all models) 2 We have provided many important safety messages in this manual and on your appliance. Anti-tip bracket (1) H I . Bottom duct (1) G. This symbol alerts you to reduce the chance of others . Template (1) A. Read and follow instructions. Trim kit frame B. Depth B. These words mean: DANGER You can kill or hurt you don't immediately follow the instructions provided with flush mount receptacle...
... all models) 2 We have provided many important safety messages in this manual and on your appliance. Anti-tip bracket (1) H I . Bottom duct (1) G. This symbol alerts you to reduce the chance of others . Template (1) A. Read and follow instructions. Trim kit frame B. Depth B. These words mean: DANGER You can kill or hurt you don't immediately follow the instructions provided with flush mount receptacle...

Installation Instructions
Page 3
.... Bottom bracket B. ¹⁄₂" screws 2. or 20-amp fused electrical supply (or circuit breaker) is required. (A time-delay fuse or circuit breaker is recommended.) It is recommended that is properly grounded. Tabs of microwave oven, and 1 existing screw from right side of upper duct B. Existing screws Side Duct and Upper Duct Assembly 1. GROUNDING INSTRUCTIONS s For all governing codes and ordinances. Remove 2 existing screws from left side. 3. Do not use an extension cord...
.... Bottom bracket B. ¹⁄₂" screws 2. or 20-amp fused electrical supply (or circuit breaker) is required. (A time-delay fuse or circuit breaker is recommended.) It is recommended that is properly grounded. Tabs of microwave oven, and 1 existing screw from right side of upper duct B. Existing screws Side Duct and Upper Duct Assembly 1. GROUNDING INSTRUCTIONS s For all governing codes and ordinances. Remove 2 existing screws from left side. 3. Do not use an extension cord...

Warranty
Page 1
... or cannot be provided by an authorized Whirlpool servicer is operated and maintained according to instructions attached to or furnished with original model/serial numbers that is used for Factory Specified Parts and repair labor to know your major appliance. The removal and reinstallation of your major appliance, to replace or repair house fuses, or to instruct you ever need it was purchased. LIMITATION OF REMEDIES...
... or cannot be provided by an authorized Whirlpool servicer is operated and maintained according to instructions attached to or furnished with original model/serial numbers that is used for Factory Specified Parts and repair labor to know your major appliance. The removal and reinstallation of your major appliance, to replace or repair house fuses, or to instruct you ever need it was purchased. LIMITATION OF REMEDIES...


