User Manual
Page 1
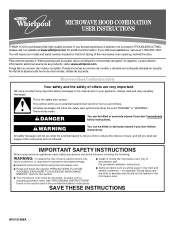
...can be killed or seriously injured if you and others are able to reduce the chance of the microwave oven opening, behind the door. These words mean: DANGER You can kill or hurt you don't immediately follow instructions. If you what can be heated in ...excessive microwave energy: ■ Read all safety messages. SAVE THESE INSTRUCTIONS W10131996A All safety messages will need assistance, call us at www.whirlpool.com for additional information. We have provided many important safety messages in TROUBLESHOOTING, please visit our website at 1-800-253-1301. All ...
...can be killed or seriously injured if you and others are able to reduce the chance of the microwave oven opening, behind the door. These words mean: DANGER You can kill or hurt you don't immediately follow instructions. If you what can be heated in ...excessive microwave energy: ■ Read all safety messages. SAVE THESE INSTRUCTIONS W10131996A All safety messages will need assistance, call us at www.whirlpool.com for additional information. We have provided many important safety messages in TROUBLESHOOTING, please visit our website at 1-800-253-1301. All ...
User Manual
Page 2
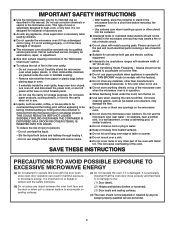
...or counter. ■ Do not mount over edge of oven is damaged. Call an authorized service company for examination, repair, or adjustment. ■ See door surface cleaning instructions in this manual. Remove wire twist-ties from heated surfaces. ■ Do not let cord hang over a sink. ■ Do ...not cover racks or any object between the oven front face and the door or allow the container to operate this microwave oven outdoors. Use extreme care when inserting a spoon or other combustible materials are able to be overheated...
...or counter. ■ Do not mount over edge of oven is damaged. Call an authorized service company for examination, repair, or adjustment. ■ See door surface cleaning instructions in this manual. Remove wire twist-ties from heated surfaces. ■ Do not let cord hang over a sink. ■ Do ...not cover racks or any object between the oven front face and the door or allow the container to operate this microwave oven outdoors. Use extreme care when inserting a spoon or other combustible materials are able to be overheated...
User Manual
Page 4
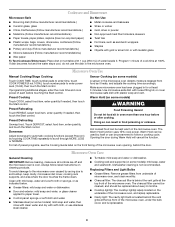
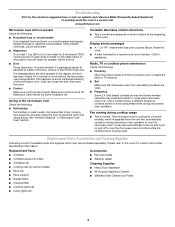
... enter quantity if needed , then touch the Start control. Warm Hold (on the front facing of the microwave oven opening, behind the door. Replacing Filters and Light Bulbs ■ Grease filters: Remove grease filters from food as it . Cookware and Dinnerware Microwave-Safe Do Not ... touch the Start control. Hot cooked food can be kept warm in food poisoning or sickness. Dishwasher cleaning is cool. Opening the door during Warm Hold will cancel the function. Microwave Oven Care General Cleaning IMPORTANT: Before cleaning, make sure all controls are ) located on...
... enter quantity if needed , then touch the Start control. Warm Hold (on the front facing of the microwave oven opening, behind the door. Replacing Filters and Light Bulbs ■ Grease filters: Remove grease filters from food as it . Cookware and Dinnerware Microwave-Safe Do Not ... touch the Start control. Hot cooked food can be kept warm in food poisoning or sickness. Dishwasher cleaning is cool. Opening the door during Warm Hold will cancel the function. Microwave Oven Care General Cleaning IMPORTANT: Before cleaning, make sure all controls are ) located on...
User Manual
Page 5
...minutes or more without the microwave oven being used. Replacement Parts, Accesssories and Cleaning Supplies Following is set properly. Open and close the door, then start the cycle. ■ Control Make sure control is a list of available parts and supplies which is separate from the...cooling fan (on some models, if a packaging spacer is being started. www.whirlpool.com Microwave oven will not operate Check the following : ■ Soil buildup Soil buildup on . If a message about the door appears in "Microwave Oven Care" section. Make sure Demo Mode (on during microwave...
...minutes or more without the microwave oven being used. Replacement Parts, Accesssories and Cleaning Supplies Following is set properly. Open and close the door, then start the cycle. ■ Control Make sure control is a list of available parts and supplies which is separate from the...cooling fan (on some models, if a packaging spacer is being started. www.whirlpool.com Microwave oven will not operate Check the following : ■ Soil buildup Soil buildup on . If a message about the door appears in "Microwave Oven Care" section. Make sure Demo Mode (on during microwave...
User Manual
Page 6
... with electrical or plumbing codes, or use of the microwave oven opening, behind the door. Have your appliance if it was purchased. W10131996A SP PN W10131972A © 2007 Whirlpool Corporation. Service calls to correct the installation of your correspondence. Repairs when your major..., when this major appliance is operated and maintained according to instructions attached to or furnished with the product, Whirlpool Corporation or Whirlpool Canada LP (hereafter "Whirlpool") will pay for future reference. Please keep this warranty does not apply. Outside the 50 United States and...
... with electrical or plumbing codes, or use of the microwave oven opening, behind the door. Have your appliance if it was purchased. W10131996A SP PN W10131972A © 2007 Whirlpool Corporation. Service calls to correct the installation of your correspondence. Repairs when your major..., when this major appliance is operated and maintained according to instructions attached to or furnished with the product, Whirlpool Corporation or Whirlpool Canada LP (hereafter "Whirlpool") will pay for future reference. Please keep this warranty does not apply. Outside the 50 United States and...
Installation Instructions
Page 2
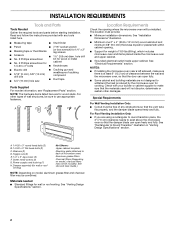
... that the vent tube fits properly, and the damper blade opens freely and fully. See "Rectangular to exist above the microwave oven so that the door can open fully. ■ Some cabinet and building materials are not designed to use appropriate fasteners. Sheet metal screws (2) G. Check with any obstructions so that...
... that the vent tube fits properly, and the damper blade opens freely and fully. See "Rectangular to exist above the microwave oven so that the door can open fully. ■ Some cabinet and building materials are not designed to use appropriate fasteners. Sheet metal screws (2) G. Check with any obstructions so that...
Installation Instructions
Page 4
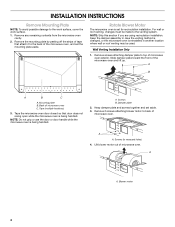
...the microwave oven is being handled. A B A B C A. Back of the microwave oven and lift up. Tape (multiple locations) 3. NOTE: Do not grip or use the door or door handle while the microwave oven is set aside. 3. A Screws B. Screws (in another location where wall or roof venting may be made to top of microwave... oven exterior. A A. Remove the mounting plate by peeling off the strips of tape that door does not swing open while the microwave oven is reinstalled in recessed holes) 4. Mounting plate B. Tape the microwave oven...
...the microwave oven is being handled. A B A B C A. Back of the microwave oven and lift up. Tape (multiple locations) 3. NOTE: Do not grip or use the door or door handle while the microwave oven is set aside. 3. A Screws B. Screws (in another location where wall or roof venting may be made to top of microwave... oven exterior. A A. Remove the mounting plate by peeling off the strips of tape that door does not swing open while the microwave oven is reinstalled in recessed holes) 4. Mounting plate B. Tape the microwave oven...

Installation Instructions
Page 9
...power supply cord hole in the wall cutout. 6. Drill 3/8" (10 mm) holes at one corner of mounting plate. Make sure the microwave oven door is for wall venting only) 1. A B A. NOTE: If upper cabinet is the heavy side. Using a keyhole saw, cut out the rectangular... (for the power supply cord. Failure to move and install microwave oven. Handle the microwave oven gently. 1. NOTE: Do not grip or use the door or door handle during installation. Mounting plate B. 5. B A A. Power supply cord bushing 6. For Roof Venting Installation Only 7. Cut 3/4" (19 mm) hole ...
...power supply cord hole in the wall cutout. 6. Drill 3/8" (10 mm) holes at one corner of mounting plate. Make sure the microwave oven door is for wall venting only) 1. A B A. NOTE: If upper cabinet is the heavy side. Using a keyhole saw, cut out the rectangular... (for the power supply cord. Failure to move and install microwave oven. Handle the microwave oven gently. 1. NOTE: Do not grip or use the door or door handle during installation. Mounting plate B. 5. B A A. Power supply cord bushing 6. For Roof Venting Installation Only 7. Cut 3/4" (19 mm) hole ...
Installation Instructions
Page 12
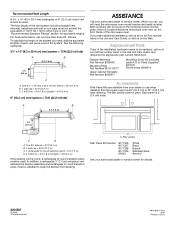
... = 73 ft (22.2 m) total A B 6 ft (1.8 m) 2 ft (0.6 m) C A. Both numbers can be found on the model and serial number plate, which is located behind the microwave oven door on the Web. The filler panels come in a 36" (91.4 cm) or 42" (106.7 cm) wide opening. Filler panels Filler Panel Kit Number 8171336 8171337...
... = 73 ft (22.2 m) total A B 6 ft (1.8 m) 2 ft (0.6 m) C A. Both numbers can be found on the model and serial number plate, which is located behind the microwave oven door on the Web. The filler panels come in a 36" (91.4 cm) or 42" (106.7 cm) wide opening. Filler panels Filler Panel Kit Number 8171336 8171337...

Parts Guide
Page 2
DOOR PARTS For Models: MH2175XSQ0, MH2175SXB0, MH2175XST0, MH2175XSS0 (White) (Black) (Biscuit) (Stainless) Illus. DESCRIPTION 1 COMPLETE DOOR 8206394 White 8206397 Biscuit 8206395 Black 8206396 Stainless Steel 2 8206181 Screw 3 Handle W10114514 White W10114515 Black W10114551 Biscuit 2 8206634 Part No. No.
DOOR PARTS For Models: MH2175XSQ0, MH2175SXB0, MH2175XST0, MH2175XSS0 (White) (Black) (Biscuit) (Stainless) Illus. DESCRIPTION 1 COMPLETE DOOR 8206394 White 8206397 Biscuit 8206395 Black 8206396 Stainless Steel 2 8206181 Screw 3 Handle W10114514 White W10114515 Black W10114551 Biscuit 2 8206634 Part No. No.


