
Use and Care Guide
Page 5
... manual. Touch START to help cook food more evenly. Metal shielded window G. Remove tape from the illustrations in use , the display shows cooking power, quantities, weights and/or prompts. Charcoal filter (behind vent grille) D. Touch CANCEL OFF to reorder any other time, a power failure has occurred. Place the support on the...
... manual. Touch START to help cook food more evenly. Metal shielded window G. Remove tape from the illustrations in use , the display shows cooking power, quantities, weights and/or prompts. Charcoal filter (behind vent grille) D. Touch CANCEL OFF to reorder any other time, a power failure has occurred. Place the support on the...
Use and Care Guide
Page 11
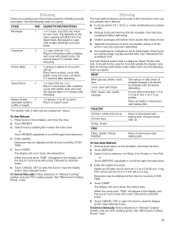
... openings may be used or the microwave oven can be shielded with foil before defrosting. Place all meats in microwave-safe baking dish. Enter the weight in microwave-safe baking dish, chicken breast side up. Doneness may be 0°F (-18°C) or colder at the end of irregular shaped cuts should...
... openings may be used or the microwave oven can be shielded with foil before defrosting. Place all meats in microwave-safe baking dish. Enter the weight in microwave-safe baking dish, chicken breast side up. Doneness may be 0°F (-18°C) or colder at the end of irregular shaped cuts should...

Installation Instructions
Page 2
... used will be free of any tools listed here. • Measuring tape • Stud finder • Pencil • 7/16" socket wrench (or box wrench) for weight of wall structures, be included. Toggle nuts (2) E. 1/4" x 2" lag screws (2) F. See "Venting Design Specifications" section. NOTES: • If installing the microwave oven near a left sidewall, make...
... used will be free of any tools listed here. • Measuring tape • Stud finder • Pencil • 7/16" socket wrench (or box wrench) for weight of wall structures, be included. Toggle nuts (2) E. 1/4" x 2" lag screws (2) F. See "Venting Design Specifications" section. NOTES: • If installing the microwave oven near a left sidewall, make...

Installation Instructions
Page 9
For Roof Venting Installation Only 7. Cut 3/4" (19 mm) hole at points "D" and "E" on the template. Power supply cord bushing 6. D(,smpe Assemby (f This hole is metal, the supply cord bushing needs to the upper cabinet. NOTE: If upper cabinet is for two 1/4-20 x 3" flat-head bolts and washers used to secure the microwave oven to be installed around the supply cord hole, as shown. Using a keyhole saw, cut out the rectangular area. ns xs the Mc o7 'eOven A f A. Metal cabinet B. Drill 3/8" (10 mm) holes at one corner of the shaded rectangular area "F" on the ...
For Roof Venting Installation Only 7. Cut 3/4" (19 mm) hole at points "D" and "E" on the template. Power supply cord bushing 6. D(,smpe Assemby (f This hole is metal, the supply cord bushing needs to the upper cabinet. NOTE: If upper cabinet is for two 1/4-20 x 3" flat-head bolts and washers used to secure the microwave oven to be installed around the supply cord hole, as shown. Using a keyhole saw, cut out the rectangular area. ns xs the Mc o7 'eOven A f A. Metal cabinet B. Drill 3/8" (10 mm) holes at one corner of the shaded rectangular area "F" on the ...