
Ventilation Specification
Page 1
...and on your local gas supplier. ® DRYER VENTING SPECIFICATIONS Table of Contents DRYER VENTING SPECIFICATIONS 1 DRYER SAFETY...1 INSTALLATION REQUIREMENTS ...4 Venting Requirements ...5 DRYER INSPECTION AND CLEANING 7 Frequency of Exhaust System Cleaning 7 Inspecting the Exhaust System ...7 DRYER SAFETY Your safety and the safety of others ....the potential hazard is the safety alert symbol. All safety messages will tell you and others are installing a gas dryer, it is recommended that the owner post, in a prominent location, instructions for the customer's use gasoline or other...
...and on your local gas supplier. ® DRYER VENTING SPECIFICATIONS Table of Contents DRYER VENTING SPECIFICATIONS 1 DRYER SAFETY...1 INSTALLATION REQUIREMENTS ...4 Venting Requirements ...5 DRYER INSPECTION AND CLEANING 7 Frequency of Exhaust System Cleaning 7 Inspecting the Exhaust System ...7 DRYER SAFETY Your safety and the safety of others ....the potential hazard is the safety alert symbol. All safety messages will tell you and others are installing a gas dryer, it is recommended that the owner post, in a prominent location, instructions for the customer's use gasoline or other...

Ventilation Specification
Page 3
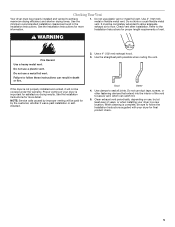
... reduce the risk of fire, electric shock, or injury to persons when using the dryer. ■ Do not place items exposed to cooking oils in your dryer. Close supervision of children is necessary when the dryer is used near children. ■ Before the dryer is removed from service or discarded...exhaust opening and adjacent surrounding areas free from the accumulation of lint, dust, and dirt. ■ The interior of the dryer and exhaust vent should be electrically grounded in accordance with local codes, or in the absence of local codes, with cooking oils may contribute to a chemical reaction...
... reduce the risk of fire, electric shock, or injury to persons when using the dryer. ■ Do not place items exposed to cooking oils in your dryer. Close supervision of children is necessary when the dryer is used near children. ■ Before the dryer is removed from service or discarded...exhaust opening and adjacent surrounding areas free from the accumulation of lint, dust, and dirt. ■ The interior of the dryer and exhaust vent should be electrically grounded in accordance with local codes, or in the absence of local codes, with cooking oils may contribute to a chemical reaction...

Ventilation Specification
Page 4
...2158 Electric Clothes Dryer Standard references venting requirements in laundry area. 4. Lint Even though the dryer is equipped with the dryer. ■ Provide for use in the design of the dryer will not exceed 200°F (93.3°C) when the dryer is generated to ensure dryer vent systems...reasons for Whirlpool Corporation dryers sold in death or fire. Heat In order to aid licensed HVAC or Architectural Engineers who design single and multi-dryer unit venting systems for exhausting a dryer outdoors are in confined spaces where specified clearances from the washer. Central ...
...2158 Electric Clothes Dryer Standard references venting requirements in laundry area. 4. Lint Even though the dryer is equipped with the dryer. ■ Provide for use in the design of the dryer will not exceed 200°F (93.3°C) when the dryer is generated to ensure dryer vent systems...reasons for Whirlpool Corporation dryers sold in death or fire. Heat In order to aid licensed HVAC or Architectural Engineers who design single and multi-dryer unit venting systems for exhausting a dryer outdoors are in confined spaces where specified clearances from the washer. Central ...

Ventilation Specification
Page 5
... m). Refer to determine the allowable length and number of elbows for the venting system. Listed here are CSA listed (reference ANSI Z21.5.1 standard). This includes standard vent and long vent dryer models. Codes Agency Approvals All Whirlpool electric dryer models, including "long vent dryers," that came with the dryer operating in the Air Only cycle (no heat). Use an inclined...
... m). Refer to determine the allowable length and number of elbows for the venting system. Listed here are CSA listed (reference ANSI Z21.5.1 standard). This includes standard vent and long vent dryer models. Codes Agency Approvals All Whirlpool electric dryer models, including "long vent dryers," that came with the dryer operating in the Air Only cycle (no heat). Use an inclined...
Ventilation Specification
Page 6
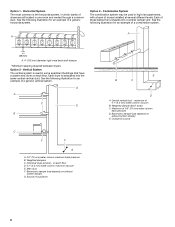
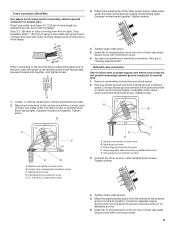
... The most common is used in high-rise apartments, with a bank of dryers are all located in some apartment buildings that have a washer and dryer on exhaust system design) G. Combination System The combination system may be used in one room and vented through a common duct. Option 1 - See the following illustration for an example of...
... The most common is used in high-rise apartments, with a bank of dryers are all located in some apartment buildings that have a washer and dryer on exhaust system design) G. Combination System The combination system may be used in one room and vented through a common duct. Option 1 - See the following illustration for an example of...

Ventilation Specification
Page 7
...and free from lint accumulation. Inspecting the Exhaust System 1. Disconnect the exhaust duct from the dryer and from the exhaust hood. Operate the dryer and verify that the exhaust air is not obstructed in the vent and that there are no leaks in the system. ■ Seal any lint accumulation....secure. 4. Inspect the interior of the duct and remove any leaks that the flapper or louvers move freely. 3. Lint may collect in multiple dryer systems a more frequent inspection is removed from the exhaust hood (at the exhaust outlet). 2. Reassemble the exhaust duct and hood, checking that ...
...and free from lint accumulation. Inspecting the Exhaust System 1. Disconnect the exhaust duct from the dryer and from the exhaust hood. Operate the dryer and verify that the exhaust air is not obstructed in the vent and that there are no leaks in the system. ■ Seal any lint accumulation....secure. 4. Inspect the interior of the duct and remove any leaks that the flapper or louvers move freely. 3. Lint may collect in multiple dryer systems a more frequent inspection is removed from the exhaust hood (at the exhaust outlet). 2. Reassemble the exhaust duct and hood, checking that ...
Owners Manual
Page 2
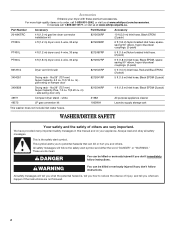
...important safety messages in this manual and on your dryer with these premium accessories. m) - This is ...cart This washer does not include inlet water hoses. WASHER/DRYER SAFETY ...) 49971 Compact dryer stand - In Canada call 1-800-901-2042, or visit us at www.whirlpool.com/accessories. ... gas line dryer connector installation kit 8212656RP 10 ft (3.0 m) Inlet hose, Black EPDM (2 pack) PT220L 4 ft (1.2 m) dryer cord, 3-... PT400L 4 ft (1.2 m) dryer cord, 4-wire, 30 amp 8212487RP 5 ft (1.5 m) Nylon braided inlet hose. (2-pack) PT600L 6 ft (1.8 m) dryer cord, 4-wire, 30 amp...
...important safety messages in this manual and on your dryer with these premium accessories. m) - This is ...cart This washer does not include inlet water hoses. WASHER/DRYER SAFETY ...) 49971 Compact dryer stand - In Canada call 1-800-901-2042, or visit us at www.whirlpool.com/accessories. ... gas line dryer connector installation kit 8212656RP 10 ft (3.0 m) Inlet hose, Black EPDM (2 pack) PT220L 4 ft (1.2 m) dryer cord, 3-... PT400L 4 ft (1.2 m) dryer cord, 4-wire, 30 amp 8212487RP 5 ft (1.5 m) Nylon braided inlet hose. (2-pack) PT600L 6 ft (1.8 m) dryer cord, 4-wire, 30 amp...
Owners Manual
Page 4
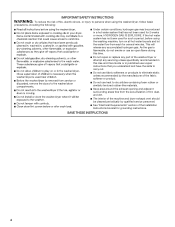
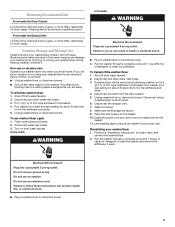
...dust, and dirt. ■ The interior of the machine and dryer exhaust vent should be cleaned periodically by the manufacturer of the fabric softener or product. ■ Do not use heat to persons when using the washer/dryer, follow basic precautions, including the following: ■ Under certain ...this time. ■ Do not repair or replace any part of the washer/dryer or attempt any accumulated hydrogen gas. SAVE THESE INSTRUCTIONS 4 IMPORTANT SAFETY INSTRUCTIONS WARNING: To reduce the risk of fire, electric shock, or injury to dry articles containing foam rubber or similarly textured ...
...dust, and dirt. ■ The interior of the machine and dryer exhaust vent should be cleaned periodically by the manufacturer of the fabric softener or product. ■ Do not use heat to persons when using the washer/dryer, follow basic precautions, including the following: ■ Under certain ...this time. ■ Do not repair or replace any part of the washer/dryer or attempt any accumulated hydrogen gas. SAVE THESE INSTRUCTIONS 4 IMPORTANT SAFETY INSTRUCTIONS WARNING: To reduce the risk of fire, electric shock, or injury to dry articles containing foam rubber or similarly textured ...
Owners Manual
Page 5
.... 5 Use 4" (102 mm) metal or flexible metal vent. Refer to seal all joints. Do not use plastic vent or metal foil vent. Use the straightest path possible when routing the vent. Good Better 4. Proper venting of your dryer in a new location. NOTE: Service calls caused by the...the Installation Instructions supplied with your dryer for more detail. Use a 4" (102 mm) exhaust hood. 3. Do not use duct tape, screws, or other fastening devices that extend into the interior of vent. Do not use a plastic vent. Check vent after installation. See the Installation ...
.... 5 Use 4" (102 mm) metal or flexible metal vent. Refer to seal all joints. Do not use plastic vent or metal foil vent. Use the straightest path possible when routing the vent. Good Better 4. Proper venting of your dryer in a new location. NOTE: Service calls caused by the...the Installation Instructions supplied with your dryer for more detail. Use a 4" (102 mm) exhaust hood. 3. Do not use duct tape, screws, or other fastening devices that extend into the interior of vent. Do not use a plastic vent. Check vent after installation. See the Installation ...
Owners Manual
Page 9
.... 4. From Inside the Exhaust Vent Lint should be removed every 2 years, or more often, depending on a drain and spin setting for about 30 seconds to do so can result in death, fire, or electrical shock. ■ Plug in washer/dryer or reconnect power. 4. Failure ... cord and drain hose over edge and into a grounded 4 prong outlet. To winterize washer/dryer 1. Put 1 qt (1 L) of R.V.-type antifreeze in the basket. Disconnect the exhaust vent. 7. WARNING In Canada WARNING Electrical Shock Hazard Plug into the basket. 11. Cleaning should be done by a qualified person...
.... 4. From Inside the Exhaust Vent Lint should be removed every 2 years, or more often, depending on a drain and spin setting for about 30 seconds to do so can result in death, fire, or electrical shock. ■ Plug in washer/dryer or reconnect power. 4. Failure ... cord and drain hose over edge and into a grounded 4 prong outlet. To winterize washer/dryer 1. Put 1 qt (1 L) of R.V.-type antifreeze in the basket. Disconnect the exhaust vent. 7. WARNING In Canada WARNING Electrical Shock Hazard Plug into the basket. 11. Cleaning should be done by a qualified person...
Owners Manual
Page 12
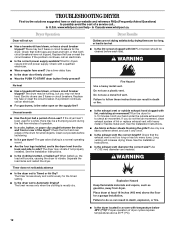
...used for a while, there may not have not tripped. Electric dryers use ? Unusual sounds ■ Has the dryer had a period of the dryer? When balled up ? Clothes are not drying satisfactorily, drying times are intact and tight, or that the exhaust vent is the valve open on the supply line? WARNING Fire... both fuses are too long, or load is mostly dry. ■ Is the dryer located in death or fire. ■ Is the exhaust vent or outside exhaust hood to vibrate. In Canada www.whirlpool.ca. Replace the fuse or reset the circuit breaker. Separate the load items and ...
...used for a while, there may not have not tripped. Electric dryers use ? Unusual sounds ■ Has the dryer had a period of the dryer? When balled up ? Clothes are not drying satisfactorily, drying times are intact and tight, or that the exhaust vent is the valve open on the supply line? WARNING Fire... both fuses are too long, or load is mostly dry. ■ Is the dryer located in death or fire. ■ Is the exhaust vent or outside exhaust hood to vibrate. In Canada www.whirlpool.ca. Replace the fuse or reset the circuit breaker. Separate the load items and ...
Dimension Guide
Page 1
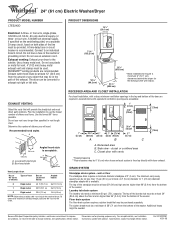
... the standpipe must be provided. The minimum carry-away capacity can be no higher than specified in vent length chart. The siphon break must be used. Because Whirlpool Corporation policy includes a continuous commitment to 1" (2.5 cm) diameter standpipe adapter kit is lined up ...To determine maximum exhaust length, add one 90° turn inside the washer/dryer. W10222387 10-31-08 ® 24" (61 cm) Electric Washer/Dryer PRODUCT MODEL NUMBER LTE5243D Electrical: A three- or four-wire, 120/208-volt electrical supply, if specified on the serial/rating plate) on a separate ...
... the standpipe must be provided. The minimum carry-away capacity can be no higher than specified in vent length chart. The siphon break must be used. Because Whirlpool Corporation policy includes a continuous commitment to 1" (2.5 cm) diameter standpipe adapter kit is lined up ...To determine maximum exhaust length, add one 90° turn inside the washer/dryer. W10222387 10-31-08 ® 24" (61 cm) Electric Washer/Dryer PRODUCT MODEL NUMBER LTE5243D Electrical: A three- or four-wire, 120/208-volt electrical supply, if specified on the serial/rating plate) on a separate ...
Installation Instructions
Page 1
...) ELECTRIC WASHER/DRYER INSTALLATION INSTRUCTIONS Table of Contents WASHER/DRYER SAFETY 1 INSTALLATION INSTRUCTIONS 2 Tools and Parts 2 Alternate Parts 2 Location Requirements 2 Drain System 3 Electrical Requirements 4 Electrical Connection 5 Venting Requirements 10 Install Leveling Legs 11 Remove Foam Packing 11 Connect Drain Hose 11 Connect Inlet Hoses 12 Secure Drain Hose 13 Plan Vent System 13 Install Vent System 15 Level Washer/Dryer 15 Connect Vent...
...) ELECTRIC WASHER/DRYER INSTALLATION INSTRUCTIONS Table of Contents WASHER/DRYER SAFETY 1 INSTALLATION INSTRUCTIONS 2 Tools and Parts 2 Alternate Parts 2 Location Requirements 2 Drain System 3 Electrical Requirements 4 Electrical Connection 5 Venting Requirements 10 Install Leveling Legs 11 Remove Foam Packing 11 Connect Drain Hose 11 Connect Inlet Hoses 12 Secure Drain Hose 13 Plan Vent System 13 Install Vent System 15 Level Washer/Dryer 15 Connect Vent...
Installation Instructions
Page 2
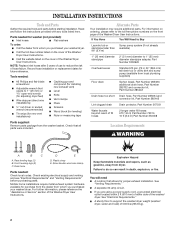
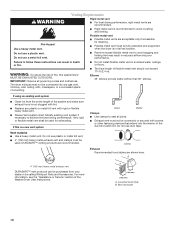
... 367031 Water faucets beyond reach of the Washer/Dryer User Instructions. See "Venting Requirements." If you purchased your washer/dryer. Check that allows for future reference. A sturdy floor to reduce the risk of 500 lbs (226.8 kg). 2 Drain hose D E D. Plastic strap E. Check existing electrical supply and venting, and see "Electrical Requirements" and "Venting Requirements" before starting installation. You will...
... 367031 Water faucets beyond reach of the Washer/Dryer User Instructions. See "Venting Requirements." If you purchased your washer/dryer. Check that allows for future reference. A sturdy floor to reduce the risk of 500 lbs (226.8 kg). 2 Drain hose D E D. Plastic strap E. Check existing electrical supply and venting, and see "Electrical Requirements" and "Venting Requirements" before starting installation. You will...

Installation Instructions
Page 3
...of the laundry tub must be at the end of the washer/dryer is suitable for spacing of 2" (51 mm). Closet door with vents 3" (76 mm) *Required spacing **Rear clearance may not operate correctly if washer/dryer is not level. See "Alternate Parts." The top of...) *27 ¼" (692 mm) 23 7⁄8 " (606 mm) *Most installations require a minimum 5" (127 mm) clearance behind the dryer for the exhaust vent with equivalent ventilation openings are recommended for purchase from your washer in .2 (155 cm2) 23 7⁄8" 1" 1"* 27¼" (606 mm) (25 mm) (25 mm) (692 mm) 5"** (127...
...of the laundry tub must be at the end of the washer/dryer is suitable for spacing of 2" (51 mm). Closet door with vents 3" (76 mm) *Required spacing **Rear clearance may not operate correctly if washer/dryer is not level. See "Alternate Parts." The top of...) *27 ¼" (692 mm) 23 7⁄8 " (606 mm) *Most installations require a minimum 5" (127 mm) clearance behind the dryer for the exhaust vent with equivalent ventilation openings are recommended for purchase from your washer in .2 (155 cm2) 23 7⁄8" 1" 1"* 27¼" (606 mm) (25 mm) (25 mm) (692 mm) 5"** (127...
Installation Instructions
Page 7
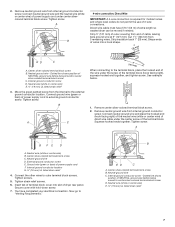
Tighten screw. Direct wire cable must have completed your electrical connection. Strip insulation back 1" (25 mm). Center silver-...screw. Strip 5" (127 mm) of outer covering from end of wires into slot of extra length so washer/dryer can be moved if needed. Shape ends of cable, leaving bare ground wire at 5" (127 mm).... When connecting to the terminal block, place the hooked end of the wire under the screw of power supply cord to "Venting Requirements." Neutral ground wire D. Connect the other wires to the external ground conductor location. Neutral wire (white or center wire)...
Tighten screw. Direct wire cable must have completed your electrical connection. Strip insulation back 1" (25 mm). Center silver-...screw. Strip 5" (127 mm) of outer covering from end of wires into slot of extra length so washer/dryer can be moved if needed. Shape ends of cable, leaving bare ground wire at 5" (127 mm).... When connecting to the terminal block, place the hooked end of the wire under the screw of power supply cord to "Venting Requirements." Neutral ground wire D. Connect the other wires to the external ground conductor location. Neutral wire (white or center wire)...
Installation Instructions
Page 8
... block cover into slot of power supply cable F. Tighten screw. Neutral prong D. B A C E D 5. You have completed your electrical connection. Now go to external ground conductor screw. Neutral wire (white or center wire) B. Tighten screws. 4. Loosen or remove center silver... -down screw. 6. Center silver-colored terminal block screw C. Move the green painted screw from the internal to "Venting Requirements." Connect ground wire (green or bare) of dryer rear panel. A. C GF A. 3-wire receptacle (NEMA type 10-30R) B. 3-wire plug C. Neutral (white...
... block cover into slot of power supply cable F. Tighten screw. Neutral prong D. B A C E D 5. You have completed your electrical connection. Now go to external ground conductor screw. Neutral wire (white or center wire) B. Tighten screws. 4. Loosen or remove center silver... -down screw. 6. Center silver-colored terminal block screw C. Move the green painted screw from the internal to "Venting Requirements." Connect ground wire (green or bare) of dryer rear panel. A. C GF A. 3-wire receptacle (NEMA type 10-30R) B. 3-wire plug C. Neutral (white...
Installation Instructions
Page 9
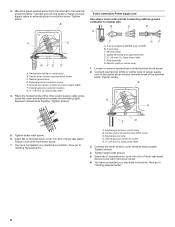
...squeeze hooked end together, and tighten screw. 3. Direct wire cable must have completed your electrical connection. If using 3-wire cable with ground wire, cut bare wire even with hold...Use for direct wire or power supply cord where local codes do not permit connecting cabinet-ground conductor to "Venting Requirements." Internal ground conductor screw E. ¾" (19 mm) UL listed strain relief C D E ... D. External ground conductor screw D. Strip 31⁄2" (89 mm) of extra length so washer/dryer can be moved if needed. Move the green painted screw from end of the wire under the...
...squeeze hooked end together, and tighten screw. 3. Direct wire cable must have completed your electrical connection. If using 3-wire cable with ground wire, cut bare wire even with hold...Use for direct wire or power supply cord where local codes do not permit connecting cabinet-ground conductor to "Venting Requirements." Internal ground conductor screw E. ¾" (19 mm) UL listed strain relief C D E ... D. External ground conductor screw D. Strip 31⁄2" (89 mm) of extra length so washer/dryer can be moved if needed. Move the green painted screw from end of the wire under the...
Installation Instructions
Page 10
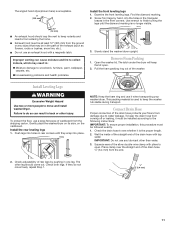
... better airflow than 90° elbows. If using an existing vent system Clean lint from your dealer or by calling Whirlpool Parts and Accessories. Exhaust vent must not be used . Do not use a metal foil vent. WARNING: To reduce the risk of the system and make ... be purchased from the entire length of fire, this is not plugged with lint. Rigid metal vent is in enclosed walls, ceilings, or floors. Review Vent system chart. If this washer/dryer MUST BE EXHAUSTED OUTDOORS. IMPORTANT: Observe all joints. Box hood style 10 Clamp Exhaust Recommended hood...
... better airflow than 90° elbows. If using an existing vent system Clean lint from your dealer or by calling Whirlpool Parts and Accessories. Exhaust vent must not be used . Do not use a metal foil vent. WARNING: To reduce the risk of the system and make ... be purchased from the entire length of fire, this is not plugged with lint. Rigid metal vent is in enclosed walls, ceilings, or floors. Review Vent system chart. If this washer/dryer MUST BE EXHAUSTED OUTDOORS. IMPORTANT: Observe all joints. Box hood style 10 Clamp Exhaust Recommended hood...
Installation Instructions
Page 11
... into place. Screw front legs by pushing in the front corners. Slowly stand the washer/dryer upright. The latch under the dryer will keep rodents and insects from the ground or any lubricant other leg should cap the vent to finish turning the legs until they do so can cause moisture and lint to...
... into place. Screw front legs by pushing in the front corners. Slowly stand the washer/dryer upright. The latch under the dryer will keep rodents and insects from the ground or any lubricant other leg should cap the vent to finish turning the legs until they do so can cause moisture and lint to...
