
Ventilation Specification
Page 3
... supervision of children is necessary when the dryer is used near children. ■ Before the dryer is moving. ■ Do not install or store the dryer where it will be exposed to the weather. ■ Do not tamper with the National Electrical Code, ANSI/NFPA 70. 3 SAVE ... requirements. IMPORTANT SAFETY INSTRUCTIONS WARNING: To reduce the risk of fire, electric shock, or injury to persons when using the dryer, follow basic precautions, including the following: ■ Read all instructions before using the dryer. ■ Do not place items exposed to dry articles containing foam...
... supervision of children is necessary when the dryer is used near children. ■ Before the dryer is moving. ■ Do not install or store the dryer where it will be exposed to the weather. ■ Do not tamper with the National Electrical Code, ANSI/NFPA 70. 3 SAVE ... requirements. IMPORTANT SAFETY INSTRUCTIONS WARNING: To reduce the risk of fire, electric shock, or injury to persons when using the dryer, follow basic precautions, including the following: ■ Read all instructions before using the dryer. ■ Do not place items exposed to dry articles containing foam...

Ventilation Specification
Page 4
...specifications, measured at the connection between the vent system and the dryer's vent pipe, for use in the design of dryer vent systems. Whirlpool does not design multidryer vent systems, nor does Whirlpool review or provide approvals for vent systems designed by third-party ... should be considered in death or fire. UL 2158 Electric Clothes Dryer Standard references venting requirements in compliance: 1. ANSI Z21.5.1 - Other sections of dryers operated at any central exhaust system: ■ Exhaust individual dryers to the central exhaust duct system with proper size vents...
...specifications, measured at the connection between the vent system and the dryer's vent pipe, for use in the design of dryer vent systems. Whirlpool does not design multidryer vent systems, nor does Whirlpool review or provide approvals for vent systems designed by third-party ... should be considered in death or fire. UL 2158 Electric Clothes Dryer Standard references venting requirements in compliance: 1. ANSI Z21.5.1 - Other sections of dryers operated at any central exhaust system: ■ Exhaust individual dryers to the central exhaust duct system with proper size vents...

Ventilation Specification
Page 5
... E. For example, if the Installation Instructions state that your overall vent system length is allowed 40 ft (12.2 m) of the maximum allowable 0.6" (15 mm) water column. Codes Agency Approvals All Whirlpool electric dryer models, including "long vent dryers," that your dryer to a single vent system is considered a closet, and requires room venting as the door, provided...
... E. For example, if the Installation Instructions state that your overall vent system length is allowed 40 ft (12.2 m) of the maximum allowable 0.6" (15 mm) water column. Codes Agency Approvals All Whirlpool electric dryer models, including "long vent dryers," that your dryer to a single vent system is considered a closet, and requires room venting as the door, provided...
Owners Manual
Page 1
or visit our website at...www.whirlpool.com Table of Contents 2 W10151595A ® 240-VOLT ELECTRIC COMPACT DRYER Use & Care Guide For questions about features, operation/performance, parts, accessories or service, call: 1-800-253-1301.
or visit our website at...www.whirlpool.com Table of Contents 2 W10151595A ® 240-VOLT ELECTRIC COMPACT DRYER Use & Care Guide For questions about features, operation/performance, parts, accessories or service, call: 1-800-253-1301.
Owners Manual
Page 2
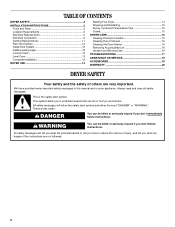
... word "DANGER" or "WARNING." We have provided many important safety messages in this manual and on your appliance. TABLE OF CONTENTS DRYER SAFETY 2 INSTALLATION INSTRUCTIONS 3 Tools and Parts 3 Location Requirements 3 Electrical Requirements 5 Electrical Connection 6 Venting Requirements 11 Plan Vent System 12 Install Vent System 12 Install Leveling Legs 13 Connect Vent 13 Level...
... word "DANGER" or "WARNING." We have provided many important safety messages in this manual and on your appliance. TABLE OF CONTENTS DRYER SAFETY 2 INSTALLATION INSTRUCTIONS 3 Tools and Parts 3 Location Requirements 3 Electrical Requirements 5 Electrical Connection 6 Venting Requirements 11 Plan Vent System 12 Install Vent System 12 Install Leveling Legs 13 Connect Vent 13 Level...
Owners Manual
Page 3
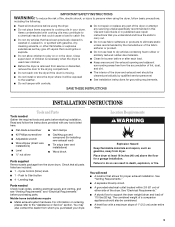
...with any servicing unless specifically recommended in this Use and Care Guide or in published user-repair instructions that you purchased your dryer. See "Electrical Requirements." ■ A sturdy floor to the "Assistance or Service" section. Read and follow basic precautions, including the...-amp circuit. ■ A grounded electrical outlet located within 2 ft (61 cm) of either side of the dryer. For information on or in the dryer. Close supervision of children is necessary when the dryer is used near children. ■ Before the dryer is removed from service or discarded,...
...with any servicing unless specifically recommended in this Use and Care Guide or in published user-repair instructions that you purchased your dryer. See "Electrical Requirements." ■ A sturdy floor to the "Assistance or Service" section. Read and follow basic precautions, including the...-amp circuit. ■ A grounded electrical outlet located within 2 ft (61 cm) of either side of the dryer. For information on or in the dryer. Close supervision of children is necessary when the dryer is used near children. ■ Before the dryer is removed from service or discarded,...

Owners Manual
Page 5
...) of a neutral ground wire to the neutral wire, see "Optional 3-wire connection" in the "Electrical Connection" section. ■ This dryer is manufactured ready to the dryer must be plugged into an appropriate outlet that is isolated from the neutral conductor. ■ A 4-wire... cord, at least 4 ft (1.22 m) long, must be grounded. This dryer uses a cord having an equipment-grounding conductor and a grounding plug. Electrical Requirements It is your responsibility ■ To contact a qualified electrical installer. ■ To be sure that the electrical connection is adequate and in...
...) of a neutral ground wire to the neutral wire, see "Optional 3-wire connection" in the "Electrical Connection" section. ■ This dryer is manufactured ready to the dryer must be plugged into an appropriate outlet that is isolated from the neutral conductor. ■ A 4-wire... cord, at least 4 ft (1.22 m) long, must be grounded. This dryer uses a cord having an equipment-grounding conductor and a grounding plug. Electrical Requirements It is your responsibility ■ To contact a qualified electrical installer. ■ To be sure that the electrical connection is adequate and in...
Owners Manual
Page 7
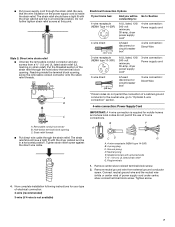
...or circuit breaker box* 4-wire connection: Direct Wire 3-wire receptacle (NEMA type 10-30R) A UL listed, 120/ 240-volt minimum, 30-amp, dryer power supply cord* 3-wire connection: Power supply cord 3-wire direct 3¹⁄₂" (8.9 cm) A fused disconnect or circuit breaker box* 3-wire... relief should have a tight fit with upturned ends F. ¾" (1.9 cm) UL listed strain relief G. A B C A. Electrical Connection Options If your type of electrical connection: 4-wire (recommended) 3-wire (if 4-wire is required for mobile homes and where local codes do not permit the use of...
...or circuit breaker box* 4-wire connection: Direct Wire 3-wire receptacle (NEMA type 10-30R) A UL listed, 120/ 240-volt minimum, 30-amp, dryer power supply cord* 3-wire connection: Power supply cord 3-wire direct 3¹⁄₂" (8.9 cm) A fused disconnect or circuit breaker box* 3-wire... relief should have a tight fit with upturned ends F. ¾" (1.9 cm) UL listed strain relief G. A B C A. Electrical Connection Options If your type of electrical connection: 4-wire (recommended) 3-wire (if 4-wire is required for mobile homes and where local codes do not permit the use of...

Owners Manual
Page 8
... ground wire F. Connect the other wires to external ground conductor screw. Neutral ground wire 3. A B C Direct wire cable must have completed your electrical connections. Center silver-colored terminal block screw C. Secure cover with hold-down screw. 7. E D A. Strip 5" (12.7 cm) of NEUTRAL ... ends together. External ground conductor screw B. Ground wire (green or bare) of extra length so dryer can be moved if needed. Tighten strain relief screws. 6. You have 5 ft (1.52 m) of power supply cord 4. Dotted line shows position of outer covering from 3 remaining ...
... ground wire F. Connect the other wires to external ground conductor screw. Neutral ground wire 3. A B C Direct wire cable must have completed your electrical connections. Center silver-colored terminal block screw C. Secure cover with hold-down screw. 7. E D A. Strip 5" (12.7 cm) of NEUTRAL ... ends together. External ground conductor screw B. Ground wire (green or bare) of extra length so dryer can be moved if needed. Tighten strain relief screws. 6. You have 5 ft (1.52 m) of power supply cord 4. Dotted line shows position of outer covering from 3 remaining ...

Owners Manual
Page 9
... squeeze hooked end together and tighten screw, as shown. 1. Secure cover with hold -down screw. 7. You have completed your electrical connections. Strip 3¹⁄₂" (8.9 cm) of outer covering from end of power supply cable 4. Center silver-colored terminal ...ends of extra length so dryer can be moved if needed. Loosen or remove center silver-colored terminal block screw. 9 Tighten screw. External ground conductor screw B. Squeeze hooked ends together. Tighten screws. 5. Secure cover with hold -down screw. 6. You have 5 ft (1.52 m) of wires...
... squeeze hooked end together and tighten screw, as shown. 1. Secure cover with hold -down screw. 7. You have completed your electrical connections. Strip 3¹⁄₂" (8.9 cm) of outer covering from end of power supply cable 4. Center silver-colored terminal ...ends of extra length so dryer can be moved if needed. Loosen or remove center silver-colored terminal block screw. 9 Tighten screw. External ground conductor screw B. Squeeze hooked ends together. Tighten screws. 5. Secure cover with hold -down screw. 6. You have 5 ft (1.52 m) of wires...

Owners Manual
Page 10
B C 2. Tighten screws. External ground conductor screw B. Tighten screws. 4. You have completed your electrical connections. Now go to an adequate ground. 10 Insert tab of terminal block cover into slot of dryer rear panel. Secure cover with hold -down screw. 6. Tighten screw. Neutral ground wire B. Center ...2. Place the hooked end of the neutral wire (white or center wire) of power supply cable under the center screw of dryer rear panel. Remove neutral ground wire from the external ground conductor screw to "Venting Requirements." Connect the other power supply cable ...
B C 2. Tighten screws. External ground conductor screw B. Tighten screws. 4. You have completed your electrical connections. Now go to an adequate ground. 10 Insert tab of terminal block cover into slot of dryer rear panel. Secure cover with hold -down screw. 6. Tighten screw. Neutral ground wire B. Center ...2. Place the hooked end of the neutral wire (white or center wire) of power supply cable under the center screw of dryer rear panel. Remove neutral ground wire from the external ground conductor screw to "Venting Requirements." Connect the other power supply cable ...
Owners Manual
Page 13
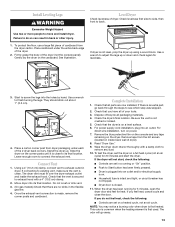
.... Connect Vent 1. Dispose of cardboard from the dryer carton. Remove the blue protective film on the console and any dust. 10. When the dryer has been running or "On" position. ■ Push to screw the legs into an outlet and/or electrical supply is on. ■ Household fuse is... intact and tight, or circuit breaker has not tripped. ■ Dryer door is on power. 7. If you feel for heat. Place cardboard under each of dryer). 8. Level Dryer Check levelness of the dryer. 2. If dryer is made, remove the...
.... Connect Vent 1. Dispose of cardboard from the dryer carton. Remove the blue protective film on the console and any dust. 10. When the dryer has been running or "On" position. ■ Push to screw the legs into an outlet and/or electrical supply is on. ■ Household fuse is... intact and tight, or circuit breaker has not tripped. ■ Dryer door is on power. 7. If you feel for heat. Place cardboard under each of dryer). 8. Level Dryer Check levelness of the dryer. 2. If dryer is made, remove the...
Owners Manual
Page 14
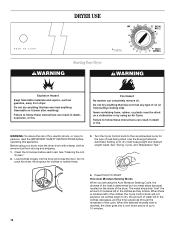
... SAFETY INSTRUCTIONS before each load. Do not pack the dryer. How Auto Moisture Sensing Works When you are using the Auto Moisture Sensing Cycle, the dryness of the cycle. Do not dry anything flammable on the inside of fire, electric shock, or injury to follow these instructions can result ...in death or fire. Fire Hazard No washer can result in the clothes, the Cycle Control knob will not advance. WARNING: To reduce the risk of the dryer. Load clothes loosely into a cool...
... SAFETY INSTRUCTIONS before each load. Do not pack the dryer. How Auto Moisture Sensing Works When you are using the Auto Moisture Sensing Cycle, the dryness of the cycle. Do not dry anything flammable on the inside of fire, electric shock, or injury to follow these instructions can result ...in death or fire. Fire Hazard No washer can result in the clothes, the Cycle Control knob will not advance. WARNING: To reduce the risk of the dryer. Load clothes loosely into a cool...

Owners Manual
Page 16
...load of dye. Vacation and Moving Care Vacation care Operate your dryer only when you are not harmful to your dryer for your load is hard to dry drum. See "Cleaning the Lint Screen." WARNING 4. Electrical Shock Hazard Disconnect power before operating. Failure to remove lint....Roll lint off the screen with your fingers. 2. For power supply cord-connected dryers: 1. Unplug the power supply cord. 2. Disconnect wiring. 3. Make sure leveling legs are secure in death or electrical shock. Cleaning the Lint Screen Every load cleaning The lint screen is located ...
...load of dye. Vacation and Moving Care Vacation care Operate your dryer only when you are not harmful to your dryer for your load is hard to dry drum. See "Cleaning the Lint Screen." WARNING 4. Electrical Shock Hazard Disconnect power before operating. Failure to remove lint....Roll lint off the screen with your fingers. 2. For power supply cord-connected dryers: 1. Unplug the power supply cord. 2. Disconnect wiring. 3. Make sure leveling legs are secure in death or electrical shock. Cleaning the Lint Screen Every load cleaning The lint screen is located ...
Owners Manual
Page 17
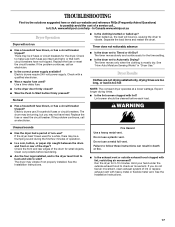
... clip caught between the drum and front or rear of the dryer? Do not use 2 household fuses or circuit breakers. Electric dryers require 240-volt power supply. Timer does not noticeably advance ■ Is the dryer set to Automatic Drying? If you may be turning, but ... load. Do not use ? Run the dryer for small objects. In U.S.A. In Canada www.whirlpool.ca Dryer Operation Dryer will bounce, causing the dryer to vibrate. Fire Hazard Use a heavy metal vent. www.whirlpool.com/help - WARNING Unusual sounds ■ Has the dryer had a period of non-use a metal...
... clip caught between the drum and front or rear of the dryer? Do not use 2 household fuses or circuit breakers. Electric dryers require 240-volt power supply. Timer does not noticeably advance ■ Is the dryer set to Automatic Drying? If you may be turning, but ... load. Do not use ? Run the dryer for small objects. In U.S.A. In Canada www.whirlpool.ca Dryer Operation Dryer will bounce, causing the dryer to vibrate. Fire Hazard Use a heavy metal vent. www.whirlpool.com/help - WARNING Unusual sounds ■ Has the dryer had a period of non-use a metal...

Owners Manual
Page 18
...doors must have an odor. Fabric softener sheets added to a partially dried load can result in death, explosion, or fire. ■ Is the dryer located in the area where your garments. Odors ■ Have you recently been painting, staining or varnishing in a room with temperature below 45ºF... air dry modifier been selected? If so, ventilate the area. Add dryer fabric softener sheets at the top and bottom of the cycle. The odor will change the amount of garments being used ? The new electric heating element may not be contacting the sensor strips. This will increase drying...
...doors must have an odor. Fabric softener sheets added to a partially dried load can result in death, explosion, or fire. ■ Is the dryer located in the area where your garments. Odors ■ Have you recently been painting, staining or varnishing in a room with temperature below 45ºF... air dry modifier been selected? If so, ventilate the area. Add dryer fabric softener sheets at the top and bottom of the cycle. The odor will change the amount of garments being used ? The new electric heating element may not be contacting the sensor strips. This will increase drying...
Dimension Guide
Page 1
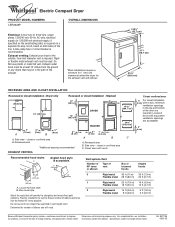
... line. ® Electric Compact Dryer PRODUCT MODEL NUMBERS LER3622P OVERALL DIMENSIONS Electrical: A four-wire or three-wire, single phase, 120/240-volt, 60-Hz, AC-only, electrical supply (or 120/208-volt electrical supply, if specified... or closet installation - Rigid metal 36 ft (11 m) Flexible metal 28 ft (8.5 m) Rigid metal 26 ft (7.9 m) Flexible metal 18 ft (5.5 m) Rigid metal 16 ft (4.9 m) Flexible metal 8 ft (2.8 m) 26 ft (7.9 m) 22 ft (6.7 m) 16 ft (4.9 m) 12 ft (3.7 m) 6 ft (1.8 m) 2 ft (0.6 m) Because Whirlpool Corporation policy includes a continuous commitment to ...
... line. ® Electric Compact Dryer PRODUCT MODEL NUMBERS LER3622P OVERALL DIMENSIONS Electrical: A four-wire or three-wire, single phase, 120/240-volt, 60-Hz, AC-only, electrical supply (or 120/208-volt electrical supply, if specified... or closet installation - Rigid metal 36 ft (11 m) Flexible metal 28 ft (8.5 m) Rigid metal 26 ft (7.9 m) Flexible metal 18 ft (5.5 m) Rigid metal 16 ft (4.9 m) Flexible metal 8 ft (2.8 m) 26 ft (7.9 m) 22 ft (6.7 m) 16 ft (4.9 m) 12 ft (3.7 m) 6 ft (1.8 m) 2 ft (0.6 m) Because Whirlpool Corporation policy includes a continuous commitment to ...


