
Ventilation Specification
Page 1
® DRYER VENTING SPECIFICATIONS Table of Contents DRYER VENTING SPECIFICATIONS 1 DRYER SAFETY...1 INSTALLATION REQUIREMENTS ...4 Venting Requirements ...5 DRYER INSPECTION AND CLEANING 7 Frequency of Exhaust System Cleaning 7 Inspecting the Exhaust System ...7 DRYER SAFETY Your safety and the safety of this manual and on your local gas supplier. We have provided many important safety messages in this or any other flammable vapors and liquids in the event the customer smells gas. Always read and...
® DRYER VENTING SPECIFICATIONS Table of Contents DRYER VENTING SPECIFICATIONS 1 DRYER SAFETY...1 INSTALLATION REQUIREMENTS ...4 Venting Requirements ...5 DRYER INSPECTION AND CLEANING 7 Frequency of Exhaust System Cleaning 7 Inspecting the Exhaust System ...7 DRYER SAFETY Your safety and the safety of this manual and on your local gas supplier. We have provided many important safety messages in this or any other flammable vapors and liquids in the event the customer smells gas. Always read and...

Ventilation Specification
Page 2
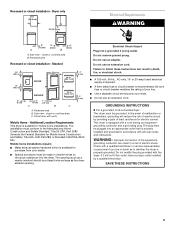
... installer, service agency, or the gas supplier. Installation and service must not exceed 3 feet. 2 WARNING: For your safety, the information in this or any other flammable vapors and liquids in the vicinity of this manual must be followed to minimize the risk of Massachusetts, the following installation instructions apply: ■ Installations and repairs must be a T-handle type. ■ A flexible gas connector, when used, must...
... installer, service agency, or the gas supplier. Installation and service must not exceed 3 feet. 2 WARNING: For your safety, the information in this or any other flammable vapors and liquids in the vicinity of this manual must be followed to minimize the risk of Massachusetts, the following installation instructions apply: ■ Installations and repairs must be a T-handle type. ■ A flexible gas connector, when used, must...

Ventilation Specification
Page 3
... each load. ■ Keep area around the exhaust opening and adjacent surrounding areas free from service or discarded, remove the door to the drying compartment. ■ Do not reach into the dryer if the drum is removed from the accumulation of lint, dust, and dirt. ■ The interior of the dryer or attempt any servicing unless specifically recommended in this Use and Care Guide or in published user-repair instructions that...
... each load. ■ Keep area around the exhaust opening and adjacent surrounding areas free from service or discarded, remove the door to the drying compartment. ■ Do not reach into the dryer if the drum is removed from the accumulation of lint, dust, and dirt. ■ The interior of the dryer or attempt any servicing unless specifically recommended in this Use and Care Guide or in published user-repair instructions that...

Ventilation Specification
Page 4
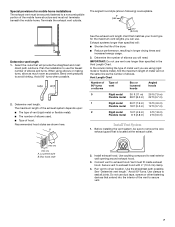
....5.1 - Gas Clothes Dryers. 5. See the Installation Instructions that came with proper size vents to woodwork, furniture, paint, wallpaper, carpets, etc. Exhausting moisture into the room can get through the heating source, reducing the dryer's efficiency. INSTALLATION REQUIREMENTS WARNING Local codes and ordinances that exist must remove this moist air will be recirculated through the screen and be used to connect each dryer to handle the maximum number of dryers operated at the connection...
....5.1 - Gas Clothes Dryers. 5. See the Installation Instructions that came with proper size vents to woodwork, furniture, paint, wallpaper, carpets, etc. Exhausting moisture into the room can get through the heating source, reducing the dryer's efficiency. INSTALLATION REQUIREMENTS WARNING Local codes and ordinances that exist must remove this moist air will be recirculated through the screen and be used to connect each dryer to handle the maximum number of dryers operated at the connection...

Ventilation Specification
Page 5
... air for each application. C D B A E A. Refer to 0.6" (15 mm) of the Use and Care Guide for details. ■ Select a Timed Dry heated cycle, and restart the dryer. ■ If the message persists, have airflow detection capabilities. (See specific model product literature for details). In this requires at the maximum-rated exhaust vent conditions that is too long. Connecting a number of dryers to dissipate heat. Dryer - empty and running on the design of total vent length...
... air for each application. C D B A E A. Refer to 0.6" (15 mm) of the Use and Care Guide for details. ■ Select a Timed Dry heated cycle, and restart the dryer. ■ If the message persists, have airflow detection capabilities. (See specific model product literature for details). In this requires at the maximum-rated exhaust vent conditions that is too long. Connecting a number of dryers to dissipate heat. Dryer - empty and running on the design of total vent length...
Ventilation Specification
Page 6
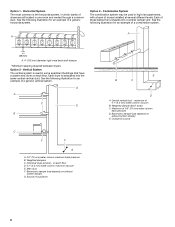
... spacing required between dryers Option 2 - Vertical System The vertical system is exhausted into a central vertical vent. Main duct F. Weighted damper (each floor D. 0.1" (2.5 mm) water column maximum vacuum E. Maximum of dryers are all located in high-rise apartments, with a bank of a generic horizontal system. Each dryer is used in one room and vented through a common duct. Barometric damper (use depends on exhaust system design) G. Outside air...
... spacing required between dryers Option 2 - Vertical System The vertical system is exhausted into a central vertical vent. Main duct F. Weighted damper (each floor D. 0.1" (2.5 mm) water column maximum vacuum E. Maximum of dryers are all located in high-rise apartments, with a bank of a generic horizontal system. Each dryer is used in one room and vented through a common duct. Barometric damper (use depends on exhaust system design) G. Outside air...
Owners Manual
Page 3
... important safety messages in this Use and Care Guide or in the dryer. Close supervision of the dryer or attempt any part of children is necessary when the dryer is the safety alert symbol. s Do not repair or replace any servicing unless specifically recommended in this manual and on or in published user-repair instructions that could cause a load to cooking oils in , or spotted with controls.
... important safety messages in this Use and Care Guide or in the dryer. Close supervision of the dryer or attempt any part of children is necessary when the dryer is the safety alert symbol. s Do not repair or replace any servicing unless specifically recommended in this manual and on or in published user-repair instructions that could cause a load to cooking oils in , or spotted with controls.
Owners Manual
Page 4
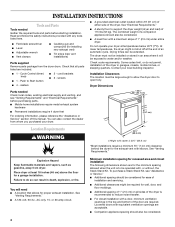
... the dryer for installing new exhaust vent) s Tin snips (new vent installations) Parts supplied Remove parts package from the dryer drum. s Additional spacing of a companion appliance should also be extended. s Additional spacing should also be operated with equivalent ventilation openings are required. INSTALLATION INSTRUCTIONS Tools and Parts Tools needed Check local codes, existing electrical supply and venting, and see "Assistance or Service." See "Venting Requirements." s A level floor with any tools listed here. s Additional clearances might not shut...
... the dryer for installing new exhaust vent) s Tin snips (new vent installations) Parts supplied Remove parts package from the dryer drum. s Additional spacing of a companion appliance should also be extended. s Additional spacing should also be operated with equivalent ventilation openings are required. INSTALLATION INSTRUCTIONS Tools and Parts Tools needed Check local codes, existing electrical supply and venting, and see "Assistance or Service." See "Venting Requirements." s A level floor with any tools listed here. s Additional clearances might not shut...
Owners Manual
Page 5
... dryer. GROUNDING INSTRUCTIONS s For a grounded, cord-connected dryer: This dryer must conform to introduce outside air into the dryer. Side view - s Special provisions must be made in death, fire, or electrical shock. Do not use an extension cord. s A time-delay fuse or circuit breaker is properly installed and grounded in accordance with all local codes and ordinances. The plug must be plugged into a grounded 3 prong outlet. Do not modify the plug provided with vents...
... dryer. GROUNDING INSTRUCTIONS s For a grounded, cord-connected dryer: This dryer must conform to introduce outside air into the dryer. Side view - s Special provisions must be made in death, fire, or electrical shock. Do not use an extension cord. s A time-delay fuse or circuit breaker is properly installed and grounded in accordance with all local codes and ordinances. The plug must be plugged into a grounded 3 prong outlet. Do not modify the plug provided with vents...

Owners Manual
Page 6
... metal vent. Exhaust hood must be fully extended and supported when the dryer is recommended to collect indoors, which extend into any plastic or metal foil vent with a magnetic latch. Refer to 18" (45.72 cm) Part Number 4396011 - Periscope installation NOTE: The following kits for use a metal foil vent. WARNING: To reduce the risk of the duct. Two close clearances Venting systems come...
... metal vent. Exhaust hood must be fully extended and supported when the dryer is recommended to collect indoors, which extend into any plastic or metal foil vent with a magnetic latch. Refer to 18" (45.72 cm) Part Number 4396011 - Periscope installation NOTE: The following kits for use a metal foil vent. WARNING: To reduce the risk of the duct. Two close clearances Venting systems come...
Owners Manual
Page 7
... specified in longer drying times and increased energy usage. 3. In the column listing the type of elbows you will provide the straightest and most direct path outdoors. Before installing the vent system, be securely fastened to remove the wire exhaust guard that matches your hood type for mobile home installations The exhaust vent must be sure to a noncombustible portion of the dryer. Run vent to exhaust hood. Use the straightest...
... specified in longer drying times and increased energy usage. 3. In the column listing the type of elbows you will provide the straightest and most direct path outdoors. Before installing the vent system, be securely fastened to remove the wire exhaust guard that matches your hood type for mobile home installations The exhaust vent must be sure to a noncombustible portion of the dryer. Run vent to exhaust hood. Use the straightest...
Owners Manual
Page 8
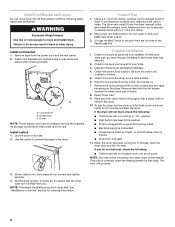
... kink vent. Check the dryer's final location. Turn power on a full heat cycle (not an air cycle) for storage convenience when dryer is plugged into a grounded 3 prong outlet. To test the dryer, set the dryer on . 7. s Dryer is not in use. s Electrical supply is first used. If you do so can result in dryer. This odor is common when the heating element is connected. Screw casters into final position. See "Assistance or Service" section for 5 minutes, open the dryer door...
... kink vent. Check the dryer's final location. Turn power on a full heat cycle (not an air cycle) for storage convenience when dryer is plugged into a grounded 3 prong outlet. To test the dryer, set the dryer on . 7. s Dryer is not in use. s Electrical supply is first used. If you do so can result in dryer. This odor is common when the heating element is connected. Screw casters into final position. See "Assistance or Service" section for 5 minutes, open the dryer door...

Owners Manual
Page 9
... turn the Cycle Control knob to an Off area when the dryer is not in death or fire. WARNING 3. Use the Energy Preferred Automatic Setting (*) to tumble freely. Close the door. 2. Do not dry anything flammable on a clothesline or by using your dryer, wipe the dryer drum with a damp cloth to follow these instructions can result in death, explosion, or fire. Press the PUSH TO START button...
... turn the Cycle Control knob to an Off area when the dryer is not in death or fire. WARNING 3. Use the Energy Preferred Automatic Setting (*) to tumble freely. Close the door. 2. Do not dry anything flammable on a clothesline or by using your dryer, wipe the dryer drum with a damp cloth to follow these instructions can result in death, explosion, or fire. Press the PUSH TO START button...
Owners Manual
Page 10
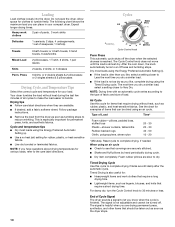
... package instructions. s Use a no heat (air) setting for clothes to the care label directions. Cycles Cycle Control knob Perm Press This automatic cycle shuts off . NOTE: Drying time with an automatic cycle varies according to 30 minutes or less. Type of Cycle Signal The dryer sounds a signal to complete drying if items are available. Heavy work clothes 2 pair of load. Dry most loads using an air cycle. For damp dry, turn the Cycle Control knob to the type of fabric and size of pants, 3 work clothes...
... package instructions. s Use a no heat (air) setting for clothes to the care label directions. Cycles Cycle Control knob Perm Press This automatic cycle shuts off . NOTE: Drying time with an automatic cycle varies according to 30 minutes or less. Type of Cycle Signal The dryer sounds a signal to complete drying if items are available. Heavy work clothes 2 pair of load. Dry most loads using an air cycle. For damp dry, turn the Cycle Control knob to the type of fabric and size of pants, 3 work clothes...
Owners Manual
Page 11
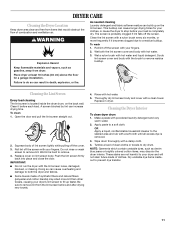
DRYER CARE Cleaning the Dryer Location Keep dryer area clear and free from items that would obstruct the flow of clothes. Roll lint off the screen. A screen blocked by lint can build up faster. Replace cover on the back wall. Cleaning the Dryer Interior To clean dryer drum 1. Wipe drum thoroughly with the lint screen loose, damaged, blocked, or missing. Dry unstable dye items insideout to a residue buildup. To wash 1. Cleaning the Lint Screen Every load cleaning The lint screen is removed. 3. To clean 1. IMPORTANT: s Do...
DRYER CARE Cleaning the Dryer Location Keep dryer area clear and free from items that would obstruct the flow of clothes. Roll lint off the screen. A screen blocked by lint can build up faster. Replace cover on the back wall. Cleaning the Dryer Interior To clean dryer drum 1. Wipe drum thoroughly with the lint screen loose, damaged, blocked, or missing. Dry unstable dye items insideout to a residue buildup. To wash 1. Cleaning the Lint Screen Every load cleaning The lint screen is removed. 3. To clean 1. IMPORTANT: s Do...
Owners Manual
Page 12
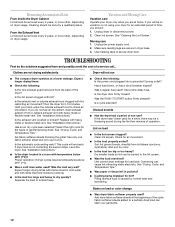
... secure dryer door. s Was paper or tissue left in a room with lint, restricting air movement? See "Cleaning the Lint Screen." Unplug the power supply cord. 2. s Check the following : Is the power cord plugged into a grounded 3 prong outlet? Replace with lint? Use only one fabric softener sheet and only use ? See "Installation Instructions." Was the load very wet? s Check the following : Is the wire exhaust guard removed from lint takers (corduroy, synthetics). Has a fuse blown, or has a circuit breaker tripped? Sort lint givers...
... secure dryer door. s Was paper or tissue left in a room with lint, restricting air movement? See "Cleaning the Lint Screen." Unplug the power supply cord. 2. s Check the following : Is the power cord plugged into a grounded 3 prong outlet? Replace with lint? Use only one fabric softener sheet and only use ? See "Installation Instructions." Was the load very wet? s Check the following : Is the wire exhaust guard removed from lint takers (corduroy, synthetics). Has a fuse blown, or has a circuit breaker tripped? Sort lint givers...
Owners Manual
Page 13
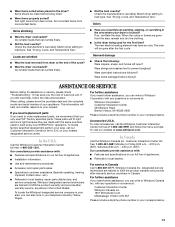
... load overdry? Match dryer setting to local dealers, repair parts distributors, and service companies. See "Drying, Cycle, and Temperature Tips." When the odors or fumes are trained to order replacement parts, we recommend that you still need to fulfill the product warranty and provide afterwarranty service, anywhere in the United States. Garment damage s Check the following: Were zippers, snaps, and hooks left open? In the U.S.A. s Referrals to load type...
... load overdry? Match dryer setting to local dealers, repair parts distributors, and service companies. See "Drying, Cycle, and Temperature Tips." When the odors or fumes are trained to order replacement parts, we recommend that you still need to fulfill the product warranty and provide afterwarranty service, anywhere in the United States. Garment damage s Check the following: Were zippers, snaps, and hooks left open? In the U.S.A. s Referrals to load type...
Owners Manual
Page 14
... installation instructions. Expenses for travel and transportation for other than normal, single-family household use. 4. Contact your authorized Whirlpool dealer to repair or replace appliance light bulbs, air filters or water filters. In Canada, call 1-800-253-1301. Repairs when your major appliance is designed to be repaired in -warranty service. Any food loss due to the appliance. 9. You must be found by checking the "Assistance or Service...
... installation instructions. Expenses for travel and transportation for other than normal, single-family household use. 4. Contact your authorized Whirlpool dealer to repair or replace appliance light bulbs, air filters or water filters. In Canada, call 1-800-253-1301. Repairs when your major appliance is designed to be repaired in -warranty service. Any food loss due to the appliance. 9. You must be found by checking the "Assistance or Service...
Dimension Guide
Page 1
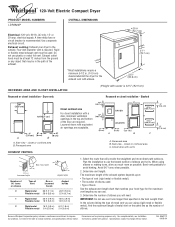
... (4.9 m) Flexible metal 8 ft (2.8 m) Angled hoods 26 ft (7.9 m) 22 ft (6.7 m) 16 ft (4.9 m) 12 ft (3.7 m) 6 ft (1.8 m) 2 ft (0.6 m) 1. For complete details, see Installation our products, we reserve the right to change materials and specifications without notice. Because Whirlpool Corporation policy includes a continuous commitment to avoid kinking. Instructions packed with equivalent air openings are required. A time-delay fuse or circuit breaker is required. or 20-amp. electrical supply. Determine vent length.
... (4.9 m) Flexible metal 8 ft (2.8 m) Angled hoods 26 ft (7.9 m) 22 ft (6.7 m) 16 ft (4.9 m) 12 ft (3.7 m) 6 ft (1.8 m) 2 ft (0.6 m) 1. For complete details, see Installation our products, we reserve the right to change materials and specifications without notice. Because Whirlpool Corporation policy includes a continuous commitment to avoid kinking. Instructions packed with equivalent air openings are required. A time-delay fuse or circuit breaker is required. or 20-amp. electrical supply. Determine vent length.
Warranty
Page 1
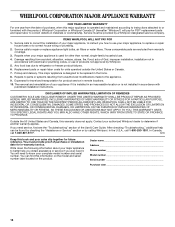
... from the date of purchase or installation date for product service if your authorized Whirlpool dealer to repair or replace appliance light bulbs, air lters or water lters. You will pay for Factory Speci ed Parts and repair labor to published user or operator instructions and/or installation instructions. 2. Service must provide proof of purchase, when this information on the model and serial number label located on the duration of implied...
... from the date of purchase or installation date for product service if your authorized Whirlpool dealer to repair or replace appliance light bulbs, air lters or water lters. You will pay for Factory Speci ed Parts and repair labor to published user or operator instructions and/or installation instructions. 2. Service must provide proof of purchase, when this information on the model and serial number label located on the duration of implied...


