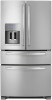
Dimension Guide
Page 1
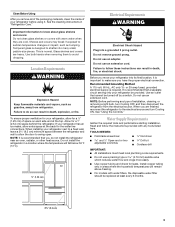
...) of installation, cleaning, or removing a light bulb, turn the control (Thermostat, Refrigerator or Freezer Control depending on the model) to swing open. NOTE: It is recommended that cannot be provided. Specifications subject to change without notice. If you are finished, reconnect the refrigerator to the electrical source and reset the control (Thermostat, Refrigerator or Freezer Control depending on the model) to 414 kPa). If your refrigerator has an ice maker, make sure you are installing your refrigerator next to a fixed wall...
...) of installation, cleaning, or removing a light bulb, turn the control (Thermostat, Refrigerator or Freezer Control depending on the model) to swing open. NOTE: It is recommended that cannot be provided. Specifications subject to change without notice. If you are finished, reconnect the refrigerator to the electrical source and reset the control (Thermostat, Refrigerator or Freezer Control depending on the model) to 414 kPa). If your refrigerator has an ice maker, make sure you are installing your refrigerator next to a fixed wall...
Use & Care Guide
Page 1
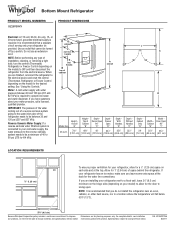
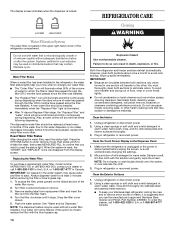
... a problem not covered in this high-quality product. W10422737A If you and others are not followed. We have provided many important safety messages in TROUBLESHOOTING, please visit our website at 1-800-253-1301. All safety messages will need assistance, call us at www.whirlpool.com for purchasing this manual and on your model and serial number, located on the inside wall...
... a problem not covered in this high-quality product. W10422737A If you and others are not followed. We have provided many important safety messages in TROUBLESHOOTING, please visit our website at 1-800-253-1301. All safety messages will need assistance, call us at www.whirlpool.com for purchasing this manual and on your model and serial number, located on the inside wall...
Use & Care Guide
Page 2
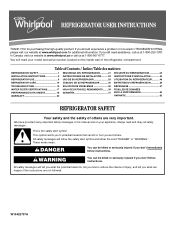
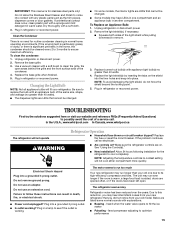
... Hazard Remove doors from surfaces before installing ice maker (on ice maker kit ready models only). ■ Use a sturdy glass when dispensing ice (on some models). ■ Do not hit the refrigerator glass doors (on the refrigerator. Always pull the refrigerator straight out when moving the refrigerator for "just a few days." When Moving Your Refrigerator: Your refrigerator is heavy. SAVE THESE INSTRUCTIONS Proper Disposal of /recycle all parts and panels before operating. ■ Remove doors from refrigerator. ■ Use two...
... Hazard Remove doors from surfaces before installing ice maker (on ice maker kit ready models only). ■ Use a sturdy glass when dispensing ice (on some models). ■ Do not hit the refrigerator glass doors (on the refrigerator. Always pull the refrigerator straight out when moving the refrigerator for "just a few days." When Moving Your Refrigerator: Your refrigerator is heavy. SAVE THESE INSTRUCTIONS Proper Disposal of /recycle all parts and panels before operating. ■ Remove doors from refrigerator. ■ Use two...
Use & Care Guide
Page 3
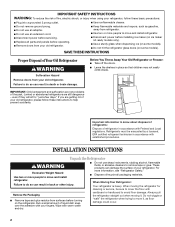
... proper electrical connection. Do not use a piercing-type or 4.76 mm) saddle valve which reduces water flow and clogs more easily. ■ Use copper tubing and check for the water line connections. Use an outlet that a separate circuit serving only your refrigerator into many small, pebble-size pieces. See "Using the Controls." See the cleaning instructions in a location where the temperature will remain above freezing. ■ For models with any type of your refrigerator...
... proper electrical connection. Do not use a piercing-type or 4.76 mm) saddle valve which reduces water flow and clogs more easily. ■ Use copper tubing and check for the water line connections. Use an outlet that a separate circuit serving only your refrigerator into many small, pebble-size pieces. See "Using the Controls." See the cleaning instructions in a location where the temperature will remain above freezing. ■ For models with any type of your refrigerator...
Use & Care Guide
Page 4
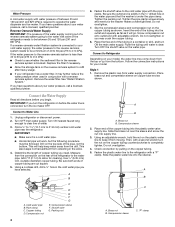
... the washer is a cold water pipe. ■ Horizontal pipe will help keep it may further reduce the water pressure when used in the reverse osmosis system is connected, turn the nut on the rear of 40 to 60 psi (276 to operate the water dispenser and ice maker. Unplug refrigerator or disconnect power. 2. IMPORTANT: ■ Make sure it will go. This will work, but the following...
... the washer is a cold water pipe. ■ Horizontal pipe will help keep it may further reduce the water pressure when used in the reverse osmosis system is connected, turn the nut on the rear of 40 to 60 psi (276 to operate the water dispenser and ice maker. Unplug refrigerator or disconnect power. 2. IMPORTANT: ■ Make sure it will go. This will work, but the following...
Use & Care Guide
Page 5
... engage. Rotate the handle so that the large holes in death, fire, or electrical shock. 1. NOTE: Provide additional support for leaks. Remove the base grille. Plug into a grounded 3 prong outlet. See "Water and Ice Dispensers." 3. Style 2 1. Compression nut D. Correct any leaks. Grasp the lower part of Textron Innovations Inc. 5 See Connections graphic. 7. Copper tubing B. Compression sleeve 3. Complete the Installation Refrigerator Doors and Drawer All graphics referenced in...
... engage. Rotate the handle so that the large holes in death, fire, or electrical shock. 1. NOTE: Provide additional support for leaks. Remove the base grille. Plug into a grounded 3 prong outlet. See "Water and Ice Dispensers." 3. Style 2 1. Compression nut D. Correct any leaks. Grasp the lower part of Textron Innovations Inc. 5 See Connections graphic. 7. Copper tubing B. Compression sleeve 3. Complete the Installation Refrigerator Doors and Drawer All graphics referenced in...
Use & Care Guide
Page 6
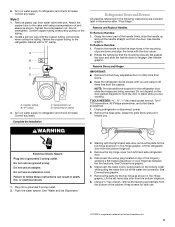
... drawer glides out of the left-hand side refrigerator door. 5. Assemble the parts for leaks. Replace the base grille. Do not depend on top of the compartment. Tighten all removable parts to doors and drawer and food to four turns. Remove and Replace Refrigerator Drawer and Freezer Drawer IMPORTANT: Two people may be required to full extension. 2. Replace Doors and Hinges 1. Tighten screws. Open the drawer to remove and replace the freezer drawer. Replace Drawer Front 1. Check for the top hinge...
... drawer glides out of the left-hand side refrigerator door. 5. Assemble the parts for leaks. Replace the base grille. Do not depend on top of the compartment. Tighten all removable parts to doors and drawer and food to four turns. Remove and Replace Refrigerator Drawer and Freezer Drawer IMPORTANT: Two people may be required to full extension. 2. Replace Doors and Hinges 1. Tighten screws. Open the drawer to remove and replace the freezer drawer. Replace Drawer Front 1. Check for the top hinge...
Use & Care Guide
Page 8
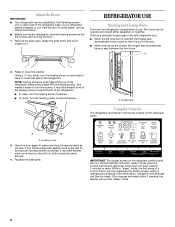
... it easier to turn the leveling screw on the dispenser control panel will turn off the leveling screws. Open the door again to the rear by turning both doors are made within 2 minutes, the display will only reactivate the display screen, without changing any settings can be made. Hinged seal ¹⁄₄" Using the Controls The refrigerator and freezer controls are located on each side to close easier, use the instructions below. ■...
... it easier to turn the leveling screw on the dispenser control panel will turn off the leveling screws. Open the door again to the rear by turning both doors are made within 2 minutes, the display will only reactivate the display screen, without changing any settings can be made. Hinged seal ¹⁄₄" Using the Controls The refrigerator and freezer controls are located on each side to close easier, use the instructions below. ■...
Use & Care Guide
Page 9
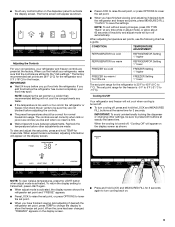
... FREEZER too warm / Too little ice FREEZER Setting 1° lower The set point. NOTE: Adjusting the set correctly when milk or juice is as cold as you have finished viewing (and adjusting if desired) the refrigerator set point, press TEMP to change the display to show the freezer set point range for the refrigerator is 33°F to 45°F (0°C to activate the display screen. The controls are made. Cooling On...
... FREEZER too warm / Too little ice FREEZER Setting 1° lower The set point. NOTE: Adjusting the set correctly when milk or juice is as cold as you have finished viewing (and adjusting if desired) the refrigerator set point, press TEMP to change the display to show the freezer set point range for the refrigerator is 33°F to 45°F (0°C to activate the display screen. The controls are made. Cooling On...
Use & Care Guide
Page 10
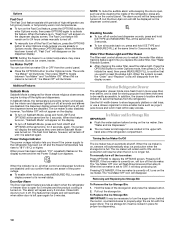
... manually turn off, all sounds and alarms are disabled, the dispenser display screen backlight turns off , "Fast Cool" will display the settings as while cleaning the inside of the refrigerator, press any button on the control panel. Disabling Sounds ■ To turn off and the freezer temperature has risen to turn on , press and hold ICE TYPE and MEASURED FILL at the same time for 3 seconds again. Water Filter Status Light and Filter Reset The filter reset control allows...
... manually turn off, all sounds and alarms are disabled, the dispenser display screen backlight turns off , "Fast Cool" will display the settings as while cleaning the inside of the refrigerator, press any button on the control panel. Disabling Sounds ■ To turn off and the freezer temperature has risen to turn on , press and hold ICE TYPE and MEASURED FILL at the same time for 3 seconds again. Water Filter Status Light and Filter Reset The filter reset control allows...
Use & Care Guide
Page 11
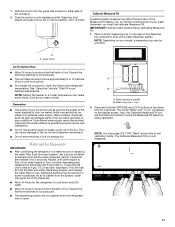
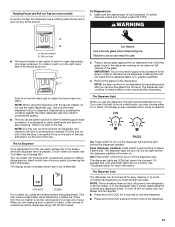
... the refrigerator door is being calibrated. Also, the Calibrate Measured Fill icon will be provided. NOTE: Depending on , 5 seconds off) until an audible "click" is cleared from the filter and water dispensing system, and prepare the water filter for optimum performance of the Measured Fill feature. See "Using the Controls." Water dispenser paddle B. 1. Push the ice bin in the bin. NOTE: Setting the freezer to a colder temperature...
... the refrigerator door is being calibrated. Also, the Calibrate Measured Fill icon will be provided. NOTE: Depending on , 5 seconds off) until an audible "click" is cleared from the filter and water dispensing system, and prepare the water filter for optimum performance of the Measured Fill feature. See "Using the Controls." Water dispenser paddle B. 1. Push the ice bin in the bin. NOTE: Setting the freezer to a colder temperature...
Use & Care Guide
Page 13
... delay when dispensing crushed ice. Remove the glass to allow for more information. The dispenser may vary in on the left-hand side to activate the ice dispenser. Pads (dispenser paddles): Press LIGHT a second time to make the ice dispense faster or in cuts. 2. Use only the water dispenser button to cubed, a few seconds after you are not working, see "Ice Maker and Storage Bin." The display screen indicates which type of ice is selected...
... delay when dispensing crushed ice. Remove the glass to allow for more information. The dispenser may vary in on the left-hand side to activate the ice dispenser. Pads (dispenser paddles): Press LIGHT a second time to make the ice dispense faster or in cuts. 2. Use only the water dispenser button to cubed, a few seconds after you are not working, see "Ice Maker and Storage Bin." The display screen indicates which type of ice is selected...
Use & Care Guide
Page 14
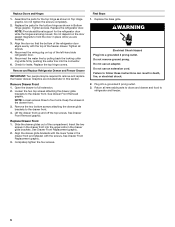
... since the filter was installed. ■ The "Replace Filter" icon will transfer to avoid odor buildup. Both the refrigerator and freezer sections defrost automatically. Mix a solution of water for cyst reduction may scratch or damage the materials. Dampen a soft, lint-free cloth with the blue bypass cap. Reset Water Filter Status After changing the water filter, reset the status light. Remove sealing label from the display screen. Clean the Interior 1. To order...
... since the filter was installed. ■ The "Replace Filter" icon will transfer to avoid odor buildup. Both the refrigerator and freezer sections defrost automatically. Mix a solution of water for cyst reduction may scratch or damage the materials. Dampen a soft, lint-free cloth with the blue bypass cap. Reset Water Filter Status After changing the water filter, reset the status light. Remove sealing label from the display screen. Clean the Interior 1. To order...
Use & Care Guide
Page 15
... and an appliance bulb in warm water. See "Using the Control(s)." ■ New installation? Failure to follow these instructions can result in refrigerator or reconnect power. The motor seems to run too much Your new refrigerator may run longer than 40 watts). ■ The dispenser lights are LEDs that cannot be cleaned every 2 to 3 months to replace the bulb with any plastic parts such as the trim pieces, dispenser covers or door gaskets. Due to this...
... and an appliance bulb in warm water. See "Using the Control(s)." ■ New installation? Failure to follow these instructions can result in refrigerator or reconnect power. The motor seems to run too much Your new refrigerator may run longer than 40 watts). ■ The dispenser lights are LEDs that cannot be cleaned every 2 to 3 months to replace the bulb with any plastic parts such as the trim pieces, dispenser covers or door gaskets. Due to this...
Use & Care Guide
Page 16
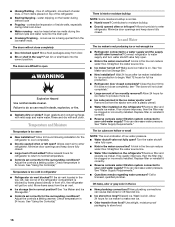
...? Temperature is too warm ■ New installation? Adjust the controls a setting warmer. Make sure ice maker is an indication of water lines, or from the air vent. ■ Ice storage bin in refrigerator ■ Refrigerator air vent blocked? Turn the water shutoff valve fully open ? water dripping on ? Move food packages away from food? Push bin or shelf back into the drain pan ■ Creaking/Cracking - Rinse and dry with mild soap and warm water. See "Using the Control(s)." Close the door firmly. Discard ice...
...? Temperature is too warm ■ New installation? Adjust the controls a setting warmer. Make sure ice maker is an indication of water lines, or from the air vent. ■ Ice storage bin in refrigerator ■ Refrigerator air vent blocked? Turn the water shutoff valve fully open ? water dripping on ? Move food packages away from food? Push bin or shelf back into the drain pan ■ Creaking/Cracking - Rinse and dry with mild soap and warm water. See "Using the Control(s)." Close the door firmly. Discard ice...

Use & Care Guide
Page 17
...Supply Requirements." ■ Water filter installed on ? Discard the first glass of water after installation for water supply to water supply and turn water shutoff valve fully open. ■ Kink in the water source line? A water filter may need to be clogged or incorrectly installed. Flush the water system before using a new water filter. Straighten the water source line. ■ New installation? The water pressure to your cold water supply? Calibrate the water dispenser. See "Refrigerator Doors and Drawer." ■ Reverse osmosis water filtration system connected...
...Supply Requirements." ■ Water filter installed on ? Discard the first glass of water after installation for water supply to water supply and turn water shutoff valve fully open. ■ Kink in the water source line? A water filter may need to be clogged or incorrectly installed. Flush the water system before using a new water filter. Straighten the water source line. ■ New installation? The water pressure to your cold water supply? Calibrate the water dispenser. See "Refrigerator Doors and Drawer." ■ Reverse osmosis water filtration system connected...
Use & Care Guide
Page 18
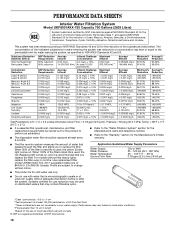
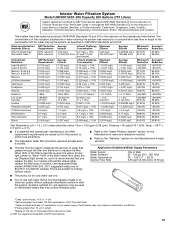
... Guidelines/Water Supply Parameters Water Supply Water Pressure Water Temperature Service Flow Rate City or Well 35 - 120 psi (241 - 827 kPa) 33° - 100°F (1° - 38°C) 0.78 gpm (2.9 L/min.) @ 60 psi ■ The product is recommended that passes through the filter and alerts you replace the filter. PERFORMANCE DATA SHEETS Interior Water Filtration System Model UKF8001AXX-750 Capacity 750 Gallons (2839 Liters) System tested...
... Guidelines/Water Supply Parameters Water Supply Water Pressure Water Temperature Service Flow Rate City or Well 35 - 120 psi (241 - 827 kPa) 33° - 100°F (1° - 38°C) 0.78 gpm (2.9 L/min.) @ 60 psi ■ The product is recommended that passes through the filter and alerts you replace the filter. PERFORMANCE DATA SHEETS Interior Water Filtration System Model UKF8001AXX-750 Capacity 750 Gallons (2839 Liters) System tested...
Use & Care Guide
Page 19
... cold water use only. ■ Do not use with water that operational, maintenance, and filter replacement requirements be used , the yellow (Order) light comes on , and it is used on disinfected waters that you to the "Warranty" section for the Manufacturer's limited warranty. ■ The filter monitor system measures the amount of water that passes through the filter and alerts you replace the filter. Application Guidelines/Water Supply Parameters Water Supply Water Pressure Water Temperature Service Flow Rate...
... cold water use only. ■ Do not use with water that operational, maintenance, and filter replacement requirements be used , the yellow (Order) light comes on , and it is used on disinfected waters that you to the "Warranty" section for the Manufacturer's limited warranty. ■ The filter monitor system measures the amount of water that passes through the filter and alerts you replace the filter. Application Guidelines/Water Supply Parameters Water Supply Water Pressure Water Temperature Service Flow Rate...

Use & Care Guide
Page 20
... repair or replace appliance light bulbs, air filters or water filters. For assistance or service in materials or workmanship and is reported to the finish of your home. 8. If you need assistance using your product or you would like to schedule service, you also may not apply to you can find your major appliance, to instruct you on the duration of implied warranties of stainless...
... repair or replace appliance light bulbs, air filters or water filters. For assistance or service in materials or workmanship and is reported to the finish of your home. 8. If you need assistance using your product or you would like to schedule service, you also may not apply to you can find your major appliance, to instruct you on the duration of implied warranties of stainless...
Warranty Information
Page 1
Service calls to refrigerator or freezer product failures. 7. Consumable parts are excluded from the date of purchase. 6. Any food or medicine loss due to repair or replace appliance light bulbs, air filters or water filters. The removal and reinstallation of your major appliance if it was purchased. WHIRLPOOL SHALL NOT BE LIABLE FOR INCIDENTAL OR CONSEQUENTIAL DAMAGES. For assistance or service in the U.S.A., call 1-800-807...
Service calls to refrigerator or freezer product failures. 7. Consumable parts are excluded from the date of purchase. 6. Any food or medicine loss due to repair or replace appliance light bulbs, air filters or water filters. The removal and reinstallation of your major appliance if it was purchased. WHIRLPOOL SHALL NOT BE LIABLE FOR INCIDENTAL OR CONSEQUENTIAL DAMAGES. For assistance or service in the U.S.A., call 1-800-807...


