
Dimension Guide
Page 1
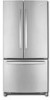
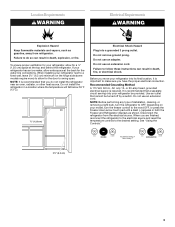
... kPa). Water: A cold water supply with product. handle C top of 40 to 60 psi (276 to change without notice. handle 4 1 D overall LOCATION REQUIREMENTS Model # GX2FHDXV Depth Cab. Do not install the refrigerator in a location where the temperature will fall below 55°F (13°C). 2-1/2" (6.3 cm) Because Whirlpool Corporation policy includes a continuous commitment to improve Dimensions are for your cold water supply, the water pressure to the system needs to be...
... kPa). Water: A cold water supply with product. handle C top of 40 to 60 psi (276 to change without notice. handle 4 1 D overall LOCATION REQUIREMENTS Model # GX2FHDXV Depth Cab. Do not install the refrigerator in a location where the temperature will fall below 55°F (13°C). 2-1/2" (6.3 cm) Because Whirlpool Corporation policy includes a continuous commitment to improve Dimensions are for your cold water supply, the water pressure to the system needs to be...
Energy Guide
Page 1
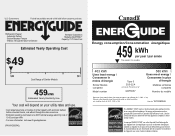
... Refrigerator-Freezer ·Automatic Defrost ·Bottom Mounted Freezer ·Without Through-the-Door-Ice Service Whirlpool Corporation Model(s):GX2FHDXV* Capacity: 21.7 Cubic Feet Estimated Yearly Operating Cost $49 $49 $61 Cost Range of Similar Models 459kWh Estimated Yearly Electricity Use Your cost will depend on your utility rates and use. · Cost range based only on models of this is an offense (S.C. 1992, c. 36). W10260546 The ENERGY STAR...
... Refrigerator-Freezer ·Automatic Defrost ·Bottom Mounted Freezer ·Without Through-the-Door-Ice Service Whirlpool Corporation Model(s):GX2FHDXV* Capacity: 21.7 Cubic Feet Estimated Yearly Operating Cost $49 $49 $61 Cost Range of Similar Models 459kWh Estimated Yearly Electricity Use Your cost will depend on your utility rates and use. · Cost range based only on models of this is an offense (S.C. 1992, c. 36). W10260546 The ENERGY STAR...
Owners Manual
Page 1
... Contents / Índice / Table des matières REFRIGERATOR SAFETY 1 INSTALLATION INSTRUCTIONS 2 REFRIGERATOR USE 12 REFRIGERATOR CARE 14 TROUBLESHOOTING 15 WATER FILTER CERTIFICATIONS 17 PRODUCT DATA SHEETS 18 WARRANTY 19 SEGURIDAD DEL REFRIGERADOR 20 INSTRUCCIONES DE INSTALACIÓN .......... 21 USO DE SU REFRIGERADOR 31 CUIDADO DE SU REFRIGERADOR 33 SOLUCIÓN DE PROBLEMAS 34 HOJA DE DATOS DEL PRODUCTO 37 GARANTÍA 38 SÉCURITÉ DU...
... Contents / Índice / Table des matières REFRIGERATOR SAFETY 1 INSTALLATION INSTRUCTIONS 2 REFRIGERATOR USE 12 REFRIGERATOR CARE 14 TROUBLESHOOTING 15 WATER FILTER CERTIFICATIONS 17 PRODUCT DATA SHEETS 18 WARRANTY 19 SEGURIDAD DEL REFRIGERADOR 20 INSTRUCCIONES DE INSTALACIÓN .......... 21 USO DE SU REFRIGERADOR 31 CUIDADO DE SU REFRIGERADOR 33 SOLUCIÓN DE PROBLEMAS 34 HOJA DE DATOS DEL PRODUCTO 37 GARANTÍA 38 SÉCURITÉ DU...
Owners Manual
Page 2
..., including the following: ■ Plug into many small, pebble-size pieces. Glass shelves and covers are getting rid of your refrigerator before turning on ice maker kit ready models only). Wipe with warm water when they will sit for cleaning or service, be sure to cover the floor with your refrigerator. See the cleaning instructions in place so that children may break if exposed to sudden temperature changes or impact, such as...
..., including the following: ■ Plug into many small, pebble-size pieces. Glass shelves and covers are getting rid of your refrigerator before turning on ice maker kit ready models only). Wipe with warm water when they will sit for cleaning or service, be sure to cover the floor with your refrigerator. See the cleaning instructions in place so that children may break if exposed to sudden temperature changes or impact, such as...
Owners Manual
Page 3
...., AC only 15- Disconnect the refrigerator from refrigerator. To ensure proper ventilation for the water line connections. If your refrigerator be turned off by a switch. NOTE: Before performing any type of installation, cleaning, or removing a light bulb, turn the freezer control to the desired setting. or 20-amp fused, grounded electrical supply is important to make sure you are finished, reconnect the refrigerator to the electrical source and reset the temperature controls to the word OFF, or...
...., AC only 15- Disconnect the refrigerator from refrigerator. To ensure proper ventilation for the water line connections. If your refrigerator be turned off by a switch. NOTE: Before performing any type of installation, cleaning, or removing a light bulb, turn the freezer control to the desired setting. or 20-amp fused, grounded electrical supply is important to make sure you are finished, reconnect the refrigerator to the electrical source and reset the temperature controls to the word OFF, or...
Owners Manual
Page 4
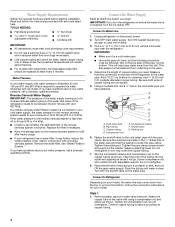
...) vertical cold water pipe near the refrigerator. Remove plastic cap from water valve inlet port. Cold water pipe B. Do not overtighten. 8. Water Supply Requirements Gather the required tools and parts before you have selected. Read and follow the instructions provided with adjustable wrench. Install copper tubing only in the cold water pipe you begin. Remove the water filter. See "Water Filtration System." Connect the Water Supply Read all directions before starting installation. Unplug refrigerator or disconnect power...
...) vertical cold water pipe near the refrigerator. Remove plastic cap from water valve inlet port. Cold water pipe B. Do not overtighten. 8. Water Supply Requirements Gather the required tools and parts before you have selected. Read and follow the instructions provided with adjustable wrench. Install copper tubing only in the cold water pipe you begin. Remove the water filter. See "Water Filtration System." Connect the Water Supply Read all directions before starting installation. Unplug refrigerator or disconnect power...
Owners Manual
Page 5
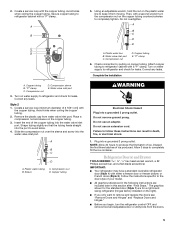
... a right-hand swing refrigerator (hinges factory installed on water supply to keep it from water valve inlet port. A B C D E A. Copper tubing E. Correct any leaks. Water valve inlet port 3. Style 2 1. Place a compression nut and sleeve on copper tubing. A B C D A. Do not use an adapter. Discard the first three batches of ice. Follow the instructions specific to produce the first batch of ice produced. Water valve inlet port C. Refrigerator Door(s) and Drawer TOOLS NEEDED hex head socket...
... a right-hand swing refrigerator (hinges factory installed on water supply to keep it from water valve inlet port. A B C D E A. Copper tubing E. Correct any leaks. Water valve inlet port 3. Style 2 1. Place a compression nut and sleeve on copper tubing. A B C D A. Do not use an adapter. Discard the first three batches of ice. Follow the instructions specific to produce the first batch of ice produced. Water valve inlet port C. Refrigerator Door(s) and Drawer TOOLS NEEDED hex head socket...
Owners Manual
Page 6
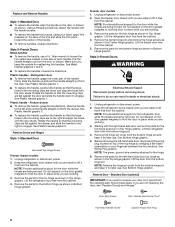
... cabinet. Make sure you keep it free from the cabinet. Plastic handle - Remove Doors and Hinges Style 1-Standard Door Hex Head Top Hinge Screw Freezer drawer models 1. Lift the refrigerator door free from the bottom hinge pin. 4. Unplug refrigerator or disconnect power. 2. See Metal Handle graphics 1 and 2. ■ To replace the handles, reverse the directions. Do not depend on the door gasket magnets to do so can result in place while you are working...
... cabinet. Make sure you keep it free from the cabinet. Plastic handle - Remove Doors and Hinges Style 1-Standard Door Hex Head Top Hinge Screw Freezer drawer models 1. Lift the refrigerator door free from the bottom hinge pin. 4. Unplug refrigerator or disconnect power. 2. See Metal Handle graphics 1 and 2. ■ To replace the handles, reverse the directions. Do not depend on the door gasket magnets to do so can result in place while you are working...
Owners Manual
Page 7
... the freezer drawer. Tighten screws. NOTE: Provide additional support for the bottom hinges as shown in death, fire, or electrical shock. 2. Reconnect the wiring plug on the door gasket magnets to hold the door in place while you are working. 3. Do not use an adapter. Remove door handle seal screw front. Remove freezer door handle seal screw. Replace the parts for the top hinge as shown in the bottom of the refrigerator door is installed...
... the freezer drawer. Tighten screws. NOTE: Provide additional support for the bottom hinges as shown in death, fire, or electrical shock. 2. Reconnect the wiring plug on the door gasket magnets to hold the door in place while you are working. 3. Do not use an adapter. Remove door handle seal screw front. Remove freezer door handle seal screw. Replace the parts for the top hinge as shown in the bottom of the refrigerator door is installed...
Owners Manual
Page 9
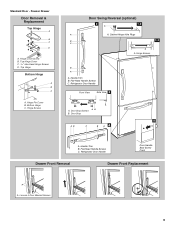
... Hinge Bottom Hinge A B C A. Cabinet Hinge Hole Plugs B 1-1 C A A A. Handle Trim B. Handle Trim B. Bottom Hinge C. Door Stop 5 AB C B A4 A. Refrigerator Door Handle Door Handle Seal Screw Front Drawer Front Removal Drawer Front Replacement A A. Freezer Drawer Door Removal & Replacement Top Hinge A B C D A. Flat-Head Handle Screws C. Hinge Screws Door Swing Reversal (optional) 2 1-2 A A A. Flat-Head Handle Screws C. Top Hinge Cover C. 5/16" Hex-Head Hinge Screws D. Refrigerator Door Handle Front View Side View 3 A. Standard Door - Hinge Cover...
... Hinge Bottom Hinge A B C A. Cabinet Hinge Hole Plugs B 1-1 C A A A. Handle Trim B. Handle Trim B. Bottom Hinge C. Door Stop 5 AB C B A4 A. Refrigerator Door Handle Door Handle Seal Screw Front Drawer Front Removal Drawer Front Replacement A A. Freezer Drawer Door Removal & Replacement Top Hinge A B C D A. Flat-Head Handle Screws C. Hinge Screws Door Swing Reversal (optional) 2 1-2 A A A. Flat-Head Handle Screws C. Top Hinge Cover C. 5/16" Hex-Head Hinge Screws D. Refrigerator Door Handle Front View Side View 3 A. Standard Door - Hinge Cover...
Owners Manual
Page 10
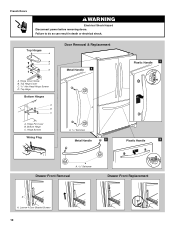
Failure to do so can result in death or electrical shock. Hinge Pin Cover B. Bottom Hinge C. Loosen 4 Door Bracket Screws 10 Hinge Cover Screw B. Top Hinges A B C D Door Removal & Replacement Metal Handle 1 A. Hinge Screws Wiring Plug A. 3/32" Setscrew Metal Handle 2 Plastic Handle 1 Plastic Handle 2 A A. 3/32" Setscrew Drawer Front Removal Drawer Front Replacement A A. Top Hinge Cover C. 5/16" Hex Head Hinge Screws D. Top Hinge Bottom Hinges A A B C A. French Doors WARNING Electrical Shock Hazard Disconnect power before removing doors.
Failure to do so can result in death or electrical shock. Hinge Pin Cover B. Bottom Hinge C. Loosen 4 Door Bracket Screws 10 Hinge Cover Screw B. Top Hinges A B C D Door Removal & Replacement Metal Handle 1 A. Hinge Screws Wiring Plug A. 3/32" Setscrew Metal Handle 2 Plastic Handle 1 Plastic Handle 2 A A. 3/32" Setscrew Drawer Front Removal Drawer Front Replacement A A. Top Hinge Cover C. 5/16" Hex Head Hinge Screws D. Top Hinge Bottom Hinges A A B C A. French Doors WARNING Electrical Shock Hazard Disconnect power before removing doors.
Owners Manual
Page 11
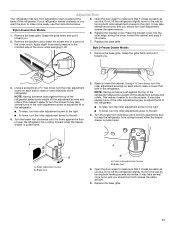
... cover notch. Style 2-Freezer Drawer Models 1. Using a ³⁄₈" hex driver, turn the roller adjustment screw(s) on each side to raise or lower that it easier to turn the roller adjustment screw to keep the refrigerator from rolling forward when the freezer drawer is pulled open . Remove the bracket cover. Replace the base grille. 11 Remove the base grille. Open the door again to make sure that side of the refrigerator...
... cover notch. Style 2-Freezer Drawer Models 1. Using a ³⁄₈" hex driver, turn the roller adjustment screw(s) on each side to raise or lower that it easier to turn the roller adjustment screw to keep the refrigerator from rolling forward when the freezer drawer is pulled open . Remove the bracket cover. Replace the base grille. 11 Remove the base grille. Open the door again to make sure that side of the refrigerator...
Owners Manual
Page 12
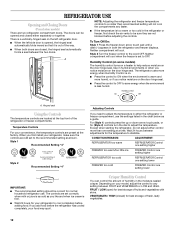
... warm and more than recommended setting will cool. The controls are still set to any faster. ■ If the temperature is less humid. If you need to save energy when the environment is too warm or too cold in the chart below as a guide. Depending on the door hinge seal. ■ Press the control to OFF to adjust the temperature in the moisture-sealed crisper. REFRIGERATOR USE Opening and Closing Doors (French door models...
... warm and more than recommended setting will cool. The controls are still set to any faster. ■ If the temperature is less humid. If you need to save energy when the environment is too warm or too cold in the chart below as a guide. Depending on the door hinge seal. ■ Press the control to OFF to adjust the temperature in the moisture-sealed crisper. REFRIGERATOR USE Opening and Closing Doors (French door models...
Owners Manual
Page 13
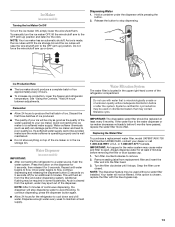
... before removing the filter or blue bypass cap. 1. See "Using the Controls." If a softened water supply cannot be avoided, make sure the water softener is operating properly and is microbiologically unsafe or of the ice maker or in some models) Turning the Ice Maker On/Off To turn the ice maker OFF, lift the wire shutoff arm to cool down . Replacing the Water Filter To purchase a replacement water filter, model UKF8001AXX-750 Part Number UKF8001AXX, contact your ice maker. Snap the filter cover closed...
... before removing the filter or blue bypass cap. 1. See "Using the Controls." If a softened water supply cannot be avoided, make sure the water softener is operating properly and is microbiologically unsafe or of the ice maker or in some models) Turning the Ice Maker On/Off To turn the ice maker OFF, lift the wire shutoff arm to cool down . Replacing the Water Filter To purchase a replacement water filter, model UKF8001AXX-750 Part Number UKF8001AXX, contact your ice maker. Snap the filter cover closed...
Owners Manual
Page 14
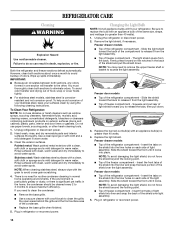
... not corrosion-proof. Changing the Light Bulb NOTE: Not all appliance bulbs will transfer to avoid water spots. Freezer drawer models ■ Top of the refrigerator compartment - The light shield opens from the light assembly. ■ Top of food, wrap or cover foods tightly. ■ For stainless steel models, stainless steel is significant pet traffic in one section will fit your surfaces clean by using the following cleaning instructions. Freezer door models ■ Top...
... not corrosion-proof. Changing the Light Bulb NOTE: Not all appliance bulbs will transfer to avoid water spots. Freezer drawer models ■ Top of the refrigerator compartment - The light shield opens from the light assembly. ■ Top of food, wrap or cover foods tightly. ■ For stainless steel models, stainless steel is significant pet traffic in one section will fit your surfaces clean by using the following cleaning instructions. Freezer door models ■ Top...
Owners Manual
Page 15
... "Using the Control(s)." ■ New installation? Clean gaskets and contact surfaces with mild soap and warm water. Allows warm air to cool completely. water dripping on . Contributes to this reduction, you did not notice from items placed on ? Make sure the refrigerator controls are difficult to coldest setting will not operate WARNING ■ Sizzling/Gurgling - Minimize door openings and keep doors fully closed . 15 Plug into a grounded 3 prong outlet. NOTE: Adjusting the temperature controls to open ? Replace...
... "Using the Control(s)." ■ New installation? Clean gaskets and contact surfaces with mild soap and warm water. Allows warm air to cool completely. water dripping on . Contributes to this reduction, you did not notice from items placed on ? Make sure the refrigerator controls are difficult to coldest setting will not operate WARNING ■ Sizzling/Gurgling - Minimize door openings and keep doors fully closed . 15 Plug into a grounded 3 prong outlet. NOTE: Adjusting the temperature controls to open ? Replace...
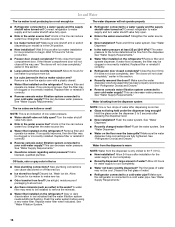
Owners Manual
Page 16
... line can reduce water flow. See "Refrigerator Door(s) and Drawer." ■ Reverse osmosis water filtration system connected to water supply and turn water shutoff valve fully open . ■ Kink in the ON position. ■ New installation? Water is normal. ■ Glass not being held under the dispenser 2 to 3 seconds after ice maker installation for ice maker to a cold water pipe? Discard the first glass of water after dispensing is leaking from the dispenser system NOTE: One or two drops of water. ■ Refrigerator connected...
... line can reduce water flow. See "Refrigerator Door(s) and Drawer." ■ Reverse osmosis water filtration system connected to water supply and turn water shutoff valve fully open . ■ Kink in the ON position. ■ New installation? Water is normal. ■ Glass not being held under the dispenser 2 to 3 seconds after ice maker installation for ice maker to a cold water pipe? Discard the first glass of water after dispensing is leaking from the dispenser system NOTE: One or two drops of water. ■ Refrigerator connected...
Owners Manual
Page 18
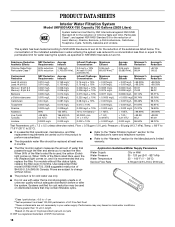
... ■ The product is for cold water use only. ■ Do not use with water that is essential that operational, maintenance, and filter replacement requirements be used , the yellow (Order) light comes on disinfected waters that passes through the filter and alerts you replace the filter. PRODUCT DATA SHEETS Interior Water Filtration System Model UKF8001AXX-750 Capacity 750 Gallons (2839 Liters) System tested and certified by NSF International against...
... ■ The product is for cold water use only. ■ Do not use with water that is essential that operational, maintenance, and filter replacement requirements be used , the yellow (Order) light comes on disinfected waters that passes through the filter and alerts you replace the filter. PRODUCT DATA SHEETS Interior Water Filtration System Model UKF8001AXX-750 Capacity 750 Gallons (2839 Liters) System tested and certified by NSF International against...

Owners Manual
Page 19
... major appliances with Whirlpool's published installation instructions. 11. Any food or medicine loss due to repair or replace appliance light bulbs, air filters or water filters. Repairs to parts or systems resulting from warranty coverage. 4. Replacement parts or repair labor on how to use or when it is used in the country in which it is installed in an inaccessible location or is not installed in accordance with original model/serial numbers that have been...
... major appliances with Whirlpool's published installation instructions. 11. Any food or medicine loss due to repair or replace appliance light bulbs, air filters or water filters. Repairs to parts or systems resulting from warranty coverage. 4. Replacement parts or repair labor on how to use or when it is used in the country in which it is installed in an inaccessible location or is not installed in accordance with original model/serial numbers that have been...
Warranty
Page 1
... installation, installation not in accordance with electrical or plumbing codes, or use of products not approved by an authorized Whirlpool servicer is not available. 10. Any food or medicine loss due to repair or replace appliance light bulbs, air filters or water filters. For assistance or service in the U.S.A., call 1-800-807-6777. Please keep this limited warranty. Repairs to parts or systems resulting from warranty coverage. 4. This warranty gives you specific...
... installation, installation not in accordance with electrical or plumbing codes, or use of products not approved by an authorized Whirlpool servicer is not available. 10. Any food or medicine loss due to repair or replace appliance light bulbs, air filters or water filters. For assistance or service in the U.S.A., call 1-800-807-6777. Please keep this limited warranty. Repairs to parts or systems resulting from warranty coverage. 4. This warranty gives you specific...


