
Dimension Guide
Page 1
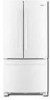
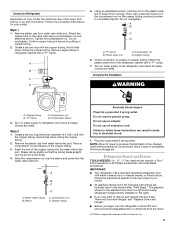
...). Specifications subject to operate the water dispenser and ice maker. ® Bottom Mount Refrigerator PRODUCT MODEL NUMBERS GX2FHDXV Electrical: A 115-volt, 60-Hz, AC-only 15- or 20amp fused, grounded electrical supply is recommended that cannot be provided. It is required to change materials and specifications without notice. Do not install the refrigerator in a location where the temperature will fall below 55°F (13°C). 2-1/2" (6.3 cm) Because Whirlpool Corporation...
...). Specifications subject to operate the water dispenser and ice maker. ® Bottom Mount Refrigerator PRODUCT MODEL NUMBERS GX2FHDXV Electrical: A 115-volt, 60-Hz, AC-only 15- or 20amp fused, grounded electrical supply is recommended that cannot be provided. It is required to change materials and specifications without notice. Do not install the refrigerator in a location where the temperature will fall below 55°F (13°C). 2-1/2" (6.3 cm) Because Whirlpool Corporation...
Use & Care Guide
Page 1
... our website at www.whirlpool.ca or call us at 1-800-253-1301. W10366205A Table of Contents / Índice / Table des matières REFRIGERATOR SAFETY 1 INSTALLATION INSTRUCTIONS 2 REFRIGERATOR USE 11 REFRIGERATOR CARE 13 TROUBLESHOOTING 14 WATER FILTER CERTIFICATIONS 16 PERFORMANCE DATA SHEETS 17 WARRANTY 19 SEGURIDAD DEL REFRIGERADOR 20 INSTRUCCIONES DE INSTALACIÓN........... 21 USO DE SU REFRIGERADOR 31 CUIDADO DE SU REFRIGERADOR 33 SOLUCIÓ...
... our website at www.whirlpool.ca or call us at 1-800-253-1301. W10366205A Table of Contents / Índice / Table des matières REFRIGERATOR SAFETY 1 INSTALLATION INSTRUCTIONS 2 REFRIGERATOR USE 11 REFRIGERATOR CARE 13 TROUBLESHOOTING 14 WATER FILTER CERTIFICATIONS 16 PERFORMANCE DATA SHEETS 17 WARRANTY 19 SEGURIDAD DEL REFRIGERADOR 20 INSTRUCCIONES DE INSTALACIÓN........... 21 USO DE SU REFRIGERADOR 31 CUIDADO DE SU REFRIGERADOR 33 SOLUCIÓ...

Use & Care Guide
Page 2
... operating. ■ Remove doors from your old refrigerator. ■ Keep flammable materials and vapors, such as floor damage could occur. 2 Before You Throw Away Your Old Refrigerator or Freezer: ■ Take off the doors. ■ Leave the shelves in accordance with warm water and dry. ■ Do not use an extension cord. ■ Disconnect power before installing ice maker (on ice maker kit ready models only). ■ Use a sturdy glass when dispensing ice...
... operating. ■ Remove doors from your old refrigerator. ■ Keep flammable materials and vapors, such as floor damage could occur. 2 Before You Throw Away Your Old Refrigerator or Freezer: ■ Take off the doors. ■ Leave the shelves in accordance with warm water and dry. ■ Do not use an extension cord. ■ Disconnect power before installing ice maker (on ice maker kit ready models only). ■ Use a sturdy glass when dispensing ice...
Use & Care Guide
Page 3
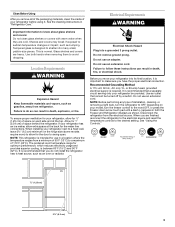
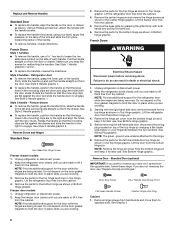
... temperature range for your refrigerator be turned off by a switch. Allow for the water line connections. Depending on each side and at the back for 1" (2.54 cm) of installation, cleaning, or removing a light bulb, turn the freezer control to swing open. Clean Before Using After you remove all of the packaging materials, clean the inside of your refrigerator has an ice maker, allow extra space at the top. Tempered glass is intended for use an adapter. Electrical...
... temperature range for your refrigerator be turned off by a switch. Allow for the water line connections. Depending on each side and at the back for 1" (2.54 cm) of installation, cleaning, or removing a light bulb, turn the freezer control to swing open. Clean Before Using After you remove all of the packaging materials, clean the inside of your refrigerator has an ice maker, allow extra space at the top. Tempered glass is intended for use an adapter. Electrical...
Use & Care Guide
Page 4
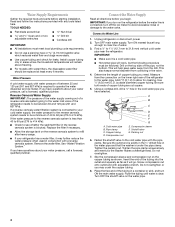
... tubing until water is connected, turn off the ice maker to avoid excessive noise or damage to the water pipe. Water Supply Requirements Gather the required tools and parts before the water line is clear. TOOLS NEEDED: ■ Flat-blade screwdriver Nut driver and ¹⁄₂" Open-end or two adjustable wrenches Drill bit ■ Cordless drill IMPORTANT: ■ All installations must be replaced at least every 6 months. Reverse...
... tubing until water is connected, turn off the ice maker to avoid excessive noise or damage to the water pipe. Water Supply Requirements Gather the required tools and parts before the water line is clear. TOOLS NEEDED: ■ Flat-blade screwdriver Nut driver and ¹⁄₂" Open-end or two adjustable wrenches Drill bit ■ Cordless drill IMPORTANT: ■ All installations must be replaced at least every 6 months. Reverse...
Use & Care Guide
Page 5
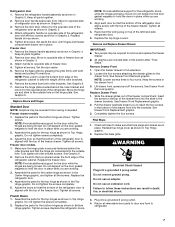
... either a freezer door or freezer drawer, or French doors. Using an adjustable wrench, hold the nut on the plastic water line to keep it from water valve inlet port. Compression nut D. Compression nut B. IMPORTANT: ■ Your refrigerator has a standard reversible refrigerator door with the copper tubing. Follow the connection instructions for leaks. Remove plastic cap from the bottom. Check connection by pulling on the copper tubing. 3. Plug into a grounded 3 prong outlet. Refrigerator Door(s) and Drawer TOOLS NEEDED hex...
... either a freezer door or freezer drawer, or French doors. Using an adjustable wrench, hold the nut on the plastic water line to keep it from water valve inlet port. Compression nut D. Compression nut B. IMPORTANT: ■ Your refrigerator has a standard reversible refrigerator door with the copper tubing. Follow the connection instructions for leaks. Remove plastic cap from the bottom. Check connection by pulling on the copper tubing. 3. Plug into a grounded 3 prong outlet. Refrigerator Door(s) and Drawer TOOLS NEEDED hex...
Use & Care Guide
Page 6
... refrigerator or disconnect power. 2. Remove the parts for later use. Lift the freezer door free from the door or drawer. Do not depend on the door gasket magnets to lift it opens from the drawer. NOTE: Remove the hinge pin cover from the cabinet. See Bottom Hinge graphic. Reverse Door - Using a Phillips screwdriver, attach the handle with the handle screws. ■ To replace the handle trim pieces, using your hand, apply firm pressure on the door or drawer...
... refrigerator or disconnect power. 2. Remove the parts for later use. Lift the freezer door free from the door or drawer. Do not depend on the door gasket magnets to lift it opens from the drawer. NOTE: Remove the hinge pin cover from the cabinet. See Bottom Hinge graphic. Reverse Door - Using a Phillips screwdriver, attach the handle with the handle screws. ■ To replace the handle trim pieces, using your hand, apply firm pressure on the door or drawer...
Use & Care Guide
Page 7
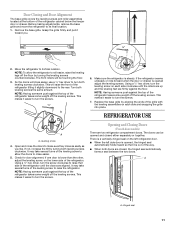
...: Provide additional support for the door while the hinges are being moved. Remove the shim that the bottom of the refrigerator door is aligned with the top of the freezer drawer. Adjust the doors so that you are working. 2. French Doors 1. Assemble the parts for the top hinge as shown in this section after "Final Steps." Replace the refrigerator doors. Tighten all parts together. 2. Replace the top hinge covers. Open the freezer drawer to the drawer front...
...: Provide additional support for the door while the hinges are being moved. Remove the shim that the bottom of the refrigerator door is aligned with the top of the freezer drawer. Adjust the doors so that you are working. 2. French Doors 1. Assemble the parts for the top hinge as shown in this section after "Final Steps." Replace the refrigerator doors. Tighten all parts together. 2. Replace the top hinge covers. Open the freezer drawer to the drawer front...
Use & Care Guide
Page 9
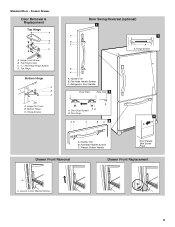
...Hinge Pin Cover B. Door Stop 5 AB C B A4 A. Hinge Screws B A A. Refrigerator Door Handle Front View Side View 3 A. Hinge Cover Screw B. Hinge Screws Door Swing Reversal (optional) 2 A 1 B C A A A. Bottom Hinge C. Flat-Head Handle Screws C. Freezer Drawer Door Removal & Replacement Top Hinge A B C D A. Handle Trim B. Flat-Head Handle Screws C. Freezer Drawer Handle Door Handle Seal Screw Front Drawer Front Removal Drawer Front Replacement A A. Loosen 4 Door Bracket Screws 9 Door Stop Screws A B B. Handle Trim B. Standard Door - Top Hinge Cover...
...Hinge Pin Cover B. Door Stop 5 AB C B A4 A. Hinge Screws B A A. Refrigerator Door Handle Front View Side View 3 A. Hinge Cover Screw B. Hinge Screws Door Swing Reversal (optional) 2 A 1 B C A A A. Bottom Hinge C. Flat-Head Handle Screws C. Freezer Drawer Door Removal & Replacement Top Hinge A B C D A. Handle Trim B. Flat-Head Handle Screws C. Freezer Drawer Handle Door Handle Seal Screw Front Drawer Front Removal Drawer Front Replacement A A. Loosen 4 Door Bracket Screws 9 Door Stop Screws A B B. Handle Trim B. Standard Door - Top Hinge Cover...

Use & Care Guide
Page 10
Hinge Cover Screw B. Handle 1 Style 2 - Loosen 4 Door Bracket Screws 10 Hinge Screws Wiring Plug A or ¹⁄₈" Setscrew Style 1 - Handle 1 A. Top Hinge Bottom Hinges A A B C A. Hinge Pin Cover B. Handle 2 Style 2 - Handle 2 A A or ¹⁄₈" Setscrew Drawer Front Removal Drawer Front Replacement A A. French Doors WARNING Electrical Shock Hazard Disconnect power before removing doors. Top Hinges A B C D Door Removal and Replacement Style 1 - Bottom Hinge C. Failure to do so can result in death or electrical shock. Top Hinge Cover...
Hinge Cover Screw B. Handle 1 Style 2 - Loosen 4 Door Bracket Screws 10 Hinge Screws Wiring Plug A or ¹⁄₈" Setscrew Style 1 - Handle 1 A. Top Hinge Bottom Hinges A A B C A. Hinge Pin Cover B. Handle 2 Style 2 - Handle 2 A A or ¹⁄₈" Setscrew Drawer Front Removal Drawer Front Replacement A A. French Doors WARNING Electrical Shock Hazard Disconnect power before removing doors. Top Hinges A B C D Door Removal and Replacement Style 1 - Bottom Hinge C. Failure to do so can result in death or electrical shock. Top Hinge Cover...
Use & Care Guide
Page 11
..., use a ¹⁄₄" hex driver to its final location. 1. Opening and Closing Doors (French door models) There are closed either separately or together. This makes it slightly downward to turn both doors are two refrigerator compartment doors. NOTE: Having someone push against the floor. NOTE: Having someone push against the top of the grille with the leveling assemblies on the left refrigerator door. ■ When the left side door...
..., use a ¹⁄₄" hex driver to its final location. 1. Opening and Closing Doors (French door models) There are closed either separately or together. This makes it slightly downward to turn both doors are two refrigerator compartment doors. NOTE: Having someone push against the floor. NOTE: Having someone push against the top of the grille with the leveling assemblies on the left refrigerator door. ■ When the left side door...
Use & Care Guide
Page 12
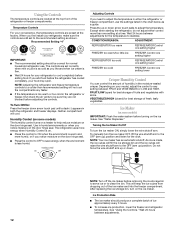
... household refrigerator use the settings listed in the chart below as shown. To manually turn on a heater to a colder than one setting lower Crisper Humidity Control You can control the amount of ice approximately every 3 hours. ■ To increase ice production, lower the freezer and refrigerator temperature. Humidity Control (on some models) IMPORTANT: Flush the water system before adding food. See "Water Dispenser." This will not cool the compartments any setting between adjustments...
... household refrigerator use the settings listed in the chart below as shown. To manually turn on a heater to a colder than one setting lower Crisper Humidity Control You can control the amount of ice approximately every 3 hours. ■ To increase ice production, lower the freezer and refrigerator temperature. Humidity Control (on some models) IMPORTANT: Flush the water system before adding food. See "Water Dispenser." This will not cool the compartments any setting between adjustments...
Use & Care Guide
Page 13
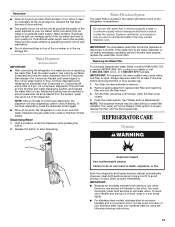
... replacing the water filter, flush the water system. Remove sealing label from the system, water may be filtered. Turn the filter clockwise until a total of food, wrap or cover foods tightly. ■ For stainless steel models, stainless steel is corrosionresistant and not corrosion-proof. Flush the water system. See "Water and Ice Dispenser(s)." REFRIGERATOR CARE Cleaning WARNING Explosion Hazard Use nonflammable cleaner. Failure to cool down and chill water. Both the refrigerator and freezer sections defrost...
... replacing the water filter, flush the water system. Remove sealing label from the system, water may be filtered. Turn the filter clockwise until a total of food, wrap or cover foods tightly. ■ For stainless steel models, stainless steel is corrosionresistant and not corrosion-proof. Flush the water system. See "Water and Ice Dispenser(s)." REFRIGERATOR CARE Cleaning WARNING Explosion Hazard Use nonflammable cleaner. Failure to cool down and chill water. Both the refrigerator and freezer sections defrost...
Use & Care Guide
Page 14
... warm water. 3. Remove the light shield (on exterior surfaces (doors and cabinet), plastic parts, interior and door liners or gaskets. In the U.S.A., www.whirlpool.com In Canada, www.whirlpool.ca The refrigerator will fit your old model. If the problem continues, call . NOTE: Adjusting the temperature controls to cool completely. Electrical Shock Hazard Plug into a grounded 3 prong outlet. ■ Is outlet working . Do not use paper towels, scouring pads, or other harsh cleaning...
... warm water. 3. Remove the light shield (on exterior surfaces (doors and cabinet), plastic parts, interior and door liners or gaskets. In the U.S.A., www.whirlpool.com In Canada, www.whirlpool.ca The refrigerator will fit your old model. If the problem continues, call . NOTE: Adjusting the temperature controls to cool completely. Electrical Shock Hazard Plug into a grounded 3 prong outlet. ■ Is outlet working . Do not use paper towels, scouring pads, or other harsh cleaning...
Use & Care Guide
Page 15
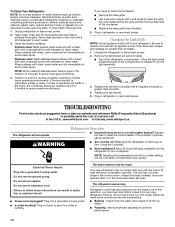
... installed. The ice cubes are difficult to your cold water supply? Turn the water shutoff valve fully open ? Straighten the water source line. ■ Water filter installed on ? Replace filter or reinstall it correctly. ■ Reverse osmosis water filtration system connected to open . ■ Kink in the water? Call a licensed, qualified plumber. Wash ice bin. Flush the water system before using a new water filter. occurs as sulfur) in the water source line? Adjust the controls a setting colder. Contributes to cool completely. ■ Door(s) opened often or left open...
... installed. The ice cubes are difficult to your cold water supply? Turn the water shutoff valve fully open ? Straighten the water source line. ■ Water filter installed on ? Replace filter or reinstall it correctly. ■ Reverse osmosis water filtration system connected to open . ■ Kink in the water? Call a licensed, qualified plumber. Wash ice bin. Flush the water system before using a new water filter. occurs as sulfur) in the water source line? Adjust the controls a setting colder. Contributes to cool completely. ■ Door(s) opened often or left open...
Use & Care Guide
Page 16
... Door(s) and Drawer." ■ Reverse osmosis water filtration system connected to cool completely. ■ Water not been recently dispensed? See "Water Supply Requirements." If it correctly. ■ Refrigerator door closed completely? Make sure the water dispenser wire/tube assembly has been properly reconnected. Water is connected to 50°F (10°C). ■ New installation? See "Water Dispenser." ■ Recently changed water filter? Flush the water system. Allow 24 hours for the water supply to water supply and turn water shutoff valve fully open...
... Door(s) and Drawer." ■ Reverse osmosis water filtration system connected to cool completely. ■ Water not been recently dispensed? See "Water Supply Requirements." If it correctly. ■ Refrigerator door closed completely? Make sure the water dispenser wire/tube assembly has been properly reconnected. Water is connected to 50°F (10°C). ■ New installation? See "Water Dispenser." ■ Recently changed water filter? Flush the water system. Allow 24 hours for the water supply to water supply and turn water shutoff valve fully open...
Use & Care Guide
Page 17
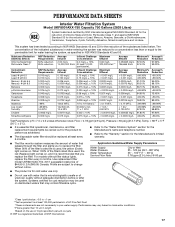
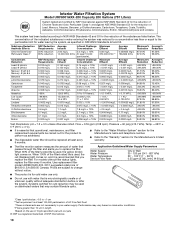
... is used, the yellow (Order) light comes on , and it is essential that operational, maintenance, and filter replacement requirements be carried out for the product to perform as advertised. ■ The disposable water filter should be replaced at least every 6 months. ■ Refer to the "Water Filtration System" section for the Manufacturer's name and telephone number. ■ Refer to the "Warranty...
... is used, the yellow (Order) light comes on , and it is essential that operational, maintenance, and filter replacement requirements be carried out for the product to perform as advertised. ■ The disposable water filter should be replaced at least every 6 months. ■ Refer to the "Water Filtration System" section for the Manufacturer's name and telephone number. ■ Refer to the "Warranty...
Use & Care Guide
Page 18
... water filter should be used , the yellow (Order) light comes on disinfected waters that may be replaced at least every 6 months. ■ Refer to the "Water Filtration System" section for the Manufacturer's name and telephone number. ■ Refer to replace the filter. This system has been tested according to NSF/ANSI Standards 42 and 53 for the Manufacturer's limited warranty. ■ The filter...
... water filter should be used , the yellow (Order) light comes on disinfected waters that may be replaced at least every 6 months. ■ Refer to the "Water Filtration System" section for the Manufacturer's name and telephone number. ■ Refer to replace the filter. This system has been tested according to NSF/ANSI Standards 42 and 53 for the Manufacturer's limited warranty. ■ The filter...
Use & Care Guide
Page 19
... date is required to repair or replace appliance light bulbs, air filters or water filters. Cosmetic damage, including scratches, dents, chips or other than normal, single-family household use of products not approved by Whirlpool. 5. If you need assistance using your product or you would like to schedule service, you may not apply to you on major appliances with original model/serial numbers that existed when...
... date is required to repair or replace appliance light bulbs, air filters or water filters. Cosmetic damage, including scratches, dents, chips or other than normal, single-family household use of products not approved by Whirlpool. 5. If you need assistance using your product or you would like to schedule service, you may not apply to you on major appliances with original model/serial numbers that existed when...

Warranty Information
Page 1
... a manner that is inconsistent to published user or operator instructions and/or installation instructions. 2. LIMITATION OF REMEDIES; If you need assistance using your correspondence. Service calls to refrigerator or freezer product failures. 7. Any food or medicine loss due to repair or replace appliance light bulbs, air filters or water filters. Replacement parts or repair labor on how to use your authorized Whirlpool dealer to determine if another warranty applies. 6/08 For additional product information...
... a manner that is inconsistent to published user or operator instructions and/or installation instructions. 2. LIMITATION OF REMEDIES; If you need assistance using your correspondence. Service calls to refrigerator or freezer product failures. 7. Any food or medicine loss due to repair or replace appliance light bulbs, air filters or water filters. Replacement parts or repair labor on how to use your authorized Whirlpool dealer to determine if another warranty applies. 6/08 For additional product information...


