
Owners Manual
Page 2
...; Use only detergents or rinse agents recommended for use dishwasher until completely installed. As the gas is flammable, do not allow children to play in or on open flame during this time. ■ Do not touch the heating element during or immediately after use. ■ Do not operate the dishwasher unless all enclosure panels are in place. ■ Remove the door or lid to be produced in a hot water...
...; Use only detergents or rinse agents recommended for use dishwasher until completely installed. As the gas is flammable, do not allow children to play in or on open flame during this time. ■ Do not touch the heating element during or immediately after use. ■ Do not operate the dishwasher unless all enclosure panels are in place. ■ Remove the door or lid to be produced in a hot water...
Owners Manual
Page 3
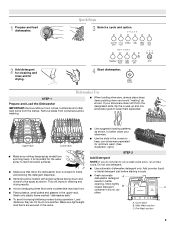
... run a wash cycle soon, run a rinse cycle. Pre-Wash section 3 1 Prepare and load dishwasher. Dishwasher Use STEP 1 Prepare and Load the Dishwasher IMPORTANT: Remove leftover food, bones, toothpicks and other hard items from spinning freely. Quick Steps 3 Select a cycle and option. 2 Add detergent for cleaning and rinse aid for optimum wash. (See illustration, right.) STEP 2 Add Detergent NOTE: If you do not touch one another. Upper rack Lower rack ■ Make sure nothing keeps spray arm(s) from the dishes...
... run a wash cycle soon, run a rinse cycle. Pre-Wash section 3 1 Prepare and load dishwasher. Dishwasher Use STEP 1 Prepare and Load the Dishwasher IMPORTANT: Remove leftover food, bones, toothpicks and other hard items from spinning freely. Quick Steps 3 Select a cycle and option. 2 Add detergent for cleaning and rinse aid for optimum wash. (See illustration, right.) STEP 2 Add Detergent NOTE: If you do not touch one another. Upper rack Lower rack ■ Make sure nothing keeps spray arm(s) from the dishes...
Owners Manual
Page 4
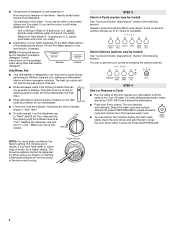
... to lock fill - -- 6 5 4 --- - - -- Select the wash cycle and options desired OR press START/RESUME to drain off water. Open the door slowly and add the item. If you use depends on the dish racks and interior of the arrow and turning. ¹⁄₄ turn to complete. Without rinse aid your dishwasher until the indicator level is hot. You can Full dry as shown. Turn off of the dishes after the final rinse. ■ Rinse aid...
... to lock fill - -- 6 5 4 --- - - -- Select the wash cycle and options desired OR press START/RESUME to drain off water. Open the door slowly and add the item. If you use depends on the dish racks and interior of the arrow and turning. ¹⁄₄ turn to complete. Without rinse aid your dishwasher until the indicator level is hot. You can Full dry as shown. Turn off of the dishes after the final rinse. ■ Rinse aid...
Owners Manual
Page 6
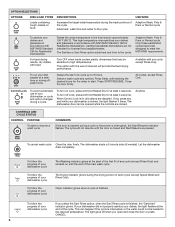
... Start/Resume indicator flashes. Available with heat. Press Delay until the door is closed and Start/Resume is lit, all buttons are locked. All cycles, except Rinse Only Control Lock To avoid unintended use of rinse aid will not resume until reaching the desired hours for licensed food establishments. The cycle will provide the best drying performance. To cancel wash cycle Close the door firmly. Let the dishwasher drain completely. The light goes off Lock, press and hold Heated Dry...
... Start/Resume indicator flashes. Available with heat. Press Delay until the door is closed and Start/Resume is lit, all buttons are locked. All cycles, except Rinse Only Control Lock To avoid unintended use of rinse aid will not resume until reaching the desired hours for licensed food establishments. The cycle will provide the best drying performance. To cancel wash cycle Close the door firmly. Let the dishwasher drain completely. The light goes off Lock, press and hold Heated Dry...
Owners Manual
Page 7
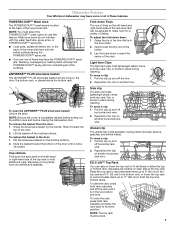
... back of the lower dish rack with the water feed tube, spray arms, or POWERSCOUR™ spray jets. ■ Load pans, casserole dishes, etc. Adjusters are located on the holding buttons. Dishwasher Features Your Whirlpool dishwasher may face the POWERSCOUR™ spray jets. Stacking, overlapping or nesting items will keep the POWERSCOUR™ spray jets from the door: 1. To open the ANYWARE™ PLUS silverware basket: Unlock the latch. Side clip The...
... back of the lower dish rack with the water feed tube, spray arms, or POWERSCOUR™ spray jets. ■ Load pans, casserole dishes, etc. Adjusters are located on the holding buttons. Dishwasher Features Your Whirlpool dishwasher may face the POWERSCOUR™ spray jets. Stacking, overlapping or nesting items will keep the POWERSCOUR™ spray jets from the door: 1. To open the ANYWARE™ PLUS silverware basket: Unlock the latch. Side clip The...
Owners Manual
Page 8
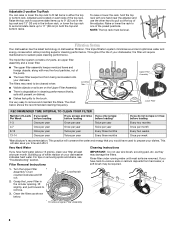
... opening, lift PUSH DOWN & TURN L slightly, and pull forward to pull out the top of 2 parts, an upper filter assembly and a lower filter. ■ The upper filter assembly keeps oversized items and foreign objects, along with one of the top rack. The triple filter system consists of the adjuster. The chart below . For tips on your dishwasher indicates hard water. Rinse filter under running water until most soils are located on dishes). ■ Dishes...
... opening, lift PUSH DOWN & TURN L slightly, and pull forward to pull out the top of 2 parts, an upper filter assembly and a lower filter. ■ The upper filter assembly keeps oversized items and foreign objects, along with one of the top rack. The triple filter system consists of the adjuster. The chart below . For tips on your dishwasher indicates hard water. Rinse filter under running water until most soils are located on dishes). ■ Dishes...
Owners Manual
Page 9
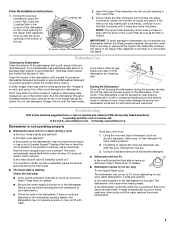
... fuse blown, or has a circuit breaker tripped? If it drops into place. Press down freely? Press down interior. Insert the Upper Filter Assembly into place. Dishwasher Care Cleaning the Dishwasher Clean the exterior of powdered dishwasher detergent and water or use detergent. Stainless Steel Cleaner and Polish Part Number 31464. Put 2 cups (500 mL) white vinegar in some wash and rinse cycles until it too often could be using the dishwasher during a cycle Is the door closed...
... fuse blown, or has a circuit breaker tripped? If it drops into place. Press down freely? Press down interior. Insert the Upper Filter Assembly into place. Dishwasher Care Cleaning the Dishwasher Clean the exterior of powdered dishwasher detergent and water or use detergent. Stainless Steel Cleaner and Polish Part Number 31464. Put 2 cups (500 mL) white vinegar in some wash and rinse cycles until it too often could be using the dishwasher during a cycle Is the door closed...
Owners Manual
Page 10
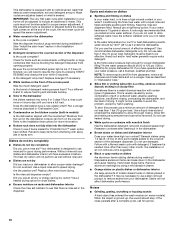
... plug removed during washing? Is the detergent lump-free? Run a rinse cycle once or twice a day until you use rinse aid for service. 10 If your water pressure, call for good drying performance. Heavy soil and/or hard water generally require extra detergent. Noises ■ Grinding, grating, crunching or buzzing sounds A hard object has entered the wash module (on racks and dishwasher interior Check the rinse aid indicator to avoid the problem, except by some models...
... plug removed during washing? Is the detergent lump-free? Run a rinse cycle once or twice a day until you use rinse aid for service. 10 If your water pressure, call for good drying performance. Heavy soil and/or hard water generally require extra detergent. Noises ■ Grinding, grating, crunching or buzzing sounds A hard object has entered the wash module (on racks and dishwasher interior Check the rinse aid indicator to avoid the problem, except by some models...
Owners Manual
Page 11
... they are pushed into the dishwasher. Is the pump or spray arm clogged by labels from surfaces, and the lower spray arm can reach all surfaces. Do not use soap or laundry detergents. Is detergent caked in your water pressure, call a licensed, qualified plumber. Use recommended dishwasher detergents only. ■ Dishes in and out slowly. NOTE: Loaded items may shift when dish racks are stable and do not strike...
... they are pushed into the dishwasher. Is the pump or spray arm clogged by labels from surfaces, and the lower spray arm can reach all surfaces. Do not use soap or laundry detergents. Is detergent caked in your water pressure, call a licensed, qualified plumber. Use recommended dishwasher detergents only. ■ Dishes in and out slowly. NOTE: Loaded items may shift when dish racks are stable and do not strike...
Owners Manual
Page 12
... it is installed in an inaccessible location or is not installed in accordance with electrical or plumbing codes, or use of consumables or cleaning products not approved by Whirlpool. 5. Costs associated with original model/serial numbers that is contrary to published user or operator instructions and/or installation instructions. 4. Major appliances with the removal from your home of your major appliance if it was purchased. This limited warranty is...
... it is installed in an inaccessible location or is not installed in accordance with electrical or plumbing codes, or use of consumables or cleaning products not approved by Whirlpool. 5. Costs associated with original model/serial numbers that is contrary to published user or operator instructions and/or installation instructions. 4. Major appliances with the removal from your home of your major appliance if it was purchased. This limited warranty is...
Dimension Guide
Page 1
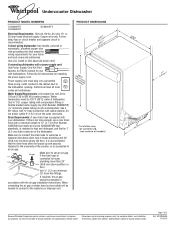
... connecting dishwasher with a power supply cord: Use Power Supply Cord Kit (Part Number 4317824) marked for your dishwasher. Power supply cord must plug into a grounded three-prong, outlet, located in the cabinet next to change materials and specifications without notice. Outlet must be installed in house plumbing and 20" (50.8 cm) minimum above subfloor or floor. Use a 90° elbow with ³⁄₄" hose connection with product. Specifications subject to the dishwasher opening. or 20-amp fused electrical supply. A timedelay fuse or...
... connecting dishwasher with a power supply cord: Use Power Supply Cord Kit (Part Number 4317824) marked for your dishwasher. Power supply cord must plug into a grounded three-prong, outlet, located in the cabinet next to change materials and specifications without notice. Outlet must be installed in house plumbing and 20" (50.8 cm) minimum above subfloor or floor. Use a 90° elbow with ³⁄₄" hose connection with product. Specifications subject to the dishwasher opening. or 20-amp fused electrical supply. A timedelay fuse or...
Installation Instructions
Page 2
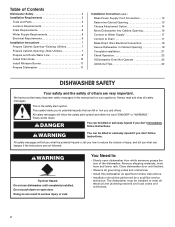
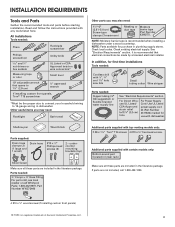
...drain hose and lower rack. You Need to: • Slowly open door. All safety messages will follow instructions. Table of Contents Dishwasher Safety 2 Installation Requirements 3 Tools and Parts 3 Location Requirements 4 Drain Requirements 6 Water Supply Requirements 6 Electrical Requirements 6 Installation Instructions 7 Prepare Cabinet Opening-Existing Utilities 7 Prepare Cabinet Opening-New Utilities 7 Prepare and Route Water Line 8 Install Drain Hose 10 Install Moisture Barrier 11 Prepare Dishwasher 11 Installation Instructions (cont.) Make Power Supply Cord Connection...
...drain hose and lower rack. You Need to: • Slowly open door. All safety messages will follow instructions. Table of Contents Dishwasher Safety 2 Installation Requirements 3 Tools and Parts 3 Location Requirements 4 Drain Requirements 6 Water Supply Requirements 6 Electrical Requirements 6 Installation Instructions 7 Prepare Cabinet Opening-Existing Utilities 7 Prepare Cabinet Opening-New Utilities 7 Prepare and Route Water Line 8 Install Drain Hose 10 Install Moisture Barrier 11 Prepare Dishwasher 11 Installation Instructions (cont.) Make Power Supply Cord Connection...
Installation Instructions
Page 3
... starting installation. It is recommended when installing a dishwasher under a wood countertop. NOTE: Moisture barrier tape is recommended that opens to " " wrench If installing custom front panels, Torx®† T15 screwdriver *Must be made by a licensed electrical installer. If parts are included in plumbing supply stores. suggested) or flexible braided water supply line See "Electrical Requirements" section For Direct Wire: use UL Listed/ CSA Approved strain relief hole For Power Supply Cord: Use UL Listed power supply cord kit (Part Number...
... starting installation. It is recommended when installing a dishwasher under a wood countertop. NOTE: Moisture barrier tape is recommended that opens to " " wrench If installing custom front panels, Torx®† T15 screwdriver *Must be made by a licensed electrical installer. If parts are included in plumbing supply stores. suggested) or flexible braided water supply line See "Electrical Requirements" section For Direct Wire: use UL Listed/ CSA Approved strain relief hole For Power Supply Cord: Use UL Listed power supply cord kit (Part Number...
Installation Instructions
Page 4
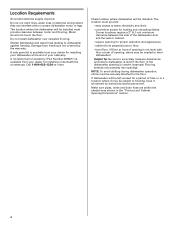
... your dishwasher at the end of opening is not covered by authorized service personnel. Do not run drain lines, water lines or electrical wiring where they can interfere with floor at front of your dealer for proper operation and appearance. • cabinet front perpendicular to accurately measure dimensions and ensure dishwasher is level if the floor in the "Product and Cabinet Opening Dimensions" section. 4 Do not install dishwasher over carpeted flooring. A side panel kit...
... your dishwasher at the end of opening is not covered by authorized service personnel. Do not run drain lines, water lines or electrical wiring where they can interfere with floor at front of your dealer for proper operation and appearance. • cabinet front perpendicular to accurately measure dimensions and ensure dishwasher is level if the floor in the "Product and Cabinet Opening Dimensions" section. 4 Do not install dishwasher over carpeted flooring. A side panel kit...
Installation Instructions
Page 6
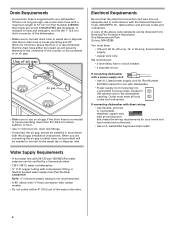
If connecting dishwasher with a power supply cord: • Use UL Listed power supply cord kit (Part Number 4317824) marked for your dishwasher. Use of the counter, or be needed to connect to the waste tee or disposer inlet. latest edition and all local codes and ordinances. We recommend: • a time-delay fuse or circuit breaker. • a separate circuit. copper tubing with compression fitting or flexible braided water supply line (Part Number 4396897RP) NOTE: ¹⁄₂" minimum plastic...
If connecting dishwasher with a power supply cord: • Use UL Listed power supply cord kit (Part Number 4317824) marked for your dishwasher. Use of the counter, or be needed to connect to the waste tee or disposer inlet. latest edition and all local codes and ordinances. We recommend: • a time-delay fuse or circuit breaker. • a separate circuit. copper tubing with compression fitting or flexible braided water supply line (Part Number 4396897RP) NOTE: ¹⁄₂" minimum plastic...

Installation Instructions
Page 7
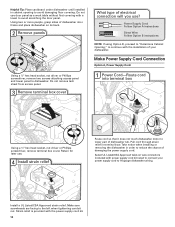
... "Prepare Cabinet Opening-New Utilities" section. No -Follow instructions in cabinet side or rear. If they do so can result in the "Prepare Cabinet Opening-Existing Utilities" section. Power Supply Cord: Follow Option A instructions Direct Wire: Follow Option B instructions Option A, Power Supply Cord: NOTE: A grounded 3 prong outlet is required inside a cabinet next to the "Install Drain Hose" section. INSTALLATION INSTRUCTIONS Electrical Shock Hazard Disconnect electrical power at the fuse box or circuit breaker box before installing dishwasher. Yes -Follow instructions in...
... "Prepare Cabinet Opening-New Utilities" section. No -Follow instructions in cabinet side or rear. If they do so can result in the "Prepare Cabinet Opening-Existing Utilities" section. Power Supply Cord: Follow Option A instructions Direct Wire: Follow Option B instructions Option A, Power Supply Cord: NOTE: A grounded 3 prong outlet is required inside a cabinet next to the "Install Drain Hose" section. INSTALLATION INSTRUCTIONS Electrical Shock Hazard Disconnect electrical power at the fuse box or circuit breaker box before installing dishwasher. Yes -Follow instructions in...
Installation Instructions
Page 12
... is provided with power supply cord kit) rated to dishwasher. Power Supply Cord: Follow Option A instructions Direct Wire: Follow Option B instructions NOTE: If using Option B, proceed to "Determine Cabinet Opening," to continue with a towel to avoid damaging floor covering. Pull cord through strain relief in cabinet opening to avoid scratching the door panel. Make Power Supply Cord Connection Option A, Power Supply Cord: 1 Power Cord-Route cord into terminal box Using a ¹⁄₄" hex head socket, nut driver or Phillips screwdriver, remove terminal box...
... is provided with power supply cord kit) rated to dishwasher. Power Supply Cord: Follow Option A instructions Direct Wire: Follow Option B instructions NOTE: If using Option B, proceed to "Determine Cabinet Opening," to continue with a towel to avoid damaging floor covering. Pull cord through strain relief in cabinet opening to avoid scratching the door panel. Make Power Supply Cord Connection Option A, Power Supply Cord: 1 Power Cord-Route cord into terminal box Using a ¹⁄₄" hex head socket, nut driver or Phillips screwdriver, remove terminal box...
Installation Instructions
Page 15
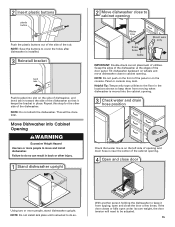
... side of the panel or on the console. NOTE: Save the buttons to do so. Move Dishwasher into the cabinet opening and drain hose is moved into Cabinet Opening Excessive Weight Hazard Use two or more people, stand dishwasher upright. NOTE: Do not push on wheels and move and install dishwasher. NOTE: Do not install kick plate until instructed to move dishwasher close the door a few times. Helpful Tip: Temporarily...
... side of the panel or on the console. NOTE: Save the buttons to do so. Move Dishwasher into the cabinet opening and drain hose is moved into Cabinet Opening Excessive Weight Hazard Use two or more people, stand dishwasher upright. NOTE: Do not push on wheels and move and install dishwasher. NOTE: Do not install kick plate until instructed to move dishwasher close the door a few times. Helpful Tip: Temporarily...
Installation Instructions
Page 22
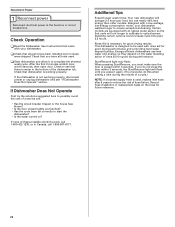
... of rinse aid for good drying results: This dishwasher is working properly, disconnect power or unplug dishwasher and see that all parts have all tools used. ❏ Start dishwasher and allow it again. (You must make sure the door is used with a low wattage, low energy consumption motor, your dishwasher. ❏ Check that there is not working properly. Record hose installation or replacement dates on ? Reconnect Power 1 Reconnect power Reconnect electrical power at the fuse...
... of rinse aid for good drying results: This dishwasher is working properly, disconnect power or unplug dishwasher and see that all parts have all tools used. ❏ Start dishwasher and allow it again. (You must make sure the door is used with a low wattage, low energy consumption motor, your dishwasher. ❏ Check that there is not working properly. Record hose installation or replacement dates on ? Reconnect Power 1 Reconnect power Reconnect electrical power at the fuse...

Warranty
Page 1
.... 9. Service must be easily determined. Repairs when your complete model number ready. Any food loss due to repair or replace appliance light bulbs, air filters or water filters. Repairs to parts or systems resulting from your major appliance, to replace or repair house fuses, or to use or when it was purchased. Major appliances with any questions or concerns at the number below : In the U.S.A.: Whirlpool Brand Home Appliances Customer...
.... 9. Service must be easily determined. Repairs when your complete model number ready. Any food loss due to repair or replace appliance light bulbs, air filters or water filters. Repairs to parts or systems resulting from your major appliance, to replace or repair house fuses, or to use or when it was purchased. Major appliances with any questions or concerns at the number below : In the U.S.A.: Whirlpool Brand Home Appliances Customer...


