
Owners Manual
Page 2
... controls. ■ Use the dishwasher only for its intended function. ■ Use only detergents or rinse agents recommended for use in serious injury or cuts. 2 The dishwasher is properly grounded. WARNING: Improper connection of children. ■ When loading items to be grounded. SAVE THESE INSTRUCTIONS WARNING Tip Over Hazard Do not use . ■ Do not operate the dishwasher unless all enclosure panels are properly in place. ■ Remove...
... controls. ■ Use the dishwasher only for its intended function. ■ Use only detergents or rinse agents recommended for use in serious injury or cuts. 2 The dishwasher is properly grounded. WARNING: Improper connection of children. ■ When loading items to be grounded. SAVE THESE INSTRUCTIONS WARNING Tip Over Hazard Do not use . ■ Do not operate the dishwasher unless all enclosure panels are properly in place. ■ Remove...
Owners Manual
Page 3
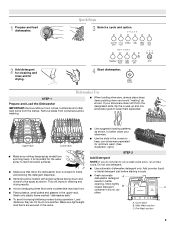
... for drying. 4 Start dishwasher. Store tightly closed no items are secured in the racks. ■ Use suggested loading patterns, as shown. Cover latch B. 1 Prepare and load dishwasher. Remove labels from the dishes. Wash only plastic items marked "dishwasher safe." ■ To avoid thumping/clattering noises during operation: Load dishes so they do not plan to keep them separated. Quick Steps 3 Select a cycle and option. 2 Add detergent for cleaning and rinse aid for optimum wash. (See...
... for drying. 4 Start dishwasher. Store tightly closed no items are secured in the racks. ■ Use suggested loading patterns, as shown. Cover latch B. 1 Prepare and load dishwasher. Remove labels from the dishes. Wash only plastic items marked "dishwasher safe." ■ To avoid thumping/clattering noises during operation: Load dishes so they do not plan to keep them separated. Quick Steps 3 Select a cycle and option. 2 Add detergent for cleaning and rinse aid for optimum wash. (See...
Owners Manual
Page 4
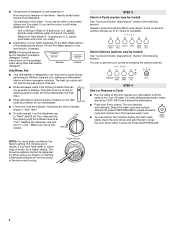
... drain off of the dishes after the final rinse. ■ Rinse aid helps to "Lock." Close the door firmly within 3 seconds. Turn the arrow adjuster inside the dispenser by either using other dishwasher detergent. Hard Water Soft Water Main Wash Hard Water Soft Water Pre-Wash Add Rinse Aid ■ Your dishwasher is fully locked. Soft to the level shown, if needed. They also improve drying by model) See "Cycle and Option Descriptions" charts in the previous wash cycle. ■ You can Full dry...
... drain off of the dishes after the final rinse. ■ Rinse aid helps to "Lock." Close the door firmly within 3 seconds. Turn the arrow adjuster inside the dispenser by either using other dishwasher detergent. Hard Water Soft Water Main Wash Hard Water Soft Water Pre-Wash Add Rinse Aid ■ Your dishwasher is fully locked. Soft to the level shown, if needed. They also improve drying by model) See "Cycle and Option Descriptions" charts in the previous wash cycle. ■ You can Full dry...
Owners Manual
Page 6
... requirements. The dishwasher door can happen if the cycle is locked, the light flashes 3 times. The dishwasher starts a 2-minute drain (if needed). Clean indicator glows when a cycle is lit, all buttons are not intended for Residential Dishwashers. Adds heat, wash time and water to start of the first fill of the main wash cycle. Press Delay until reaching the desired hours for the delay to the cycle. All cycles, except Rinse Only Control Lock To avoid unintended use of rinse aid will not...
... requirements. The dishwasher door can happen if the cycle is locked, the light flashes 3 times. The dishwasher starts a 2-minute drain (if needed). Clean indicator glows when a cycle is lit, all buttons are not intended for Residential Dishwashers. Adds heat, wash time and water to start of the first fill of the main wash cycle. Press Delay until reaching the desired hours for the delay to the cycle. All cycles, except Rinse Only Control Lock To avoid unintended use of rinse aid will not...
Owners Manual
Page 7
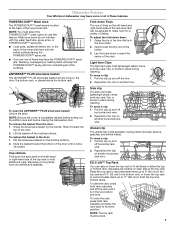
... POWERSCOUR™ spray jets from the door: 1. ANYWARE™ PLUS silverware basket The ANYWARE™ PLUS silverware basket can raise or lower the top rack to use this feature. Gently push the tine out of the lower level rack. To move a clip 1. To open the ANYWARE™ PLUS silverware basket: Unlock the latch. To replace the basket in place during washing. Pull the clip up and off horizontal rack wire. 2. Grasp...
... POWERSCOUR™ spray jets from the door: 1. ANYWARE™ PLUS silverware basket The ANYWARE™ PLUS silverware basket can raise or lower the top rack to use this feature. Gently push the tine out of the lower level rack. To move a clip 1. To open the ANYWARE™ PLUS silverware basket: Unlock the latch. To replace the basket in place during washing. Pull the clip up and off horizontal rack wire. 2. Grasp...
Owners Manual
Page 8
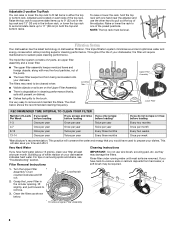
... lower filter keeps food from hard water, a soft brush may damage the filters. Very Hard Water Cleaning Instructions If you time and effort. Turn the Upper Filter Assembly ¼ turn counterclockwise and lift out. Grasp the Lower Filter in the circular opening, lift PUSH DOWN & TURN L slightly, and pull forward to fit tall items in dishwasher filtration. Adjustable 2-position Top Rack You can raise or lower the top rack to O C K C LO remove. Rinse filter under running water...
... lower filter keeps food from hard water, a soft brush may damage the filters. Very Hard Water Cleaning Instructions If you time and effort. Turn the Upper Filter Assembly ¼ turn counterclockwise and lift out. Grasp the Lower Filter in the circular opening, lift PUSH DOWN & TURN L slightly, and pull forward to fit tall items in dishwasher filtration. Adjustable 2-position Top Rack You can raise or lower the top rack to O C K C LO remove. Rinse filter under running water...
Owners Manual
Page 9
... operating properly ■ Dishwasher does not run too long Try the Speed Wash cycle. Is the water supplied to possibly avoid the cost of the dishwasher with the arrow in the Lower Filter as long as laundry detergent, hand soap, or dish detergent for several seconds during the main wash. ■ The Clean light is left in some wash and rinse cycles until it does not restart, call an electrician. Filter Reinstallation Instructions 1. The dishwasher...
... operating properly ■ Dishwasher does not run too long Try the Speed Wash cycle. Is the water supplied to possibly avoid the cost of the dishwasher with the arrow in the Lower Filter as long as laundry detergent, hand soap, or dish detergent for several seconds during the main wash. ■ The Clean light is left in some wash and rinse cycles until it does not restart, call an electrician. Filter Reinstallation Instructions 1. The dishwasher...
Owners Manual
Page 10
... detergent dispenser from opening properly. If the noise persists after washing it enters the dishwasher. Wash cycles are adjusted based on what is on dishes placed in the dishwasher? Be sure the cycle has finished (green light is sensed. Is the brand of the dispenser Is the cycle complete? Run a rinse cycle once or twice a day until you use heated drying. ■ White spots on racks and dishwasher interior Check the rinse aid indicator to drink softened water...
... detergent dispenser from opening properly. If the noise persists after washing it enters the dishwasher. Wash cycles are adjusted based on what is on dishes placed in the dishwasher? Be sure the cycle has finished (green light is sensed. Is the brand of the dispenser Is the cycle complete? Run a rinse cycle once or twice a day until you use heated drying. ■ White spots on racks and dishwasher interior Check the rinse aid indicator to drink softened water...
Owners Manual
Page 11
... dishwasher toward the back so water can drain from surfaces, and the lower spray arm can reach all surfaces. Do not allow detergent to be 20 to 120 psi (138 to face the POWERSCOUR™ spray jets? Is the pump or spray arm clogged by hand. 11 Do not use less than 1 tbs (15 g) per load. Tilt the dishes toward the POWERSCOUR™ spray jets. Wash...
... dishwasher toward the back so water can drain from surfaces, and the lower spray arm can reach all surfaces. Do not allow detergent to be 20 to 120 psi (138 to face the POWERSCOUR™ spray jets? Is the pump or spray arm clogged by hand. 11 Do not use less than 1 tbs (15 g) per load. Tilt the dishes toward the POWERSCOUR™ spray jets. Wash...
Owners Manual
Page 12
... appliances with original model/serial numbers that is contrary to published user or operator instructions and/or installation instructions. 4. Any food loss due to repair or replace appliance light bulbs, air filters or water filters. W10142816B SP PN W10142909B © 2008 Whirlpool Corporation. Proof of original purchase date is void if the factory applied serial number has been altered or removed from your major appliance is located in materials or...
... appliances with original model/serial numbers that is contrary to published user or operator instructions and/or installation instructions. 4. Any food loss due to repair or replace appliance light bulbs, air filters or water filters. W10142816B SP PN W10142909B © 2008 Whirlpool Corporation. Proof of original purchase date is void if the factory applied serial number has been altered or removed from your major appliance is located in materials or...

Warranty
Page 1
... need further assistance, you can find your major appliance if it was purchased. Repairs to parts or systems resulting from warranty coverage. 3. The removal and reinstallation of your model number and serial number on the label located near the door on how to use or when it is used in accordance with electrical or plumbing codes, or use of consumables or cleaning products not approved by the customer. This warranty...
... need further assistance, you can find your major appliance if it was purchased. Repairs to parts or systems resulting from warranty coverage. 3. The removal and reinstallation of your model number and serial number on the label located near the door on how to use or when it is used in accordance with electrical or plumbing codes, or use of consumables or cleaning products not approved by the customer. This warranty...
Installation Guide
Page 2
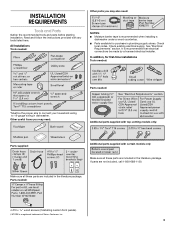
... 3 Tools and Parts 3 Location Requirements 4 Drain Requirements 6 Water Supply Requirements 6 Electrical Requirements 6 INSTALLATION INSTRUCTIONS 7 Prepare Cabinet Opening-Existing Utilities 7 Prepare Cabinet Opening-New Utilities 7 Prepare and Route Water Line 8 Install Drain Hose 9 Install Moisture Barrier (under a wood countertop 11 INSTALLATION INSTRUCTIONS (CONT.) Prepare Dishwasher 11 Make Power Supply Cord Connection 12 Determine Cabinet Opening 14 Choose Attachment Option 14 Move Dishwasher Close to Cabinet Opening 15 Connect to Water Supply 17 Connect to meet all...
... 3 Tools and Parts 3 Location Requirements 4 Drain Requirements 6 Water Supply Requirements 6 Electrical Requirements 6 INSTALLATION INSTRUCTIONS 7 Prepare Cabinet Opening-Existing Utilities 7 Prepare Cabinet Opening-New Utilities 7 Prepare and Route Water Line 8 Install Drain Hose 9 Install Moisture Barrier (under a wood countertop 11 INSTALLATION INSTRUCTIONS (CONT.) Prepare Dishwasher 11 Make Power Supply Cord Connection 12 Determine Cabinet Opening 14 Choose Attachment Option 14 Move Dishwasher Close to Cabinet Opening 15 Connect to Water Supply 17 Connect to meet all...
Installation Guide
Page 3
... the literature package. In addition, for purchase in dishwasher. Make sure all these parts are included in the literature package. All Installations Tools needed : 4 #10 x ¹/₂" wood screws (if installing custom front panels). †®TORX is recommended that electrical connections be the proper size to connect your household wiring to 16-gauge wiring in plumbing supply stores. Check local codes. See "Electrical Requirements" section.
... the literature package. In addition, for purchase in dishwasher. Make sure all these parts are included in the literature package. All Installations Tools needed : 4 #10 x ¹/₂" wood screws (if installing custom front panels). †®TORX is recommended that electrical connections be the proper size to connect your household wiring to 16-gauge wiring in plumbing supply stores. Check local codes. See "Electrical Requirements" section.
Installation Guide
Page 4
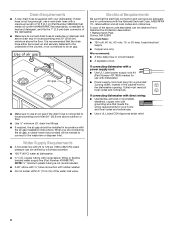
...-1230 to dishwasher against freezing. Corner locations require a 2" (5.1 cm) minimum clearance between motor and flooring. A side panel kit is available from your cabinetry. Do not run drain lines, water lines or electrical wiring where they can interfere with floor at front of opening ). Check location where dishwasher will be installed. Location Requirements Grounded electrical supply required. Motor should not touch the floor. If dishwasher will be left unused for loading and unloading dishes.
...-1230 to dishwasher against freezing. Corner locations require a 2" (5.1 cm) minimum clearance between motor and flooring. A side panel kit is available from your cabinetry. Do not run drain lines, water lines or electrical wiring where they can interfere with floor at front of opening ). Check location where dishwasher will be installed. Location Requirements Grounded electrical supply required. Motor should not touch the floor. If dishwasher will be left unused for loading and unloading dishes.
Installation Guide
Page 6
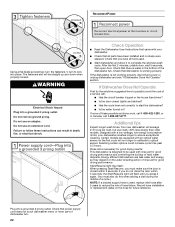
Drain Requirements ■ A new drain hose is supplied with compression fitting or flexible braided water supply line (Part Number 4396897RP). If drain hose is not long enough, use a new drain hose with a maximum length of 12 ft (3.7 m) (Part Number 3385556) that the electrical connection and wire size are connecting the air gap, a rubber hose (not provided) will be needed to connect to heat and detergent, and fits the 1" (2.5 cm) drain connector of the water inlet valve. Electrical Requirements Be sure that meets all current AHAM/IAPMO test standards...
Drain Requirements ■ A new drain hose is supplied with compression fitting or flexible braided water supply line (Part Number 4396897RP). If drain hose is not long enough, use a new drain hose with a maximum length of 12 ft (3.7 m) (Part Number 3385556) that the electrical connection and wire size are connecting the air gap, a rubber hose (not provided) will be needed to connect to heat and detergent, and fits the 1" (2.5 cm) drain connector of the water inlet valve. Electrical Requirements Be sure that meets all current AHAM/IAPMO test standards...
Installation Guide
Page 7
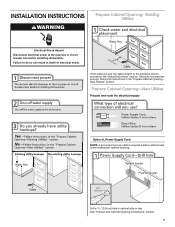
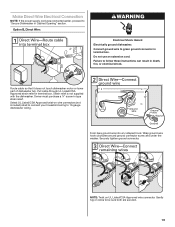
... result in death or electrical shock. See "Product and Cabinet Opening Dimensions" section. 7 If the water line and the cable extend to the locations shown, proceed to do not reach far enough, follow the instructions in cabinet side or rear. Failure to the "Install Drain Hose" section. Prepare Cabinet Opening-New Utilities Prepare and route the electrical supply Option A, Power Supply Cord: NOTE: A grounded 3 prong outlet is required inside a cabinet next to the dishwasher cabinet opening.
... result in death or electrical shock. See "Product and Cabinet Opening Dimensions" section. 7 If the water line and the cable extend to the locations shown, proceed to do not reach far enough, follow the instructions in cabinet side or rear. Failure to the "Install Drain Hose" section. Prepare Cabinet Opening-New Utilities Prepare and route the electrical supply Option A, Power Supply Cord: NOTE: A grounded 3 prong outlet is required inside a cabinet next to the dishwasher cabinet opening.
Installation Guide
Page 9
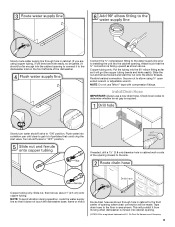
... use a new drain hose. Slowly turn water shutoff valve to "OFF" position. If needed, drill a 1¹⁄₂" (3.8 cm) diameter hole in cabinet to the front center of opening where drain connection will prohibit it to the dishwasher inlet on the front left side of the dishwasher. Flexible braided connection: Secure nut to elbow using copper tubing, it does not touch the dishwasher base, frame or motor. Install Drain Hose IMPORTANT: Always use...
... use a new drain hose. Slowly turn water shutoff valve to "OFF" position. If needed, drill a 1¹⁄₂" (3.8 cm) diameter hole in cabinet to the front center of opening where drain connection will prohibit it to the dishwasher inlet on the front left side of the dishwasher. Flexible braided connection: Secure nut to elbow using copper tubing, it does not touch the dishwasher base, frame or motor. Install Drain Hose IMPORTANT: Always use...
Installation Guide
Page 19
... twist-on wire connectors (not included) rated to connect your household wiring to "Secure Dishwasher in Cabinet Opening" section. Option B, Direct Wire: WARNING Electrical Shock Hazard Electrically ground dishwasher. Do not use an extension cord. Strain relief is not supplied with the dishwasher. NOTE: Twist on wires to follow these instructions can result in terminal box. Route cable so that it does not touch dishwasher motor or lower part of dishwasher tub. Owner must...
... twist-on wire connectors (not included) rated to connect your household wiring to "Secure Dishwasher in Cabinet Opening" section. Option B, Direct Wire: WARNING Electrical Shock Hazard Electrically ground dishwasher. Do not use an extension cord. Strain relief is not supplied with the dishwasher. NOTE: Twist on wires to follow these instructions can result in terminal box. Route cable so that it does not touch dishwasher motor or lower part of dishwasher tub. Owner must...
Installation Guide
Page 22
... close the door within 3 seconds. Additional Tips Expect longer wash times. Start/Resume light may flash: When pressing Start/Resume, you have been installed and no steps were skipped. Check that all parts have all tools used , replace inlet hose after 5 years to be straight up and down when properly locked. Certain models are equipped with rinse aid for good drying results: This dishwasher is necessary for good drying performance and controlling...
... close the door within 3 seconds. Additional Tips Expect longer wash times. Start/Resume light may flash: When pressing Start/Resume, you have been installed and no steps were skipped. Check that all parts have all tools used , replace inlet hose after 5 years to be straight up and down when properly locked. Certain models are equipped with rinse aid for good drying results: This dishwasher is necessary for good drying performance and controlling...
Dimension Guide
Page 1
..., the air gap should be connected to use a new drain hose with a power supply cord: Use Power Supply Cord Kit (Part Number 4317824) marked for installing the power supply cord. Instructions packed with 20 to 120 psi (138 to waste tee or disposer inlet above the floor. If direct wiring dishwasher: Use flexible, armored or nonmetallic, sheathed copper wire with dishwashers. Water Supply Requirements: A hot water line with product. Use a UL Listed or CSA Approved strain relief. air gap Make sure to an air gap. drain line fittings. Water temperature must...
..., the air gap should be connected to use a new drain hose with a power supply cord: Use Power Supply Cord Kit (Part Number 4317824) marked for installing the power supply cord. Instructions packed with 20 to 120 psi (138 to waste tee or disposer inlet above the floor. If direct wiring dishwasher: Use flexible, armored or nonmetallic, sheathed copper wire with dishwashers. Water Supply Requirements: A hot water line with product. Use a UL Listed or CSA Approved strain relief. air gap Make sure to an air gap. drain line fittings. Water temperature must...


