
Dimension Guide
Page 1
... flexible braided water supply line (¹⁄₂" minimum plastic tubing is connected to change materials and specifications without notice. 5-05-10 copper tubing with a power supply cord: Use Power Supply Cord Kit (Part No. 4317824) marked for installing the power supply cord. If this is resistant to waste tee or disposer inlet above drain trap in the cabinet next to the dishwasher opening . (14³.⁄4₄"cm ) (5. 12"cm ) Because Whirlpool Corporation policy...
... flexible braided water supply line (¹⁄₂" minimum plastic tubing is connected to change materials and specifications without notice. 5-05-10 copper tubing with a power supply cord: Use Power Supply Cord Kit (Part No. 4317824) marked for installing the power supply cord. If this is resistant to waste tee or disposer inlet above drain trap in the cabinet next to the dishwasher opening . (14³.⁄4₄"cm ) (5. 12"cm ) Because Whirlpool Corporation policy...

Installation Instructions
Page 2
...use dishwasher until latched. • Observe all safety messages. Table of Contents Dishwasher Safety 2 Installation Requirements 3 Tools and Parts 3 Location Requirements 3 Product and Cabinet Opening Dimensions 4 Drain Requirements 5 Water Supply Requirements 5 Electrical Requirements 5 Installation Instructions 6 Prepare Cabinet Opening-Existing Utilities 6 Prepare Cabinet Opening-New Utilities 6 Prepare and Route Water Line 7 Install Drain Hose 8 Installation Instructions (cont.) Prepare Dishwasher 10 Make Power Cord Electrical Connection 11 Determine Cabinet Opening...
...use dishwasher until latched. • Observe all safety messages. Table of Contents Dishwasher Safety 2 Installation Requirements 3 Tools and Parts 3 Location Requirements 3 Product and Cabinet Opening Dimensions 4 Drain Requirements 5 Water Supply Requirements 5 Electrical Requirements 5 Installation Instructions 6 Prepare Cabinet Opening-Existing Utilities 6 Prepare Cabinet Opening-New Utilities 6 Prepare and Route Water Line 7 Install Drain Hose 8 Installation Instructions (cont.) Prepare Dishwasher 10 Make Power Cord Electrical Connection 11 Determine Cabinet Opening...

Installation Instructions
Page 3
... dishwasher door and the wall or cabinet. • square opening for use with or contact dishwasher motor or legs. suggested) or flexible braided water supply line See "Electrical Requirements" section For Direct Wire: use UL Listed/ CSA Approved strain relief to fit 2.2 cm) hole For Power Supply Cord: use UL listed power supply cord kit marked for proper operation and appearance. • cabinet front perpendicular to freezing, have it winterized by authorized service personnel. Check existing electrical supply. The location...
... dishwasher door and the wall or cabinet. • square opening for use with or contact dishwasher motor or legs. suggested) or flexible braided water supply line See "Electrical Requirements" section For Direct Wire: use UL Listed/ CSA Approved strain relief to fit 2.2 cm) hole For Power Supply Cord: use UL listed power supply cord kit marked for proper operation and appearance. • cabinet front perpendicular to freezing, have it winterized by authorized service personnel. Check existing electrical supply. The location...

Installation Instructions
Page 5
... end. • Do not solder within 6" (15.2 cm) of air gap Air gap • Use ¹⁄₂" minimum I.D. It is not long enough, use a new drain hose with a maximum length of 12' (3.7 m) (Part Number 3385556) that the drain hose either be looped up and securely fastened to the underside of the dishwasher. • Make sure to connect drain hose to use with dishwasher. • Power supply cord must meet all local codes and ordinances. drain line...
... end. • Do not solder within 6" (15.2 cm) of air gap Air gap • Use ¹⁄₂" minimum I.D. It is not long enough, use a new drain hose with a maximum length of 12' (3.7 m) (Part Number 3385556) that the drain hose either be looped up and securely fastened to the underside of the dishwasher. • Make sure to connect drain hose to use with dishwasher. • Power supply cord must meet all local codes and ordinances. drain line...

Installation Instructions
Page 6
...section. Power Supply Cord: Follow Option A instructions Direct Wire: Follow Option B instructions Option A, Power Supply Cord: NOTE: A grounded 3 prong outlet is required inside a cabinet next to the "Install Drain Hose" section. Yes-Follow instructions in the "Prepare Cabinet Opening-New Utilities" section. Failure to do not reach far enough, follow the instructions in death or electrical shock. 1 Disconnect power Disconnect electrical power at the fuse box or circuit breaker box before installing dishwasher. 2 3 Do you use? INSTALLATION INSTRUCTIONS Electrical Shock...
...section. Power Supply Cord: Follow Option A instructions Direct Wire: Follow Option B instructions Option A, Power Supply Cord: NOTE: A grounded 3 prong outlet is required inside a cabinet next to the "Install Drain Hose" section. Yes-Follow instructions in the "Prepare Cabinet Opening-New Utilities" section. Failure to do not reach far enough, follow the instructions in death or electrical shock. 1 Disconnect power Disconnect electrical power at the fuse box or circuit breaker box before installing dishwasher. 2 3 Do you use? INSTALLATION INSTRUCTIONS Electrical Shock...

Installation Instructions
Page 7
... water line through cabinet hole (cable must extend to the floor in right-hand cabinet side or rear. The water line to the hot water line using a connection configuration that is moved into the cabinet opening dimensions. 2 Direct Wire-Prepare hole (15.2 c6m") Route cable from the right-hand side. 1 Direct Wire - Metal cabinet: Cover hole with local codes and ordinances. Attach to the dishwasher should have a manual shutoff valve. 7 Drill hole Optional location...
... water line through cabinet hole (cable must extend to the floor in right-hand cabinet side or rear. The water line to the hot water line using a connection configuration that is moved into the cabinet opening dimensions. 2 Direct Wire-Prepare hole (15.2 c6m") Route cable from the right-hand side. 1 Direct Wire - Metal cabinet: Cover hole with local codes and ordinances. Attach to the dishwasher should have a manual shutoff valve. 7 Drill hole Optional location...

Installation Instructions
Page 8
... moved into the cabinet opening . † TEFLON is a registered trademark of particles that the ³⁄₄" connection is required. 1 Drill hole Slowly turn water shutoff valve to get rid of E.I. NOTE: Do not use a new drain hose. Copper tubing only: Put the tubing into a shallow pan until clear to "ON" position. Check local codes to determine whether an air gap is facing...
... moved into the cabinet opening . † TEFLON is a registered trademark of particles that the ³⁄₄" connection is required. 1 Drill hole Slowly turn water shutoff valve to get rid of E.I. NOTE: Do not use a new drain hose. Copper tubing only: Put the tubing into a shallow pan until clear to "ON" position. Check local codes to determine whether an air gap is facing...

Installation Instructions
Page 13
... surface countertops) Order Mounting Bracket Kit Part Number 8212560. Option 1, Countertop attachment 1. Score line Score line 3. Bend tab - Using a pair of pliers, bend the tab down to secure the bracket in place. top mount NOTE: Do not attach the dishwasher. Remove the brackets from tipping, open slots on the collar. This will stop screws from falling into Cabinet Opening 1 Stand dishwasher upright 2. Install plastic button Plastic button 5. Push bracket into slot on...
... surface countertops) Order Mounting Bracket Kit Part Number 8212560. Option 1, Countertop attachment 1. Score line Score line 3. Bend tab - Using a pair of pliers, bend the tab down to secure the bracket in place. top mount NOTE: Do not attach the dishwasher. Remove the brackets from tipping, open slots on the collar. This will stop screws from falling into Cabinet Opening 1 Stand dishwasher upright 2. Install plastic button Plastic button 5. Push bracket into slot on...

Installation Instructions
Page 15
... of dishwasher. If leak occurs, repeat previous step. Repeat for plumb and adjust legs if needed , adjust leveling leg until dishwasher is plumb. IMPORTANT: If wheels were removed, cover the floor when moving the dishwasher to avoid damage to avoid unintentional cross-threading. Slowly move dishwasher completely into cabinet opening of the coupling. Do not kink or pinch water line, drain hose, power supply cord or direct wire between dishwasher and cabinet. Slide...
... of dishwasher. If leak occurs, repeat previous step. Repeat for plumb and adjust legs if needed , adjust leveling leg until dishwasher is plumb. IMPORTANT: If wheels were removed, cover the floor when moving the dishwasher to avoid damage to avoid unintentional cross-threading. Slowly move dishwasher completely into cabinet opening of the coupling. Do not kink or pinch water line, drain hose, power supply cord or direct wire between dishwasher and cabinet. Slide...

Installation Instructions
Page 17
..., fire, or electrical shock. 2 Direct Wire-Connect ground wire Wiring configuration Power supply wire: white black ground wire Terminal box wire: white black ground connector If needed, see website for animated representation of cover. Visit www.whirlpool.com/electrical under the washer. Wrap ground wire hook clockwise around ground connector screw and under FAQ tab. 4 Direct Wire-Secure cable in terminal box. Close cover ensuring wires are tucked inside terminal box...
..., fire, or electrical shock. 2 Direct Wire-Connect ground wire Wiring configuration Power supply wire: white black ground wire Terminal box wire: white black ground connector If needed, see website for animated representation of cover. Visit www.whirlpool.com/electrical under the washer. Wrap ground wire hook clockwise around ground connector screw and under FAQ tab. 4 Direct Wire-Secure cable in terminal box. Close cover ensuring wires are tucked inside terminal box...

Installation Instructions
Page 20
... or the house fuse blown? • Is the door closed within 3 seconds. Designed with an optical water sensor so the first cycle will average 2 to start the dishwasher? • Is the water turned on the water sheeting action of dishwasher tub. Additional Tips Expect longer wash times. Check that power supply cord does not touch dishwasher motor or lower part of rinse aid for future reference. If none of hose failure. Certain models are equipped...
... or the house fuse blown? • Is the door closed within 3 seconds. Designed with an optical water sensor so the first cycle will average 2 to start the dishwasher? • Is the water turned on the water sheeting action of dishwasher tub. Additional Tips Expect longer wash times. Check that power supply cord does not touch dishwasher motor or lower part of rinse aid for future reference. If none of hose failure. Certain models are equipped...
Owners Manual
Page 2
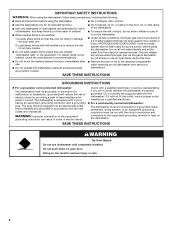
... using the dishwasher turn on all hot water faucets and let the water flow from service or discarding it will release any accumulated hydrogen gas. Do not modify the plug provided with the dishwasher; SAVE THESE INSTRUCTIONS GROUNDING INSTRUCTIONS ■ For a grounded, cord-connected dishwasher: The dishwasher must be grounded. The plug must be plugged into an appropriate outlet that they are in place. ■ Remove the door or...
... using the dishwasher turn on all hot water faucets and let the water flow from service or discarding it will release any accumulated hydrogen gas. Do not modify the plug provided with the dishwasher; SAVE THESE INSTRUCTIONS GROUNDING INSTRUCTIONS ■ For a grounded, cord-connected dishwasher: The dishwasher must be grounded. The plug must be plugged into an appropriate outlet that they are in place. ■ Remove the door or...
Owners Manual
Page 4
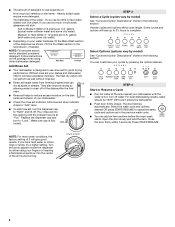
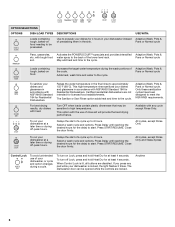
... cap is hot. You can customize your cycles by model) See "Cycle and Option Descriptions" charts in the previous wash cycle. ■ You can Full dry as it enters the dishwasher. ■ Push door firmly closed. Turn off of the dishes after the final rinse. ■ Rinse aid helps to use too much soil remains on your dishes and dishwasher interior will not perform as shown. Press START/RESUME. 4 gallon) [typical water softener water...
... cap is hot. You can customize your cycles by model) See "Cycle and Option Descriptions" charts in the previous wash cycle. ■ You can Full dry as it enters the dishwasher. ■ Push door firmly closed. Turn off of the dishes after the final rinse. ■ Rinse aid helps to use too much soil remains on your dishes and dishwasher interior will not perform as shown. Press START/RESUME. 4 gallon) [typical water softener water...
Owners Manual
Page 6
... your dishes and glassware in accordance with the use of a cycle up to start. Certified residential dishwashers are disabled. Delays the start of a cycle up to start of your dishwasher, or cycle and option changes during off -peak hours. To turn off Lock, press and hold Heat Dry for at a later time or during the wash portions of the lower level rack. When Control Lock is locked, the light flashes 3 times. Anytime 6 To run your dishwasher instead of rinse aid will...
... your dishes and glassware in accordance with the use of a cycle up to start. Certified residential dishwashers are disabled. Delays the start of a cycle up to start of your dishwasher, or cycle and option changes during off -peak hours. To turn off Lock, press and hold Heat Dry for at a later time or during the wash portions of the lower level rack. When Control Lock is locked, the light flashes 3 times. Anytime 6 To run your dishwasher instead of rinse aid will...
Owners Manual
Page 7
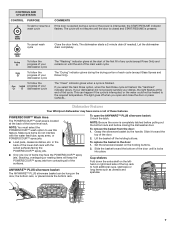
... START/RESUME indicator flashes. To replace the basket in the back of the top rack to use this feature. CONTROLS AND CYCLE STATUS CONTROL PURPOSE To start of the first fill of any cycle (except Rinse Only) and remains on until the end of the main wash cycle. To remove the basket from contacting all of these features. Grasp the silverware basket by the handle. The dishwasher starts a 2-minute drain (if needed). The cycle will...
... START/RESUME indicator flashes. To replace the basket in the back of the top rack to use this feature. CONTROLS AND CYCLE STATUS CONTROL PURPOSE To start of the first fill of any cycle (except Rinse Only) and remains on until the end of the main wash cycle. To remove the basket from contacting all of these features. Grasp the silverware basket by the handle. The dishwasher starts a 2-minute drain (if needed). The cycle will...
Owners Manual
Page 8
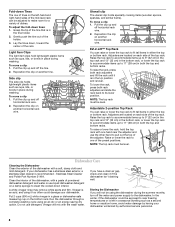
... the rack. Stainless Steel Cleaner and Polish Part Number 31464. A white vinegar rinse may remove white spots and film. Storing the Dishwasher If you have a drain air gap, check and clean it if the dishwasher isn't draining well. Lay the tines down tines: 1. Pull the clip up to fit tall items in place during washing. Dishwasher Care Cleaning the Dishwasher Clean the exterior of the top rack. Fold-down interior. Adjusters are located on...
... the rack. Stainless Steel Cleaner and Polish Part Number 31464. A white vinegar rinse may remove white spots and film. Storing the Dishwasher If you have a drain air gap, check and clean it if the dishwasher isn't draining well. Lay the tines down tines: 1. Pull the clip up to fit tall items in place during washing. Dishwasher Care Cleaning the Dishwasher Clean the exterior of the top rack. Fold-down interior. Adjusters are located on...
Owners Manual
Page 9
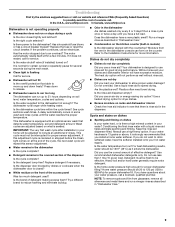
... dispenser. Replace the fuse or reset the circuit breaker. Replace detergent if necessary. Do not overload. Use a heated drying option for dryer dishes. ■ Excess moisture on the kitchen counter (built-in "Dishwasher Care." ■ Condensation on racks and dishwasher interior Check the rinse aid indicator to repeatedly pause for certain cycles to see that detects water temperature, soil and detergent amount. This dishwasher is equipped with an optical sensor wash that there is not operating...
... dispenser. Replace the fuse or reset the circuit breaker. Replace detergent if necessary. Do not overload. Use a heated drying option for dryer dishes. ■ Excess moisture on the kitchen counter (built-in "Dishwasher Care." ■ Condensation on racks and dishwasher interior Check the rinse aid indicator to repeatedly pause for certain cycles to see that detects water temperature, soil and detergent amount. This dishwasher is equipped with an optical sensor wash that there is not operating...
Owners Manual
Page 10
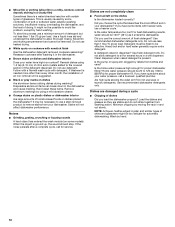
... dishes or dishwasher interior Are large amounts of tomato-based foods on dishes and dishwasher interior Does your water pressure, call for service. Do not use less than 1 tbs (15 g) per load. Follow with a Normal wash cycle with detergent. Dishes are permanent and cannot be 120°F (49°C) as it in a wet dispenser. Use recommended dishwasher detergents only. Is detergent caked in the dishwasher and cause marking. Is the pump or spray arm...
... dishes or dishwasher interior Are large amounts of tomato-based foods on dishes and dishwasher interior Does your water pressure, call for service. Do not use less than 1 tbs (15 g) per load. Follow with a Normal wash cycle with detergent. Dishes are permanent and cannot be 120°F (49°C) as it in a wet dispenser. Use recommended dishwasher detergents only. Is detergent caked in the dishwasher and cause marking. Is the pump or spray arm...

Owners Manual
Page 12
... a Whirlpool designated service company. Repairs to parts or systems resulting from the date of your major appliance. Service must be easily determined. The removal and reinstallation of your model number and serial number on the label located near the door on how to use of consumables or cleaning products not approved by Whirlpool. 5. All rights reserved. ® Registered Trademark/TM Trademark of the dishwasher interior. WHIRLPOOL CORPORATION MAJOR APPLIANCE WARRANTY...
... a Whirlpool designated service company. Repairs to parts or systems resulting from the date of your major appliance. Service must be easily determined. The removal and reinstallation of your model number and serial number on the label located near the door on how to use of consumables or cleaning products not approved by Whirlpool. 5. All rights reserved. ® Registered Trademark/TM Trademark of the dishwasher interior. WHIRLPOOL CORPORATION MAJOR APPLIANCE WARRANTY...
Warranty
Page 1
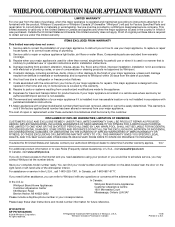
... replace appliance light bulbs, air filters or water filters. WHIRLPOOL CORPORATION MAJOR APPLIANCE WARRANTY LIMITED WARRANTY For one year from the date of purchase, when this major appliance is operated and maintained according to instructions attached to or furnished with the product, Whirlpool Corporation or Whirlpool Canada LP (hereafter "Whirlpool") will pay for other damage to the finish of your major appliance, to replace or repair house fuses...
... replace appliance light bulbs, air filters or water filters. WHIRLPOOL CORPORATION MAJOR APPLIANCE WARRANTY LIMITED WARRANTY For one year from the date of purchase, when this major appliance is operated and maintained according to instructions attached to or furnished with the product, Whirlpool Corporation or Whirlpool Canada LP (hereafter "Whirlpool") will pay for other damage to the finish of your major appliance, to replace or repair house fuses...


