User Instructions
Page 1
... REFRIGERATOR SAFETY 1 INSTALLATION INSTRUCTIONS 2 SÉCURITÉ DU RÉFRIGÉRATEUR 17 INSTRUCTIONS D'INSTALLATION 18 REFRIGERATOR USE 5 UTILISATION DU RÉFRIGÉRATEUR 21 REFRIGERATOR CARE 10 TROUBLESHOOTING 11 ENTRETIEN DU RÉFRIGÉRATEUR 26 DÉPANNAGE 27 ACCESSORIES 13 ACCESSOIRES 29 WATER FILTER CERTIFICATIONS 13 FEUILLES DE DONNÉES SUR LA PERFORMANCE 30 PERFORMANCE DATA SHEETS 14 GARANTIE 32 WARRANTY...
... REFRIGERATOR SAFETY 1 INSTALLATION INSTRUCTIONS 2 SÉCURITÉ DU RÉFRIGÉRATEUR 17 INSTRUCTIONS D'INSTALLATION 18 REFRIGERATOR USE 5 UTILISATION DU RÉFRIGÉRATEUR 21 REFRIGERATOR CARE 10 TROUBLESHOOTING 11 ENTRETIEN DU RÉFRIGÉRATEUR 26 DÉPANNAGE 27 ACCESSORIES 13 ACCESSOIRES 29 WATER FILTER CERTIFICATIONS 13 FEUILLES DE DONNÉES SUR LA PERFORMANCE 30 PERFORMANCE DATA SHEETS 14 GARANTIE 32 WARRANTY...
User Instructions
Page 2
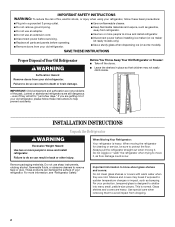
... getting rid of your old refrigerator, please follow these instructions to help prevent accidents. Do not use an extension cord. ■ Disconnect power before servicing. ■ Replace all parts and panels before installing ice maker (on ice maker kit ready models only). ■ Use a sturdy glass when dispensing ice (on some models). This is heavy. Use special care when removing them to know about glass shelves and covers: Do not clean glass shelves or covers with warm water when they will sit for cleaning...
... getting rid of your old refrigerator, please follow these instructions to help prevent accidents. Do not use an extension cord. ■ Disconnect power before servicing. ■ Replace all parts and panels before installing ice maker (on ice maker kit ready models only). ■ Use a sturdy glass when dispensing ice (on some models). This is heavy. Use special care when removing them to know about glass shelves and covers: Do not clean glass shelves or covers with warm water when they will sit for cleaning...
User Instructions
Page 3
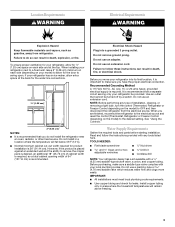
... installation, cleaning, or removing a light bulb, turn the control (Thermostat, Refrigerator or Freezer Control depending on the model) to swing open. Electrical Shock Hazard Plug into its final location, it is required. Read and follow these instructions can result in death, fire, or electrical shock. TOOLS NEEDED: ■ Flat-blade screwdriver Nut driver and ¹⁄₂" Open-end or two adjustable wrenches Drill bit ■ Cordless drill NOTE: Your refrigerator dealer has a kit...
... installation, cleaning, or removing a light bulb, turn the control (Thermostat, Refrigerator or Freezer Control depending on the model) to swing open. Electrical Shock Hazard Plug into its final location, it is required. Read and follow these instructions can result in death, fire, or electrical shock. TOOLS NEEDED: ■ Flat-blade screwdriver Nut driver and ¹⁄₂" Open-end or two adjustable wrenches Drill bit ■ Cordless drill NOTE: Your refrigerator dealer has a kit...
User Instructions
Page 4
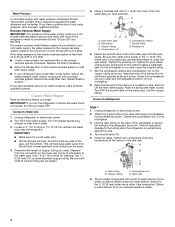
... tubing. Using a cordless drill, drill a ¹⁄₄" (6.35 mm) hole in the reverse osmosis system is required to the cold water pipe with a reverse osmosis system. Coil the copper tubing. Copper tubing C. Measure from the connection on the water pipe. Fasten the shutoff valve to operate the water dispenser and ice maker. Tighten the packing nut. Do not overtighten. 3. Valve inlet 6. IMPORTANT: If you turn the refrigerator on...
... tubing. Using a cordless drill, drill a ¹⁄₄" (6.35 mm) hole in the reverse osmosis system is required to the cold water pipe with a reverse osmosis system. Coil the copper tubing. Copper tubing C. Measure from the connection on the water pipe. Fasten the shutoff valve to operate the water dispenser and ice maker. Tighten the packing nut. Do not overtighten. 3. Valve inlet 6. IMPORTANT: If you turn the refrigerator on...

User Instructions
Page 5
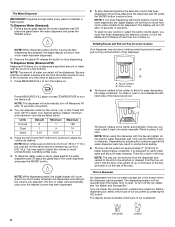
... dispenser panel. Household water line 4. Tighten any nuts or connections (including connections at exactly the same time. Style 3 1. Remove and discard the black nylon plug from the gray water tube on the rear of the refrigerator. 3. Failure to follow these instructions can result in order to connect the water tubing to press both buttons at the valve) that leak. REFRIGERATOR USE Using the Controls Temperature Control Adjustment and Cooling On/Off The refrigerator and freezer control buttons are still set to turn cooling...
... dispenser panel. Household water line 4. Tighten any nuts or connections (including connections at exactly the same time. Style 3 1. Remove and discard the black nylon plug from the gray water tube on the rear of the refrigerator. 3. Failure to follow these instructions can result in order to connect the water tubing to press both buttons at the valve) that leak. REFRIGERATOR USE Using the Controls Temperature Control Adjustment and Cooling On/Off The refrigerator and freezer control buttons are still set to turn cooling...

User Instructions
Page 6
...not change the applicable settings. CONDITION: REFRIGERATOR too cold REFRIGERATOR too warm FREEZER too cold FREEZER too warm/too little ice TEMPERATURE ADJUSTMENT: REFRIGERATOR Setting 1° higher REFRIGERATOR Setting 1° lower FREEZER Setting 1° higher FREEZER Setting 1° lower Press TEMPERATURE to raise the set points. NOTE: To view Celsius temperatures, press the FILTER button when adjust mode is activated, the ICE and LIGHT buttons adjust the freezer compartment temperature. Additional Features NOTE: The display screen on the dispenser control panel...
...not change the applicable settings. CONDITION: REFRIGERATOR too cold REFRIGERATOR too warm FREEZER too cold FREEZER too warm/too little ice TEMPERATURE ADJUSTMENT: REFRIGERATOR Setting 1° higher REFRIGERATOR Setting 1° lower FREEZER Setting 1° higher FREEZER Setting 1° lower Press TEMPERATURE to raise the set points. NOTE: To view Celsius temperatures, press the FILTER button when adjust mode is activated, the ICE and LIGHT buttons adjust the freezer compartment temperature. Additional Features NOTE: The display screen on the dispenser control panel...

User Instructions
Page 7
... control buttons will repeat every 2 minutes. IMPORTANT: To avoid unintentionally locking the dispenser or changing other settings, be adjusted to avoid "spot" freezing and can rack are not associated with regulating the temperature inside the pan is operating. Crisper Humidity Control (on , 5 seconds off . Chilled Door Bin Control The chilled door bin control is located on some models) The control can control the amount of ice produced. ■ The display screen on . NOTES: ■ The dispensing...
... control buttons will repeat every 2 minutes. IMPORTANT: To avoid unintentionally locking the dispenser or changing other settings, be adjusted to avoid "spot" freezing and can rack are not associated with regulating the temperature inside the pan is operating. Crisper Humidity Control (on , 5 seconds off . Chilled Door Bin Control The chilled door bin control is located on some models) The control can control the amount of ice produced. ■ The display screen on . NOTES: ■ The dispensing...
User Instructions
Page 8
..., or liter. There is no drain in the freezer when the dispenser pad is selected. Before dispensing ice, select which type of water with the faucet rotated, do not use the WATER button to adjust the volume as shown. Remove the glass OR release the button to adjust your desired setting. Press the LOCK and FAST ICE/COOL buttons to dispense. NOTE: While dispensing water, the digital display will continue to show how...
..., or liter. There is no drain in the freezer when the dispenser pad is selected. Before dispensing ice, select which type of water with the faucet rotated, do not use the WATER button to adjust the volume as shown. Remove the glass OR release the button to adjust your desired setting. Press the LOCK and FAST ICE/COOL buttons to dispense. NOTE: While dispensing water, the digital display will continue to show how...
User Instructions
Page 9
...; The quality of your ice will not make noise for a few ounces of crushed ice will automatically adjust to select DIM mode. Removing and Replacing Ice Storage Bin 1. Replace the storage bin on top of or in the ON (left wall of the freezer stops the ice maker from the pad or releasing the button. Noise from crushed to the dispenser light. It simply deactivates the dispenser controls and levers. Pressing hard will...
...; The quality of your ice will not make noise for a few ounces of crushed ice will automatically adjust to select DIM mode. Removing and Replacing Ice Storage Bin 1. Replace the storage bin on top of or in the ON (left wall of the freezer stops the ice maker from the pad or releasing the button. Noise from crushed to the dispenser light. It simply deactivates the dispenser controls and levers. Pressing hard will...
User Instructions
Page 10
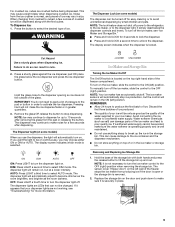
... your water dispenser or ice maker decreases noticeably, change the water filter cartridge. Be sure the O-rings are still in normal home operating environments. See "Water and Ice Dispensers." Unplug refrigerator or disconnect power. 2. There is part of unknown quality without a filter. Replace light shield when applicable. 5. Both the refrigerator and freezer sections defrost automatically. Water Filtration System Do not use with water that can not be changed. ■ All other lights require a 40-watt bulb. 1. After changing the water filter, reset...
... your water dispenser or ice maker decreases noticeably, change the water filter cartridge. Be sure the O-rings are still in normal home operating environments. See "Water and Ice Dispensers." Unplug refrigerator or disconnect power. 2. There is part of unknown quality without a filter. Replace light shield when applicable. 5. Both the refrigerator and freezer sections defrost automatically. Water Filtration System Do not use with water that can not be changed. ■ All other lights require a 40-watt bulb. 1. After changing the water filter, reset...
User Instructions
Page 11
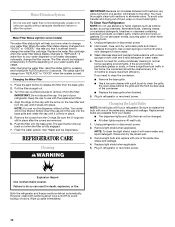
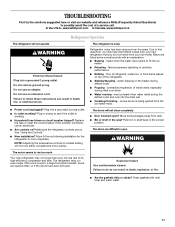
.... heard when the water valve opens to coldest setting will not cool either compartment more quickly. may run longer than your old model. The refrigerator may be heard when water melts during defrost cycle ■ Popping - NOTE: Adjusting the temperature controls to fill the ice maker ■ Pulsating - Explosion Hazard Use nonflammable cleaner. Do not use an adapter. Plug in a lamp to its high-efficiency compressor and fans. Move food...
.... heard when the water valve opens to coldest setting will not cool either compartment more quickly. may run longer than your old model. The refrigerator may be heard when water melts during defrost cycle ■ Popping - NOTE: Adjusting the temperature controls to fill the ice maker ■ Pulsating - Explosion Hazard Use nonflammable cleaner. Do not use an adapter. Plug in a lamp to its high-efficiency compressor and fans. Move food...

User Instructions
Page 12
... Hazard Use a sturdy glass when dispensing ice. Temperature and Moisture Temperature is firmly in the water? Minimize door openings and keep doors fully closed completely? See "Using the Controls." Straighten the water source line. ■ Ice maker turned on model) is in the socket or burned out? See "Water Supply Requirements." ■ Questions remain regarding water pressure? Discard ice. Wash ice bin. Be sure the ice bin is too warm ■ New installation? Adjust the controls a setting colder. Make sure wire shutoff arm or switch...
... Hazard Use a sturdy glass when dispensing ice. Temperature and Moisture Temperature is firmly in the water? Minimize door openings and keep doors fully closed completely? See "Using the Controls." Straighten the water source line. ■ Ice maker turned on model) is in the socket or burned out? See "Water Supply Requirements." ■ Questions remain regarding water pressure? Discard ice. Wash ice bin. Be sure the ice bin is too warm ■ New installation? Adjust the controls a setting colder. Make sure wire shutoff arm or switch...
User Instructions
Page 13
... part number listed below or contact your cold water supply? See "Water Supply Requirements." Hold the glass under the dispenser long enough? See "Prepare the Water System" or "Water and Ice Dispensers." ■ Recently changed water filter? See "Water Supply Requirements" in the home water source line? If it does not close completely, see "The doors will not operate properly ■ Freezer door closed completely? See "Water Supply Requirements." ■ Kink in either the Installation Instructions or the Use and Care Guide...
... part number listed below or contact your cold water supply? See "Water Supply Requirements." Hold the glass under the dispenser long enough? See "Prepare the Water System" or "Water and Ice Dispensers." ■ Recently changed water filter? See "Water Supply Requirements" in the home water source line? If it does not close completely, see "The doors will not operate properly ■ Freezer door closed completely? See "Water Supply Requirements." ■ Kink in either the Installation Instructions or the Use and Care Guide...

User Instructions
Page 14
... conditions, actual performance may vary. *Class II particle size: 1 um to the "Warranty" section for the Manufacturer's limited warranty. Temp. = 68°F to 71.6°F (20°C to "ORDER," order a new filter. When the filter indicator light changes from "GOOD" to 22°C). ■ It is for cold water use only. ■ Do not use replacement cartridge T2RFWG2, part #4396841B. 2008 suggested retail price of $39.99...
... conditions, actual performance may vary. *Class II particle size: 1 um to the "Warranty" section for the Manufacturer's limited warranty. Temp. = 68°F to 71.6°F (20°C to "ORDER," order a new filter. When the filter indicator light changes from "GOOD" to 22°C). ■ It is for cold water use only. ■ Do not use replacement cartridge T2RFWG2, part #4396841B. 2008 suggested retail price of $39.99...

User Instructions
Page 15
... to the permissible limit for water leaving the system, as advertised. ■ Use replacement cartridge T2RFWG2, part #4396841. When the filter indicator light changes from yellow to red, it is essential that you replace the filter. Model T1WG2L: Style 1 - The concentration of Chlorine Taste and Odor, Particulate Class II*; Flow = 0.5 gpm (1.9 Lpm). Application Guidelines/Water Supply Parameters Water Supply Water Pressure Water Temperature Service Flow Rate City or Well 30 - 120...
... to the permissible limit for water leaving the system, as advertised. ■ Use replacement cartridge T2RFWG2, part #4396841. When the filter indicator light changes from yellow to red, it is essential that you replace the filter. Model T1WG2L: Style 1 - The concentration of Chlorine Taste and Odor, Particulate Class II*; Flow = 0.5 gpm (1.9 Lpm). Application Guidelines/Water Supply Parameters Water Supply Water Pressure Water Temperature Service Flow Rate City or Well 30 - 120...
User Instructions
Page 16
... user or operator instructions and/or installation instructions. 4. Outside the 50 United States and Canada, this User Instructions and model number information for Factory Specified Parts and repair labor to parts or systems resulting from warranty coverage. 3. Proof of original purchase date is reported to Whirlpool within 30 days from the date of repair or replacement under this warranty. 8. Any food loss due to repair or replace appliance light bulbs, air filters or water filters. Repairs...
... user or operator instructions and/or installation instructions. 4. Outside the 50 United States and Canada, this User Instructions and model number information for Factory Specified Parts and repair labor to parts or systems resulting from warranty coverage. 3. Proof of original purchase date is reported to Whirlpool within 30 days from the date of repair or replacement under this warranty. 8. Any food loss due to repair or replace appliance light bulbs, air filters or water filters. Repairs...
Parts Diagram
Page 2
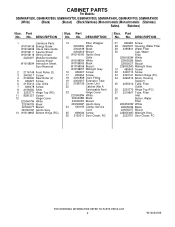
... Screw 33 2303141 Bottom Hinge (FC) 34 2260519 Block, Housing Support 35 2255012 Tube, Filter Outlet 36 2203770 Hinge Top (FC) 37 2319867 Tube, Filter Inlet 38 Button, Water Filter 2260503W White 2260503B Black 2260503T Biscuit 2260503MG Midnight Grey 39 2223751 Door Closer, FC 2 W10204189 No. Part No. No. DESCRIPTION 1 Literature Parts W10194138 Energy Guide W10162458 Use & Care Guide W10156111 Service Sheet W10156118 Wiring Sheet 2220407 Modular Icemaker Service Sheet W10168294 Instruction Sheet, Door Removal 2 2174748 Front Roller (2) 3 3400517...
... Screw 33 2303141 Bottom Hinge (FC) 34 2260519 Block, Housing Support 35 2255012 Tube, Filter Outlet 36 2203770 Hinge Top (FC) 37 2319867 Tube, Filter Inlet 38 Button, Water Filter 2260503W White 2260503B Black 2260503T Biscuit 2260503MG Midnight Grey 39 2223751 Door Closer, FC 2 W10204189 No. Part No. No. DESCRIPTION 1 Literature Parts W10194138 Energy Guide W10162458 Use & Care Guide W10156111 Service Sheet W10156118 Wiring Sheet 2220407 Modular Icemaker Service Sheet W10168294 Instruction Sheet, Door Removal 2 2174748 Front Roller (2) 3 3400517...

Parts Diagram
Page 10
...DOOR PARTS For Models: GS6NHAXVQ00, GS6NHAXVB00, GS6NHAXVT00, GS6NHAXVS00, GS6NHAXVA00, GS6NHAXVY00, GS6NHAXVK00 (White) (Black) (Biscuit) (Black/Stainless) (Monochromatic (Monochromatic (Stainless) Satina) Stainless) Illus. No. DESCRIPTION 1 Refrigerator Door (Includes Item #6) W10167185 White W10167186 Black W10169212 Biscuit W10167187 Stainless W10169214 Mono Satina W10169213 Mono Stainless 2 2255421 Dairy Door 3 2223464K Mat, Bin (2) 4 3400012 Screw 5 W10129563 Screw 6 Door Gasket, Magnetic 2221302 Mist 2221313 Black 2326338 Apollo Grey 7 2156022 Trivet 8 Handle...
...DOOR PARTS For Models: GS6NHAXVQ00, GS6NHAXVB00, GS6NHAXVT00, GS6NHAXVS00, GS6NHAXVA00, GS6NHAXVY00, GS6NHAXVK00 (White) (Black) (Biscuit) (Black/Stainless) (Monochromatic (Monochromatic (Stainless) Satina) Stainless) Illus. No. DESCRIPTION 1 Refrigerator Door (Includes Item #6) W10167185 White W10167186 Black W10169212 Biscuit W10167187 Stainless W10169214 Mono Satina W10169213 Mono Stainless 2 2255421 Dairy Door 3 2223464K Mat, Bin (2) 4 3400012 Screw 5 W10129563 Screw 6 Door Gasket, Magnetic 2221302 Mist 2221313 Black 2326338 Apollo Grey 7 2156022 Trivet 8 Handle...
Parts Diagram
Page 14
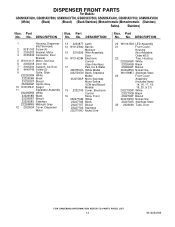
..., Door Bracket 5 W1014111 Motor, Ice Door 6 2305258 Door, Ice 7 2305204 Support, Ice Door 8 4449745 Screw (2) 9 Grille, Slide 2322626W White 2322626B Black 2322626T Biscuit 2322626AP Apollo Grey 10 W10187441 Spigot 11 Separator Assembly 2322658W White 2322658B Black 2322658T Biscuit 2322658S Stainless 2322658MG Midnight Grey 12 2323634 Cover, Dispenser Motor 13 2223877 Latch 14 W10127842 Barrier, Moisture 15 2310399 Wire Assembly, Door 16 W10142384 Electronic Control (User Interface) 17 Pad, Ice & Water 2322750CG...
..., Door Bracket 5 W1014111 Motor, Ice Door 6 2305258 Door, Ice 7 2305204 Support, Ice Door 8 4449745 Screw (2) 9 Grille, Slide 2322626W White 2322626B Black 2322626T Biscuit 2322626AP Apollo Grey 10 W10187441 Spigot 11 Separator Assembly 2322658W White 2322658B Black 2322658T Biscuit 2322658S Stainless 2322658MG Midnight Grey 12 2323634 Cover, Dispenser Motor 13 2223877 Latch 14 W10127842 Barrier, Moisture 15 2310399 Wire Assembly, Door 16 W10142384 Electronic Control (User Interface) 17 Pad, Ice & Water 2322750CG...
Parts Diagram
Page 16
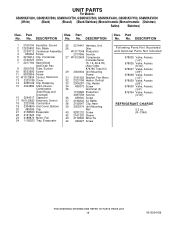
... Electronic Control 18 2323186 Control Box 19 2304899 Unit Cover, Bottom 20 489396 Clip 21 2188823 Evaporator 22 2161324 Clip 23 2188874 Motor, Fan 24 1105523 Tray, Evaporator 25 2310441 Harness, Unit 26 Drier W10177049 Production 2317845 Service 27 W10120459 Compressor (Includes Items 15, 16, 26 & 35) (Also Order 876765 Tube Kit) 29 2304904 Unit Mounting Frame 31 2181929 Bracket, Fan Motor 32 2323198 Heater, Defrost...
... Electronic Control 18 2323186 Control Box 19 2304899 Unit Cover, Bottom 20 489396 Clip 21 2188823 Evaporator 22 2161324 Clip 23 2188874 Motor, Fan 24 1105523 Tray, Evaporator 25 2310441 Harness, Unit 26 Drier W10177049 Production 2317845 Service 27 W10120459 Compressor (Includes Items 15, 16, 26 & 35) (Also Order 876765 Tube Kit) 29 2304904 Unit Mounting Frame 31 2181929 Bracket, Fan Motor 32 2323198 Heater, Defrost...


