
Dimension Guide
Page 1
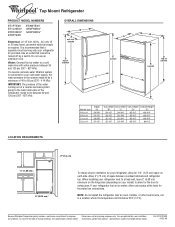
... model) to allow for the water line connections. Because Whirlpool Corporation policy includes a continuous commitment to be provided. ® Top Mount Refrigerator PRODUCT MODEL NUMBERS ET1FTEXV ET1CHEXV ET8CHEXV ET8FTEXV ET8WTEXV GR2FHMXV GR9FHMXV Electrical: A 115 Volt, 60 Hz., AC only 15 or 20 amp fused, grounded electrical supply is connected to your refrigerator, allow for planning purposes only. Water: Connect the ice maker to swing open. NOTE: Do not install the refrigerator...
... model) to allow for the water line connections. Because Whirlpool Corporation policy includes a continuous commitment to be provided. ® Top Mount Refrigerator PRODUCT MODEL NUMBERS ET1FTEXV ET1CHEXV ET8CHEXV ET8FTEXV ET8WTEXV GR2FHMXV GR9FHMXV Electrical: A 115 Volt, 60 Hz., AC only 15 or 20 amp fused, grounded electrical supply is connected to your refrigerator, allow for planning purposes only. Water: Connect the ice maker to swing open. NOTE: Do not install the refrigerator...
User Instructions
Page 1
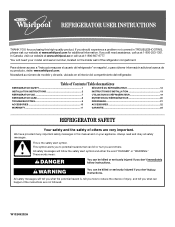
... www.whirlpool.com for purchasing this manual and on your model and serial number, located on the inside wall of injury, and tell you still need your appliance. These words mean: DANGER You can be killed or seriously injured if you to reduce the chance of the refrigerator compartment. Para obtener acceso a "Instrucciones para el usuario del refrigerador" en español, o para obtener...
... www.whirlpool.com for purchasing this manual and on your model and serial number, located on the inside wall of injury, and tell you still need your appliance. These words mean: DANGER You can be killed or seriously injured if you to reduce the chance of the refrigerator compartment. Para obtener acceso a "Instrucciones para el usuario del refrigerador" en español, o para obtener...
User Instructions
Page 2
... Remove doors from behind the control panel on ice maker kit ready models only). Failure to do so can result in place so that children may migrate down from the freezer and cause icicles to move and install refrigerator. ■ Disconnect power before operating. ■ Remove doors from refrigerator. ■ Use two or more people to move and install refrigerator. Failure to do so can result in "Refrigerator Care." IMPORTANT SAFETY INSTRUCTIONS...
... Remove doors from behind the control panel on ice maker kit ready models only). Failure to do so can result in place so that children may migrate down from the freezer and cause icicles to move and install refrigerator. ■ Disconnect power before operating. ■ Remove doors from refrigerator. ■ Use two or more people to move and install refrigerator. Failure to do so can result in "Refrigerator Care." IMPORTANT SAFETY INSTRUCTIONS...
User Instructions
Page 3
... connected to your water pressure, call a licensed, qualified plumber. When you turn the control (Thermostat, Refrigerator or Freezer Control depending on the model) to refill after heavy usage. Water Pressure A cold water supply with your refrigerator, allow for the door to swing open. IMPORTANT: If you are finished, reconnect the refrigerator to the electrical source and reset the control (Thermostat, Refrigerator or Freezer Control depending on the model) to operate the water dispenser and ice maker. or 20-amp fused, grounded electrical supply...
... connected to your water pressure, call a licensed, qualified plumber. When you turn the control (Thermostat, Refrigerator or Freezer Control depending on the model) to refill after heavy usage. Water Pressure A cold water supply with your refrigerator, allow for the door to swing open. IMPORTANT: If you are finished, reconnect the refrigerator to the electrical source and reset the control (Thermostat, Refrigerator or Freezer Control depending on the model) to operate the water dispenser and ice maker. or 20-amp fused, grounded electrical supply...
User Instructions
Page 4
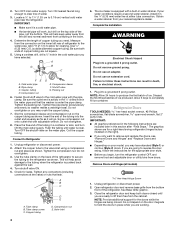
.... Remove Doors and Hinges (all models) Hex-Head Hinge Screw 1. See Base Grille graphic. 3. NOTE: Provide additional support for leaks. This will work, but drill on the water pipe. Use ¹⁄₄" (6.35 mm) O.D. (outside diameter) copper tubing. Copper tubing D. Flush the tubing until you have standard (Style 1) or contour (Style 2) doors. Turn OFF the shutoff valve on the top side of refrigerator to follow the instructions...
.... Remove Doors and Hinges (all models) Hex-Head Hinge Screw 1. See Base Grille graphic. 3. NOTE: Provide additional support for leaks. This will work, but drill on the water pipe. Use ¹⁄₄" (6.35 mm) O.D. (outside diameter) copper tubing. Copper tubing D. Flush the tubing until you have standard (Style 1) or contour (Style 2) doors. Turn OFF the shutoff valve on the top side of refrigerator to follow the instructions...
User Instructions
Page 5
... refrigerator door as shown in Graphic 2. 4. Assemble the parts for the doors while the hinges are not reversing the doors, see "Replace Doors and Hinges." Do not tighten the screws completely. 4. Replace the base grille. WARNING Electrical Shock Hazard Plug into a grounded 3 prong outlet. 4. Plug into a grounded 3 prong outlet. Reset the controls. Assemble handles on the door as shown. Remove refrigerator handle bottom trim. For Style 1, replace the door handle screw cover. If you are working. 2. Remove the cabinet hinge...
... refrigerator door as shown in Graphic 2. 4. Assemble the parts for the doors while the hinges are not reversing the doors, see "Replace Doors and Hinges." Do not tighten the screws completely. 4. Replace the base grille. WARNING Electrical Shock Hazard Plug into a grounded 3 prong outlet. 4. Plug into a grounded 3 prong outlet. Reset the controls. Assemble handles on the door as shown. Remove refrigerator handle bottom trim. For Style 1, replace the door handle screw cover. If you are working. 2. Remove the cabinet hinge...
User Instructions
Page 6
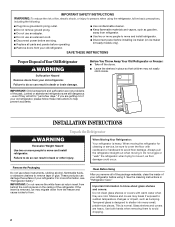
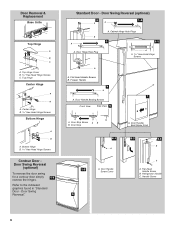
... indicated graphics found in "Standard Door - Freezer Handle 4 A 7 A. Door Stop A. Flat-Head Handle Screw B. Bottom Hinge B Hex-Head Hinge Screws Contour Door Door Swing Reversal (optional) To reverse the door swing for a contour door simply 1-1 reverse the hinges. Standard Door - Door Hinge Hole Plug A. Door Stop Screw A B B. Handle Screw 5 6 Cabinet Hinge Hole Plugs 3 1-1 1 A A Hex-Head Hinge Screws A A. Flat-Head Handle Screws B. Refrigerator Handle C. Door Handle Seal Screw Front 6-1 A 1-2 A. Top Hinge Cover B Hex-Head Hinge Screws C. Door...
... indicated graphics found in "Standard Door - Freezer Handle 4 A 7 A. Door Stop A. Flat-Head Handle Screw B. Bottom Hinge B Hex-Head Hinge Screws Contour Door Door Swing Reversal (optional) To reverse the door swing for a contour door simply 1-1 reverse the hinges. Standard Door - Door Hinge Hole Plug A. Door Stop Screw A B B. Handle Screw 5 6 Cabinet Hinge Hole Plugs 3 1-1 1 A A Hex-Head Hinge Screws A A. Flat-Head Handle Screws B. Refrigerator Handle C. Door Handle Seal Screw Front 6-1 A 1-2 A. Top Hinge Cover B Hex-Head Hinge Screws C. Door...
User Instructions
Page 7
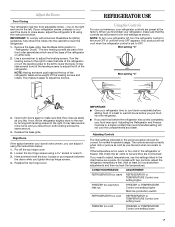
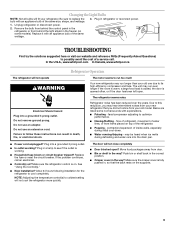
... ice production switch REFRIGERATOR too cold REFRIGERATOR or TEMPERATURE Control one setting lower FREEZER too cold FREEZER or TEMPERATURE Control one on the left to close as easily as you like . If your refrigerator controls are at the base of the refrigerator takes some weight off the leveling screws and rollers. This makes it using the instructions below: 1. Your product will not cool the compartments any faster. Loosen the top hinge screws using the instructions...
... ice production switch REFRIGERATOR too cold REFRIGERATOR or TEMPERATURE Control one setting lower FREEZER too cold FREEZER or TEMPERATURE Control one on the left to close as easily as you like . If your refrigerator controls are at the base of the refrigerator takes some weight off the leveling screws and rollers. This makes it using the instructions below: 1. Your product will not cool the compartments any faster. Loosen the top hinge screws using the instructions...

User Instructions
Page 8
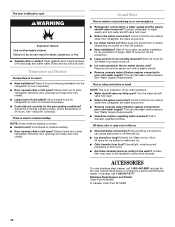
... To turn the ice maker OFF, lift the wire shutoff arm to break up ) position. Crisper Humidity Control (on some models), push the switch to eliminate odors. Unplug refrigerator or disconnect power. 2. Clean the exterior surfaces. To manually turn the ice maker ON, simply lower the wire shutoff arm. If a softened water supply cannot be only as good as the quality of your surfaces clean by using the following cleaning instructions. Remember...
... To turn the ice maker OFF, lift the wire shutoff arm to break up ) position. Crisper Humidity Control (on some models), push the switch to eliminate odors. Unplug refrigerator or disconnect power. 2. Clean the exterior surfaces. To manually turn the ice maker ON, simply lower the wire shutoff arm. If a softened water supply cannot be only as good as the quality of your surfaces clean by using the following cleaning instructions. Remember...
User Instructions
Page 9
... during defrosting and water runs into a grounded 3 prong outlet. Remove the bulb from behind the light shield in the way? Electrical Shock Hazard Plug into the drain pan. ■ Power cord unplugged? Due to its high-efficiency compressor and fans. contraction/expansion of the same size, shape, and wattage. 1. Move food packages away from behind the control panel in the refrigerator or from door. ■ Bin or shelf in the freezer (on...
... during defrosting and water runs into a grounded 3 prong outlet. Remove the bulb from behind the light shield in the way? Electrical Shock Hazard Plug into the drain pan. ■ Power cord unplugged? Due to its high-efficiency compressor and fans. contraction/expansion of the same size, shape, and wattage. 1. Move food packages away from behind the control panel in the refrigerator or from door. ■ Bin or shelf in the freezer (on...
User Instructions
Page 10
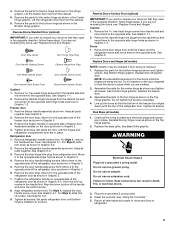
.... ■ Door opened often or left open . ■ Kink in the ice maker ejector arm? See "Using the Control(s)." Turn the water shutoff valve fully open ? Straighten the water source line. ■ Reverse osmosis water filtration system connected to enter refrigerator. New plumbing connections can reduce water flow. Temperature and Moisture Temperature is normal. ■ Humid room? A kink in the ON position. ■ New installation? Make sure wire shutoff arm or switch (depending on model) is not producing ice or...
.... ■ Door opened often or left open . ■ Kink in the ice maker ejector arm? See "Using the Control(s)." Turn the water shutoff valve fully open ? Straighten the water source line. ■ Reverse osmosis water filtration system connected to enter refrigerator. New plumbing connections can reduce water flow. Temperature and Moisture Temperature is normal. ■ Humid room? A kink in the ON position. ■ New installation? Make sure wire shutoff arm or switch (depending on model) is not producing ice or...
User Instructions
Page 11
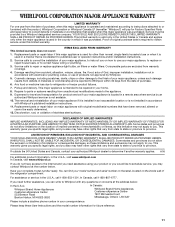
... location or is not available. 10. WHIRLPOOL SHALL NOT BE LIABLE FOR INCIDENTAL OR CONSEQUENTIAL DAMAGES. For assistance or service in the U.S.A., call 1-800-807-6777. If you need assistance using your correspondence. Proof of original purchase date is inconsistent to correct house wiring or plumbing. 3. Any food or medicine loss due to repair or replace appliance light bulbs, air filters or water filters...
... location or is not available. 10. WHIRLPOOL SHALL NOT BE LIABLE FOR INCIDENTAL OR CONSEQUENTIAL DAMAGES. For assistance or service in the U.S.A., call 1-800-807-6777. If you need assistance using your correspondence. Proof of original purchase date is inconsistent to correct house wiring or plumbing. 3. Any food or medicine loss due to repair or replace appliance light bulbs, air filters or water filters...
Parts Diagram
Page 1
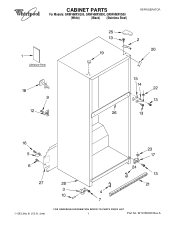
W10180450 Rev.A CABINET PARTS For Models: GR9FHMXVQ00, GR9FHMXVB00, GR9FHMXVS00 (White) (Black) (Stainless Steel) REFRIGERATOR 1−08 Litho In U.S.A. (rrm) 1 Part No.
W10180450 Rev.A CABINET PARTS For Models: GR9FHMXVQ00, GR9FHMXVB00, GR9FHMXVS00 (White) (Black) (Stainless Steel) REFRIGERATOR 1−08 Litho In U.S.A. (rrm) 1 Part No.

Parts Diagram
Page 2
No. DESCRIPTION 1 Literature Parts W10142143 Service & Wiring Sheet W10178120 Energy Label Use & Care Guide W10131409 Bilingual W10131417 Trilingual 2225623 Modular Icemaker Service Sheet Following May Be Purchased DO−IT−YOURSELF REPAIR MANUALS 677969 Do−It−Yourself Manual Ref./Fzr. 2 2189410 Hinge (Top) 3 2166108 Roller, Front (2) 4 2189356 Clip, Grille 5 489385 Clamp, Tube (Water Supply Line) 6 489427 Screw 7 3400504 Screw 9 489442 Screw 10 2221797 Rivet 12 549193 Clamp...
No. DESCRIPTION 1 Literature Parts W10142143 Service & Wiring Sheet W10178120 Energy Label Use & Care Guide W10131409 Bilingual W10131417 Trilingual 2225623 Modular Icemaker Service Sheet Following May Be Purchased DO−IT−YOURSELF REPAIR MANUALS 677969 Do−It−Yourself Manual Ref./Fzr. 2 2189410 Hinge (Top) 3 2166108 Roller, Front (2) 4 2189356 Clip, Grille 5 489385 Clamp, Tube (Water Supply Line) 6 489427 Screw 7 3400504 Screw 9 489442 Screw 10 2221797 Rivet 12 549193 Clamp...

Parts Diagram
Page 4
... Gasket, Evaporator Switch 34 2302536 Knob, Damper Cover (2) 20 W10129791 Wire Assembly, 35 2254454 Bracket 4 2304099 Timer, Defrost Freezer Compartment Evap. Fan, Rear 5 2212485 Thermostat Tube (Includes 36 2205079 Seal, Rear Barrier Illus. 28) Thermostat 7 2310057 Wire Assembly, 21 2176281 Cover, Air 37 2300417 Housing Base Control Box Diffuser 38 2187601 Wiring Harness, 8 2162085 Socket, Light 22 2200863 Knob, Thermostat Freezer Light 9 2179858 Damper, Air 23 2254354 Air Tower 39 2193491 Electrical Shield, 10 2315539 Fan Motor...
... Gasket, Evaporator Switch 34 2302536 Knob, Damper Cover (2) 20 W10129791 Wire Assembly, 35 2254454 Bracket 4 2304099 Timer, Defrost Freezer Compartment Evap. Fan, Rear 5 2212485 Thermostat Tube (Includes 36 2205079 Seal, Rear Barrier Illus. 28) Thermostat 7 2310057 Wire Assembly, 21 2176281 Cover, Air 37 2300417 Housing Base Control Box Diffuser 38 2187601 Wiring Harness, 8 2162085 Socket, Light 22 2200863 Knob, Thermostat Freezer Light 9 2179858 Damper, Air 23 2254354 Air Tower 39 2193491 Electrical Shield, 10 2315539 Fan Motor...
Parts Diagram
Page 6
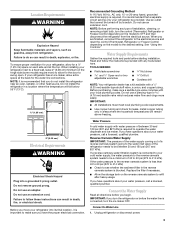
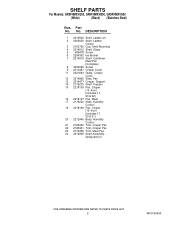
SHELF PARTS For Models: GR9FHMXVQ00, GR9FHMXVB00, GR9FHMXVS00 (White) (Black) (Stainless Steel) Illus. No. DESCRIPTION 1 2210522 Shelf, Ladder (2) 2 2300520 Shelf, Ladder Center 3 2163762 Cup, Shelf Mounting 4 2214912 Shelf, Glass 5 489478 Screw 6 2254352 Ice Bucket 7 2214910 Shelf, Cantilever Meat Pan (Complete) 8 3400065 Screw 9 2314497 Crisper Cover 11 2221693 Glass, Crisper Cover 12 2214892 Slide, Pan 13 2314477 Crisper, Support 14 2176275 Shelf, Freezer 15 2218139 Pan, Crisper (13−Inch) (Includes 17, 20 & 22) 16 2218127 Pan, Meat...
SHELF PARTS For Models: GR9FHMXVQ00, GR9FHMXVB00, GR9FHMXVS00 (White) (Black) (Stainless Steel) Illus. No. DESCRIPTION 1 2210522 Shelf, Ladder (2) 2 2300520 Shelf, Ladder Center 3 2163762 Cup, Shelf Mounting 4 2214912 Shelf, Glass 5 489478 Screw 6 2254352 Ice Bucket 7 2214910 Shelf, Cantilever Meat Pan (Complete) 8 3400065 Screw 9 2314497 Crisper Cover 11 2221693 Glass, Crisper Cover 12 2214892 Slide, Pan 13 2314477 Crisper, Support 14 2176275 Shelf, Freezer 15 2218139 Pan, Crisper (13−Inch) (Includes 17, 20 & 22) 16 2218127 Pan, Meat...
Parts Diagram
Page 10
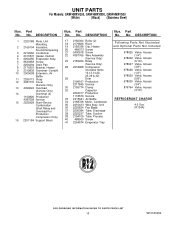
..., Defrost 5 2254250 Evaporator Assy. 6 8533859 Screw 7 2254294 Drain Pan 8 2176301 Bracket, Heater 9 2319835 Grommet−Cond(4) 10 2300638 Extension, Air Baffle 11 2255113 Strap 12 4387731 Cover (Service Only) 13 4390624 Overload (Service Only) 14 Grommet (4) 1100826 Production 4387558 Service 15 2225929 Start−Device Combination (Start Relay and Overload For Production Compressor Only) 16 2201184 Support Block Illus. UNIT PARTS For Models...
..., Defrost 5 2254250 Evaporator Assy. 6 8533859 Screw 7 2254294 Drain Pan 8 2176301 Bracket, Heater 9 2319835 Grommet−Cond(4) 10 2300638 Extension, Air Baffle 11 2255113 Strap 12 4387731 Cover (Service Only) 13 4390624 Overload (Service Only) 14 Grommet (4) 1100826 Production 4387558 Service 15 2225929 Start−Device Combination (Start Relay and Overload For Production Compressor Only) 16 2201184 Support Block Illus. UNIT PARTS For Models...
Parts Diagram
Page 12
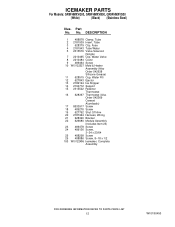
ICEMAKER PARTS For Models: GR9FHMXVQ00, GR9FHMXVB00, GR9FHMXVS00 (White) (Black) (Stainless Steel) Illus. Part No. DESCRIPTION 1 488878 Clamp, Tube 2 2181939 Insert, Tube 3 628379 Clip, Fuse 4 2181943 Tube Water 5 2315576 Valve Solenoid (Single) 7 2210495 Clip, Water Valve 8 2210484 Cover 9 489464 Screw 10 W10122527 Mold & Heater Assembly (Also Order 542638 Sillicone Grease) 11 628515 Cup, Water Fill 12 627843 Ejector 13 2182124 Ice Stripper 14 2194712 Support 15 2315522 Retainer Thermostat 16...
ICEMAKER PARTS For Models: GR9FHMXVQ00, GR9FHMXVB00, GR9FHMXVS00 (White) (Black) (Stainless Steel) Illus. Part No. DESCRIPTION 1 488878 Clamp, Tube 2 2181939 Insert, Tube 3 628379 Clip, Fuse 4 2181943 Tube Water 5 2315576 Valve Solenoid (Single) 7 2210495 Clip, Water Valve 8 2210484 Cover 9 489464 Screw 10 W10122527 Mold & Heater Assembly (Also Order 542638 Sillicone Grease) 11 628515 Cup, Water Fill 12 627843 Ejector 13 2182124 Ice Stripper 14 2194712 Support 15 2315522 Retainer Thermostat 16...

Parts Diagram
Page 14
...) 4392901 Enamel, Biscuit (12 Oz. Part No. Uncut) 833938 Kit, Terminal Connector Important: The spray paint is not to be used where the paint may make contact with the door gaskets. 14 W10180450 DESCRIPTION Illus. Spray Can) 350930 Enamel, White (12 Oz. No. OPTIONAL PARTS For Models: GR9FHMXVQ00, GR9FHMXVB00, GR9FHMXVS00 (White) (Black) (Stainless Steel) Illus. Spray Can) 350939 Enamel...
...) 4392901 Enamel, Biscuit (12 Oz. Part No. Uncut) 833938 Kit, Terminal Connector Important: The spray paint is not to be used where the paint may make contact with the door gaskets. 14 W10180450 DESCRIPTION Illus. Spray Can) 350930 Enamel, White (12 Oz. No. OPTIONAL PARTS For Models: GR9FHMXVQ00, GR9FHMXVB00, GR9FHMXVS00 (White) (Black) (Stainless Steel) Illus. Spray Can) 350939 Enamel...


