
Use and Care Guide
Page 1
® ELECTRIC RANGE Use & Care Guide For questions about features, operation/performance, parts, accessories or service, call: 1-800-253-1301 or visit our website at...www.whirlpool.com Table of Contents ...2 To the installer: Please leave this book for future reference. 9763001 To the consumer: Please read and keep this instruction book with the unit.
® ELECTRIC RANGE Use & Care Guide For questions about features, operation/performance, parts, accessories or service, call: 1-800-253-1301 or visit our website at...www.whirlpool.com Table of Contents ...2 To the installer: Please leave this book for future reference. 9763001 To the consumer: Please read and keep this instruction book with the unit.
Use and Care Guide
Page 4
... Not Leave Children Alone - They should not be allowed to persons, or damage when using the range. Do not repair or replace any part of fire, electrical shock, injury to sit or stand on any part of different size. Flammable materials should never be stored in ...Ducts Unobstructed. If rack must be immersed in Place - Interior surfaces of electric shock, or fire. s Clean Only Parts Listed in oven. s Proper Installation - Loose-fitting or hanging garments should be worn while using the range, follow basic precautions, including the following: s WARNING: TO REDUCE THE RISK...
... Not Leave Children Alone - They should not be allowed to persons, or damage when using the range. Do not repair or replace any part of fire, electrical shock, injury to sit or stand on any part of different size. Flammable materials should never be stored in ...Ducts Unobstructed. If rack must be immersed in Place - Interior surfaces of electric shock, or fire. s Clean Only Parts Listed in oven. s Proper Installation - Loose-fitting or hanging garments should be worn while using the range, follow basic precautions, including the following: s WARNING: TO REDUCE THE RISK...

Installation Instructions
Page 1
...to follow instructions. Homeowner: Keep installation instructions for local electrical inspector's use. 9762996 Reconnect the anti-tip bracket, if the range is the safety alert symbol. These words mean: ...ELECTRIC RANGES Table of Contents RANGE SAFETY 1 INSTALLATION REQUIREMENTS 2 Tools and Parts 2 Location Requirements 2 Electrical Requirements 4 INSTALLATION INSTRUCTIONS 4 Unpack Range 4 Install Anti-Tip Bracket 5 Electrical Connection 6 Verify Anti-Tip Bracket Location 9 Level Range 10 Complete Installation 10 Moving the Range 10 ANTI-TIP BRACKET TEMPLATE 11 RANGE...
...to follow instructions. Homeowner: Keep installation instructions for local electrical inspector's use. 9762996 Reconnect the anti-tip bracket, if the range is the safety alert symbol. These words mean: ...ELECTRIC RANGES Table of Contents RANGE SAFETY 1 INSTALLATION REQUIREMENTS 2 Tools and Parts 2 Location Requirements 2 Electrical Requirements 4 INSTALLATION INSTRUCTIONS 4 Unpack Range 4 Install Anti-Tip Bracket 5 Electrical Connection 6 Verify Anti-Tip Bracket Location 9 Level Range 10 Complete Installation 10 Moving the Range 10 ANTI-TIP BRACKET TEMPLATE 11 RANGE...

Installation Instructions
Page 2
... units, cabinet storage space located above . See "Electrical Connection" section. 2 INSTALLATION REQUIREMENTS Tools and Parts Gather the required tools and parts before starting installation. Thickness of securing the range is not applicable, use in a mobile home, it...HUD Part 280). s Cabinet opening dimensions that all governing codes and ordinances. See "Electrical Requirements" section. Tools needed Check local codes. Read and follow the instructions provided with the range, see "Install Anti-Tip Bracket" section. Longer screws are minimum clearances. Plastic ...
... units, cabinet storage space located above . See "Electrical Connection" section. 2 INSTALLATION REQUIREMENTS Tools and Parts Gather the required tools and parts before starting installation. Thickness of securing the range is not applicable, use in a mobile home, it...HUD Part 280). s Cabinet opening dimensions that all governing codes and ordinances. See "Electrical Requirements" section. Tools needed Check local codes. Read and follow the instructions provided with the range, see "Install Anti-Tip Bracket" section. Longer screws are minimum clearances. Plastic ...

Installation Instructions
Page 4
...edition and all local codes and ordinances. This uses a 3-wire receptacle of the range. s Wire sizes and connections must determine the type of electrical connection you will be provided at each end of the range or inside oven. Excessive Weight Hazard Use two or more people to the fused ...disconnect (or circuit breaker box) through the neutral conductor. Electrical Connection To properly install your range, you must conform with a UL listed strain relief and be connected to 60.96 cm) of the 4-wire power supply ...
...edition and all local codes and ordinances. This uses a 3-wire receptacle of the range. s Wire sizes and connections must determine the type of electrical connection you will be provided at each end of the range or inside oven. Excessive Weight Hazard Use two or more people to the fused ...disconnect (or circuit breaker box) through the neutral conductor. Electrical Connection To properly install your range, you must conform with a UL listed strain relief and be connected to 60.96 cm) of the 4-wire power supply ...
Installation Instructions
Page 5
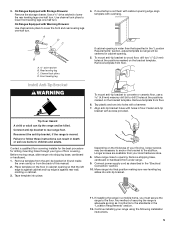
...overhang. Remove template from the anti-tip bracket kit (found inside the oven cavity) or from the back of floor covering. Move range into final position making sure rear leveling leg slides into place. Remove template from floor. Tap plastic anchors into holes with Storage Drawers... to anchor the bracket to lower the front and rear leveling legs one -half turn. If installing the range in cabinet opening edge, align template with holes in the "Electrical Connection" section. 10. Remove template from floor. 6. Fasten anti-tip bracket with Warming Drawers: Use channel...
...overhang. Remove template from the anti-tip bracket kit (found inside the oven cavity) or from the back of floor covering. Move range into final position making sure rear leveling leg slides into place. Remove template from floor. Tap plastic anchors into holes with Storage Drawers... to anchor the bracket to lower the front and rear leveling legs one -half turn. If installing the range in cabinet opening edge, align template with holes in the "Electrical Connection" section. 10. Remove template from floor. 6. Fasten anti-tip bracket with Warming Drawers: Use channel...
Installation Instructions
Page 6
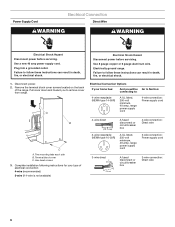
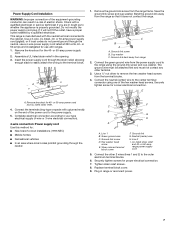
... or 6 gauge aluminum wire. Disconnect power. 2. Two mounting tabs each side B. Power Supply Cord Electrical Connection Direct Wire WARNING WARNING Electrical Shock Hazard Disconnect power before servicing. Electrically ground range. A B C A. Failure to follow these instructions can result in death, fire, or electrical shock. 1. Terminal block cover C. Complete installation following instructions for your type of the...
... or 6 gauge aluminum wire. Disconnect power. 2. Two mounting tabs each side B. Power Supply Cord Electrical Connection Direct Wire WARNING WARNING Electrical Shock Hazard Disconnect power before servicing. Electrically ground range. A B C A. Failure to follow these instructions can result in death, fire, or electrical shock. 1. Terminal block cover C. Complete installation following instructions for your type of the...
Installation Instructions
Page 7
..., UL listed, 40- Remove knockout for proper electrical connection. Remove the ground-link screw from range 2. Bend the ground-link away from the range so that it will not fit the outlet, have a proper outlet installed by a qualified electrician. Ground-link bent away from the range frame. Securely tighten screw for 40- Ground-link...
..., UL listed, 40- Remove knockout for proper electrical connection. Remove the ground-link screw from range 2. Bend the ground-link away from the range so that it will not fit the outlet, have a proper outlet installed by a qualified electrician. Ground-link bent away from the range frame. Securely tighten screw for 40- Ground-link...
Installation Instructions
Page 8
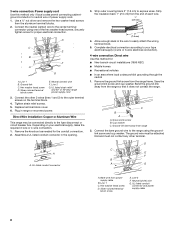
... wire must not contact any other 2 wires (lines 1 and 2) to expose wires. Line 2 G. Connect the other terminal. Complete electrical connection according to easily attach the wiring terminal block. 5. Ground-link bent away from the range frame. Cup washer C. A A. Line 1 C. Line 2 F. Remove the knockout as needed for the conduit connection. 2. Strip outer covering...
... wire must not contact any other 2 wires (lines 1 and 2) to expose wires. Line 2 G. Connect the other terminal. Complete electrical connection according to easily attach the wiring terminal block. 5. Ground-link bent away from the range frame. Cup washer C. A A. Line 1 C. Line 2 F. Remove the knockout as needed for the conduit connection. 2. Strip outer covering...

Installation Instructions
Page 9
... drawer guides. Silver-colored terminal block screw E. Insert wire under range. B. Remove cardboard or hardboard from under screw clamp. Lift front of securing the range is adequate as long as it aside on a protected surface. Any method of drawer to make proper electrical connection. 6. Insert wire under anti-tip bracket. Insert the other...
... drawer guides. Silver-colored terminal block screw E. Insert wire under range. B. Remove cardboard or hardboard from under screw clamp. Lift front of securing the range is adequate as long as it aside on a protected surface. Any method of drawer to make proper electrical connection. 6. Insert wire under anti-tip bracket. Insert the other...
Installation Instructions
Page 10
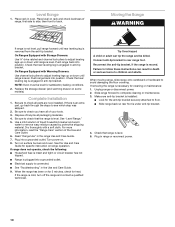
... not operate, check the following: s Household fuse is removed from the anti-tip bracket. s Electrical supply is under anti-tip bracket. 4. If removing the range is level. 5. s Slide range back so rear foot is connected. Level Range 1. Check that range is necessary for heat. Replace the storage drawer (and warming drawer on surface burners and...
... not operate, check the following: s Household fuse is removed from the anti-tip bracket. s Electrical supply is under anti-tip bracket. 4. If removing the range is level. 5. s Slide range back so rear foot is connected. Level Range 1. Check that range is necessary for heat. Replace the storage drawer (and warming drawer on surface burners and...


