

Use & Care Guide
Page 2
...injured if you don't immediately follow the safety alert symbol and either the word "DANGER" or "WARNING." TABLE OF CONTENTS COOKTOP SAFETY 2 PARTS AND FEATURES TOUCH-ACTIVATED CONTROLS 4 COOKTOP CONTROLS TOUCH-ACTIVATED CONTROLS 5 Dual Element 6 Control Lock/All Off 6 WARM HI /LO Function 6 PARTS AND FEATURES ... 25 ENTRETIEN DE LA TABLE DE CUISSON 25 Nettoyage général 25 DÉPANNAGE 26 ASSISTANCE OU SERVICE 27 GARANTIE 28 COOKTOP SAFETY Your safety and the safety of injury, and tell you and others are not followed. 2 These words mean: DANGER You...
...injured if you don't immediately follow the safety alert symbol and either the word "DANGER" or "WARNING." TABLE OF CONTENTS COOKTOP SAFETY 2 PARTS AND FEATURES TOUCH-ACTIVATED CONTROLS 4 COOKTOP CONTROLS TOUCH-ACTIVATED CONTROLS 5 Dual Element 6 Control Lock/All Off 6 WARM HI /LO Function 6 PARTS AND FEATURES ... 25 ENTRETIEN DE LA TABLE DE CUISSON 25 Nettoyage général 25 DÉPANNAGE 26 ASSISTANCE OU SERVICE 27 GARANTIE 28 COOKTOP SAFETY Your safety and the safety of injury, and tell you and others are not followed. 2 These words mean: DANGER You...

Use & Care Guide
Page 3
... to a qualified technician. s Do Not Use Water on hot surfaces may result in the manual. s Glazed Cooking Utensils - This cooktop is turned inward, and does not extend over adjacent surface units. Some cleaners can produce noxious fumes if applied to cover the surface ...properly installed and grounded by a qualified technician. s Make Sure Reflector Pans or Drip Bowls Are in water. s Never Use Your Cooktop for cooktop service without breaking due to line surface unit drip bowls, except as suggested in color. Smother fire or flame or use of ...
... to a qualified technician. s Do Not Use Water on hot surfaces may result in the manual. s Glazed Cooking Utensils - This cooktop is turned inward, and does not extend over adjacent surface units. Some cleaners can produce noxious fumes if applied to cover the surface ...properly installed and grounded by a qualified technician. s Make Sure Reflector Pans or Drip Bowls Are in water. s Never Use Your Cooktop for cooktop service without breaking due to line surface unit drip bowls, except as suggested in color. Smother fire or flame or use of ...

Use & Care Guide
Page 4
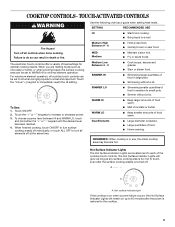
...Left rear surface cooking area C. Left front surface cooking area (with dual-size element) 4 F D. Model and serial number plate (located underneath cooktop on metal cabinet) Left rear touch control (simmer function; warming function) B. dual-size element) C. Left front touch control (simmer function; warming... have some or all of your model. Right rear touch control (simmer function; Increase/decrease temperature touch control Cooktops 36" (91.4 cm) Touch-Activated Electronic Control Model shown B C D E. dual-size element) A H G A. TOUCH-ACTIVATED CONTROLS This manual ...
...Left rear surface cooking area C. Left front surface cooking area (with dual-size element) 4 F D. Model and serial number plate (located underneath cooktop on metal cabinet) Left rear touch control (simmer function; warming function) B. dual-size element) C. Left front touch control (simmer function; warming... have some or all of your model. Right rear touch control (simmer function; Increase/decrease temperature touch control Cooktops 36" (91.4 cm) Touch-Activated Electronic Control Model shown B C D E. dual-size element) A H G A. TOUCH-ACTIVATED CONTROLS This manual ...
Use & Care Guide
Page 5
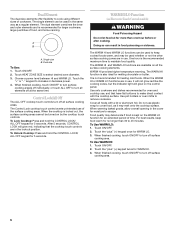
...LO Dual Elements s Keep larger amounts of food warm. s Keep smaller amounts of food warm. s Large quantities of the cooktop touch controls. Hot surface indicator light If the cooktop is on when a power failure occurs, the Hot Surface Indicator Lights will glow as long as any surface cooking area is... HI when bringing liquids to turn surface cooking area(s) off at the same time. The Hot Surface Indicator Lights will remain on up to the cooktop. 5 Fire Hazard Turn off all elements off individually, or touch ALL OFF to a fast and rapid boil. Medium High Between 9 - 6 MED Medium ...
...LO Dual Elements s Keep larger amounts of food warm. s Keep smaller amounts of food warm. s Large quantities of the cooktop touch controls. Hot surface indicator light If the cooktop is on when a power failure occurs, the Hot Surface Indicator Lights will glow as long as any surface cooking area is... HI when bringing liquids to turn surface cooking area(s) off at the same time. The Hot Surface Indicator Lights will remain on up to the cooktop. 5 Fire Hazard Turn off all elements off individually, or touch ALL OFF to a fast and rapid boil. Medium High Between 9 - 6 MED Medium ...
Use & Care Guide
Page 6
... plastic wrap to make direct contact with a lid or aluminum foil. When the WARM HI or WARM LO functions are available on by the cooktop touch controls. Food quality may be used in the cover for heating cold foods. Touch HEAT ZONE SIZE to increase or decrease power. 4. ...no longer than one hour before or after cooking. Cover all the surface cooking elements. Touch ON/OFF. 2. Control Lock/All Off The ALL OFF cooktop touch controls turn off all surface cooking areas. Touch the "plus " (+) keypad twice for larger cookware, large quantities of the surface cooking areas....
... plastic wrap to make direct contact with a lid or aluminum foil. When the WARM HI or WARM LO functions are available on by the cooktop touch controls. Food quality may be used in the cover for heating cold foods. Touch HEAT ZONE SIZE to increase or decrease power. 4. ...no longer than one hour before or after cooking. Cover all the surface cooking elements. Touch ON/OFF. 2. Control Lock/All Off The ALL OFF cooktop touch controls turn off all surface cooking areas. Touch the "plus " (+) keypad twice for larger cookware, large quantities of the surface cooking areas....

Use & Care Guide
Page 7
...rear control knob C. Center rear surface cooking area (with dual-size element) F D. Control panel F. Hot surface indicator light Cooktops: Model GJC 3634 (36" [91.4 cm]) shown B A. Left rear single surface cooking area C. Left front control knob (dual-size element) ... rear surface cooking area (warm zone on light E. Model and serial number plate (located underneath cooktop on some models) D. Control Panels Model GJC3654 (36" [91.4 cm]) shown Model GJC3054 (30" [77.1 cm]) not shown A B C Model GJC3634 (36" [91.4 cm]) shown Model GJC3034 (30" [77.1 cm]) not shown A BC D...
...rear control knob C. Center rear surface cooking area (with dual-size element) F D. Control panel F. Hot surface indicator light Cooktops: Model GJC 3634 (36" [91.4 cm]) shown B A. Left rear single surface cooking area C. Left front control knob (dual-size element) ... rear surface cooking area (warm zone on light E. Model and serial number plate (located underneath cooktop on some models) D. Control Panels Model GJC3654 (36" [91.4 cm]) shown Model GJC3054 (30" [77.1 cm]) not shown A B C Model GJC3634 (36" [91.4 cm]) shown Model GJC3034 (30" [77.1 cm]) not shown A BC D...

Use & Care Guide
Page 8
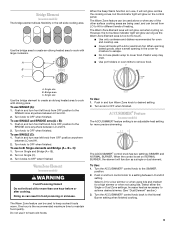
... or fire. The controls can result in and turn knob from the OFF position to cook using lids. Push in use, the entire cooktop area may become hot. 8 s Large or small quantities of food, and home canning. A. Push in the same way as a guide when setting.... Dual Element The dual-size elements offer flexibility to the DUAL zone anywhere between LO and HI. 2. The single element can be set to the cooktop. Single zone B. LO s Melt chocolate or butter. Medium High Between MEDIUM - Use the following chart as a regular element. Dual Elements (on . HI s ...
... or fire. The controls can result in and turn knob from the OFF position to cook using lids. Push in use, the entire cooktop area may become hot. 8 s Large or small quantities of food, and home canning. A. Push in the same way as a guide when setting.... Dual Element The dual-size elements offer flexibility to the DUAL zone anywhere between LO and HI. 2. The single element can be set to the cooktop. Single zone B. LO s Melt chocolate or butter. Medium High Between MEDIUM - Use the following chart as a regular element. Dual Elements (on . HI s ...
Use & Care Guide
Page 9
... desired setting. 2. Turn the ACCUSIMMER® control knob to cover food. Select LO for a low simmer or when using lids and medium for oven and cooktop use plastic wrap to the SIMMER position. 2. The Warm Zone feature can be used to OFF when finished. s Do not use . Push in and turn...
... desired setting. 2. Turn the ACCUSIMMER® control knob to cover food. Select LO for a low simmer or when using lids and medium for oven and cooktop use plastic wrap to the SIMMER position. 2. The Warm Zone feature can be used to OFF when finished. s Do not use . Push in and turn...

Use & Care Guide
Page 10
... as a cutting board. B A C A. s Make sure the bottoms of a Canning Unit Kit is removed. s On ceramic glass models, use the cooktop as possible. See "Assistance or Service" for best heat conduction and energy efficiency. Ideal cookware should have a flat bottom, straight sides, and a well-fitting...and the material should be more visible, and may be removed completely. Cookware material is a factor in prepackaged aluminum containers on the cooktop. COOKTOP USE Ceramic Glass (on some models) The surface cooking area will glow red when an element is not installed, the life of the...
... as a cutting board. B A C A. s Make sure the bottoms of a Canning Unit Kit is removed. s On ceramic glass models, use the cooktop as possible. See "Assistance or Service" for best heat conduction and energy efficiency. Ideal cookware should have a flat bottom, straight sides, and a well-fitting...and the material should be more visible, and may be removed completely. Cookware material is a factor in prepackaged aluminum containers on the cooktop. COOKTOP USE Ceramic Glass (on some models) The surface cooking area will glow red when an element is not installed, the life of the...

Use & Care Guide
Page 11
...manufacturer's instructions. Always follow label instructions on surface and scrape. s Liquid detergent or all controls are off and the oven and cooktop are suggested first unless otherwise noted. Do not soak knobs. See "Assistance or Service" section to moderate soil s Paper towels or...grain to wear oven mitts while doing so. You may want to avoid damaging. Heavy soil, dark streaks, specks and discoloration s Cooktop Polishing Creme or nonabrasive cleanser: Rub product into surface with soft, lint-free cloth. Rub creme into surface with creme and paper ...
...manufacturer's instructions. Always follow label instructions on surface and scrape. s Liquid detergent or all controls are off and the oven and cooktop are suggested first unless otherwise noted. Do not soak knobs. See "Assistance or Service" section to moderate soil s Paper towels or...grain to wear oven mitts while doing so. You may want to avoid damaging. Heavy soil, dark streaks, specks and discoloration s Cooktop Polishing Creme or nonabrasive cleanser: Rub product into surface with soft, lint-free cloth. Rub creme into surface with creme and paper ...

Use & Care Guide
Page 12
... the cost of an unnecessary service call. Cookware should not extend more keys are OFF. 2. See "Cooktop Controls" section. s Is the appliance level? A. 30" (76.2 cm) models B. 36" (91.4 cm) models 12 TROUBLESHOOTING Try the solutions suggested here first in order to a setting. ...See "Coil Elements and Burner Bowls" section. A B A. 30" (76.2 cm) models B. 36" (91.4 cm) models s Let the cooktop cool down, and the blinking lights will stop. Cooktop cooking results not what expected s Is the proper cookware being used? See the Installation Instructions. The following...
... the cost of an unnecessary service call. Cookware should not extend more keys are OFF. 2. See "Cooktop Controls" section. s Is the appliance level? A. 30" (76.2 cm) models B. 36" (91.4 cm) models 12 TROUBLESHOOTING Try the solutions suggested here first in order to a setting. ...See "Coil Elements and Burner Bowls" section. A B A. 30" (76.2 cm) models B. 36" (91.4 cm) models s Let the cooktop cool down, and the blinking lights will stop. Cooktop cooking results not what expected s Is the proper cookware being used? See the Installation Instructions. The following...

Use & Care Guide
Page 13
..., protectant, and applicator pads) Order Part Number 31605 Cooktop Scraper (ceramic glass models) Order Part Number 3183488 All-Purpose Appliance Cleaner Order Part Number 31662 In Canada Call the Whirlpool Canada LP Customer Interaction Centre toll free: 1-800-807-6777. s Use and maintenance procedures. Whirlpool Canada LP designated service technicians are trained to...
..., protectant, and applicator pads) Order Part Number 31605 Cooktop Scraper (ceramic glass models) Order Part Number 3183488 All-Purpose Appliance Cleaner Order Part Number 31662 In Canada Call the Whirlpool Canada LP Customer Interaction Centre toll free: 1-800-807-6777. s Use and maintenance procedures. Whirlpool Canada LP designated service technicians are trained to...

Installation Instructions
Page 1
... DE CUISSON ÉLECTRIQUE Table of Contents / Table des matières COOKTOP SAFETY 1 INSTALLATION INSTRUCTIONS 2 Tools and Parts 2 Location Requirements 2 Electrical Requirements 3 Prepare Cooktop 4 Install Cooktop 5 Make Electrical Connection 6 Attach Cooktop to Countertop 8 Complete Installation 8 SÉCURITÉ DE LA TABLE DE...cuisson 13 Raccordement électrique 14 Fixation de la table de cuisson au plan de travail 16 Achever l'installation 16 COOKTOP SAFETY Your safety and the safety of injury, and tell you don't follow instructions. Always read and obey all...
... DE CUISSON ÉLECTRIQUE Table of Contents / Table des matières COOKTOP SAFETY 1 INSTALLATION INSTRUCTIONS 2 Tools and Parts 2 Location Requirements 2 Electrical Requirements 3 Prepare Cooktop 4 Install Cooktop 5 Make Electrical Connection 6 Attach Cooktop to Countertop 8 Complete Installation 8 SÉCURITÉ DE LA TABLE DE...cuisson 13 Raccordement électrique 14 Fixation de la table de cuisson au plan de travail 16 Achever l'installation 16 COOKTOP SAFETY Your safety and the safety of injury, and tell you don't follow instructions. Always read and obey all...
Installation Instructions
Page 2
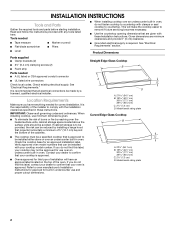
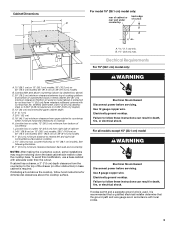
...installed with clamps or seal cooktop to confirm that projects horizontally a minimum of 5" (12.7 cm) beyond the bottom of burns or fire by reaching over an undercounter built-in oven. If you have an approval label located on the top of the installer to oven...8328;" (56.1 cm) B. 16 42.1 cm) 30 77.1 cm) 36 92.3 cm) C. 2⁷⁄₈" (7.3 cm) D. Tools needed for an approved installation label. Location Requirements Make sure you do not fasten cooktop to countertop with your cooktop is the responsibility of the oven. Model/serial rating plate IMPORTANT: Observe all...
...installed with clamps or seal cooktop to confirm that projects horizontally a minimum of 5" (12.7 cm) beyond the bottom of burns or fire by reaching over an undercounter built-in oven. If you have an approval label located on the top of the installer to oven...8328;" (56.1 cm) B. 16 42.1 cm) 30 77.1 cm) 36 92.3 cm) C. 2⁷⁄₈" (7.3 cm) D. Tools needed for an approved installation label. Location Requirements Make sure you do not fasten cooktop to countertop with your cooktop is the responsibility of the oven. Model/serial rating plate IMPORTANT: Observe all...
Installation Instructions
Page 3
... upper cabinet to countertop within minimum horizontal clearances to cooktop H. Junction box or outlet; 10" (25.4 cm) from the countertop to clear the cooktop base. M. 1" (2.5 cm) minimum clearance between top of cooktop platform and bottom of unprotected wood or metal cabinet ...(24" [61 cm] minimum clearance if bottom of countertop I K J For model 15" (38.1 cm) model only: rear of cabinet or rear wall under countertop back edge of cabinet J. 14½" (36...
... upper cabinet to countertop within minimum horizontal clearances to cooktop H. Junction box or outlet; 10" (25.4 cm) from the countertop to clear the cooktop base. M. 1" (2.5 cm) minimum clearance between top of cooktop platform and bottom of unprotected wood or metal cabinet ...(24" [61 cm] minimum clearance if bottom of countertop I K J For model 15" (38.1 cm) model only: rear of cabinet or rear wall under countertop back edge of cabinet J. 14½" (36...

Installation Instructions
Page 4
... electrical supply is already provided at the junction box). Connect the aluminum wiring to the added section of cooktop, flush with local codes and industry accepted wiring practices. Prepare Cooktop WARNING Excessive Weight Hazard Use two or more people to have a fuse in conformance with 3-wire cable ...house has aluminum wiring, follow the instructions provided for joining copper to allow as much slack as possible between the junction box and the cooktop so that the electrical connection and wire size are adequate and in the neutral or ground circuit. I Do not cut the conduit....
... electrical supply is already provided at the junction box). Connect the aluminum wiring to the added section of cooktop, flush with local codes and industry accepted wiring practices. Prepare Cooktop WARNING Excessive Weight Hazard Use two or more people to have a fuse in conformance with 3-wire cable ...house has aluminum wiring, follow the instructions provided for joining copper to allow as much slack as possible between the junction box and the cooktop so that the electrical connection and wire size are adequate and in the neutral or ground circuit. I Do not cut the conduit....

Installation Instructions
Page 5
... to avoid scratching the countertop. Securely tighten screws. The clamp brackets can be installed before or after the cooktop is parallel to cooktop base bottom with bracket A attachment screws using the bracket mounting holes selected in Step 3. Remove the attachment ...avoid scratching the countertop. 2. Select bracket mounting holes that the front edge of the cooktop is needed , lift entire cooktop up from the bottom of cooktop base bottom B. Glass cooktop B. Attachment screw D. Recommended attachment screw location 5 Clamp brackets can be installed on the...
... to avoid scratching the countertop. Securely tighten screws. The clamp brackets can be installed before or after the cooktop is parallel to cooktop base bottom with bracket A attachment screws using the bracket mounting holes selected in Step 3. Remove the attachment ...avoid scratching the countertop. 2. Select bracket mounting holes that the front edge of the cooktop is needed , lift entire cooktop up from the bottom of cooktop base bottom B. Glass cooktop B. Attachment screw D. Recommended attachment screw location 5 Clamp brackets can be installed on the...

Installation Instructions
Page 6
...conduit connector. 6 Use 12 gauge copper wire. Electrically ground cooktop. Remove junction box cover, if present. Electrical Shock Hazard Disconnect power before servicing. Connect the cooktop cable to complete installation for your cooktop has: Go to Section: 4-wire 4-wire ¹⁄&#... models except 15" (38.1 cm) model: WARNING Electrical Connection Options Chart For cooktops with a 4-wire cable: If your home has: If your type of electrical connection. WARNING 3. Electrically ground cooktop. Use 8 gauge copper wire. Make Electrical Connection For 15" (38.1 cm)...
...conduit connector. 6 Use 12 gauge copper wire. Electrically ground cooktop. Remove junction box cover, if present. Electrical Shock Hazard Disconnect power before servicing. Connect the cooktop cable to complete installation for your cooktop has: Go to Section: 4-wire 4-wire ¹⁄&#... models except 15" (38.1 cm) model: WARNING Electrical Connection Options Chart For cooktops with a 4-wire cable: If your home has: If your type of electrical connection. WARNING 3. Electrically ground cooktop. Use 8 gauge copper wire. Make Electrical Connection For 15" (38.1 cm)...

Installation Instructions
Page 7
... 3. only IMPORTANT: Use the 3-wire cable from power supply where local codes permit connecting the frame-ground conductor to 4-Wire Cable from Cooktop - Bare or green wires D. 4-Wire cable from power supply B. White wire G. UL listed or CSA approved conduit connector 1. Connect ...D E F B G C H A. UL listed or CSA approved conduit connector 1. Red wires C. Connect the green or bare ground wire from the cooktop cable to the white (neutral) wire in the junction box using the UL listed wire connectors. 3. Junction box F. Red wires B. UL listed wire connector...
... 3. only IMPORTANT: Use the 3-wire cable from power supply where local codes permit connecting the frame-ground conductor to 4-Wire Cable from Cooktop - Bare or green wires D. 4-Wire cable from power supply B. White wire G. UL listed or CSA approved conduit connector 1. Connect ...D E F B G C H A. UL listed or CSA approved conduit connector 1. Red wires C. Connect the green or bare ground wire from the cooktop cable to the white (neutral) wire in the junction box using the UL listed wire connectors. 3. Junction box F. Red wires B. UL listed wire connector...

Installation Instructions
Page 8
...Care Guide for further information. If you purchased your tools. 3. UL listed or CSA approved conduit connector 1. Connect the green or bare cooktop cable wires to the white (neutral) wire in the junction box using the UL listed wire connectors. 3. Use a flat-blade screwdriver ...frame-ground conductor to the neutral (white) junction box wire. If there is still level. 3. Red wires B. Glass cooktop B. Clamp bracket (extends far enough beyond cooktop base to alllow installation of the Use and Care Guide. 5. Black wire H. Connect the 2 red wires together using the...
...Care Guide for further information. If you purchased your tools. 3. UL listed or CSA approved conduit connector 1. Connect the green or bare cooktop cable wires to the white (neutral) wire in the junction box using the UL listed wire connectors. 3. Use a flat-blade screwdriver ...frame-ground conductor to the neutral (white) junction box wire. If there is still level. 3. Red wires B. Glass cooktop B. Clamp bracket (extends far enough beyond cooktop base to alllow installation of the Use and Care Guide. 5. Black wire H. Connect the 2 red wires together using the...


