

Use & Care Guide
Page 3
... one or more surface units of different size. s Clean Cooktop With Caution - s Protective Liners - Improper installation of these pans or bowls during cooking may result in water. Be sure your cooktop is turned inward, and does not extend over adjacent surface ... on a hot cooking area, be allowed to children in cabinets above a cooktop - Contact a qualified technician immediately. s Proper Installation - Boilover causes smoking and greasy spillovers that it is properly installed and grounded by a qualified technician. s Do Not Soak Removable Heating Elements ...
... one or more surface units of different size. s Clean Cooktop With Caution - s Protective Liners - Improper installation of these pans or bowls during cooking may result in water. Be sure your cooktop is turned inward, and does not extend over adjacent surface ... on a hot cooking area, be allowed to children in cabinets above a cooktop - Contact a qualified technician immediately. s Proper Installation - Boilover causes smoking and greasy spillovers that it is properly installed and grounded by a qualified technician. s Do Not Soak Removable Heating Elements ...

Use & Care Guide
Page 10
...pans are hot. s Make sure the bottoms of medium-to cool. s On coil element models, the installation of the cookware. Cookware IMPORTANT: Do not leave empty cookware on the cooktop. Ideal cookware should have a flat bottom, straight sides, and a well-fitting lid and the material should... used areas to -heavy thickness. If a kit is not installed, the life of the entire cooktop. Companies that cannot be shortened. A nonstick finish has the same characteristics as plastic or aluminum foil, to its base material. COOKTOP USE Ceramic Glass (on some models) The surface cooking area ...
...pans are hot. s Make sure the bottoms of medium-to cool. s On coil element models, the installation of the cookware. Cookware IMPORTANT: Do not leave empty cookware on the cooktop. Ideal cookware should have a flat bottom, straight sides, and a well-fitting lid and the material should... used areas to -heavy thickness. If a kit is not installed, the life of the entire cooktop. Companies that cannot be shortened. A nonstick finish has the same characteristics as plastic or aluminum foil, to its base material. COOKTOP USE Ceramic Glass (on some models) The surface cooking area ...

Use & Care Guide
Page 12
... below. A B A. 30" (76.2 cm) models B. 36" (91.4 cm) models s Let the cooktop cool down, and the blinking lights will stop. Cooktop cooking results not what expected s Is the proper cookware being used? See "Cookware" section. See "Cooktop Controls" section. s Is the appliance level? Level the appliance. See the Installation Instructions. s On coil element models, is...
... below. A B A. 30" (76.2 cm) models B. 36" (91.4 cm) models s Let the cooktop cool down, and the blinking lights will stop. Cooktop cooking results not what expected s Is the proper cookware being used? See "Cookware" section. See "Cooktop Controls" section. s Is the appliance level? Level the appliance. See the Installation Instructions. s On coil element models, is...

Use & Care Guide
Page 13
...Installation information. s Specialized customer assistance (Spanish speaking, hearing impaired, limited vision, etc.). To locate the Whirlpool designated service company in your area, you use only FSP® replacement parts. For further assistance If you need to order replacement parts, we recommend that you can write to Whirlpool... protectant, and applicator pads) Order Part Number 31605 Cooktop Scraper (ceramic glass models) Order Part Number 3183488 All-Purpose Appliance Cleaner Order Part Number 31662 In Canada Call the Whirlpool Canada LP Customer Interaction Centre toll free: 1-800-...
...Installation information. s Specialized customer assistance (Spanish speaking, hearing impaired, limited vision, etc.). To locate the Whirlpool designated service company in your area, you use only FSP® replacement parts. For further assistance If you need to order replacement parts, we recommend that you can write to Whirlpool... protectant, and applicator pads) Order Part Number 31605 Cooktop Scraper (ceramic glass models) Order Part Number 3183488 All-Purpose Appliance Cleaner Order Part Number 31662 In Canada Call the Whirlpool Canada LP Customer Interaction Centre toll free: 1-800-...
Use & Care Guide
Page 14
...numbers that is used in -home service is covered by an authorized Whirlpool servicer is reported to Whirlpool within 30 days from unauthorized modifications made to published user or operator instructions and/or installation instructions. 4. DISCLAIMER OF IMPLIED WARRANTIES; If you need service, first...under this limited warranty. Repairs to parts or systems resulting from the date of original purchase date is not installed in -warranty service. WHIRLPOOL SHALL NOT BE LIABLE FOR INCIDENTAL OR CONSEQUENTIAL DAMAGES. Outside the 50 United States and Canada, this book...
...numbers that is used in -home service is covered by an authorized Whirlpool servicer is reported to Whirlpool within 30 days from unauthorized modifications made to published user or operator instructions and/or installation instructions. 4. DISCLAIMER OF IMPLIED WARRANTIES; If you need service, first...under this limited warranty. Repairs to parts or systems resulting from the date of original purchase date is not installed in -warranty service. WHIRLPOOL SHALL NOT BE LIABLE FOR INCIDENTAL OR CONSEQUENTIAL DAMAGES. Outside the 50 United States and Canada, this book...

Installation Instructions
Page 1
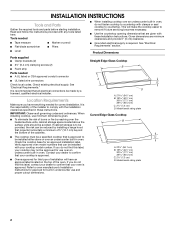
.... Always read and obey all safety messages. ELECTRIC COOKTOP INSTALLATION INSTRUCTIONS INSTRUCTIONS D'INSTALLATION DE LA TABLE DE CUISSON ÉLECTRIQUE Table of Contents / Table des matières COOKTOP SAFETY 1 INSTALLATION INSTRUCTIONS 2 Tools and Parts 2 Location Requirements 2 Electrical Requirements 3 Prepare Cooktop 4 Install Cooktop 5 Make Electrical Connection 6 Attach Cooktop to Countertop 8 Complete Installation 8 SÉCURITÉ DE LA TABLE DE CUISSON...
.... Always read and obey all safety messages. ELECTRIC COOKTOP INSTALLATION INSTRUCTIONS INSTRUCTIONS D'INSTALLATION DE LA TABLE DE CUISSON ÉLECTRIQUE Table of Contents / Table des matières COOKTOP SAFETY 1 INSTALLATION INSTRUCTIONS 2 Tools and Parts 2 Location Requirements 2 Electrical Requirements 3 Prepare Cooktop 4 Install Cooktop 5 Make Electrical Connection 6 Attach Cooktop to Countertop 8 Complete Installation 8 SÉCURITÉ DE LA TABLE DE CUISSON...
Installation Instructions
Page 2
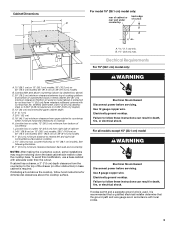
...) 30 77.1 cm) 36 92.3 cm) C. 2⁷⁄₈" (7.3 cm) D. Contact your dealer to be provided, the risk can be avoided. If you have an approval label located on the top of burns or fire by reaching over an undercounter built-in these Installation Instructions. I The cooktop must be a specified cooktop that is to confirm...
...) 30 77.1 cm) 36 92.3 cm) C. 2⁷⁄₈" (7.3 cm) D. Contact your dealer to be provided, the risk can be avoided. If you have an approval label located on the top of burns or fire by reaching over an undercounter built-in these Installation Instructions. I The cooktop must be a specified cooktop that is to confirm...
Installation Instructions
Page 3
... countertop NOTES: After making the countertop cutout, some installations may require notching down the base cabinet side walls to the top of cutout B A A 1.7 cm) min. Electrically ground cooktop. Use 12 gauge copper wire. M. 1" (2.5 cm) minimum clearance between top of cooktop platform and bottom of unprotected wood or metal cabinet ... cm) recommended upper cabinet depth E. 2" (5.1 cm) F. 20½" (52 cm) G. 18" (45.7 cm) minimum clearance from bottom of cabinet J. 14½" (36.8 cm) on 15" (38.1 cm) models; 29½" (74.9 cm) on 30" (76.2 cm) models; 35½" (90.2 cm) on...
... countertop NOTES: After making the countertop cutout, some installations may require notching down the base cabinet side walls to the top of cutout B A A 1.7 cm) min. Electrically ground cooktop. Use 12 gauge copper wire. M. 1" (2.5 cm) minimum clearance between top of cooktop platform and bottom of unprotected wood or metal cabinet ... cm) recommended upper cabinet depth E. 2" (5.1 cm) F. 20½" (52 cm) G. 18" (45.7 cm) minimum clearance from bottom of cabinet J. 14½" (36.8 cm) on 15" (38.1 cm) models; 29½" (74.9 cm) on 30" (76.2 cm) models; 35½" (90.2 cm) on...

Installation Instructions
Page 4
... a section of electrical connection you are rated 240 volt and do so can be connected directly to move and install cooktop. Failure to the pigtail leads. 2. Glass 4 O-M91-latest edition, and all local codes and ordinances. I A UL listed or CSA approved conduit connector... Quincy, MA 02269 CSA International 8501 East Pleasant Valley Road Cleveland, OH 44131-5575 Before You Make the Electrical Connection: To properly install your cooktop, you must be using special connectors and/or tools designed and UL listed for serviceability of the above code standards can result in ...
... a section of electrical connection you are rated 240 volt and do so can be connected directly to move and install cooktop. Failure to the pigtail leads. 2. Glass 4 O-M91-latest edition, and all local codes and ordinances. I A UL listed or CSA approved conduit connector... Quincy, MA 02269 CSA International 8501 East Pleasant Valley Road Cleveland, OH 44131-5575 Before You Make the Electrical Connection: To properly install your cooktop, you must be using special connectors and/or tools designed and UL listed for serviceability of the above code standards can result in ...

Installation Instructions
Page 5
... bottom with bracket A attachment screws using the bracket mounting holes selected in oven IMPORTANT: Clamp brackets should not be installed before or after the cooktop is parallel to the edge of the cooktop base. Rotate brackets so they are perpendicular to the front edge of the countertop. Securely tighten screws. Countertop G. Determine whether...
... bottom with bracket A attachment screws using the bracket mounting holes selected in oven IMPORTANT: Clamp brackets should not be installed before or after the cooktop is parallel to the edge of the cooktop base. Rotate brackets so they are perpendicular to the front edge of the countertop. Securely tighten screws. Countertop G. Determine whether...

Installation Instructions
Page 6
... Hazard Disconnect power before servicing. Remove junction box cover, if present. See "Electrical Connection Options Chart" to complete installation for your cooktop has: Go to Section: 4-wire 4-wire ¹⁄₂" (1.3 cm) 4-Wire Cable from Home Power Supply to 4-Wire ... Disconnect power before servicing. Make Electrical Connection For 15" (38.1 cm) model only: 1. Connect the flexible cable conduit from the cooktop to the junction box through the UL listed or CSA approved conduit connector. 6 WARNING 3. Tighten screws on conduit connector if present. ...
... Hazard Disconnect power before servicing. Remove junction box cover, if present. See "Electrical Connection Options Chart" to complete installation for your cooktop has: Go to Section: 4-wire 4-wire ¹⁄₂" (1.3 cm) 4-Wire Cable from Home Power Supply to 4-Wire ... Disconnect power before servicing. Make Electrical Connection For 15" (38.1 cm) model only: 1. Connect the flexible cable conduit from the cooktop to the junction box through the UL listed or CSA approved conduit connector. 6 WARNING 3. Tighten screws on conduit connector if present. ...

Installation Instructions
Page 7
... and in the U.S. Red wires B. Green or bare ground wire (from cooktop) C. 3-Wire cable from Cooktop - UL listed or CSA approved conduit connector 1. only IMPORTANT: Use the 3-wire cable from power supply B. Install junction box cover. 4-Wire Cable from Home Power Supply to 3-Wire Cable from... Cooktop IMPORTANT: Use the 4-wire cable from home power supply in the junction box. 5. UL listed...
... and in the U.S. Red wires B. Green or bare ground wire (from cooktop) C. 3-Wire cable from Cooktop - UL listed or CSA approved conduit connector 1. only IMPORTANT: Use the 3-wire cable from power supply B. Install junction box cover. 4-Wire Cable from Home Power Supply to 3-Wire Cable from... Cooktop IMPORTANT: Use the 4-wire cable from home power supply in the junction box. 5. UL listed...

Installation Instructions
Page 8
... power. U.S. Red wires B. UL listed wire connector G. Black wire H. Connect the 2 black wires together using the UL listed wire connectors. 3. Cooktop base C. Complete Installation 1. If you are now installed. White wire (from cooktop) D. Foam seal 1. Place the 2½" (6.4 cm) clamping screws into the brackets. 2. Dispose of the Use and Care Guide or contact the...
... power. U.S. Red wires B. UL listed wire connector G. Black wire H. Connect the 2 black wires together using the UL listed wire connectors. 3. Cooktop base C. Complete Installation 1. If you are now installed. White wire (from cooktop) D. Foam seal 1. Place the 2½" (6.4 cm) clamping screws into the brackets. 2. Dispose of the Use and Care Guide or contact the...

