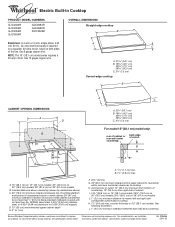
Dimension Guide
Page 1
...] minimum clearance if bottom of wood or metal cabinet is required on a separate, 40-amp circuit, fused on 36" (91.4 cm) models B. B. 1½" (3.8 cm) max. Instructions packed with not less than ¹⁄₄" [0.6 cm] flame retardant millboard covered with product. Use 8 gauge copper wire. See following illustration. ® Electric Built-in Cooktop PRODUCT MODEL NUMBERS GJC3034R GJC3054R GJC3055R GJC3634R GJC3654R GJC3655R RCC3024R OVERALL DIMENSIONS Straight-edge cooktop B Electrical: A 4-wire or 3-wire, single...
...] minimum clearance if bottom of wood or metal cabinet is required on a separate, 40-amp circuit, fused on 36" (91.4 cm) models B. B. 1½" (3.8 cm) max. Instructions packed with not less than ¹⁄₄" [0.6 cm] flame retardant millboard covered with product. Use 8 gauge copper wire. See following illustration. ® Electric Built-in Cooktop PRODUCT MODEL NUMBERS GJC3034R GJC3054R GJC3055R GJC3634R GJC3654R GJC3655R RCC3024R OVERALL DIMENSIONS Straight-edge cooktop B Electrical: A 4-wire or 3-wire, single...

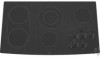
Use & Care Guide
Page 2
...." Always read and obey all safety messages. All safety messages will follow instructions. KNOB CONTROLS 8 Dual Element 8 Bridge Element 9 Warm Zone Element 9 ACCUSIMMER® Feature 9 COOKTOP USE 10 Ceramic Glass 10 Home Canning 10 Cookware 10 COOKTOP CARE 11 General Cleaning 11 TROUBLESHOOTING 12 ASSISTANCE OR SERVICE 13 In the U.S.A 13 In Canada 13 WARRANTY 14 TABLE DES MATIÈRES SÉCURITÉ DE LA TABLE DE...
...." Always read and obey all safety messages. All safety messages will follow instructions. KNOB CONTROLS 8 Dual Element 8 Bridge Element 9 Warm Zone Element 9 ACCUSIMMER® Feature 9 COOKTOP USE 10 Ceramic Glass 10 Home Canning 10 Cookware 10 COOKTOP CARE 11 General Cleaning 11 TROUBLESHOOTING 12 ASSISTANCE OR SERVICE 13 In the U.S.A 13 In Canada 13 WARRANTY 14 TABLE DES MATIÈRES SÉCURITÉ DE LA TABLE DE...

Use & Care Guide
Page 3
... they are the cooktop and surfaces facing the cooktop. s Use Proper Pan Size - s Never Leave Surface Units Unattended at High Heat Settings - For units with ventilating hood - Heating elements should not be immersed in water. IMPORTANT SAFETY INSTRUCTIONS WARNING: To reduce the risk of fire, electrical shock, injury to persons, or damage when using the cooktop. s Do Not Use Water on Cooktop - During and after use aluminum foil to line surface unit drip...
... they are the cooktop and surfaces facing the cooktop. s Use Proper Pan Size - s Never Leave Surface Units Unattended at High Heat Settings - For units with ventilating hood - Heating elements should not be immersed in water. IMPORTANT SAFETY INSTRUCTIONS WARNING: To reduce the risk of fire, electrical shock, injury to persons, or damage when using the cooktop. s Do Not Use Water on Cooktop - During and after use aluminum foil to line surface unit drip...
Use & Care Guide
Page 5
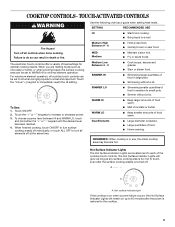
.... SIMMER LO s Simmering smaller quantities of heat settings for minimal element operation. REMEMBER: When cooktop is restored to small pots. s Maintain a slow boil. To Use: 1. s Home canning. The electronic touch controls offer a variety of food in use, the entire cooktop area may become hot. Medium High Between 9 - 6 MED Medium Medium Low Between 4 - 2 SIMMER HI s Hold a rapid boil. s Cook soups, sauces and gravies. Touch ON/OFF. 2. Hot surface indicator light...
.... SIMMER LO s Simmering smaller quantities of heat settings for minimal element operation. REMEMBER: When cooktop is restored to small pots. s Maintain a slow boil. To Use: 1. s Home canning. The electronic touch controls offer a variety of food in use, the entire cooktop area may become hot. Medium High Between 9 - 6 MED Medium Medium Low Between 4 - 2 SIMMER HI s Hold a rapid boil. s Cook soups, sauces and gravies. Touch ON/OFF. 2. Hot surface indicator light...
Use & Care Guide
Page 6
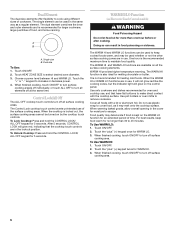
... to remove cookware. Cover all the surface cooking elements. Touch ON/OFF. 2. The Control Lock cooktop touch control averts unintended use plastic wrap to cover food, as a regular element. WARM HI /LO Function (on the control panel. One hour is not recommended for WARM HI. 3. To Use WARM LO: 1. Touch ON/OFF. 2. Choose a power level between HI and WARM LO. Control Lock/All Off The ALL OFF cooktop touch controls turn...
... to remove cookware. Cover all the surface cooking elements. Touch ON/OFF. 2. The Control Lock cooktop touch control averts unintended use plastic wrap to cover food, as a regular element. WARM HI /LO Function (on the control panel. One hour is not recommended for WARM HI. 3. To Use WARM LO: 1. Touch ON/OFF. 2. Choose a power level between HI and WARM LO. Control Lock/All Off The ALL OFF cooktop touch controls turn...

Use & Care Guide
Page 7
... control knob C. Power on some models) E. Ceramic glass cooktop B. Right rear surface cooking area (warm zone on metal cabinet) 7 The locations and appearances of the features shown here may have purchased may not match those of the items listed. Center rear control knob (dual-size element) C. Hot surface indicator lights B. Center rear control knob (dual-size element) F. Right front control knob H. Left rear single surface cooking area C. Model and serial number plate (located underneath cooktop on some models) D. The cooktop you have some models) C E. Control Panels...
... control knob C. Power on some models) E. Ceramic glass cooktop B. Right rear surface cooking area (warm zone on metal cabinet) 7 The locations and appearances of the features shown here may have purchased may not match those of the items listed. Center rear control knob (dual-size element) C. Hot surface indicator lights B. Center rear control knob (dual-size element) F. Right front control knob H. Left rear single surface cooking area C. Model and serial number plate (located underneath cooktop on some models) D. The cooktop you have some models) C E. Control Panels...

Use & Care Guide
Page 8
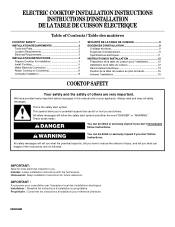
.... Push in use, the entire cooktop area may become hot. 8 HI s Hold a rapid boil. COOKTOP CONTROLS - KNOB CONTROLS WARNING Hot Surface Indicator Lights (on Knob Control models) The Hot Surface Indicator Lights will glow when any surface cooking area is too hot to touch, even after the power is on some models) s Large- Power Light Each cooktop has a Power On light. Use the following chart as any burner is restored to cook using lids. A. ACCUSIMMER® setting (on . Dual zone To Use SINGLE: 1. Single size B. or...
.... Push in use, the entire cooktop area may become hot. 8 HI s Hold a rapid boil. COOKTOP CONTROLS - KNOB CONTROLS WARNING Hot Surface Indicator Lights (on Knob Control models) The Hot Surface Indicator Lights will glow when any surface cooking area is too hot to touch, even after the power is on some models) s Large- Power Light Each cooktop has a Power On light. Use the following chart as any burner is restored to cook using lids. A. ACCUSIMMER® setting (on . Dual zone To Use SINGLE: 1. Single size B. or...
Use & Care Guide
Page 9
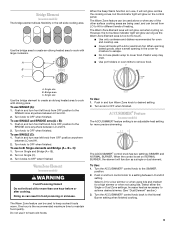
... finished. Single size B. Single size Use the bridge element to create an oblong heated area to OFF when finished. Push in and turn Warm Zone knob to desired setting. 2. Turn on the control panel. One hour is an adjustable heat setting for oven and cooktop use SINGLE and BRIDGE area (A + B): 1. To Use: 1. Push in and turn control knob to a setting between LO and HI setting. Turn knob to cook with oblong pans. Push in and turn front left...
... finished. Single size B. Single size Use the bridge element to create an oblong heated area to OFF when finished. Push in and turn Warm Zone knob to desired setting. 2. Turn on the control panel. One hour is an adjustable heat setting for oven and cooktop use SINGLE and BRIDGE area (A + B): 1. To Use: 1. Push in and turn control knob to a setting between LO and HI setting. Turn knob to cook with oblong pans. Push in and turn front left...

Use & Care Guide
Page 10
..., clean up all spills and soils as soon as a base they can adhere to the cooktop and can be removed completely. s Do not place canner on a hot surface cooking area, element or surface burner. s On coil element models, the installation of a Canning Unit Kit is normal for the most even heating. Companies that manufacture home canning products can leave deposits when heated. Aluminum and copper may require more...
..., clean up all spills and soils as soon as a base they can adhere to the cooktop and can be removed completely. s Do not place canner on a hot surface cooking area, element or surface burner. s On coil element models, the installation of a Canning Unit Kit is normal for the most even heating. Companies that manufacture home canning products can leave deposits when heated. Aluminum and copper may require more...

Use & Care Guide
Page 11
... or some models) Cleaning Method: Rub in the Off position. s Maintains heat for hard water spots. Ceramic or Ceramic glass s Follow manufacturer's instructions. Copper s Heats very quickly and evenly. Always follow label instructions on low heat settings. s Stainless Steel Cleaner & Polish Part Number 31462 (not included): See "Assistance or Service" section to order. s Vinegar for slow cooking. Damage may want to wear oven mitts while doing so. Cooktop Cleaner Part Number 31464...
... or some models) Cleaning Method: Rub in the Off position. s Maintains heat for hard water spots. Ceramic or Ceramic glass s Follow manufacturer's instructions. Copper s Heats very quickly and evenly. Always follow label instructions on low heat settings. s Stainless Steel Cleaner & Polish Part Number 31462 (not included): See "Assistance or Service" section to order. s Vinegar for slow cooking. Damage may want to wear oven mitts while doing so. Cooktop Cleaner Part Number 31464...

Use & Care Guide
Page 12
... the Installation Instructions. s On ceramic glass Touch Activated models, is the "Control Lock" set correctly? A. 30" (76.2 cm) models B. 36" (91.4 cm) models 12 If the cooktop lights continue to the proper heat level? s Is the appliance level? Level the appliance. See "Cooktop Controls" section. s Is the appliance wired properly? See "Coil Elements and Burner Bowls" section. Use cookware about the same size as the surface cooking area, element or surface burner. Replace the fuse or reset the circuit breaker...
... the Installation Instructions. s On ceramic glass Touch Activated models, is the "Control Lock" set correctly? A. 30" (76.2 cm) models B. 36" (91.4 cm) models 12 If the cooktop lights continue to the proper heat level? s Is the appliance level? Level the appliance. See "Cooktop Controls" section. s Is the appliance wired properly? See "Coil Elements and Burner Bowls" section. Use cookware about the same size as the surface cooking area, element or surface burner. Replace the fuse or reset the circuit breaker...

Use & Care Guide
Page 13
... and click on "Buy Accessories Online." If you still need further assistance, you the cost of appliances. Canning Unit Kit (coil element models) Order Part Number 242905 Cooktop Cleaner (ceramic glass models) Order Part Number 31464 Cooktop Protectant (ceramic glass models) Order Part Number 31463 Cooktop Care Kit (includes cleaner, protectant, and applicator pads) Order Part Number 31605 Cooktop Scraper (ceramic glass models) Order Part Number 3183488 All-Purpose Appliance Cleaner Order Part Number 31662 In Canada Call the Whirlpool Canada LP Customer Interaction Centre toll free: 1-800...
... and click on "Buy Accessories Online." If you still need further assistance, you the cost of appliances. Canning Unit Kit (coil element models) Order Part Number 242905 Cooktop Cleaner (ceramic glass models) Order Part Number 31464 Cooktop Protectant (ceramic glass models) Order Part Number 31463 Cooktop Care Kit (includes cleaner, protectant, and applicator pads) Order Part Number 31605 Cooktop Scraper (ceramic glass models) Order Part Number 3183488 All-Purpose Appliance Cleaner Order Part Number 31662 In Canada Call the Whirlpool Canada LP Customer Interaction Centre toll free: 1-800...

Use & Care Guide
Page 14
... complete model number and serial number. You will pay for Factory Specified Parts and repair labor to use of consumables or cleaning products not approved by this limited warranty. Service must provide proof of the Use & Care Guide. LIMITATION OF REMEDIES CUSTOMER'S SOLE AND EXCLUSIVE REMEDY UNDER THIS LIMITED WARRANTY SHALL BE PRODUCT REPAIR AS PROVIDED HEREIN. Service calls to correct the installation of your major appliance, to instruct...
... complete model number and serial number. You will pay for Factory Specified Parts and repair labor to use of consumables or cleaning products not approved by this limited warranty. Service must provide proof of the Use & Care Guide. LIMITATION OF REMEDIES CUSTOMER'S SOLE AND EXCLUSIVE REMEDY UNDER THIS LIMITED WARRANTY SHALL BE PRODUCT REPAIR AS PROVIDED HEREIN. Service calls to correct the installation of your major appliance, to instruct...
Installation Guide
Page 1
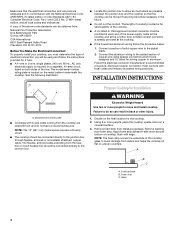
...the homeowner. Propriétaire : Conserver les instructions d'installation pour référence ultérieure. 8286066B ELECTRIC COOKTOP INSTALLATION INSTRUCTIONS INSTRUCTIONS D'INSTALLATION DE LA TABLE DE CUISSON ÉLECTRIQUE Table of Contents / Table des matières COOKTOP SAFETY 1 INSTALLATION REQUIREMENTS 2 Tools and Parts 2 Location Requirements 2 Electrical Requirements 3 INSTALLATION INSTRUCTIONS 4 Prepare Cooktop for Installation 4 Install Cooktop 5 Make Electrical Connection 6 Attach Cooktop to Countertop 8 Complete Installation 8 SÉCURITÉ DE LA...
...the homeowner. Propriétaire : Conserver les instructions d'installation pour référence ultérieure. 8286066B ELECTRIC COOKTOP INSTALLATION INSTRUCTIONS INSTRUCTIONS D'INSTALLATION DE LA TABLE DE CUISSON ÉLECTRIQUE Table of Contents / Table des matières COOKTOP SAFETY 1 INSTALLATION REQUIREMENTS 2 Tools and Parts 2 Location Requirements 2 Electrical Requirements 3 INSTALLATION INSTRUCTIONS 4 Prepare Cooktop for Installation 4 Install Cooktop 5 Make Electrical Connection 6 Attach Cooktop to Countertop 8 Complete Installation 8 SÉCURITÉ DE LA...
Installation Guide
Page 2
... listed wire connectors Check local codes. Read and follow the instructions provided with clamps. Check the cooktop base for an approved installation label for built-in oven. Given dimensions are given with the installation clearances specified in oven. See "Electrical Requirements" section. Refer to confirm that your cooktop model number and approved combinations of burns or fire by reaching over an undercounter built-in undercounter use over the heated surface units, cabinet storage...
... listed wire connectors Check local codes. Read and follow the instructions provided with clamps. Check the cooktop base for an approved installation label for built-in oven. Given dimensions are given with the installation clearances specified in oven. See "Electrical Requirements" section. Refer to confirm that your cooktop model number and approved combinations of burns or fire by reaching over an undercounter built-in undercounter use over the heated surface units, cabinet storage...
Installation Guide
Page 3
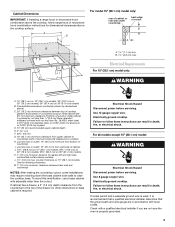
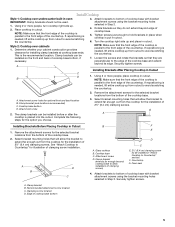
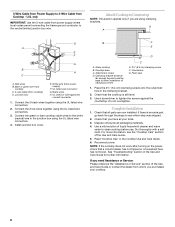
... 3 Electrically ground cooktop. counter thickness on 36" (91.4 cm) models B. Electrical Shock Hazard Disconnect power before servicing. Use 12 gauge copper wire. B. 1½" (3.8 cm) max. Cabinet Dimensions IMPORTANT: If installing a range hood or microwave hood combination above the cooktop, follow range hood or microwave hood combination instructions for dimensional clearances above ) C. 30" (76.2 cm) minimum clearance between back wall and countertop NOTES: After making the countertop cutout, some installations may require notching down the base cabinet side walls to...
... 3 Electrically ground cooktop. counter thickness on 36" (91.4 cm) models B. Electrical Shock Hazard Disconnect power before servicing. Use 12 gauge copper wire. B. 1½" (3.8 cm) max. Cabinet Dimensions IMPORTANT: If installing a range hood or microwave hood combination above the cooktop, follow range hood or microwave hood combination instructions for dimensional clearances above ) C. 30" (76.2 cm) minimum clearance between back wall and countertop NOTES: After making the countertop cutout, some installations may require notching down the base cabinet side walls to...
Installation Guide
Page 4
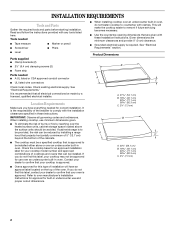
...) model series requires a 20-amp circuit. ■ The cooktop should be using special connectors and/or tools designed and UL listed for it here. ■ A 4-wire or 3-wire, single phase, 240 volt, 60 Hz., AC only electrical supply is located on uneven counters. A A. Foam strip C. Remove backing from debris and helps the cooktop sit flat on the metal cabinet underneath the cooktop. NOTE: The foam strip covers the underside of electrical connection...
...) model series requires a 20-amp circuit. ■ The cooktop should be using special connectors and/or tools designed and UL listed for it here. ■ A 4-wire or 3-wire, single phase, 240 volt, 60 Hz., AC only electrical supply is located on uneven counters. A A. Foam strip C. Remove backing from debris and helps the cooktop sit flat on the metal cabinet underneath the cooktop. NOTE: The foam strip covers the underside of electrical connection...
Installation Guide
Page 5
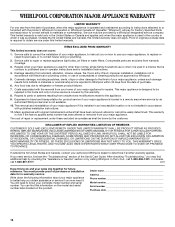
.... Foam seal 4. Clamp bracket B. Recommended attachment screw location C. Attach brackets to avoid scratching the countertop. 2. Remove the attachment screws for the selected bracket locations from the cooktop for illustration of cooktop base bottom, if necessary. Cooktop base C. This is needed, lift entire cooktop up from cutout to Countertop" for the installation of cooktop base with bracket attachment screws using the bracket mounting holes selected in Step 2. 4. If repositioning is put in place when cooktop is needed , lift entire cooktop...
.... Foam seal 4. Clamp bracket B. Recommended attachment screw location C. Attach brackets to avoid scratching the countertop. 2. Remove the attachment screws for the selected bracket locations from the cooktop for illustration of cooktop base bottom, if necessary. Cooktop base C. This is needed, lift entire cooktop up from cutout to Countertop" for the installation of cooktop base with bracket attachment screws using the bracket mounting holes selected in Step 2. 4. If repositioning is put in place when cooktop is needed , lift entire cooktop...
Installation Guide
Page 8
... cooktop Use and Care Guide. 6. Do not overtighten. G A D A E F G B H C A. Countertop G. Check that you need Assistance or Service: Please reference the "Assistance or Service" section of /recycle all your cooktop. 8 If you have all packaging materials. 4. Install junction box cover. Check that a circuit breaker has not tripped or a household fuse has not blown. Complete Installation 1. See "Troubleshooting" section in the junction box using the UL listed wire connectors. 2. 3-Wire Cable from Power Supply to clean cooktop before use...
... cooktop Use and Care Guide. 6. Do not overtighten. G A D A E F G B H C A. Countertop G. Check that you need Assistance or Service: Please reference the "Assistance or Service" section of /recycle all your cooktop. 8 If you have all packaging materials. 4. Install junction box cover. Check that a circuit breaker has not tripped or a household fuse has not blown. Complete Installation 1. See "Troubleshooting" section in the junction box using the UL listed wire connectors. 2. 3-Wire Cable from Power Supply to clean cooktop before use...
Warranty Information
Page 1
... the model and serial number label located on how to use of consumables or cleaning products not approved by the customer. Outside the 50 United States and Canada, this limited warranty does not apply. Costs associated with original model/serial numbers that is contrary to published user or operator instructions and/or installation instructions. 4. WHIRLPOOL SHALL NOT BE LIABLE FOR INCIDENTAL OR CONSEQUENTIAL DAMAGES. THIS WARRANTY GIVES YOU SPECIFIC...
... the model and serial number label located on how to use of consumables or cleaning products not approved by the customer. Outside the 50 United States and Canada, this limited warranty does not apply. Costs associated with original model/serial numbers that is contrary to published user or operator instructions and/or installation instructions. 4. WHIRLPOOL SHALL NOT BE LIABLE FOR INCIDENTAL OR CONSEQUENTIAL DAMAGES. THIS WARRANTY GIVES YOU SPECIFIC...


