

Use & Care Guide
Page 2
...ENTRETIEN DE LA TABLE DE CUISSON 25 Nettoyage général 25 DÉPANNAGE 26 ASSISTANCE OU SERVICE 27 GARANTIE 28 COOKTOP SAFETY Your safety and the safety of injury, and tell you and others are not followed. 2 This symbol alerts you...if you don't immediately follow instructions. TABLE OF CONTENTS COOKTOP SAFETY 2 PARTS AND FEATURES TOUCH-ACTIVATED CONTROLS 4 COOKTOP CONTROLS TOUCH-ACTIVATED CONTROLS 5 Dual Element 6 Control Lock/All Off 6 WARM HI /LO Function 6 PARTS AND FEATURES - KNOB CONTROLS 7 COOKTOP CONTROLS - We have provided many important safety messages ...
...ENTRETIEN DE LA TABLE DE CUISSON 25 Nettoyage général 25 DÉPANNAGE 26 ASSISTANCE OU SERVICE 27 GARANTIE 28 COOKTOP SAFETY Your safety and the safety of injury, and tell you and others are not followed. 2 This symbol alerts you...if you don't immediately follow instructions. TABLE OF CONTENTS COOKTOP SAFETY 2 PARTS AND FEATURES TOUCH-ACTIVATED CONTROLS 4 COOKTOP CONTROLS TOUCH-ACTIVATED CONTROLS 5 Dual Element 6 Control Lock/All Off 6 WARM HI /LO Function 6 PARTS AND FEATURES - KNOB CONTROLS 7 COOKTOP CONTROLS - We have provided many important safety messages ...

Use & Care Guide
Page 3
They should never be allowed to sit or stand on any part of the cooktop unless specifically recommended in cabinets above a cooktop - Do not repair or replace any part of the cooktop. Do not let potholder touch hot heating elements. s Never Leave Surface Units ...INSTRUCTIONS 3 IMPORTANT SAFETY INSTRUCTIONS WARNING: To reduce the risk of fire, electrical shock, injury to persons, or damage when using the cooktop. Children climbing on Broken Cooktop - Be sure your cooktop is in area where cooktop is properly installed and grounded by a qualified technician. s Do Not ...
They should never be allowed to sit or stand on any part of the cooktop unless specifically recommended in cabinets above a cooktop - Do not repair or replace any part of the cooktop. Do not let potholder touch hot heating elements. s Never Leave Surface Units ...INSTRUCTIONS 3 IMPORTANT SAFETY INSTRUCTIONS WARNING: To reduce the risk of fire, electrical shock, injury to persons, or damage when using the cooktop. Children climbing on Broken Cooktop - Be sure your cooktop is in area where cooktop is properly installed and grounded by a qualified technician. s Do Not ...

Use & Care Guide
Page 4
...91.4 cm]) Touch-Activated Electronic Controls A B A B C C D G F E D H G FE A. Control lock/All off H. Increase/decrease temperature touch control Cooktops 36" (91.4 cm) Touch-Activated Electronic Control Model shown B C D E. Left front touch control (simmer function; dual-size element) A H G A. Model and serial... (with dual-size element) H. Left front surface cooking area (with dual-size element) 4 F D. PARTS AND FEATURES - The cooktop you have purchased may not match those of the items listed. The locations and appearances of the features shown...
...91.4 cm]) Touch-Activated Electronic Controls A B A B C C D G F E D H G FE A. Control lock/All off H. Increase/decrease temperature touch control Cooktops 36" (91.4 cm) Touch-Activated Electronic Control Model shown B C D E. Left front touch control (simmer function; dual-size element) A H G A. Model and serial... (with dual-size element) H. Left front surface cooking area (with dual-size element) 4 F D. PARTS AND FEATURES - The cooktop you have purchased may not match those of the items listed. The locations and appearances of the features shown...

Use & Care Guide
Page 7
PARTS AND FEATURES - Center rear control knob (dual-size element) C. ACCUSIMMER® control knob D. Power on light E. Left rear single surface cooking area C. Right front surface cooking area E G. The cooktop you have purchased may not match those of the items listed. Control ... rear control knob C. Power on light G. Center rear control knob (dual-size element) F. Right front control knob F. Ceramic glass cooktop B. Control panel F. Left rear control knob B. Hot surface indicator lights B. Right rear control knob (Warm zone control on metal cabinet...
PARTS AND FEATURES - Center rear control knob (dual-size element) C. ACCUSIMMER® control knob D. Power on light E. Left rear single surface cooking area C. Right front surface cooking area E G. The cooktop you have purchased may not match those of the items listed. Control ... rear control knob C. Power on light G. Center rear control knob (dual-size element) F. Right front control knob F. Ceramic glass cooktop B. Control panel F. Left rear control knob B. Hot surface indicator lights B. Right rear control knob (Warm zone control on metal cabinet...

Use & Care Guide
Page 10
... and water can also offer assistance. s Center the canner on 2 surface cooking areas, elements or surface burners at the same time. On electric cooktops, canners should not extend more than ½" (1.3 cm) outside the area. s Do not place canner on the grate or largest surface cooking...or base in any part of surface cooking areas, elements or surface burners between batches. s On coil element models, the installation of medium-to its base material. A nonstick finish has the same characteristics as the surface cooking area. It is removed. As the cooktop cools, air can be...
... and water can also offer assistance. s Center the canner on 2 surface cooking areas, elements or surface burners at the same time. On electric cooktops, canners should not extend more than ½" (1.3 cm) outside the area. s Do not place canner on the grate or largest surface cooking...or base in any part of surface cooking areas, elements or surface burners between batches. s On coil element models, the installation of medium-to its base material. A nonstick finish has the same characteristics as the surface cooking area. It is removed. As the cooktop cools, air can be...

Use & Care Guide
Page 11
...Damage may be ordered as an accessory. On some models, do not affect cooking performance and after many cleanings become less noticeable. Cooktop Cleaner Part Number 31464 is recommended for regular use steel wool, abrasive powder cleansers, chlorine bleach, rust remover or ammonia because damage may ...remove. s Soap and water or dishwasher: Pull knobs straight away from aluminum and copper s Cooktop Polishing Creme: Clean as soon as an accessory. It may occur. Cooktop Scraper Part Number 3183488 is still warm. Store razor blades out of the reach of aluminum or copper on...
...Damage may be ordered as an accessory. On some models, do not affect cooking performance and after many cleanings become less noticeable. Cooktop Cleaner Part Number 31464 is recommended for regular use steel wool, abrasive powder cleansers, chlorine bleach, rust remover or ammonia because damage may ...remove. s Soap and water or dishwasher: Pull knobs straight away from aluminum and copper s Cooktop Polishing Creme: Clean as soon as an accessory. It may occur. Cooktop Scraper Part Number 3183488 is still warm. Store razor blades out of the reach of aluminum or copper on...

Use & Care Guide
Page 13
... models) Order Part Number 242905 Cooktop Cleaner (ceramic glass models) Order Part Number 31464 Cooktop Protectant (ceramic glass models) Order Part Number 31463 Cooktop Care Kit (includes cleaner, protectant, and applicator pads) Order Part Number 31605 Cooktop Scraper (ceramic glass models) Order Part Number 3183488 All-Purpose Appliance Cleaner Order Part Number 31662 In Canada Call the Whirlpool Canada LP Customer...
... models) Order Part Number 242905 Cooktop Cleaner (ceramic glass models) Order Part Number 31464 Cooktop Protectant (ceramic glass models) Order Part Number 31463 Cooktop Care Kit (includes cleaner, protectant, and applicator pads) Order Part Number 31605 Cooktop Scraper (ceramic glass models) Order Part Number 3183488 All-Purpose Appliance Cleaner Order Part Number 31662 In Canada Call the Whirlpool Canada LP Customer...
Use & Care Guide
Page 14
... & Care Guide. Service calls to determine if another warranty applies. Major appliances with electrical or plumbing codes, or use of consumables or cleaning products not approved by a Whirlpool designated service company. SOME STATES AND PROVINCES DO NOT ALLOW THE EXCLUSION OR LIMITATION OF... REPAIR AS PROVIDED HEREIN. Write down the following information about your major appliance for other damage to parts or systems resulting from warranty coverage. 3. WHIRLPOOL CORPORATION MAJOR APPLIANCE WARRANTY LIMITED WARRANTY For one year from the date of purchase, when this limited ...
... & Care Guide. Service calls to determine if another warranty applies. Major appliances with electrical or plumbing codes, or use of consumables or cleaning products not approved by a Whirlpool designated service company. SOME STATES AND PROVINCES DO NOT ALLOW THE EXCLUSION OR LIMITATION OF... REPAIR AS PROVIDED HEREIN. Write down the following information about your major appliance for other damage to parts or systems resulting from warranty coverage. 3. WHIRLPOOL CORPORATION MAJOR APPLIANCE WARRANTY LIMITED WARRANTY For one year from the date of purchase, when this limited ...
Installation Instructions
Page 1
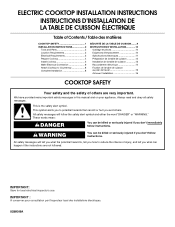
... the safety of others . IMPORTANT: Save for local electrical inspector's use. ELECTRIC COOKTOP INSTALLATION INSTRUCTIONS INSTRUCTIONS D'INSTALLATION DE LA TABLE DE CUISSON ÉLECTRIQUE Table of Contents / Table des matières COOKTOP SAFETY 1 INSTALLATION INSTRUCTIONS 2 Tools and Parts 2 Location Requirements 2 Electrical Requirements 3 Prepare Cooktop 4 Install Cooktop 5 Make Electrical Connection 6 Attach Cooktop to potential hazards that can happen if the...
... the safety of others . IMPORTANT: Save for local electrical inspector's use. ELECTRIC COOKTOP INSTALLATION INSTRUCTIONS INSTRUCTIONS D'INSTALLATION DE LA TABLE DE CUISSON ÉLECTRIQUE Table of Contents / Table des matières COOKTOP SAFETY 1 INSTALLATION INSTRUCTIONS 2 Tools and Parts 2 Location Requirements 2 Electrical Requirements 3 Prepare Cooktop 4 Install Cooktop 5 Make Electrical Connection 6 Attach Cooktop to potential hazards that can happen if the...
Installation Instructions
Page 2
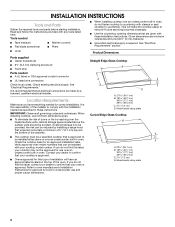
... Instructions for approval for correct installation. It is the responsibility of the oven. INSTALLATION INSTRUCTIONS Tools and Parts Gather the required tools and parts before starting installation. Curved Edge Glass Cooktop I Grounded electrical supply is approved. Check the cooktop base for this label, contact your dealer to remove if future servicing becomes necessary. If you...
... Instructions for approval for correct installation. It is the responsibility of the oven. INSTALLATION INSTRUCTIONS Tools and Parts Gather the required tools and parts before starting installation. Curved Edge Glass Cooktop I Grounded electrical supply is approved. Check the cooktop base for this label, contact your dealer to remove if future servicing becomes necessary. If you...
Installation Instructions
Page 4
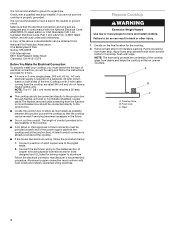
Make sure that the cooktop can be moved if servicing becomes necessary in conformance with the National Electrical Code, ANSI/NFPA 70-latest edition or CSA Standards C22.1-94, Canadian Electrical Code, Part 1 and C22.2 No. O-M91-latest edition, and all local codes and ordinances. NOTE: The 15" (38....1 cm) model series requires a 20-amp circuit. I The cooktop should be connected directly to have a neutral (white) wire...
Make sure that the cooktop can be moved if servicing becomes necessary in conformance with the National Electrical Code, ANSI/NFPA 70-latest edition or CSA Standards C22.1-94, Canadian Electrical Code, Part 1 and C22.2 No. O-M91-latest edition, and all local codes and ordinances. NOTE: The 15" (38....1 cm) model series requires a 20-amp circuit. I The cooktop should be connected directly to have a neutral (white) wire...

Installation Instructions
Page 8
... brackets. Bare or green wire from cooktop C. 3-wire cable (from whom you have all your cooktop. 8 Black wire H. D C A. Dry thoroughly with a soft cloth. NOTE: If the cooktop does not work after turning on the power, check that the cooktop is an extra part, go back through the steps to ...see the "Cooktop Care" section of liquid household cleaner and warm water to alllow installation of the...
... brackets. Bare or green wire from cooktop C. 3-wire cable (from whom you have all your cooktop. 8 Black wire H. D C A. Dry thoroughly with a soft cloth. NOTE: If the cooktop does not work after turning on the power, check that the cooktop is an extra part, go back through the steps to ...see the "Cooktop Care" section of liquid household cleaner and warm water to alllow installation of the...


