
Use & Care Guide
Page 2
... you to reduce the chance of others . Always read and obey all safety messages. All safety messages will follow instructions. TABLE OF CONTENTS COOKTOP SAFETY 2 PARTS AND FEATURES TOUCH-ACTIVATED CONTROLS 4 COOKTOP CONTROLS TOUCH-ACTIVATED CONTROLS 5 Dual Element 6 Control Lock/All Off 6 WARM HI /LO Function...
... you to reduce the chance of others . Always read and obey all safety messages. All safety messages will follow instructions. TABLE OF CONTENTS COOKTOP SAFETY 2 PARTS AND FEATURES TOUCH-ACTIVATED CONTROLS 4 COOKTOP CONTROLS TOUCH-ACTIVATED CONTROLS 5 Dual Element 6 Control Lock/All Off 6 WARM HI /LO Function...

Use & Care Guide
Page 3
...the risk of burns, ignition of flammable materials, and spillage due to cool. If cooktop should never be allowed to accumulate on any part of glass, glass/ceramic, ceramic, earthenware, or other servicing should never be hot even though they have had sufficient time to unintentional ...let potholder touch hot heating elements. Be sure your cooktop is properly installed and grounded by a qualified technician. Do not repair or replace any part of interest to damage. s Use Only Dry Potholders - Areas near units until they are dark in cabinets above a cooktop - Surface units ...
...the risk of burns, ignition of flammable materials, and spillage due to cool. If cooktop should never be allowed to accumulate on any part of glass, glass/ceramic, ceramic, earthenware, or other servicing should never be hot even though they have had sufficient time to unintentional ...let potholder touch hot heating elements. Be sure your cooktop is properly installed and grounded by a qualified technician. Do not repair or replace any part of interest to damage. s Use Only Dry Potholders - Areas near units until they are dark in cabinets above a cooktop - Surface units ...

Use & Care Guide
Page 4
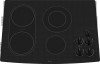
... temperature touch control Cooktops 36" (91.4 cm) Touch-Activated Electronic Control Model shown B C D E. Right rear surface cooking area E. Control lock/All off G. dual-size element) A. PARTS AND FEATURES - warming function;
... temperature touch control Cooktops 36" (91.4 cm) Touch-Activated Electronic Control Model shown B C D E. Right rear surface cooking area E. Control lock/All off G. dual-size element) A. PARTS AND FEATURES - warming function;

Use & Care Guide
Page 7
... models. Left rear single surface cooking area C. Right rear control knob (Warm zone control on some models) D. Right front control knob H. Hot surface indicator lights B. PARTS AND FEATURES -
... models. Left rear single surface cooking area C. Right rear control knob (Warm zone control on some models) D. Right front control knob H. Hot surface indicator lights B. PARTS AND FEATURES -

Use & Care Guide
Page 10
... a well-fitting lid and the material should be more than ½" (1.3 cm) beyond the surface cooking area or element. Cookware material is a factor in any part of a Canning Unit Kit is on the cooktop or grates. s Do not store jars or cans above the cooktop. s Do not leave a hot lid on...
... a well-fitting lid and the material should be more than ½" (1.3 cm) beyond the surface cooking area or element. Cookware material is a factor in any part of a Canning Unit Kit is on the cooktop or grates. s Do not store jars or cans above the cooktop. s Do not leave a hot lid on...

Use & Care Guide
Page 11
...: Before cleaning, make sure knobs are in direction of aluminum or copper on stainless steel provides even heating. s Stainless Steel Cleaner & Polish Part Number 31462 (not included): See "Assistance or Service" section to remove. s Liquid detergent or all-purpose cleaner: Rinse with clean water and...are off and the oven and cooktop are suggested first unless otherwise noted. Cooktop Cleaner Part Number 31464 is still warm. See "Assistance or Service" section to order. Cooktop Scraper Part Number 3183488 is also recommended for most cooking tasks. You may occur. 11 Continue ...
...: Before cleaning, make sure knobs are in direction of aluminum or copper on stainless steel provides even heating. s Stainless Steel Cleaner & Polish Part Number 31462 (not included): See "Assistance or Service" section to remove. s Liquid detergent or all-purpose cleaner: Rinse with clean water and...are off and the oven and cooktop are suggested first unless otherwise noted. Cooktop Cleaner Part Number 31464 is still warm. See "Assistance or Service" section to order. Cooktop Scraper Part Number 3183488 is also recommended for most cooking tasks. You may occur. 11 Continue ...

Use & Care Guide
Page 13
... our full line of a service call. To locate FSP® replacement parts in your request. s Accessory and repair parts sales. s Referrals to your area, call the Whirlpool Customer eXperience Center toll free at www.whirlpool.com and click on "Buy Accessories Online." For further assistance If you.... s Use and maintenance procedures. s Use and maintenance procedures. It may save you can write to order replacement parts, we recommend that you still need to Whirlpool Canada LP with : s Features and specifications on our full line of your area, you the cost of appliances....
... our full line of a service call. To locate FSP® replacement parts in your request. s Accessory and repair parts sales. s Referrals to your area, call the Whirlpool Customer eXperience Center toll free at www.whirlpool.com and click on "Buy Accessories Online." For further assistance If you.... s Use and maintenance procedures. s Use and maintenance procedures. It may save you can write to order replacement parts, we recommend that you still need to Whirlpool Canada LP with : s Features and specifications on our full line of your area, you the cost of appliances....

Use & Care Guide
Page 14
... the 50 United States and Canada, this major appliance is reported to Whirlpool within 30 days from unauthorized modifications made to correct defects in which it is used for Factory Specified Parts and repair labor to the appliance. 9. Any food loss due to ...the date of purchase, when this limited warranty does not apply. Consumable parts are excluded from your major appliance is used in a remote area where service by calling Whirlpool. This warranty is covered by Whirlpool. 5. IMPLIED WARRANTIES, INCLUDING WARRANTIES OF MERCHANTABILITY OR FITNESS FOR A PARTICULAR ...
... the 50 United States and Canada, this major appliance is reported to Whirlpool within 30 days from unauthorized modifications made to correct defects in which it is used for Factory Specified Parts and repair labor to the appliance. 9. Any food loss due to ...the date of purchase, when this limited warranty does not apply. Consumable parts are excluded from your major appliance is used in a remote area where service by calling Whirlpool. This warranty is covered by Whirlpool. 5. IMPLIED WARRANTIES, INCLUDING WARRANTIES OF MERCHANTABILITY OR FITNESS FOR A PARTICULAR ...
Installation Guide
Page 1
... INSTALLATION INSTRUCTIONS INSTRUCTIONS D'INSTALLATION DE LA TABLE DE CUISSON ÉLECTRIQUE Table of Contents / Table des matières COOKTOP SAFETY 1 INSTALLATION REQUIREMENTS 2 Tools and Parts 2 Location Requirements 2 Electrical Requirements 3 INSTALLATION INSTRUCTIONS 4 Prepare Cooktop for Installation 4 Install Cooktop 5 Make Electrical Connection 6 Attach Cooktop to Countertop 8 Complete Installation 8 SÉCURITÉ DE...
... INSTALLATION INSTRUCTIONS INSTRUCTIONS D'INSTALLATION DE LA TABLE DE CUISSON ÉLECTRIQUE Table of Contents / Table des matières COOKTOP SAFETY 1 INSTALLATION REQUIREMENTS 2 Tools and Parts 2 Location Requirements 2 Electrical Requirements 3 INSTALLATION INSTRUCTIONS 4 Prepare Cooktop for Installation 4 Install Cooktop 5 Make Electrical Connection 6 Attach Cooktop to Countertop 8 Complete Installation 8 SÉCURITÉ DE...
Installation Guide
Page 2
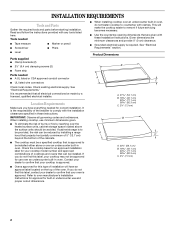
... above the surface units should be reduced by a licensed, qualified electrical installer. INSTALLATION REQUIREMENTS Tools and Parts Gather the required tools and parts before starting installation. Read and follow the instructions provided with these instructions. Tools needed ■ Tape ... ■ Marker or pencil ■ Screwdriver ■ Pliers ■ Level Parts supplied ■ Clamp brackets (2) ■ 2¹⁄₂" (6.4 cm) clamping screws (2) ■ Foam strip Parts needed for this label, your cooktop model number and approved combinations of the installer...
... above the surface units should be reduced by a licensed, qualified electrical installer. INSTALLATION REQUIREMENTS Tools and Parts Gather the required tools and parts before starting installation. Read and follow the instructions provided with these instructions. Tools needed ■ Tape ... ■ Marker or pencil ■ Screwdriver ■ Pliers ■ Level Parts supplied ■ Clamp brackets (2) ■ 2¹⁄₂" (6.4 cm) clamping screws (2) ■ Foam strip Parts needed for this label, your cooktop model number and approved combinations of the installer...
Installation Guide
Page 4
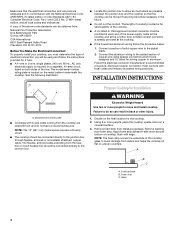
... surface. 3. Model/serial number plate ■ Cooktops with the National Electrical Code, ANSI/NFPA 70-latest edition or CSA Standards C22.1-94, Canadian Electrical Code, Part 1 and C22.2 No. Make sure that the cooktop can be connected directly to the junction box through flexible, armored or nonmetallic sheathed, copper cable.
... surface. 3. Model/serial number plate ■ Cooktops with the National Electrical Code, ANSI/NFPA 70-latest edition or CSA Standards C22.1-94, Canadian Electrical Code, Part 1 and C22.2 No. Make sure that the cooktop can be connected directly to the junction box through flexible, armored or nonmetallic sheathed, copper cable.
Installation Guide
Page 8
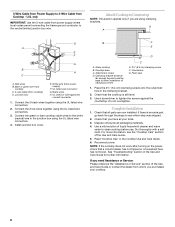
White wire (from whom you need Assistance or Service: Please reference the "Assistance or Service" section of /recycle all parts are using the UL listed wire connectors. 4. Connect the 2 black wires together using the UL listed wire connectors. 3. Glass cooktop B. Countertop G. Check... 2½" (6.4 cm) clamping screw F. NOTE: If the cooktop does not work after turning on the power, check that the cooktop is an extra part, go back through the steps to tighten the screws against the countertop. only IMPORTANT: Use the 3-wire cable from power supply where local codes permit...
White wire (from whom you need Assistance or Service: Please reference the "Assistance or Service" section of /recycle all parts are using the UL listed wire connectors. 4. Connect the 2 black wires together using the UL listed wire connectors. 3. Glass cooktop B. Countertop G. Check... 2½" (6.4 cm) clamping screw F. NOTE: If the cooktop does not work after turning on the power, check that the cooktop is an extra part, go back through the steps to tighten the screws against the countertop. only IMPORTANT: Use the 3-wire cable from power supply where local codes permit...
Warranty Information
Page 1
...or Canada and applies only when the major appliance is used in the country in a remote area where service by calling Whirlpool. Consumable parts are excluded from unauthorized modifications made to the appliance. 9. Repairs to better help by checking the "Assistance or Service"... section or by an authorized Whirlpool servicer is reported to correct the installation of your major appliance for repairs. DISCLAIMER OF IMPLIED WARRANTIES...
...or Canada and applies only when the major appliance is used in the country in a remote area where service by calling Whirlpool. Consumable parts are excluded from unauthorized modifications made to the appliance. 9. Repairs to better help by checking the "Assistance or Service"... section or by an authorized Whirlpool servicer is reported to correct the installation of your major appliance for repairs. DISCLAIMER OF IMPLIED WARRANTIES...


