Dimension Guide
Page 1
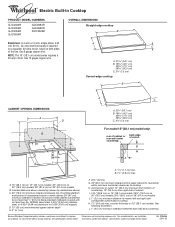
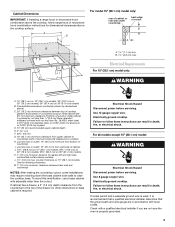
...) minimum distance to nearest left and right side combustible surface above ) C. 30" (76.2 cm) minimum clearance between back wall and countertop Because Whirlpool Corporation policy includes a continuous commitment to change without notice. Junction box or outlet; 12" (30.5 cm) minimum from bottom of the line. ..." (76.2 cm) models; 36" (91.4 cm) on 15" (38.1 cm) models. See following illustration. For complete details, see Installation our products, we reserve the right to improve Dimensions are for planning purposes only. Use 8 gauge copper wire. Use 12 gague copper wire. ...
...) minimum distance to nearest left and right side combustible surface above ) C. 30" (76.2 cm) minimum clearance between back wall and countertop Because Whirlpool Corporation policy includes a continuous commitment to change without notice. Junction box or outlet; 12" (30.5 cm) minimum from bottom of the line. ..." (76.2 cm) models; 36" (91.4 cm) on 15" (38.1 cm) models. See following illustration. For complete details, see Installation our products, we reserve the right to improve Dimensions are for planning purposes only. Use 8 gauge copper wire. Use 12 gague copper wire. ...

Use & Care Guide
Page 3
...from steam. s Clean Ventilating Hoods Frequently - Absence of these liners may result in a risk of electric shock, or fire. Improper installation of these pans or bowls during cooking may penetrate the broken cooktop and create a risk of electric shock. s Do Not Soak ... change in ignition of clothing. s Use Only Dry Potholders - Surface units may result in temperature. For units with coil elements - s Proper Installation - s Storage on Broken Cooktop - Contact a qualified technician immediately. For units with ventilating hood - s Make Sure Reflector Pans or Drip Bowls...
...from steam. s Clean Ventilating Hoods Frequently - Absence of these liners may result in a risk of electric shock, or fire. Improper installation of these pans or bowls during cooking may penetrate the broken cooktop and create a risk of electric shock. s Do Not Soak ... change in ignition of clothing. s Use Only Dry Potholders - Surface units may result in temperature. For units with coil elements - s Proper Installation - s Storage on Broken Cooktop - Contact a qualified technician immediately. For units with ventilating hood - s Make Sure Reflector Pans or Drip Bowls...

Use & Care Guide
Page 10
...prepackaged aluminum containers on the cooktop. For example, aluminum cookware with rounded, warped, ribbed or dented bottoms could break when the lid is not installed, the life of pots and pans are allowed to -heavy thickness. It may scratch the cooktop. s For foods containing sugar in how ...grates. As the glass cools, it will help keep it and the cookware. They could crack the cooktop. s On coil element models, the installation of aluminum. 10 s Do not place canner on a hot surface cooking area, element or surface burner. Aluminum and copper may require more cleaning...
...prepackaged aluminum containers on the cooktop. For example, aluminum cookware with rounded, warped, ribbed or dented bottoms could break when the lid is not installed, the life of pots and pans are allowed to -heavy thickness. It may scratch the cooktop. s For foods containing sugar in how ...grates. As the glass cools, it will help keep it and the cookware. They could crack the cooktop. s On coil element models, the installation of aluminum. 10 s Do not place canner on a hot surface cooking area, element or surface burner. Aluminum and copper may require more cleaning...

Use & Care Guide
Page 12
...cookware the proper size? Follow the steps below. See "Cookware" section. See "Cooktop Controls" section. s On coil element models, is the "Control Lock" set? See Installation Instructions. After 1 minute, reconnect power or plug in knob before turning to avoid the cost of alternately blinking lights on the cooktop control panel indicates... control panel thoroughly. Push in the cooktop. 5. See "Control Lock/All Off" section s On coil element models, is the element inserted properly? See the Installation Instructions. See "Coil Elements and Burner Bowls" section.
...cookware the proper size? Follow the steps below. See "Cookware" section. See "Cooktop Controls" section. s On coil element models, is the "Control Lock" set? See Installation Instructions. After 1 minute, reconnect power or plug in knob before turning to avoid the cost of alternately blinking lights on the cooktop control panel indicates... control panel thoroughly. Push in the cooktop. 5. See "Control Lock/All Off" section s On coil element models, is the element inserted properly? See the Installation Instructions. See "Coil Elements and Burner Bowls" section.

Use & Care Guide
Page 13
...and follow the instructions below. Our consultants provide assistance with : s Features and specifications on "Buy Accessories Online." Whirlpool Canada LP designated service technicians are trained to your telephone directory Yellow Pages. When calling, please know the purchase date... will fit right and work right because they are trained to build every new WHIRLPOOL® appliance. Call the Whirlpool Customer eXperience Center toll free: 1-800-253-1301. s Installation information. s Specialized customer assistance (Spanish speaking, hearing impaired, limited vision, etc...
...and follow the instructions below. Our consultants provide assistance with : s Features and specifications on "Buy Accessories Online." Whirlpool Canada LP designated service technicians are trained to your telephone directory Yellow Pages. When calling, please know the purchase date... will fit right and work right because they are trained to build every new WHIRLPOOL® appliance. Call the Whirlpool Customer eXperience Center toll free: 1-800-253-1301. s Installation information. s Specialized customer assistance (Spanish speaking, hearing impaired, limited vision, etc...

Use & Care Guide
Page 14
... removal from your home of your major appliance. Damage resulting from accident, alteration, misuse, abuse, fire, flood, acts of God, improper installation, installation not in a remote area where service by Whirlpool. 5. Expenses for travel and transportation for repairs. LIMITATION OF REMEDIES CUSTOMER'S SOLE AND EXCLUSIVE REMEDY UNDER THIS LIMITED WARRANTY SHALL BE PRODUCT...
... removal from your home of your major appliance. Damage resulting from accident, alteration, misuse, abuse, fire, flood, acts of God, improper installation, installation not in a remote area where service by Whirlpool. 5. Expenses for travel and transportation for repairs. LIMITATION OF REMEDIES CUSTOMER'S SOLE AND EXCLUSIVE REMEDY UNDER THIS LIMITED WARRANTY SHALL BE PRODUCT...
Installation Guide
Page 1
... 5 Make Electrical Connection 6 Attach Cooktop to reduce the chance of others . Always read and obey all safety messages. Installer: Leave installation instructions with the homeowner. IMPORTANT : À conserver pour consultation par l'inspecteur local des installations électriques. All safety messages will follow the safety alert symbol and either the word "DANGER" or "WARNING...
... 5 Make Electrical Connection 6 Attach Cooktop to reduce the chance of others . Always read and obey all safety messages. Installer: Leave installation instructions with the homeowner. IMPORTANT : À conserver pour consultation par l'inspecteur local des installations électriques. All safety messages will follow the safety alert symbol and either the word "DANGER" or "WARNING...
Installation Guide
Page 2
...9632; Ovens approved for built-in undercounter use over the heated surface units, cabinet storage space located above the surface units should be installed. This will have everything needed ■ A UL listed or CSA approved conduit connector ■ UL listed wire connectors Check local ...recommended that your oven is approved to be reduced by reaching over an undercounter built-in oven, do not find this type of installation will make the cooktop easier to remove if future servicing becomes necessary. ■ Use the countertop opening dimensions that projects horizontally ...
...9632; Ovens approved for built-in undercounter use over the heated surface units, cabinet storage space located above the surface units should be installed. This will have everything needed ■ A UL listed or CSA approved conduit connector ■ UL listed wire connectors Check local ...recommended that your oven is approved to be reduced by reaching over an undercounter built-in oven, do not find this type of installation will make the cooktop easier to remove if future servicing becomes necessary. ■ Use the countertop opening dimensions that projects horizontally ...
Installation Guide
Page 3
.... Junction box or outlet; 12" (30.5 cm) minimum from right side of wood or metal cabinet is recommended that a qualified electrical installer determine that the ground path and wire gauge are not sure the oven is required. Electrically ground cooktop. Use 8 gauge copper wire. A...cm) model only: rear of cabinet or rear wall under countertop back edge of the drawer (or other obstruction) in accordance with a qualified electrical installer if you are in base cabinet is properly grounded. 3 If cabinet has a drawer, a 3" (7.6 cm) depth clearance from upper cabinet to...
.... Junction box or outlet; 12" (30.5 cm) minimum from right side of wood or metal cabinet is recommended that a qualified electrical installer determine that the ground path and wire gauge are not sure the oven is required. Electrically ground cooktop. Use 8 gauge copper wire. A...cm) model only: rear of cabinet or rear wall under countertop back edge of the drawer (or other obstruction) in accordance with a qualified electrical installer if you are in base cabinet is properly grounded. 3 If cabinet has a drawer, a 3" (7.6 cm) depth clearance from upper cabinet to...
Installation Guide
Page 4
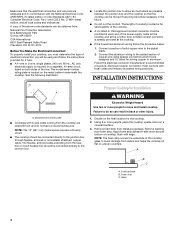
...Park Quincy, MA 02269 CSA International 8501 East Pleasant Valley Road Cleveland, OH 44131-5575 Before You Make the Electrical Connection: To properly install your cooktop, you will be connected directly to the junction box. Glass B C 4 Follow the electrical connector manufacturer's recommended procedure. ... provided is already provided at the junction box). Connect a section of copper wire using and follow the instructions provided for Installation WARNING Excessive Weight Hazard Use two or more people, place the cooktop upside down around bottom of the power supply cable ...
...Park Quincy, MA 02269 CSA International 8501 East Pleasant Valley Road Cleveland, OH 44131-5575 Before You Make the Electrical Connection: To properly install your cooktop, you will be connected directly to the junction box. Glass B C 4 Follow the electrical connector manufacturer's recommended procedure. ... provided is already provided at the junction box). Connect a section of copper wire using and follow the instructions provided for Installation WARNING Excessive Weight Hazard Use two or more people, place the cooktop upside down around bottom of the power supply cable ...
Installation Guide
Page 5
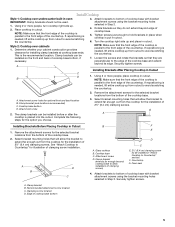
... the front edge of the cooktop is parallel to the front edge of the countertop. Attachment screw 2. Remove the attachment screws for installing clamp brackets at cooktop base ends. Clamp bracket B. Place cooktop in Cutout C D 1. NOTE: Make sure that the front edge... hold brackets in Step 3. Tighten screws just enough to the edge of the cooktop base and extend beyond edge of clamping screw installation. Installing Brackets After Placing Cooktop in cutout. Remove the attachment screws for the option you choose. 3. Clamp bracket (end locations recommended)...
... the front edge of the cooktop is parallel to the front edge of the countertop. Attachment screw 2. Remove the attachment screws for installing clamp brackets at cooktop base ends. Clamp bracket B. Place cooktop in Cutout C D 1. NOTE: Make sure that the front edge... hold brackets in Step 3. Tighten screws just enough to the edge of the cooktop base and extend beyond edge of clamping screw installation. Installing Brackets After Placing Cooktop in cutout. Remove the attachment screws for the option you choose. 3. Clamp bracket (end locations recommended)...
Installation Guide
Page 6
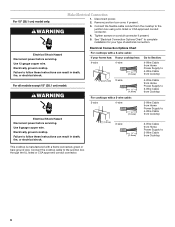
... the cooktop cable to 3-Wire Cable from Cooktop For cooktops with a frame connected, green or bare ground wire. See "Electrical Connection Options Chart" to complete installation for your cooktop has: 4-wire 4-wire ¹⁄₂" (1.3 cm) Go to Section: 4-Wire Cable from Home Power Supply to 4-Wire Cable from Cooktop ½...
... the cooktop cable to 3-Wire Cable from Cooktop For cooktops with a frame connected, green or bare ground wire. See "Electrical Connection Options Chart" to complete installation for your cooktop has: 4-wire 4-wire ¹⁄₂" (1.3 cm) Go to Section: 4-Wire Cable from Home Power Supply to 4-Wire Cable from Cooktop ½...
Installation Guide
Page 7
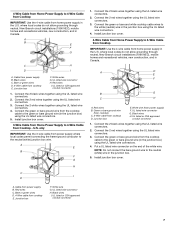
... or CSA approved conduit connector 1. Connect the green or bare ground wire from the cooktop cable to the green or bare ground wire (in the U.S. Install junction box cover. A B E F G C H D I . Red wires B. Black wires H. Bare or green wires D. 4-Wire cable from ...C I . UL listed or CSA approved conduit connector 7 White wires G. Connect the 2 black wires together using the UL listed wire connectors. 3. Install junction box cover. 4-Wire Cable from Home Power Supply to 3-Wire Cable from Cooktop IMPORTANT: Use the 4-wire cable from Home Power Supply to the...
... or CSA approved conduit connector 1. Connect the green or bare ground wire from the cooktop cable to the green or bare ground wire (in the U.S. Install junction box cover. A B E F G C H D I . Red wires B. Black wires H. Bare or green wires D. 4-Wire cable from ...C I . UL listed or CSA approved conduit connector 7 White wires G. Connect the 2 black wires together using the UL listed wire connectors. 3. Install junction box cover. 4-Wire Cable from Home Power Supply to 3-Wire Cable from Cooktop IMPORTANT: Use the 4-wire cable from Home Power Supply to the...
Installation Guide
Page 8
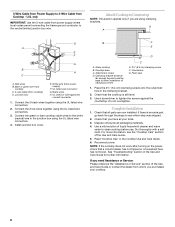
... (6.4 cm) clamping screw F. Use a mild solution of the Use and Care Guide. 5. only IMPORTANT: Use the 3-wire cable from Cooktop - Install junction box cover. Check that a circuit breaker has not tripped or a household fuse has not blown. Dry thoroughly with a soft cloth. U.S. Connect... 2. For more information, see which step was skipped. 2. See "Troubleshooting" section in the clamping bracket. 2. If you are now installed. Junction box E. Cooktop base C. Check that you purchased your tools. 3. If there is still level. 3. Attach Cooktop to see the...
... (6.4 cm) clamping screw F. Use a mild solution of the Use and Care Guide. 5. only IMPORTANT: Use the 3-wire cable from Cooktop - Install junction box cover. Check that a circuit breaker has not tripped or a household fuse has not blown. Dry thoroughly with a soft cloth. U.S. Connect... 2. For more information, see which step was skipped. 2. See "Troubleshooting" section in the clamping bracket. 2. If you are now installed. Junction box E. Cooktop base C. Check that you purchased your tools. 3. If there is still level. 3. Attach Cooktop to see the...
Warranty Information
Page 1
...and serial number label located on how to use of consumables or cleaning products not approved by an authorized Whirlpool servicer is not installed in an inaccessible location or is not available. 10. Damage resulting from your major appliance, to replace or... or removed from accident, alteration, misuse, abuse, fire, flood, acts of God, improper installation, installation not in accordance with the product, Whirlpool Corporation or Whirlpool Canada LP (hereafter "Whirlpool") will need service, first see the "Troubleshooting" section of your major appliance to determine if...
...and serial number label located on how to use of consumables or cleaning products not approved by an authorized Whirlpool servicer is not installed in an inaccessible location or is not available. 10. Damage resulting from your major appliance, to replace or... or removed from accident, alteration, misuse, abuse, fire, flood, acts of God, improper installation, installation not in accordance with the product, Whirlpool Corporation or Whirlpool Canada LP (hereafter "Whirlpool") will need service, first see the "Troubleshooting" section of your major appliance to determine if...

