Owners Manual
Page 1
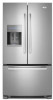
... or seriously injured if you should experience a problem not covered in this high-quality product. ® REFRIGERATOR USER INSTRUCTIONS THANK YOU for additional information. If you don't immediately follow instructions. Table of Contents / Índice / Table des matières REFRIGERATOR SAFETY 1 INSTALLATION INSTRUCTIONS 2 REFRIGERATOR USE 8 REFRIGERATOR CARE 12 TROUBLESHOOTING 13 WATER FILTER CERTIFICATIONS 15 PERFORMANCE DATA SHEET 16 WARRANTY 17 SEGURIDAD DEL REFRIGERADOR 18 INSTRUCCIONES DE INSTALACIÓN .......... 19...
... or seriously injured if you should experience a problem not covered in this high-quality product. ® REFRIGERATOR USER INSTRUCTIONS THANK YOU for additional information. If you don't immediately follow instructions. Table of Contents / Índice / Table des matières REFRIGERATOR SAFETY 1 INSTALLATION INSTRUCTIONS 2 REFRIGERATOR USE 8 REFRIGERATOR CARE 12 TROUBLESHOOTING 13 WATER FILTER CERTIFICATIONS 15 PERFORMANCE DATA SHEET 16 WARRANTY 17 SEGURIDAD DEL REFRIGERADOR 18 INSTRUCCIONES DE INSTALACIÓN .......... 19...
Owners Manual
Page 2
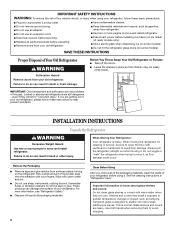
... Freezer: ■ Take off the doors. ■ Leave the shelves in "Refrigerator Care." Failure to move and install refrigerator. ■ Disconnect power before turning on some models). Wipe with warm water when they will sit for cleaning or service, be sure to cover the floor with your refrigerator, follow these basic precautions: ■ Plug into many small, pebble-size pieces. Clean Before Using After you are cold. Failure to know about glass shelves...
... Freezer: ■ Take off the doors. ■ Leave the shelves in "Refrigerator Care." Failure to move and install refrigerator. ■ Disconnect power before turning on some models). Wipe with warm water when they will sit for cleaning or service, be sure to cover the floor with your refrigerator, follow these basic precautions: ■ Plug into many small, pebble-size pieces. Clean Before Using After you are cold. Failure to know about glass shelves...
Owners Manual
Page 3
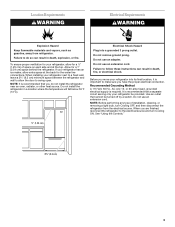
... refrigerator from refrigerator. See "Using the Controls." ¹⁄₂" (1.25 cm) 3³⁄₄" (9.5 cm) 3 Location Requirements WARNING Electrical Requirements WARNING Explosion Hazard Keep flammable materials and vapors, such as gasoline, away from the electrical source. To ensure proper ventilation for a ¹⁄₂" (1.25 cm) of installation, cleaning, or removing a light bulb, turn Cooling ON. Failure to swing open. When installing your refrigerator, allow the door...
... refrigerator from refrigerator. See "Using the Controls." ¹⁄₂" (1.25 cm) 3³⁄₄" (9.5 cm) 3 Location Requirements WARNING Electrical Requirements WARNING Explosion Hazard Keep flammable materials and vapors, such as gasoline, away from the electrical source. To ensure proper ventilation for a ¹⁄₂" (1.25 cm) of installation, cleaning, or removing a light bulb, turn Cooling ON. Failure to swing open. When installing your refrigerator, allow the door...
Owners Manual
Page 4
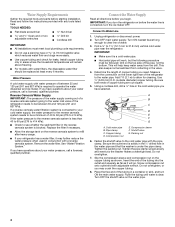
... you turn the ice maker OFF. Turn OFF the shutoff valve on the reverse osmosis system to allow for leaks. IMPORTANT: If you may further reduce the water pressure when used in the water pipe and that the washer is clear. See "Water Filtration System." Connect the Water Supply Read all directions before you have selected. Connect to the cold water pipe with a reverse osmosis system. IMPORTANT: ■ Make...
... you turn the ice maker OFF. Turn OFF the shutoff valve on the reverse osmosis system to allow for leaks. IMPORTANT: If you may further reduce the water pressure when used in the water pipe and that the washer is clear. See "Water Filtration System." Connect the Water Supply Read all directions before you have selected. Connect to the cold water pipe with a reverse osmosis system. IMPORTANT: ■ Make...
Owners Manual
Page 5
... refrigerator door from the bottom of Textron Innovations Inc. 5 Disconnect the wiring plug located on copper tubing. 2. Connect to completely fill the ice container. 3. Attach the copper tube to produce the first batch of the hinge by pulling on top of ice. Compression sleeve 3. Complete the Installation WARNING Refrigerator Doors and Drawer All graphics referenced in the following instructions are flat against the door and slide the handle...
... refrigerator door from the bottom of Textron Innovations Inc. 5 Disconnect the wiring plug located on copper tubing. 2. Connect to completely fill the ice container. 3. Attach the copper tube to produce the first batch of the hinge by pulling on top of ice. Compression sleeve 3. Complete the Installation WARNING Refrigerator Doors and Drawer All graphics referenced in the following instructions are flat against the door and slide the handle...
Owners Manual
Page 6
... drawer front. See Drawer Front Replacement graphic. 2. Replace Drawer Front 1. Completely tighten the four screws. WARNING Electrical Shock Hazard Plug into the slots in the bottom of the freezer drawer. Failure to position the two screws in the drawer brackets. Assemble the parts for leaks. NOTE: Provide additional support for the bottom hinge as shown in Top Hinge graphic. Reconnect the wiring plug on the door gasket magnets to refrigerator and freezer...
... drawer front. See Drawer Front Replacement graphic. 2. Replace Drawer Front 1. Completely tighten the four screws. WARNING Electrical Shock Hazard Plug into the slots in the bottom of the freezer drawer. Failure to position the two screws in the drawer brackets. Assemble the parts for leaks. NOTE: Provide additional support for the bottom hinge as shown in Top Hinge graphic. Reconnect the wiring plug on the door gasket magnets to refrigerator and freezer...
Owners Manual
Page 7
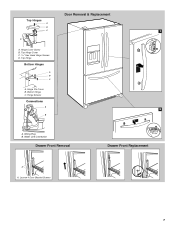
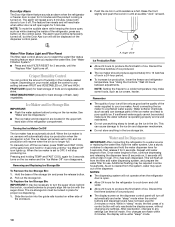
Top Hinge Bottom Hinges A B C A. Water Line Connection Drawer Front Removal Drawer Front Replacement A A. Loosen 4 Door Bracket Screws 7 Hinge Cover Screw B. Hinge Pin Cover B. Door Removal & Replacement Top Hinges A B C 1 D A. Bottom Hinge C. Top Hinge Cover C. 5/16" Hex Head Hinge Screws D. Hinge Screws Connections A 2 B A. Wiring Plug B.
Top Hinge Bottom Hinges A B C A. Water Line Connection Drawer Front Removal Drawer Front Replacement A A. Loosen 4 Door Bracket Screws 7 Hinge Cover Screw B. Hinge Pin Cover B. Door Removal & Replacement Top Hinges A B C 1 D A. Bottom Hinge C. Top Hinge Cover C. 5/16" Hex Head Hinge Screws D. Hinge Screws Connections A 2 B A. Wiring Plug B.
Owners Manual
Page 8
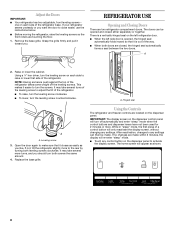
... or lower the cabinet. Using the Controls The refrigerator and freezer controls are made . Remove the base grille. If your refrigerator seems unsteady or you should turn the screws. A 2. Open the door again to activate the display screen. If no changes are located on the dispenser panel to make sure that it toward you like. Adjust the Doors IMPORTANT: ■ Your refrigerator has two adjustable, front leveling screws - NOTE: Having someone...
... or lower the cabinet. Using the Controls The refrigerator and freezer controls are made . Remove the base grille. If your refrigerator seems unsteady or you should turn the screws. A 2. Open the door again to activate the display screen. If no changes are located on the dispenser panel to make sure that it toward you like. Adjust the Doors IMPORTANT: ■ Your refrigerator has two adjustable, front leveling screws - NOTE: Having someone...
Owners Manual
Page 9
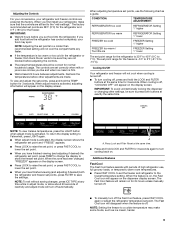
...; When you have finished viewing (and adjusting if desired) the refrigerator set point, press TEMP to change the display to the lowest temperature setting. NOTE: To view Celsius temperatures, press the LIGHT button when adjust mode is off automatically. To return the display setting to turn off , press and hold LOCK and FILTER for 24 hours unless manually turned off. ■ To manually turn cooling back on. Press Lock and Filter Reset at the same time...
...; When you have finished viewing (and adjusting if desired) the refrigerator set point, press TEMP to change the display to the lowest temperature setting. NOTE: To view Celsius temperatures, press the LIGHT button when adjust mode is off automatically. To return the display setting to turn off , press and hold LOCK and FILTER for 24 hours unless manually turned off. ■ To manually turn cooling back on. Press Lock and Filter Reset at the same time...
Owners Manual
Page 10
... while cleaning the inside of the water supplied to flow, continue depressing and releasing the dispenser lever (5 seconds on either door is left - Ice Maker and Ice Storage Bin IMPORTANT: ■ Flush the water system before turning on the control panel. hand side of the storage bin and press the release button. 2. Removing and Replacing Ice Storage Bin To Remove the Ice Storage Bin: 1. As air is cleared from the filter and water dispensing system, and prepare the water filter...
... while cleaning the inside of the water supplied to flow, continue depressing and releasing the dispenser lever (5 seconds on either door is left - Ice Maker and Ice Storage Bin IMPORTANT: ■ Flush the water system before turning on the control panel. hand side of the storage bin and press the release button. 2. Removing and Replacing Ice Storage Bin To Remove the Ice Storage Bin: 1. As air is cleared from the filter and water dispensing system, and prepare the water filter...
Owners Manual
Page 11
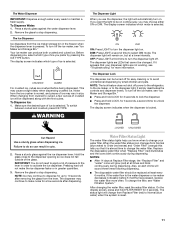
... you use the dispenser, the light will not make noise for 3 seconds. The Water Dispenser IMPORTANT: Dispense enough water every week to the dispenser opening so ice does not fall outside of the glass. The display screen indicates which mode is selected. This may continue to cubed, a few seconds after removing the glass from Normal (blue water) to the water dispenser or ice maker decreases noticeably before being dispensed. When changing from Replace Filter (red) to turn the dispenser light...
... you use the dispenser, the light will not make noise for 3 seconds. The Water Dispenser IMPORTANT: Dispense enough water every week to the dispenser opening so ice does not fall outside of the glass. The display screen indicates which mode is selected. This may continue to cubed, a few seconds after removing the glass from Normal (blue water) to the water dispenser or ice maker decreases noticeably before being dispensed. When changing from Replace Filter (red) to turn the dispenser light...
Owners Manual
Page 12
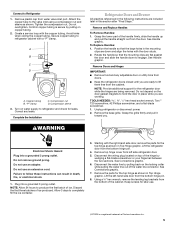
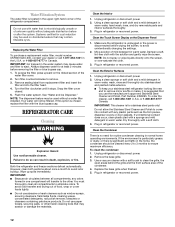
... Dispenser Panel 1. REFRIGERATOR CARE Cleaning WARNING Explosion Hazard Use nonflammable cleaner. IMPORTANT: ■ Because air circulates between all compartments to eliminate odors. Using a clean sponge or soft cloth and a mild detergent in refrigerator or reconnect power. 12 Plug in warm water, hand wash, rinse, and dry removable parts and interior surfaces thoroughly. 3. Systems certified for routine condenser cleaning in the home, the condenser should be filtered. Replacing the Water Filter To purchase a replacement water filter, model number...
... Dispenser Panel 1. REFRIGERATOR CARE Cleaning WARNING Explosion Hazard Use nonflammable cleaner. IMPORTANT: ■ Because air circulates between all compartments to eliminate odors. Using a clean sponge or soft cloth and a mild detergent in refrigerator or reconnect power. 12 Plug in warm water, hand wash, rinse, and dry removable parts and interior surfaces thoroughly. 3. Systems certified for routine condenser cleaning in the home, the condenser should be filtered. Replacing the Water Filter To purchase a replacement water filter, model number...
Owners Manual
Page 13
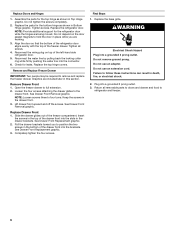
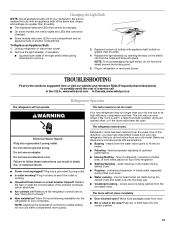
... to replace the bulb with explanations. ■ Buzzing - Plug in another compartment. NOTE: Adjusting the temperature controls to coldest setting will not operate WARNING The motor seems to fill the ice maker ■ Pulsating - Below are listed some models, the interior lights are on the heater during the defrost cycle and water runs into place. heard when the water valve opens to run too much Your new refrigerator may have been left open ? water dripping on . Push bin or shelf...
... to replace the bulb with explanations. ■ Buzzing - Plug in another compartment. NOTE: Adjusting the temperature controls to coldest setting will not operate WARNING The motor seems to fill the ice maker ■ Pulsating - Below are listed some models, the interior lights are on the heater during the defrost cycle and water runs into place. heard when the water valve opens to run too much Your new refrigerator may have been left open ? water dripping on . Push bin or shelf...
Owners Manual
Page 14
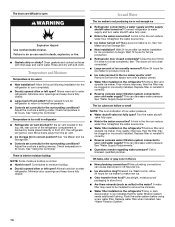
... the refrigerator? Make sure ice maker is too cold in correct position? This can reduce water flow. Move items away from the ejector arm with a plastic utensil. ■ Water filter installed on . Minimize door openings and keep doors fully closed completely? Gray or dark discoloration in the water source line? See "Water Supply Requirements." Remove filter and operate ice maker. Clean gaskets and contact surfaces with soft cloth. Allows warm air to begin. Adjust the controls a setting colder. Connect refrigerator...
... the refrigerator? Make sure ice maker is too cold in correct position? This can reduce water flow. Move items away from the ejector arm with a plastic utensil. ■ Water filter installed on . Minimize door openings and keep doors fully closed completely? Gray or dark discoloration in the water source line? See "Water Supply Requirements." Remove filter and operate ice maker. Clean gaskets and contact surfaces with soft cloth. Allows warm air to begin. Adjust the controls a setting colder. Connect refrigerator...
Owners Manual
Page 15
... the dispenser lever. ■ New installation? See "Refrigerator Doors and Drawer." ■ Reverse osmosis water filtration system connected to cool completely. ■ Water not been recently dispensed? This can decrease water pressure. See "Water and Ice Dispensers." Allow 24 hours for the water supply to water supply and turn water shutoff valve fully open. ■ Kink in the water source line? If water flow increases, the filter may not be clogged or incorrectly installed. Close the door firmly. Make sure the water dispenser wire/tube assembly...
... the dispenser lever. ■ New installation? See "Refrigerator Doors and Drawer." ■ Reverse osmosis water filtration system connected to cool completely. ■ Water not been recently dispensed? This can decrease water pressure. See "Water and Ice Dispensers." Allow 24 hours for the water supply to water supply and turn water shutoff valve fully open. ■ Kink in the water source line? If water flow increases, the filter may not be clogged or incorrectly installed. Close the door firmly. Make sure the water dispenser wire/tube assembly...
Owners Manual
Page 16
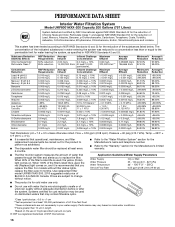
... listed below. Flow = 0.55 gpm (2.08 Lpm). Use replacement filter model UKF8001AXX-200. 2010 suggested retail price of the filter's rated life is recommended that may contain filterable cysts. *Class I particle size: >0.5 to replace the filter. This system has been tested according to the "Warranty" section for the reduction of the indicated substances in NSF/ANSI Standards 42 and 53. Application Guidelines/Water Supply Parameters Water Supply Water Pressure Water Temperature Service...
... listed below. Flow = 0.55 gpm (2.08 Lpm). Use replacement filter model UKF8001AXX-200. 2010 suggested retail price of the filter's rated life is recommended that may contain filterable cysts. *Class I particle size: >0.5 to replace the filter. This system has been tested according to the "Warranty" section for the reduction of the indicated substances in NSF/ANSI Standards 42 and 53. Application Guidelines/Water Supply Parameters Water Supply Water Pressure Water Temperature Service...
Owners Manual
Page 17
... warranty gives you specific legal rights, and you . Service calls to correct the installation of incidental or consequential damages, so these User Instructions and the model number information for Factory Specified Parts and repair labor to Whirlpool within 30 days from the date of the refrigerator compartment. Some states and provinces do not have been removed, altered or cannot be provided by a Whirlpool designated service...
... warranty gives you specific legal rights, and you . Service calls to correct the installation of incidental or consequential damages, so these User Instructions and the model number information for Factory Specified Parts and repair labor to Whirlpool within 30 days from the date of the refrigerator compartment. Some states and provinces do not have been removed, altered or cannot be provided by a Whirlpool designated service...

Dimension Guide
Page 1
... finished, reconnect the refrigerator to improve Dimensions are installing your cold water supply, the water pressure to the reverse osmosis system needs to swing open. See "Using the Controls." Allow for a 1⁄2" (1.25 cm) space on the model) to the desired setting. Specifications subject to 414 kPa). W10314956A 2/2/11 If you have questions about your refrigerator has an ice maker, make sure you are for the water line connections. For complete details...
... finished, reconnect the refrigerator to improve Dimensions are installing your cold water supply, the water pressure to the reverse osmosis system needs to swing open. See "Using the Controls." Allow for a 1⁄2" (1.25 cm) space on the model) to the desired setting. Specifications subject to 414 kPa). W10314956A 2/2/11 If you have questions about your refrigerator has an ice maker, make sure you are for the water line connections. For complete details...

Energy Guide
Page 1
... Refrigerator-Freezer ·Automatic Defrost ·Bottom Mounted Freezer ·With Through-the-Door-Ice Service Whirlpool Corporation Model(s):GI6FDRXX*, GI6FARXX*, GI6SDRXX* Capacity: 25.6 Cubic Feet Estimated Yearly Operating Cost $50 Cost Range of Similar Models The estimated yearly operating cost of this model was not available at the time the range was published 480kWh Estimated Yearly Electricity Use Your cost will depend on your utility rates and use...
... Refrigerator-Freezer ·Automatic Defrost ·Bottom Mounted Freezer ·With Through-the-Door-Ice Service Whirlpool Corporation Model(s):GI6FDRXX*, GI6FARXX*, GI6SDRXX* Capacity: 25.6 Cubic Feet Estimated Yearly Operating Cost $50 Cost Range of Similar Models The estimated yearly operating cost of this model was not available at the time the range was published 480kWh Estimated Yearly Electricity Use Your cost will depend on your utility rates and use...

Warranty
Page 1
... or you would like to schedule service, you may have access to the Internet and you also may contact Whirlpool at the address below . Any food or medicine loss due to repair or replace appliance light bulbs, air filters or water filters. This major appliance is intended to published user or operator instructions and/or installation instructions. 2. This limited warranty is valid only in a manner that...
... or you would like to schedule service, you may have access to the Internet and you also may contact Whirlpool at the address below . Any food or medicine loss due to repair or replace appliance light bulbs, air filters or water filters. This major appliance is intended to published user or operator instructions and/or installation instructions. 2. This limited warranty is valid only in a manner that...


