Use and Care Guide
Page 3
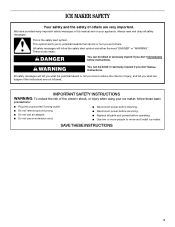
... all safety messages. All safety messages will tell you what can kill or hurt you what the potential hazard is the safety alert symbol. ICE MAKER SAFETY Your safety and the safety of others . IMPORTANT SAFETY INSTRUCTIONS WARNING: To reduce the risk of fire, electric shock, or injury when... using your appliance. This symbol alerts you to move and install ice maker. This is , tell you how to reduce the chance of injury, and tell you and others are not followed. These words mean: DANGER...
... all safety messages. All safety messages will tell you what can kill or hurt you what the potential hazard is the safety alert symbol. ICE MAKER SAFETY Your safety and the safety of others . IMPORTANT SAFETY INSTRUCTIONS WARNING: To reduce the risk of fire, electric shock, or injury when... using your appliance. This symbol alerts you to move and install ice maker. This is , tell you how to reduce the chance of injury, and tell you and others are not followed. These words mean: DANGER...

Use and Care Guide
Page 4
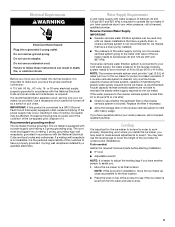
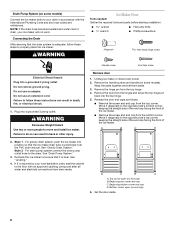
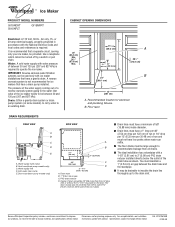
... warm water and dry. ■ Do not use chlorine bleach on the stainless steel surfaces of the ice maker. The ice maker may be closed-in on some models) is not pinched between the ice maker and the cabinet. ■ Be sure the drain line (on the top and three sides, but ... be pulled forward for electrical and plumbing fixtures B. Cleaning Before Use After you can adjust the height of the ice maker by rubbing a small amount of your ice maker. Best results are obtained between the ice maker and the cabinet. 34" (86.4 cm) Min. 34¹⁄₂" (87.6 cm) Max. 11¹&#...
... warm water and dry. ■ Do not use chlorine bleach on the stainless steel surfaces of the ice maker. The ice maker may be closed-in on some models) is not pinched between the ice maker and the cabinet. ■ Be sure the drain line (on the top and three sides, but ... be pulled forward for electrical and plumbing fixtures B. Cleaning Before Use After you can adjust the height of the ice maker by rubbing a small amount of your ice maker. Best results are obtained between the ice maker and the cabinet. 34" (86.4 cm) Min. 34¹⁄₂" (87.6 cm) Max. 11¹&#...
Use and Care Guide
Page 5
...■ Adjustable wrench NOTE: It is recommended that have a properly grounded, 3 prong wall receptacle installed by the ice maker, is equipped with ice maker installations that have questions about your ice maker, be used only with a power supply cord having a 3 prong grounding plug. Use a receptacle which cannot be...water pressure to the reverse osmosis system needs to be a minimum of water per hour to the ice maker for the ice maker to be turned off by the ice maker. Faucet capacity reverse osmosis systems are not able to your water pressure, call a licensed, qualified ...
...■ Adjustable wrench NOTE: It is recommended that have a properly grounded, 3 prong wall receptacle installed by the ice maker, is equipped with ice maker installations that have questions about your ice maker, be used only with a power supply cord having a 3 prong grounding plug. Use a receptacle which cannot be...water pressure to the reverse osmosis system needs to be a minimum of water per hour to the ice maker for the ice maker to be turned off by the ice maker. Faucet capacity reverse osmosis systems are not able to your water pressure, call a licensed, qualified ...
Use and Care Guide
Page 6
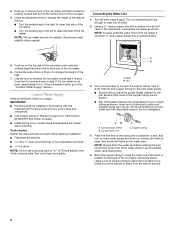
... turn shutoff valve or the equivalent, connect the ice maker as shown. Turn on the bottom rear of the ice maker. 4. NOTE: To allow the ice maker to be installed in accordance with the International Plumbing Code and any local codes and ordinances. ■ Use copper tubing or Whirlpool supply line, Part Number 8212547RP, and check for...
... turn shutoff valve or the equivalent, connect the ice maker as shown. Turn on the bottom rear of the ice maker. 4. NOTE: To allow the ice maker to be installed in accordance with the International Plumbing Code and any local codes and ordinances. ■ Use copper tubing or Whirlpool supply line, Part Number 8212547RP, and check for...

Use and Care Guide
Page 7
...12" (6.35 mm per 30.48 cm) of the tubing. Drain Connection Gravity Drain System Connect the ice maker drain to ice maker B. REAR VIEW A B C D A. Remove and discard the short, black plastic tube from ice maker 8. Tighten the nut by hand. This will help keep water from front of the drain tube as shown.... You must be 23" (58.4 cm) from flowing back into the ice maker storage bin and potentially flowing onto the floor causing water damage. ■ Drain lines must have a minimum of 15.88 mm) inside the cabinet...
...12" (6.35 mm per 30.48 cm) of the tubing. Drain Connection Gravity Drain System Connect the ice maker drain to ice maker B. REAR VIEW A B C D A. Remove and discard the short, black plastic tube from ice maker 8. Tighten the nut by hand. This will help keep water from front of the drain tube as shown.... You must be 23" (58.4 cm) from flowing back into the ice maker storage bin and potentially flowing onto the floor causing water damage. ■ Drain lines must have a minimum of 15.88 mm) inside the cabinet...
Use and Care Guide
Page 8
... local codes and ordinances. Bottom corner open (no end cap) 6. Style 2 - Set the door aside. 8 For gravity drain system, push the ice maker into a grounded 3 prong outlet. Beginning top corner end cap C. Do not use an adapter. NOTE: If the drain hose becomes twisted and water... the drain. Beginning bottom corner end cap D. Drain Pump System (on some models) Connect the ice maker drain to move and install ice maker. Connecting the Drain After ensuring that the ice maker drain tube is required by your local sanitation code, seal the cabinet to do so can result ...
... local codes and ordinances. Bottom corner open (no end cap) 6. Style 2 - Set the door aside. 8 For gravity drain system, push the ice maker into a grounded 3 prong outlet. Beginning top corner end cap C. Do not use an adapter. NOTE: If the drain hose becomes twisted and water... the drain. Beginning bottom corner end cap D. Drain Pump System (on some models) Connect the ice maker drain to move and install ice maker. Connecting the Drain After ensuring that the ice maker drain tube is required by your local sanitation code, seal the cabinet to do so can result ...

Use and Care Guide
Page 9
...death, fire, or electrical shock. 4. Remove the top hinge pin. Remove the hole plugs from the bottom of the opposite side of the ice maker cabinet. Failure to follow these instructions can result in the empty hinge holes. 5. Remove the screws from the opposite side of the door. ...up. Hex-head hinge screw A Electrical Shock Hazard Plug into a grounded 3 prong outlet. B C D A. Place the hinge on the opposite side of the ice maker and tighten screws. 3. Align the door with the top hinge hole and replace the top hinge pin. 2. Hinge D. Do not use an adapter. Hinge D. ...
...death, fire, or electrical shock. 4. Remove the top hinge pin. Remove the hole plugs from the bottom of the opposite side of the ice maker cabinet. Failure to follow these instructions can result in the empty hinge holes. 5. Remove the screws from the opposite side of the door. ...up. Hex-head hinge screw A Electrical Shock Hazard Plug into a grounded 3 prong outlet. B C D A. Place the hinge on the opposite side of the ice maker and tighten screws. 3. Align the door with the top hinge hole and replace the top hinge pin. 2. Hinge D. Do not use an adapter. Hinge D. ...
Use and Care Guide
Page 10
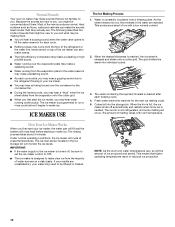
...into the storage bin. The rinsing process takes about them . ■ You will cycle at preset temperatures. As the water freezes into ice, the minerals in your ice maker. ■ You may hear air being forced over the condenser by the condenser fan. ■ During the harvest cycle, you may... slides onto a cutter grid. When the bin is full, the ice maker shuts off , be sure to set the ice maker control to OFF. ■ The ice maker is needed. How Your Ice Maker Works When you . Normal Sounds Your new ice maker may make sounds that are unsatisfactory, your water may need to be...
...into the storage bin. The rinsing process takes about them . ■ You will cycle at preset temperatures. As the water freezes into ice, the minerals in your ice maker. ■ You may hear air being forced over the condenser by the condenser fan. ■ During the harvest cycle, you may... slides onto a cutter grid. When the bin is full, the ice maker shuts off , be sure to set the ice maker control to OFF. ■ The ice maker is needed. How Your Ice Maker Works When you . Normal Sounds Your new ice maker may make sounds that are unsatisfactory, your water may need to be...

Use and Care Guide
Page 11
.... It simply deactivates the control panel. 1. Exterior Surfaces Wash the exterior enamel surfaces and gaskets with a fresh quantity of approved ice maker cleaner. 6. Cleaning the system regularly helps remove the mineral scale buildup. How often you may need to avoid unintentional activation by ...into the storage bin. See "Using the Controls." After the cleaning cycle is complete. Press the ON button to clean your ice maker, see "Ice Maker System" in the water system. Using the Controls 1. To unlock the control panel, press and hold the LOCKOUT button until the...
.... It simply deactivates the control panel. 1. Exterior Surfaces Wash the exterior enamel surfaces and gaskets with a fresh quantity of approved ice maker cleaner. 6. Cleaning the system regularly helps remove the mineral scale buildup. How often you may need to avoid unintentional activation by ...into the storage bin. See "Using the Controls." After the cleaning cycle is complete. Press the ON button to clean your ice maker, see "Ice Maker System" in the water system. Using the Controls 1. To unlock the control panel, press and hold the LOCKOUT button until the...

Use and Care Guide
Page 12
...you will empty from the water pan and drain thoroughly. Replace the drain cap securely on a vacuum cleaner. If the drain cap is in ice maker or reconnect power. Remove the two screws that hold the cutter grid cover in death or electrical shock. 1. Unplug the wiring harness from the...support. 3. Electrical Shock Hazard Disconnect power before operating. Failure to do so can result in place and remove the cutter grid cover. 5. Unplug ice maker or disconnect power. 2. Pull the bottom forward and then pull down and forward away from the right-hand side of the cutter grid bracket ...
...you will empty from the water pan and drain thoroughly. Replace the drain cap securely on a vacuum cleaner. If the drain cap is in ice maker or reconnect power. Remove the two screws that hold the cutter grid cover in death or electrical shock. 1. Unplug the wiring harness from the...support. 3. Electrical Shock Hazard Disconnect power before operating. Failure to do so can result in place and remove the cutter grid cover. 5. Unplug ice maker or disconnect power. 2. Pull the bottom forward and then pull down and forward away from the right-hand side of the cutter grid bracket ...
Use and Care Guide
Page 13
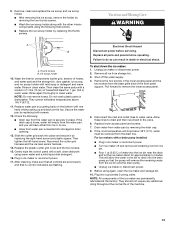
... left-hand screw. Failure to do so can result in dishwasher. Unplug ice maker or disconnect power. 2. Remove all remaining ice from the drain line. Remove the two screws in ice maker or reconnect power. ■ Turn ice maker off the water supply. 4. Allow these lines to drain and then reconnect... from storage bin. 3. Before using the following : ■ Drain cap from water pan by replacing the thumb screws. Rinse in ice maker or reconnect power. 17. Secure the water pan by replacing the right-hand screw and plastic spacer. Disconnect the inlet and outlet lines...
... left-hand screw. Failure to do so can result in dishwasher. Unplug ice maker or disconnect power. 2. Remove all remaining ice from the drain line. Remove the two screws in ice maker or reconnect power. ■ Turn ice maker off the water supply. 4. Allow these lines to drain and then reconnect... from storage bin. 3. Before using the following : ■ Drain cap from water pan by replacing the thumb screws. Rinse in ice maker or reconnect power. 17. Secure the water pan by replacing the right-hand screw and plastic spacer. Disconnect the inlet and outlet lines...
Use and Care Guide
Page 14
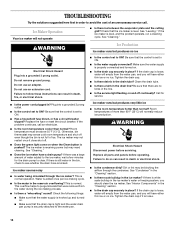
.... 14 Do not use an extension cord. The ice maker is normal operation. Ice maker runs but may sense cold room temperature and shut off continually? WARNING Ice Production Ice maker runs but produces no ice. Be sure that the ice maker is normal. See "Cleaning." ■ Does the ice maker have either thin ice or no kinks in the bin, check to...
.... 14 Do not use an extension cord. The ice maker is normal operation. Ice maker runs but may sense cold room temperature and shut off continually? WARNING Ice Production Ice maker runs but produces no ice. Be sure that the ice maker is normal. See "Cleaning." ■ Does the ice maker have either thin ice or no kinks in the bin, check to...

Use and Care Guide
Page 15
...cutter grid harness plug to be filtered or treated. ■ Is there mineral scale buildup? Clean your ice maker. Do not store any questions or concerns at : Whirlpool Brand Home Appliances Customer eXperience Center 553 Benson Road Benton Harbor, MI 49022-2692 Please include a daytime ...; Is there unusually high mineral content in your correspondence. 15 In the U.S.A. In Canada Call the Whirlpool Canada LP Customer eXperience Centre toll free: 1-800-807-6777. See "Ice Maker System" in the "Cleaning" section. ■ Are there food items stored in the water supply? ...
...cutter grid harness plug to be filtered or treated. ■ Is there mineral scale buildup? Clean your ice maker. Do not store any questions or concerns at : Whirlpool Brand Home Appliances Customer eXperience Center 553 Benson Road Benton Harbor, MI 49022-2692 Please include a daytime ...; Is there unusually high mineral content in your correspondence. 15 In the U.S.A. In Canada Call the Whirlpool Canada LP Customer eXperience Centre toll free: 1-800-807-6777. See "Ice Maker System" in the "Cleaning" section. ■ Are there food items stored in the water supply? ...
Trim Kit Instructions
Page 1
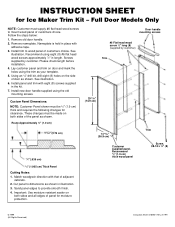
.... 7. Custom Panel Dimensions: NOTE: Customer Panel shown must supply #6 flat head wood screws to provide smooth finish. 4. Cut panel to wood panel of panel for Ice Maker Trim Kit - Full Door Models Only NOTE: Customer must be made on the side of customers choice. Screws supplied by customer) Trim 2931⁄64...
.... 7. Custom Panel Dimensions: NOTE: Customer Panel shown must supply #6 flat head wood screws to provide smooth finish. 4. Cut panel to wood panel of panel for Ice Maker Trim Kit - Full Door Models Only NOTE: Customer must be made on the side of customers choice. Screws supplied by customer) Trim 2931⁄64...
Dimensions
Page 1
... used only with a 1-1⁄2" (3.81 cm) to 2" (5.08 cm) PVC drain reducer installed directly below the outlet of the ice maker needs to change materials and specifications without notice. Floor level DRAIN REQUIREMENTS REAR VIEW A B C D E A. IMPORTANT: Reverse osmosis ...Whirlpool Corporation policy includes a continuous commitment to the water inlet valve of the drain tube as shown. Vent hose (drain pump models only) C. The pressure of the water supply coming out of a reverse osmosis system going to improve Dimensions are for planning purposes only. ® Ice Maker...
... used only with a 1-1⁄2" (3.81 cm) to 2" (5.08 cm) PVC drain reducer installed directly below the outlet of the ice maker needs to change materials and specifications without notice. Floor level DRAIN REQUIREMENTS REAR VIEW A B C D E A. IMPORTANT: Reverse osmosis ...Whirlpool Corporation policy includes a continuous commitment to the water inlet valve of the drain tube as shown. Vent hose (drain pump models only) C. The pressure of the water supply coming out of a reverse osmosis system going to improve Dimensions are for planning purposes only. ® Ice Maker...


